Transcription
StudioRackUser Guide
Introduction . 3Quick Start . 5Getting Around StudioRack . 7Selecting a View . 7Floating Plugin Panels . 8StudioRack Windows . 9Using StudioRack . 13Adding Plugins . 13Components and Racks .13Managing, Moving, and Copying Plugins .14Parallel Split Insert . 16Parallel Split Signal Flow .17Multiband Split . 18Multiband Split Rack Signal Flow .19Internal Sidechain . 20Input, Output, and Imaging Controls . 21Main Chainer .21Parallel and Multiband Split Racks Input .21Panning, Rotation, and Rack Output Level .22Track Name . 23Latency . 24Using Macros . 25Editing Macros .28About Automation .30Using StudioRack with SoundGrid . 31SoundGrid Essentials. 32Offloading Processing from the Host Computer to the Server . 35Low-Latency Monitoring During Recording . 37StudioRack Monitor Setup.38Mixer StudioRack Layer .40Linking StudioRacks to the Mixer .41Automatically Linking to DAW Playback/Input and Auto Monitor Status . 42Set Up a Mackie HUI in a DAW . 442StudioRack / User Guide
IntroductionStudioRack is a plugin chainer that helps you to create and mix sounds more efficiently. It lets you do complexthings in a simple way. StudioRack flexibly chains up to eight plugins per DAW instance, and it provides far morethan simple plugin chaining. Using Parallel Split, you can split a rack at any point in the signal flow and send the signal to up to eightsupplemental racks for parallel processing. This lets you quickly create processing chains that areindependent of each other and of the rest of the main chainer. Very specific effects can be created and theninserted back into the signal flow at the same insert point. And since everything can be controlled by Macros,you can use different parallel racks for different sections of a song or scene. In the Multiband Split mode, you can split the signal from the main rack and isolate the processing based onfrequency. Up to five frequency bands can be processed with different racks of plugins, so you can treat thehighs, lows, and midrange of an instrument in entirely different ways. Stereo Parallel Split input can be set to L/R stereo, M/S, M, or S. This allows for targeted processing ofspecific parts of the stereo image. This, combined with Multiband Split processing, provides detailed control ofwhat you are processing. Parallel Split rack and Multiband Split rack processing do not tie up extra DAW channels or plugin instances. A Macros section lets you group the controls of any of the plugins in the racks of the StudioRack instance.You can adjust complex groupings of controls—all from one Macro. Since Macros can span several plugins,you can create personal Macros for things you might call “shine,” or “bottom,” or whatever else. Turn onecontrol and you’ll adjust all the settings together. This leaves you free to create, rather than bother withcontrols while you mix.All of these features are available in both Native CPU processing and SoundGrid processing modes.3StudioRack / User Guide
SOUNDGRID PROCESSINGStudioRack can also operate within a SoundGrid network. This opens up two more important functions: Plugin processing is offloaded from the host processor (your local DSP) to a high-speed SoundGrid server.This provides much more CPU power than the local host can, which enables a significantly higher plugincount. When part of a SoundGrid network, StudioRack is integrated with SoundGrid Studio. This enables low-latencymonitoring and recording. This means that when the DAW is in record, monitoring switches from the DAW tothe server, which makes possible very low-latency record monitoring—an option that is not possible within thehost. Switching between DAW to server and back to DAW follows the host’s commands, in most popularDAWs.PORTABILITYMove a StudioRack from one track to another or from one DAW session to another, and rack organization, pluginsand all presets will follow. Move a session from one studio to another, and the StudioRack—with all its properties—will follow. You will, of course, need the same plugins and licenses installed and activated in both systems, but youdon’t need the same hardware. The same StudioRacks will work when using your local CPU or a SoundGrid server.To install software and manage your licenses, you need to have a free Waves account. Sign up at www.waves.com.With a Waves account you can keep track of your products, renew your Waves Update Plan, participate in bonusprograms, and keep up to date with important information.We suggest that you become familiar with the Waves Support pages: www.waves.com/support. There are technicalarticles about installation, troubleshooting, specifications, and more. Plus, you’ll find company contact informationand Waves Support news.4StudioRack / User Guide
Quick StartFOLLOW THESE STEPS TO SET UP AND USE STUDIORACK:1. Instantiate StudioRack on a DAW track. The plugin will open with the main chainer rack.2. To insert a plugin into a rack slot, click on the slot’s plus sign ( ). This opens the Plugins menu. Search for aplugin by name or navigate to it by category. The plugin will open in a floating window.3. Once plugins are set up, adjust the rack input and output levels.4. Rack signal flow is from top to bottom. Drag a plugin up or down the rack to change its position in the signalflow.Use the buttons on the left side to select a view: Rack, Macro, or All.FOR PARALLEL PROCESSING:1. Select “Rack” or “All” view.2. Open the Plugins menu and select “Parallel Split.” Since the position of the Parallel Split insert determines itsplace in the signal flow, move the Parallel Split insert point to where you want it in the signal.3. Use the plus sign ( ) to add up to eight parallel processing racks.4. Add plugins to the processing racks, just as you did in the main chainer rack. We suggest that you organizethe plugins so that each rack represents a single type of process. You might, for example, want to design aset of parallel processing racks to process a drum track. On the first rack, add a bit of distortion and power toa drum track. Start, for example with distortion. Try Abbey Road Saturator and Schepps Omni Channel, thenadd PSR SuperModels for amp trash. On another parallel rack, take care of dynamics. And on yet a third rack,create your space. All of these parallel racks take the same input signal that their signals all return to theParallel Split insert slot. Adjust the input and output levels and panning of the rack as needed.FOR MULTIBAND SPLIT PROCESSING:1. Open the Plugins menu and select “Multiband Split.” Place the insert where you want the rack to fall in thesignal flow. Use the plus sign ( ) to open up to five crossover processing bands.2. Control the crossover frequency between two bands by sliding up and down on the crossover value box. Thisdefines what frequencies will be processed by each band.5StudioRack / User Guide
TO LINK CONTROLSThere are three ways to assign plugin controls to a Macro, but (for now) we will describe only one method. Macroassignment is discussed in detail later in this user guide.1. Select “Macro” or “All” view.2. Open the plugins whose controls you want to assign to Macros.3. One at a time, right-click on a plugin control. On the Add Macro sub menu, select the Macro you want toassign the control to. Once the control has been assigned, it will have a red trim on the plugin interface.Assign as many controls as you like to a Macro.4. To edit the offset, direction, or limit of a control, select “Edit Macro” from the drop-down menu. This opensthe Macros Edit Window, where you can set the range, direction, and offset of any control that’s assignedto a Macro.Other ways to assign and edit Macros are described later in this user guide.USING STUDIORACK WITH SOUNDGRIDStudioRack can be used in conjunction with the SoundGrid Studio application to enhance performance. Using abasic SoundGrid Studio configuration and a server, plugin processing can be offloaded to the DSP server to greatlyincrease plugin processing. Adding an I/O and a server can enable low-latency monitoring while recording. This iscarried out with the eMotion ST mixer, which is a key element of SoundGrid Studio. There are several SoundGridStudio configurations—larger configurations offer more mixer channels, auxes, and groups, but all configurationsallow DSP offloading.SoundGrid Studio must be installed and configured for StudioRack to work in the SoundGrid processing mode.Using StudioRack with SoundGrid Studio is described later in this user guide.6StudioRack / User Guide
Getting Around StudioRackSelecting a ViewStudioRack has four basic sections: Racks, Macros controls, Macros editing, and floating Plugin windows. Use thebuttons on the left side to select a view.RACKSThere is one main plugin chainer rack that accepts up to eight plugins. From here youcan also insert Parallel Split racks and Multiband Split racks.MACROSMacros let you link controls of one or more plugins.Right-click on any control to open the Macroassignment drop-down menu and assign thecontrol to one of eight Macros.MACROS EDITORThe Macros Edit Window is where the range, start and stoppoints, and direction are set for Macro-assigned controls.7StudioRack / User Guide
Floating Plugin PanelsClick on a plugin name in a rack slot to open the plugin in a floating window.Floating windows can be positioned anywhereand will remain visible until closed. If a plugininterface is hidden by another object, it remainsopen and can be brought to the front by clickingon its rack icon. Pin a window and it will remainin front in any view or application.Floating plugin panels are controlledin the area above the WaveSystemToolbar.Plugin channel and plugin name.In/Out button bypasses the plugin.Pin window. When the pin is active, this window will remain in the front.Close all plugin windows.WaveSystem Toolbar. Use the bar at the top of the plugin to save and load presets, compare settings,undo and redo steps, and resize the plugin. To learn more, click the icon at the upper-right corner of thewindow and open the WaveSystem Guide.Hide this floating plugin window.8StudioRack / User Guide
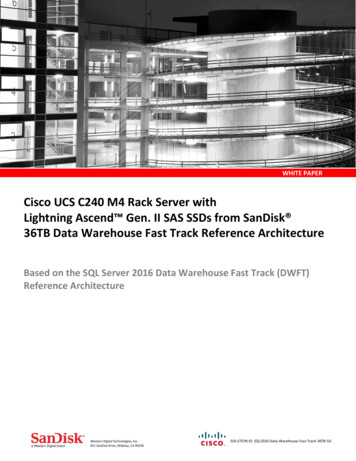
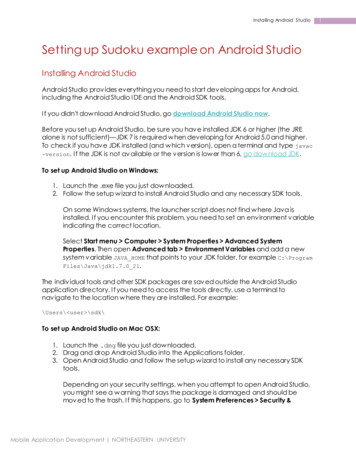
StudioRack WindowsMain Insert ViewThe main page has eight plugin slots and input and output sections. From any slot, you can insert additionalprocessing racks for parallel processing and Multiband Split racks to process by frequency band.WaveSystem ToolbarSoundGrid StudioControl BarInput Phase ReverseInput GainInput SectionMain Rack On/OffPlugin BypassOutput FaderFull-scale MeterProcessing ViewSelectorOutputSectionFader PositionLeft and Right Peak ValuesTotal Gain Reduction of MainChainerMain Plugins RackDAW Track Name9StudioRack / User Guide
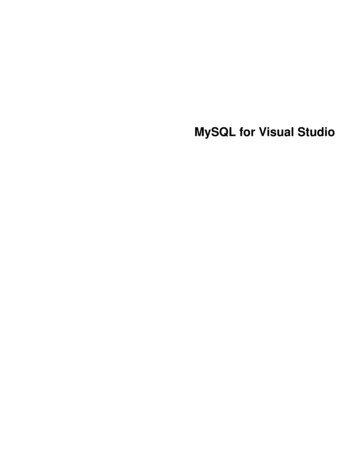
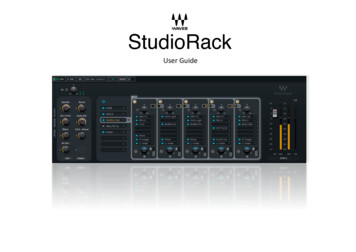
Parallel Split ViewA Parallel Split is an insert on the plugin rack that splits the signal and sends it to up to eight more racks foradditional processing. This is similar to copying the DAW source track several times, sending each copy to an auxtrack for processing, and returning each signal to the DAW; except that in StudioRack all of this happens on onetrack. This way, the different processes are parallel to each other, not in a series (like a chainer rack). One parallelrack is not influenced by the others.Each processing rack has gain and phase reverse controls, and stereo racks can be panned and rotated individually.Racks EngagedInput SectionRack BypassedParallel SplitInsert PointMain Plugins Rack10Parallel Processing RacksOutput SectionStudioRack / User Guide
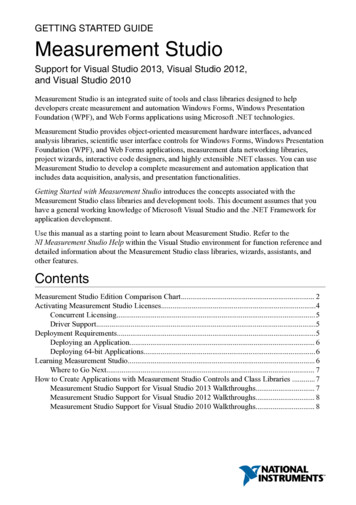
Macros ViewThere are eight Macro Controllers, to each of which you can assign plugin controls or other StudioRack controls.This lets you group controls and adjust them together. Macro assignments can span several plugins, and once youcreate a group, you can name the Macro.Macro ControlsOpen Macro Editor11Enable Macro AssignmentsStudioRack / User Guide
Multiband Split ViewA Multiband Split Rack, like a Parallel Split, is an insert in the plugin rack from which you can send and return asignal for processing. In the Multiband Split mode, there is an adjustable crossover between the processing racks,so each rack can process different parts of the frequency spectrum. There can be up to five processing racks perMultiband Split Rack insert.Crossover FrequenciesMultiband SplitInsert PointMain Plugins Rack12Multiband Processing RacksStudioRack / User Guide
Using StudioRackAdding Plugins To add plugins to a rack slot, click anywhere in a slot and choose from the list of plugins.This is the Plugins menu. You can search for the plugin’s name or browse by category. The new plugin will open as a floating widow that you can position anywhere on yourdisplays. Double-click on a plugin name to close or reopen its floating window. Up to fiveplugin floating windows can be open at the same time. Close a floating window with the OSclose window. You can show/hide a plugin by clicking on its rack slot.Components and RacksMonoInstantiated on a mono DAW track. Only mono plugins can be inserted in a StudioRack.StereoInstantiated on a stereo DAW track. Only stereo plugins can be inserted in a StudioRack.Mono-to-StereoWhen mono components are inserted, the rack is mono. If you insert a mono-to-stereo plugin,that plugin will be stereo, as will all rack slots later in the signal flow (lower in the rack). Pluginsearlier in the signal flow (above) will remain mono.This enables you to apply mono processing to a signal (e.g., EQ, Dynamics) in order to keepthe image tight, and then add stereo delay and reverb to create a stereo image.A mono StudioRack can be converted to a stereo StudioRack by changing the component inthe host DAW. All plugin settings will be preserved. This is useful if you build a complex monoprocessing chain, and then decide to add a stereo reverb, for example, at the end of the chain.13StudioRack / User Guide
Managing, Moving, and Copying PluginsTools for managing a plugin are at the top of the Plugin Menu.Remove Plugin deletes the plugin from the rack slot. All parameter settings and controlassignments are lost.Bypass bypasses the plugin while keeping it in the processing chain. It does not reduce latencyor CPU. Click on the small blue light next to the plugin name to bypass/un-bypass the plugin.You can also bypass/un-bypass the plugin with the power button at the top of the frame.Disable Plugin removes the plugin from the processing chain without deleting it from the rack. Disabling a pluginremoves its latency from the rack. It also frees up processing power. You can re-enable a disabled plugin withoutlosing its settings, controls, or automation assignments.Copy copies the plugin and its parameters. Please refer to the next page.Latency indicates the delay introduced by the plugin.Rack Latency shows the total latency of all plugins in the StudioRack, including ParallelSplits and Multiband Split racks. If no latency is declared by any of the plugins in the rack,both latency sections will be grayed out.MOVING PLUGINSYou can change the order of the plugins in the rack simply by dragging them upand down. This changes the plugin’s place in the signal flow, which affects theplugins lower in the rack. Changing a plugin’s position in the rack may alter thegain structure of the rack, so you may need to rebalance some plugin levels.You may choose to keep the first slot in a Parallel Split rack or a Multiband Splitrack empty. This enables you to later propagate a plugin at the top of eachrack’s signal flow without repositioning all of the other plugins in the rack.14StudioRack / User Guide
COPYING PLUGINS AND PLUGIN PRESETSAny plugin and its settings can be copied to an empty rack slot or pasted into a currently populated slot.Copy PluginTo copy a plugin and its preset (settings), select the plugin and choose “Copy” fromthe Plugins menu. In this example, Renaissance 6 EQ (REQ6) and its current presetare copied to the clipboardThe copied plugin and its preset can be pasted into an empty slot or a slot that already has a plugin. If the slot ispopulated, then Paste [plugin name] will replace the existing plugin. The preset for the replaced plugin is lost unlessit has been saved with the WaveSystem Toolbar.You can also paste only a plugin’s preset. Select Paste [plugin name] Preset. This requires thatthe copied plugin is of the same plugin family as the target. You can, for example, paste a presetfrom a REQ6 to a REQ4. You cannot, however, paste a preset from a REQ6 to a Q6.When you cannot paste presets only, then your only option is Paste [pluginname], which replaces the plugin and its preset.Plugins and plugin presets can be copied to and from the Main chainer rack,Parallel Splits, and Multiband Split Rack. In the Parallel Split or MultibandSplit Rack views you can move plugins between racks. To copy a plugin toanother rack, Opt/Alt drag the plugin.15StudioRack / User Guide
Parallel Split InsertA plugin chainer is, by its nature, serial. The output of a plugin becomes the input of the next one, so each plugin’sprocessing is influenced by its predecessor. Normally, this is what you want to do in a DAW insert. There are,however, times when you want to process one signal in several different ways with several racks working in parallel.All the racks have the same input and are not influenced serially by each other’s processing.To process several racks in parallel, choose a plugin slot and select “Parallel Split” fromthe top of the plugin menu. A Parallel Split’s position in the rack determines the place of allof its hosted racks in the signal flow.Each Parallel Split can host up to eight parallel processing racks.Add and mange plugins in the same manner as in the Main Chainer. The processed signals from each parallel rackare delay compensated and returned to the same Parallel Split slot in the Main Chainer.To add or remove processing racks, click on the plus ( ) orminus (-) symbols at the top of the racks. When a rack isremoved, all of its contents and presets are lost. You will beprompted to confirm this choice.Parallel Rack input and output controls are described later in this user guide.16StudioRack / User Guide
Parallel Split Signal FlowPlugin InputSignal from Parallel Split insert in Main Chainer RackSignal flowin racksProcessed signal returns to Parallel Split insert in Main Chainer RackPlugin OutputMain rack output17StudioRack / User Guide
Multiband SplitMultiband processing enables you to split a signal into adjustable frequency bands and process each bandseparately. There can be up to five processing bands with four crossovers.To adjust the crossover betweenprocessing bands, drag the crossovervalue up or down.Add or remove processing bandswith the /- symbol on the left.CROSSOVER RANGES18Crossover 192 Hz to 545 HzCrossover 2545 Hz to 4000 HzCrossover 34000 Hz to 11,071 HzCrossover 411,071 Hz to 20,000 HzStudioRack / User Guide
Multiband Split Rack Signal FlowPlugin InputSignal from Multiband Split insert in Main Chainer RackCrossover frequenciesdetermine processingrack InputSignal flowin racksPlugin OutputProcessed signal returns to Multiband Split insert in Main Chainer RackPlugin OutputMain rack output19StudioRack / User Guide
Internal SidechainThere are four sideband sources for Parallel Split and Multiband Split racks. Click the SC button on the upper left cornerof a sidechain-enabled plugin and choose from the menu. This selection affects the entire rack, not just the plugin.ExternalSidechain signal is from the internal patch of the host DAW.StudioRack InputSidechain is from plugin input, before input gain control, before main rack processing.Parallel orMultiband Split InputThe Split insert in the main rack is the sidechain source.Rack # OutputA specified Multiband Split or Parallel Split rack is used to create the sidechain for aplugin in a later split rack. Before rack gain control, before mute control, after panner.USING THE MAIN RACK AS A SIDECHAINIn this example, we want to drastically compress adrum while adding distortion from a stomp. We don'twant the compressor to be triggered by the stompaction, so it is placed after the stomp and istriggered by a sidechain from the parallel insert splitin the main rack. When the split insert is thesidechain source, any plugins above the split (in thiscase, an SSL Channel) will influence the sidechain.USING A SPLIT RACK AS A SIDECHAINA PuigTec EQ in Parallel Rack 1 is shaping thesidechain used by HComp in rack 3. Note thatParallel Rack 1 is muted—it is used only forsidechain, so we do not want to hear it in the mix.Sidechain signal flows from left to right. Splitrack 2, for example, can provide a sidechainfor racks 3 and higher, but not for rack 1.20StudioRack / User Guide
Input, Output, and Imaging ControlsMain ChainerThe main input and output sections are visible in all views.The rack input level is adjustable from -24 dB to 24 dB. A small, full-scale meter with a clipindicator shows post-fader input gain. Click on the meter to reset the clip light. There is also aphase invert switch.The main output section consists of a full-scale meter and a fader (range: -infinity to 12 dB). Faderposition is shown beneath the fader. Meter peak level (L/R) is shown beneath the meter. Click onthe peak light to reset the peak level and clip indicators.The host DAW track name is displayed at the bottom of the output section.Parallel and Multiband Split Racks InputThe Parallel racks and Multiband Split racks have inputcontrols and phase reverse buttons at the top of each rack.Click on the rack’s number to turn the rack on or off.Select the rack input source with the drop-down menu.Main Rack: Stereo21Stereo Parallel SplitStereo SourceNote: A stereo StudioRack output is always two channels,even if the input source is mono (e.g., left, right, mid, or sides).Stereo Parallel Split:Mono SourceStudioRack / User Guide
Panning, Rotation, and Rack Output LevelStereo SourceRack OnMono SourceRack OffA stereo rack with a stereo source (image on the left) can bepanned and rotated. A stereo rack (right) with a mono source canbe panned but not rotated.Pan/Balance Control KnobA mono StudioRack has a mono input and output. A mono signal (i.e., left, right, mid, or sides) in a stereo rack canbe panned between left and right channels. Turning the knob causes a gain decrease in one channel and acorresponding increase in the other. The sound image moves left and right, but the internal balance may be affected.Stereo RotatorWhen working with a stereo component, the S1 stereo rotator lets you move an entire stereo image, to change itssize asymmetrically and to change the width of the image. The colored area around the panner indicates the widthand orientation of the stereo image. Drag this area to rotate the image. This moves the entire stereo image, so theinternal balance is unchanged.Stereo Width AdjustDrag up and down on the “W” button to change the width of the stereo image. When you drag the width value to lessthan zero, the sides of the stereo image will reverse. The colored ring will turn brown to indicate this condition.A22StudioRack / User Guide
OTHER RACK OUTPUT CONTROLS AND DISPLAYSRack Output FaderRange: -infinity to 12 dBRack Output MeterRange: -infinity to 0 dBSoloSolos the rack with respect to the other Parallel Split or Multiband Split racks in this insert. It does not mute otherplugins in the main rack.There is no Mute button on a Parallel Split or Multiband Split rack. Use, instead, the Rack On/Off button at the top ofthe rack.Track NameThe name of the DAW track on which this StudioRack is instantiated is displayed in the boxbelow the meters. If you change the track name in the DAW, this name will changeaccordingly. Some DAWs do not support track naming, in which case you can fill in the TrackName manually.23StudioRack / User Guide
LatencyLatency is the delay imposed on a signal as it passes through a buss. The mostcommon source of latency is plugin processing, but buss summing can alsoincrease delay. It’s likely that different racks will have different latencies, sinceeach has its own plugins. When these racks are summed, they must be timealigned. Otherwise, their signals may not be in sync.StudioRack measures the total latency of all of the plugins in the main rack,which includes the latency of any Multiband Split racks and Parallel Splits andtheir plugins. Once calculated, this latency is reported to the DAW’s latencycompensation engine.The latency of a specific plugin as well as the total latency of the StudioRack areshown at the bottom of the plugin menu. There are two latency indicators:Latency of the selected plugin: 117 samplesLatency for all busses and plugins in the StudioRack instance: 182samples.This value is reported to the Host.In native StudioRack, buss latency and the maximum number of plugins in the DAW session is determined by the speed andpower of the host computer. The faster its CPU, the more
StudioRack / User Guide Floating Plugin Panels Click on a plugin namein a rack slot to open the plugin in a floating window. Floating windows can be positioned anywhere and will remain visible until closed. If a plugin interface is hidden by another object, it remains open and