Transcription
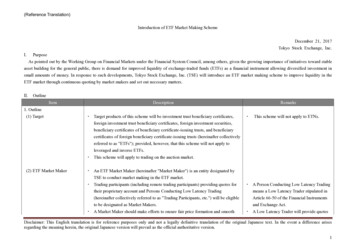
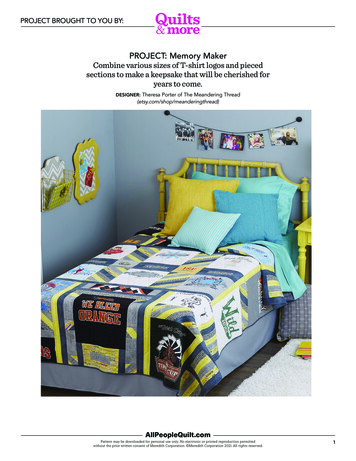
PROJECT BROUGHT TO YOU BY:PROJECT: Memory MakerCombine various sizes of T-shirt logos and piecedsections to make a keepsake that will be cherished foryears to come.DESIGNER: Theresa Porter of The Meandering lt.comPattern may be downloaded for personal use only. No electronic or printed reproduction permittedwithout the prior written consent of Meredith Corporation. Meredith Corporation 2021. All rights reserved.1
PROJECT BROUGHT TO YOU BY:QUILTFinished size: 701 2 911 2"MATERIALSYardages and cutting instructions arebased on 42" of usable fabric width.o 24 to 30 T-shirts with logos (sections)o 3 4 yard yellow-and-white print(sections)o 1 yard light gray tone-on-tone(sections)o 11 4 yards yellow tone-on-tone(sections)o 3 4 yard black-and-white chevron(sections)o yards dark gray tone-on-tone(sections, binding)21 4o 55 8 yards backing fabrico 79 100" battingo 10 yards 20"-wide featherweightfusible interfacingo Acrylic ruler with 45 angle markingPREPARE T-SHIRTS1) Cut T-shirts open along side seams,underarm seams, and shoulderseams, but do not trim to size.2) Place T-shirts facedown. Cutinterfacing pieces a few incheslarger than each T-shirt section thatyou want to include in the quilt.3) Following manufacturer’sinstructions, press fusibleinterfacing pieces onto wrong sidesof T-shirts; let cool.CUT T-SHIRTSThe T-shirt measurements that followare for the quilt shown. If your shirtsare smaller in size, combine two T-shirtpieces to make one larger unit.Refer to the Quilt AssemblyDiagram, as a guide for placement andsize of T-shirt pieces needed. The QuiltSection Measurements Diagram,shows the size of each completedsection. Refer to “Tips for T-shirtQuilts,” page 4, for ways to adapt thepattern.Cut pieces in the following order.Press seams in directions indicatedby arrows on diagrams. If no directionis specified, press seam toward darkerfabric.From interfaced T-shirts, cut:n 1—181 2 7" rectanglen 1—141 2 41 2" rectanglen 2—131 2 15" rectanglesn 2—13 16" rectanglesn 1—13 151 2" rectanglen 3—13 15" rectanglesn 2—13 141 2" rectanglesn 3—13 91 2" rectanglesn 1—13 7" rectanglen 6—101 2 13" rectanglesn 2—61 2" squares1) Referring to Diagram 1, sewtogether a yellow-and-white print,light gray tone-on-tone, yellowtone-on-tone, and black-and-whitechevron 2 42" strip along longedges to make a strip set. Pressseams in one direction. The strip setshould be 61 2 42" including seamallowances.CUT FABRICSCut pieces in the following order.3) Cut strip sets into sixteen 61 2"squares (Diagram 2).From yellow-and-white print, cut:n 9—2 42" stripsn 4—21 2 101 2" stripsn 4—21 2" squaresFrom light gray tone-on-tone, cut:n 9—2 42" stripsn 8—3 7" stripsn 1—21 2 13" stripn 2—21 2 61 2" stripsn 2—21 2 41 2" stripsFrom yellow tone-on-tone, cut:n 9—2 42" stripsn 2—2 341 2" stripsn 8—2 29" stripsFrom black-and-white chevron, cut:n 9—2 42" stripsn 1—3 181 2" stripn 3—21 2 61 2" stripsFrom dark gray tone-on-tone, cut:n 9—21 2 42" binding stripsn 9—2 42" stripsn 12—2 29" stripsn 2—2 181 2" stripsn 6—21 2 101 2" stripsn 16—2 61 2" stripsn 6—21 2" squares4) Referring to Diagram 3, sewtogether four Step 3 squares andthree dark gray tone-on-tone 2 61 2"strips, rotating every other square,to make a sashing strip. Press seamsaway from squares. The sashingstrip should be 61 2 29" includingseam allowances.ASSEMBLE SECTIONS A1–A4Measurements include 1 4" seamallowances. Sew with right sidestogether unless otherwise stated.2) Repeat Step 1 to make three stripsets total.5) Repeat Step 4 to make four sashingstrips total.6) Referring to Diagram 4, sewtogether a dark gray tone-on-tone,yellow-and-white print, light graytone-on-tone, yellow tone-ontone, and black-and-white chevron2 42" strip along long edges tomake a strip set. Press seams in onedirection. The strip set should be8 42" including seam allowances.Repeat to make six strip sets total.7) Join two Step 6 strip sets along longedges to make a 151 2 42" strip set(Diagram 5). Press seam in onedirection. Repeat to make three151 2 42" strip sets total.AllPeopleQuilt.comPattern may be downloaded for personal use only. No electronic or printed reproduction permittedwithout the prior written consent of Meredith Corporation. Meredith Corporation 2021. All rights reserved.2
PROJECT BROUGHT TO YOU BY:8) Referring to Diagram 6 and aligningthe 45 line on an acrylic ruler alongleft edge of one Step 7 strip set,diagonally cut:n 2—61 2 13" pieced rectangles(used in D section)n 2—51 2 13" pieced rectangles(used in A sections)9) Aligning the ruler from the rightedge on a second Step 7 strip setand using the 45 line on the ruler,diagonally cut:n 2—61 2 13" pieced rectangles(used in D section)n 2—51 2 13" pieced rectangles(used in A sections)10) Referring to Diagram 7 fordirection of cutting lines and usingthe 45 line on the ruler, fromthe remaining Step 7 strip set,diagonally cut:n 2—5 13" pieced rectangles (cut1 in each direction; used in Csections)n 12—3" pieced squares (used in Bsections)11) Referring to Quilt AssemblyDiagram, join a T-shirt 13 15"rectangle, a 51 2 13" piecedrectangle, and a T-shirt 13 91 2"rectangle in a vertical row; pressseams open. Add a sashing strip,three dark gray tone-on-tone 2 29"strips, and two yellow tone-on-tone2 29" strips to the vertical rowto make Section A1. Press seamsin one direction. The A1 sectionshould be 261 2 29" including seamallowances.12) Using the T-shirt and fabric piecesindicated in Quilt AssemblyDiagram, repeat Step 11 to makesections A2, A3, and A4, positioningpieces as shown. See Quilt SectionMeasurements Diagram, for sizeof each completed section includingseam allowances.ASSEMBLE SECTIONS B1 AND B21) Referring to Diagram 8, sew ayellow-and-white print 21 2" squareto each short edge of a light graytone-on-tone 21 2 61 2" strip; pressseams away from light gray tone-ontone strip. Add yellow-and-whiteprint 21 2 101 2" strips to remainingedges; press as before. Join darkgray tone-on-tone 2 61 2" stripsto opposite short edges to makea yellow rectangle unit. Press asbefore. The unit should be 131 2 61 2"including seam allowances. Repeatto make a second yellow rectangleunit.2) Referring to Quilt AssemblyDiagram, gather six 3" piecedsquares, a yellow rectangle unit,four light gray tone-on-tone 3 7"strips, a dark gray tone-on-tone2 181 2" strip, a T-shirt 131 2 15"rectangle, and a T-shirt 181 2 7"rectangle.3) Sew together three 3" piecedsquares and two light gray tone-ontone 3 7" strips, alternating piecesand noting direction of diagonalseams in squares, to make a verticalstrip (Diagram 9). Press seams inone direction. The strip should be3 21" including seam allowances.Repeat to make a second verticalstrip.4) Add a yellow rectangle unit toT-shirt 131 2 15" rectangle. Pressseam in one direction.5) Join a Step 3 vertical strip to eachlong edge of Step 4 unit. Pressseams in one direction.6) Add a dark gray tone-on-tone2 181 2" strip and a T-shirt 181 2 7"rectangle to bottom edge of Step5 unit to make Section B1. Pressseams in one direction. TheB1 section should be 181 2 29"including seam allowances.7) Using the T-shirt and fabric piecesindicated in Quilt AssemblyDiagram, repeat steps 2–6 to makeSection B2, positioning pieces asshown.ASSEMBLE SECTIONS C1 AND C21) Referring to Quilt AssemblyDiagram, gather a T-shirt 13 16"rectangle, T-shirt 13 141 2"rectangle, yellow tone-on-tone2 341 2" strip, and a 5 13" piecedrectangle.2) Sew together T-shirt rectangles and5 13" pieced rectangle. Press seamsin one direction.3) Add yellow tone-on-tone 2 341 2"strip to make Section C1. Pressseam in one direction. The C1section should be 141 2 341 2"including seam allowances.4) Using the T-shirt pieces indicatedin Quilt Assembly Diagram, repeatsteps 1–3 to make Section C2,positioning pieces as shown.ASSEMBLE SECTION D1) Referring to Diagram 10, sew adark gray tone-on-tone 21 2" squareto each short edge of a black-andwhite chevron 21 2 61 2" strip. Pressseams away from black-and-whitechevron strip. Add dark graytone-on-tone 21 2 101 2" strips toremaining edges to make a grayrectangle unit. Press as before. Theunit should be 101 2 61 2" includingseam allowances. Repeat to makethree gray rectangle units total.2) Referring to Quilt AssemblyDiagram, sew a T-shirt 101 2 13"rectangle to each long edge ofa gray rectangle unit to make alarge T-shirt segment. Press seamstoward rectangle unit. Repeat tomake three large T-shirt segmentstotal.AllPeopleQuilt.comPattern may be downloaded for personal use only. No electronic or printed reproduction permittedwithout the prior written consent of Meredith Corporation. Meredith Corporation 2021. All rights reserved.3
PROJECT BROUGHT TO YOU BY:3) Sew 61 2 13" pieced rectangles to topand bottom edges of a T-shirt 61 2"square, noting direction of diagonalseams, to make a small T-shirtsegment. Press seams toward piecedrectangles. Repeat to make a secondsmall T-shirt segment.4) Sew together large and smallT-shirt segments; press seams inone direction. Cut and piece threeremaining dark gray tone-on tone2 42" strips to make two 2 421 2"strips. Sew the strips to top andbottom edges of the joined T-shirtsegments to make Section D.Press seams in one direction. TheD section should be 421 2 341 2"including seam allowances.ASSEMBLE QUILT TOP1) Referring to Quilt AssemblyDiagram, lay out sections in threehorizontal rows, noting position ofeach section. Sew together sectionsin each row; press seams open.Top and bottom rows should be701 2 29" including seam allowances;middle row should be 701 2 341 2"including seam allowances.2) Join rows to complete quilt top;press seams open.FINISH QUILT1) Layer quilt top, batting, andbacking; baste.2) Quilt as desired. Designer TheresaPorter machine-quilted customdesigns across the quilt top,including wavy and straight lines,loops, and a starburst motif. Shealso quilted words and dates intosome of the fabric pieces.TIPS FOR T-SHIRT QUILTST-shirt pieces to make one larger unit.Designer Theresa Porter has madedozens of T-shirt quilts. What is hermost important rule for these projects?“There are no rules,” she says. “Theydo not have to be perfect in any way.They are soft, snuggly scrapbooks fullof memories.” While there aren’t rules,there are ways to make the processeasy and enjoyable. Use these tipsto transform stacks of T-shirts intomemorable quilts.Use a lightweight interfacing. Manybad experiences while making T-shirtquilts come from using interfacingthat is too thick or stiff. Sewing stifflyinterfaced pieces together is hardon you and your machine, and theresulting quilt isn’t cuddly. Choose alightweight interfacing that controlsmost of the T-shirt stretch withoutadding bulk or rigidity. Many quiltersuse fusible knit tricot interfacing.(When using knit interfacing, be sureto put the stretch of the interfacingopposite the stretch of the T-shirt.)Others prefer woven or nonwoveninterfacing. When purchasinginterfacing, look for words likefeatherweight, lightweight, and sheer.Be careful when ironing. Press T-shirtpieces from the wrong side or use apress cloth, because some logos andlettering can be damaged (or candamage your iron) if they are toucheddirectly with a hot iron.Add unexpected materials. In additionto using T-shirts, Theresa incorporatedteam uniforms, some of which weremade of mesh or jersey. She bastedthese open-weave fabrics to samesize pieces of cotton fabric beforeincorporating them into the quilt top.To include patches in a quilt, first sewthem to a cotton fabric.Make the quilting meaningful.Continue the personalization byincorporating names and significantwords or dates into the machinequilting.Adapt the pattern. “Following a T-shirtquilt pattern exactly as written is nearlyimpossible because the shirts you areusing are unlikely to match up perfectlyin size to those used in the pattern,”Theresa says. It’s easy to adapt anypattern. If your shirts are too small fora particular area, combine two or moreT-shirt pieces to make one larger unit.Or add a strip cut from another part ofthe T-shirt or from coordinating fabricto bring it to size. Graph paper can helpwhen you’re making adjustments likethis to the layout.3) Bind with dark gray tone-on-tonebinding strips.AllPeopleQuilt.comPattern may be downloaded for personal use only. No electronic or printed reproduction permittedwithout the prior written consent of Meredith Corporation. Meredith Corporation 2021. All rights reserved.4
21 2 61 Quilts and More Fall 2016CMR:Memory MakerDiagram 1M Steenson 05/15/2016100589570PROJECT BROUGHT TO YOU BY:61 2"SECTION B1181 2 29"SECTION A2261 2 29"2 42"SECTION A1261 2 29"2 61 2"Quilts and More Fall 2016CMR:Memory MakerDiagram 2M Steenson 05/15/2016100589571SECTION C2141 2 341 2"SECTION C1141 2 341 2"DIAGRAM 161 2"SECTION D421 2 341 2"SECTION A3261 2 29"SECTION B2181 2 29"SECTION A4261 2 29"DIAGRAM 2QUILT SECTION MEASUREMENTS DIAGRAMDIAGRAM 3Quilts and More Fall 2016CMR:Memory MakerDiagram 4M Steenson 05/15/2016100589573151 2"8"42"2 42"Quilts and More FaCMR:Memory MakerDiagram 5M Steenson 05/15/100589574DIAGRAM 4DIAGRAM 5AllPeopleQuilt.comPattern may be downloaded for personal use only. No electronic or printed reproduction permittedwithout the prior written consent of Meredith Corporation. Meredith Corporation 2021. All rights reserved.5
Quilts and More Fall 2016CMR:Memory MakerDiagram 6M Steenson 05/15/2016100589575PROJECT BROUGHT TO YOU BY:Quilts andCMR:Memory MDiagram 7M Steenso100589576"135 1 255 13"3" 11 263" 1DIAGRAM 6DIAGRAM 7Quilts and More Fall 2016CMR:Memory MakerDiagram 8M Steenson 05/15/20163" 100589577sq.21 2"sq.3 7"21 2 101 2"21 2 61 2"2 61 2"21 2 101 2"21 2 61 2"Quilts and More Fall 2016CMR:Memory MakerDiagram 9M Steenson 05/15/201610058957821 2"sq.DIAGRAM 821 2 61 2"DIAGRAM 10DIAGRAM 9AllPeopleQuilt.comPattern may be downloaded for personal use only. No electronic or printed reproduction permittedwithout the prior written consent of Meredith Corporation. Meredith Corporation 2021. All rights reserved.6
Quilts and More Fall 2016CMR:Memory MakerQADM Steenson 05/16/2016100589580PROJECT BROUGHT TO YOU BY:SECTION B1SECTION A1SECTION A213 91 2"2 29"2 29"2 29"2 29"2 29"51 2 13"131 2 15"2 29"2 29"2 29"2 29"2 29"13 15"51 2 13"13 15"2 181 2"13 91 2"181 2 7"SECTION D61 2"sq.101 2 13"13 141 2"101 2 13"13 141 2"101 2 13"2 341 2"2 341 2"5 13"101 2 13"61 2"sq.101 2 13"101 2 13"SECTION C2SECTION C113 16"61 2 13"421 2 2"5 13"13 16"21 2 41 2"421 2 2"141 2 41 2"13 91 2"2 181 2"13 151 2"3 181 2"2 29"2 29"2 29"131 2 15"2 29"2 29"2 29"2 29"2 29"2 29"2 29"51 2 13"51 2 13"21 2 13"13 15"13 7"SECTION A3SECTION B2SECTION A4QUILT ASSEMBLY DIAGRAMAllPeopleQuilt.comPattern may be downloaded for personal use only. No electronic or printed reproduction permittedwithout the prior written consent of Meredith Corporation. Meredith Corporation 2021. All rights reserved.7
PROJECT BROUGHT TO YOU BY:AllPeopleQuilt.comPattern may be downloaded for personal use only. No electronic or printed reproduction permittedwithout the prior written consent of Meredith Corporation. Meredith Corporation 2021. All rights reserved.8
7) Using the T-shirt and fabric pieces indicated in Quilt Assembly Diagram, repeat steps 2–6 to make Section B2, positioning pieces as shown. ASSEMBLE SECTIONS C1 AND C2 1) Referring to Quilt Assembly Diagram, gather a T-shirt 13 16" rectangle, T-shirt 13 141 2" rectangle, ye