Transcription
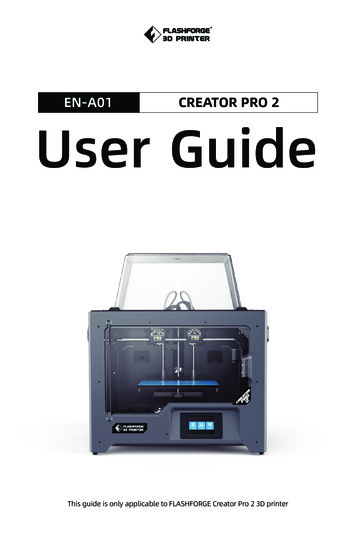
Creator 3金刚U S E R狼三代G U I D E用户使用手册SZ20-CN/EN-A02中文P50This guide is only applicable to FLASHFORGE Creator 3 3D printer本手册仅适用于闪铸科技 Creator 3 3D打印机
PREFACENote: Each device must be tested before leaving factory. If there are some residues in extruder or some tiny scratches on the build tape, it is normal and won’t affect the printing quality.On the completion of this User Guide, thanks all FlashForge engineers and the FlashForge 3D printer users for theirunremitting efforts and sincere assistance.The FlashForge Creator 3 User Guide is designed for the Creator 3 users to start their printing journey with FlashForgeCreator 3. Even if you are familiar with earlier FlashForge machines or 3D printing technology, we still recommend thatplease read this guide, as there is lots of important information about the Creator3 for you to get a better 3D experience.For a better and more successful printing experience, you can refer to the following materials:(1) User Guide:Users will find the User Guide together with the printer accessories. The User Guide will help you start your print journeyas soon as possible.(2) Official FlashForge Website:FlashForge Chinese website:www.sz3dp.comFlashForge English website:www.flashforge.comThe official FlashForge website contains the up-to-date information concerning FlashForge software, firmware, devicemaintenance and so on. Users are also able to get the contact information from there.NOTICEPLEASE STRICTLY FOLLOW ALL THE SAFETY WARNINGS AND NOTICE BELOW ALL THE TIME.WORK ENVIRONMENT SAFETYKeep your work place tidy.Do not operate Creator 3 in the presence of flammable liquids, gases or dust.Keep Creator3 out of children and untrained persons' reach.ELECTRICAL SAFETYAlways use the Creator3 with a properly grounded outlet. Do not refit Creator3 plug.Do not use Creator3 in damp or wet locations. Do not expose Creator3 to burning sun.In case of device damage, please use the power supply provided by FlashForge.Avoid using the device during an thunderstorm.In case of uncertain accident, please unplug the device if you do not use it for long.PERSONAL SAFETYDo not touch the nozzle and build plate during printing.Do not touch the nozzle after finishing printing.Dress properly. Do not wear loose clothing or jewelry. Keep your hair, clothing and gloves away from moving parts.Do not operate the device while you are tired or under the influence of drugs, alcohol or medication.01
CAUTIONSDo not leave the device unattended for long.Do not make any modifications to the device.To lower the build plate before loading/unloading filament. (The distance between the nozzle and build plateshould be kept for at least 50mm)Operate the device in a well-ventilated environment.Never use the device for illegal activities.Never use the device to make any food storage vessels.Never use the device to make any electrical appliance.Never put the model into your mouth.Do not remove the models with force.Never connect the device with network cable longer than 3m.ENVIRONMENT REQUIREMENTSTemperature: RT 15-30 Moisture: 20%-70%PLACE REQUIREMENTSThe device must be placed in a dry and ventilated environment. The distances of the left, right and back side spaceshould be at least 20cm, and the distance of the front side space should be at least 35cm.FILAMENT REQUIREMENTSDo not abuse the filament. Please make sure you use the FlashForge filament or the filament from the brandsaccepted by FlashForge.FILAMENT STORAGEAll polymers degrade with time. Do not unpack until filament is needed. Filament should be stored at clean and dryconditions.LEGAL NOTICEAll the information in this document is subject to any amendment or change without the official authorization fromFlashForge.FLASHFORGE CORPORATION MAKES NO WARRANTY OF ANY KIND WITH REGARD TO THIS DOCUMENT, INCLUDING, BUTNOT LIMITED TO, THE IMPLIED WARRATIES OF MERCHANTABILITY AND FITNESS FOR A PARTICULAR PURPOSE.FlashForge shall not be liable for errors contained herein for incidental consequential damages in connection withfurnishing, performance or use of this material.Flashforge reserves the right to modify the User guide due to subsequent equipment updates.Copyright 2019 FlashForge Corp. All Rights Reserved02
FCC STATEMENTThis device complies with Part 15 of the FCC Rules. Operation is subject to the following two conditions:(1) This device may not cause harmful interference,(2) This device must accept any interference received, including interference that may cause undesired operation.Warning: Changes or modifications not expressly approved by the party responsible for compliance could void theuser's authority to operate the equipment.This equipment has been tested and found to comply with the limits for a Class B digital device, pursuant · to Part 15of the FCC Rules. These limits are designed to provide reasonable protection against harmful interference in aresidential installation. This equipment generates uses and can radiate radio frequency energy and, if not installedand used in accordance with the instructions, may cause harmful interference to radio communications. However,there is no guarantee that interference will not occur in a particular installation. If this equipment does causeharmful interference to radio or television reception, which can be determined by turning the equipment off and on,the user is encouraged to try to correct the interference by one or more of the following measures:· Reorient or relocate the receiving antenna.· Increase the separation between the equipment and receiver.· Connect the equipment into an outlet on a circuit different from that to which the receiver is connected.· Consult the dealer or an experienced radio/TV technician for help.This document contains proprietary information protected by copyright.SERVICEAlways unplug Creator3 from its power before performing any service procedures. Failure to do so may result inpersonal injury and equipment damage.Use only Creator 3 approved materials and components. Use of object materials, or 3D objects other than FlashForge approved object materials and genuine FlashForge components may void warranty.03
CONTENT1. ----------------------------------1.1 About Creator31.2 Accessories1.3 Product Parameters1.4 Terms2. Unpacking and Hardware Assembly2.1 Unpacking2.2 Hardware Assembly3. First -------- ---------------------3.1 Leveling3.2 Filament Installation3.3 Loading and Unloading3.4 Calibration3.5 Internet Connection3.6 Flashforge Software3.6.1 Software Installation3.6.2 Software Interface3.6.3 Set Dual Extruder Print131315171922232323244. ----------------------------------- 284.1 Filament284.1.1 Filament Compatibility284.1.2 Print Setting284.2 Print Start-up294.3 Model Removal324.4 Support Removal324.5 Camera Connection335. Introduction of Touch Screen5.1 Print5.2 Preheat5.3 -- 363638396. -------------------------------- 476.1 Log Copy476.2 Maintenance and Service476.3 Extruder Unclogging486.4 Daily Maintenance and Use Suggestion487. Support and ------------------ 4904
1. Introduction1.1 About Creator 3Device View1. Touch screen5. Left extruder9. Leveling nut13. Nozzle2. USB stick input6. Nozzle brush10. Filament cover14. Ethernet Input3. Touch screen button7. Waste box11. Filament cover handle15. Power switch4. Right extruder8. Build plate12. Wind guide nose16. Power input05
1.2 AccessoriesCreator 3金刚U S E R狼三代G U I D E用户使用手册SZ20-CN/EN-A01中文P50This guide is only applicable to FLASHFORGE Creator 3 3D printer本手册仅适用于闪铸科技 Creator 3 3D打印机Creator 3FilamentUser GuideAfter-sales CardPower cableScraperUSB StickWaste boxPTFE TubeUnclogging Pin ToolStamping wrenchScrew driverAllen wrenchGreaseGlue stickSilicone brush06
1.3 Product ParametersNameNumber of ExtruderPrint TechnologyScreen SizeBuild VolumeLayer ResolutionBuild AccuracyPositioning AccuracyPrint FilamentFilament DiameterNozzle DiameterCreator 32, independentFused Filament Fabrication(FFF)4.5’’ color IPS Touch Screen300 250 200mm0.05 - 0.4mm 0.2mmZ axis 0.0025mm; XY axis 0.011mmPLA/ABS/PC/PVA/HIPS/PETG/wood filament/Nylon1.75mm( 0.07mm)0.4mmPrint Speed10 150 mm/sTravel speed10 150 mm/sSoftwareSupport FormatOperation systemFlashPrintInput: 3MF/STL/OBJ/FPP/BMP/PNG/JPG/JPEGOutput: GX/GWin XP/Vista/7/8/10、Mac OS、LinuxDevice Size627 485 615mmNet Weight40KgAC InputConnectivityInput: 100V-240VAC, 47-63HzUSB Stick, Wi-Fi, Ethernet,07Power: 500W
1.4 TermsBuild PlateThe surface on which the Creator3 builds an object.Build TapeThe blue tape that covers Creator3’s build plate so that the object canstick to the build plate well.Build VolumeThe three dimensional amount of space that an object will use once it iscompleted. The largest build volume of Creator3 is 300*250*200 mm.Leveling NutsNuts under the build platform that are used for adjusting the distancebetween the nozzle and build plate.ExtruderNozzleNozzle fanThe device that draws the filament from the spool, melts it and pushes itthrough a nozzle into the build plate.Also called “print head”, which located at the bottom of the extruderwhere heated filament is squeezed out.Used to lower extruder temperature and speed up filament solidification.Filament IntakeAn opening located at the top of the extruder.FilamentCartridgeA specific box for placing FlashForge filament.Filament GuideTubeGlue StickUnclogging PinToolStamping WrenchNozzle brushA plastic piece that guides the filament from the filament box to thefilament intake.A solid adhesive used for making the model stick to the build plate firmly.A tool that used for cleaning and unclogging the extruder.A tool that used for seizing the nozzle’s metal cube.Used to clean extruder waste.08
2. Unpacking and Hardware Assembly开箱步骤2.1 Unpacking1. Cut off packaging ties, and tear off stretch wrap.2. Lift outer packing box.3. Remove top foam.4. Remove foam around the printer.5. Unrip tapes on four corners of the printer, take bubblepack down.6. Remove tapes on the top, open head cover.09
7. Take top parts and foam out.8. Remove the blue fastening tape.9. Open the front door and take out the front foam which should contain two filament spools and two waste boxes.10. Remove clips on timing belt of X axis and Y axis.10
11. Insert power cable into power input of the printer back ,turn the power on.After that, tap[Tools]-[Manual] in turns tooperate interface.12. Tap[Z-]continuously until build plate rises to a high position ,thus taking out foam below easily.13. Remove foam pieces under build plate.14. Unboxing completed!Suggest to keep your accessorieswell for further use and transportation.11
2.2 Hardware AssemblyInstall Waste boxInstall Nozzle brushTake out waste box, hang it on the hookbeside build plate.(One waste box on each side)Take out nozzle brush, install it onmounting base.(One nozzle brush on each side)Hook holesHookHook12
开箱步骤3. First Installation3.1 Leveling1、Tap[Tools]-[Level] in turns on the touch screen, leveling starts.2、After extruder and build plate stop moving,choose left/right extruder to do the leveling.3、After choosing completed, extruder moves to the first point to do the verify distance between nozzle and plate.Afterverifying completed,extruder moves to the second point to do the leveling.13
4、Wait for the extruder verifying distance between nozzle and plate on the second point and third point. If the distancebetween nozzle and plate is not appropriate,operate according to the instruction on the touch screen.After verifyingcompleted,extruder moves to the third point,repeat the above steps to verify the distance as well. After finishing thethird point, leveling completed.Note: If leveling failed tip shown up on the touch screen, please repeat the leveling operation according toinstructions until leveling finished.14
3.2 Filament InstallationFilamentintake1. Open the filament cover.2. Insert the filament into filament intake.3. Notice: For filament convenient rotation, please install filament follow the direction shown in the picture.When installing filament on the left side, please unload filament anticlockwise;when installing filament on the right side, please unload filament clockwise.15
4. Insert filament into filament intake continuously untilfilament goes through filament guidetube.5. Press the spring presser, put filament vertically intothe left filament intake to the bottom.6. Insert filament guidetube into filament intake to fix.7. Put the spool of filament on the spool holder, closethe filament cover.16
3.3 Loading and Unloading[Loading]1. Tap [Tools]-[Filament]-target extruder[Load] in turns on the touch screen, wait for extruder heating up.Click the temperature value, and a window for modifying the temperature value will pop up . The default filamentloading temperature is 220 degrees.When high temperature filament such as ABS/ PC are needed, please click tomodify the temperature value.2. Install filament spool on the printer, thread filament through filament detecting components; Insert filament intofilament intake until filament goes through white filament guidetube.17
3. When extruder heated up to the target temperature,press down the spring presser with left hand, and insert filamentinto filament intake until filament drive gear starts to load filament. Let white filament go,and insert white filamentguidetube into extruder filament intake.4. Wait for even filament from nozzle. If is filament changing, please wait for same color of filament, then stop loading.Note: Please loading before inserting filament into filament guidetube.Insert filament guidetube into filament intakeafter loading completed.[Unloading]1. Tap [Tools]-[Filament]-target extruder[Unload] in turns on the touch screen, wait for extruder heating up.WithdrawFilamentGuidetubePush filamentdown throughfor 3 secondsPress here2. When extruder heated up to the target temperature, wait for even filament from nozzle.Now,press down springpresser with left hand, pull out white filament guide tube with right hand, pull out filament quickly,unloading completed.18
3.4 CalibrationTap [Tools]-[Setting]-[Calibration] in turns on the touch screen.[Z axis calibration]1. Do leveling before Z axis calibration,leveling see Page 13.2.Tap[Z axis calibration],wait for calibration between nozzle and Z axis without itivity]: shows the sensitivity of sensor in the nozzle. The higher the value, the lower the sensitivity;When the sensitivity is too strong, it may cause an error report of z-axis calibration abnormal. When the equipmentoften prompts the z-axis calibration abnormal, please adjust the sensitivity of the sensor;Increase the value.This function is factory default setting.How to use this function?When creator3 keeps reminding "please recalibration z-axis” or "z-axis error" before printing, and the platformcontinues to move upward after touching with the nozzle during manual adjustment.Your printer's sensor of z axiscalibration may have malfunctioned.Please follow the following steps to adjust.19
Click[Setting]-[Calibration]-[Sensitivity]· The value should be adjusted to a larger value greatly if the piezoelectric plate is too sensitive.· The value should be adjusted to a smaller value if the piezoelectric plate is not sensitive.· Normal values are recommended at 20-25.· When z-axis stops in the middle or stops without touching with the nozzle during printing, the corresponding nozzlesensitivity value should be increased.· When the platform is still moving upward after contacting with the nozzle, the corresponding nozzle sensitivity valueshould be reduced.[X axis calibration]By comparing if printing lines of two extruders coincide in the direction of X axis to judge if two extruders in the sameX-axis.1. Tap[X axis calibration],wait for two extruders heating up to the target temperature, two extruders print one line inturns. After printing completed,check if two lines coincide; In the meanwhile, a confirmation notice pops up.2. When the two lines do not coincide, click the next step, and there will be a prompt pop-up operation, and the nozzlewill adjust the deviation to the left or right.· Next step: shows judge next prompt operation and operate.· Recalibration: The left and the right nozzle reprints one straight line respectively.· Skip: The user knows that the two lines do not coincide, so there is no need to do the next prompt operation, so he candirectly click "skip" to adjust the value deviation setting.· Confirm: Save adjustive deviation value.· Back: Exit the calibration page directly without saving the data in the face of the current operation.20
RLDeviation of two straight lineRPlease click the icon as shown in the picture andadjust the nozzle with the left nozzle as the indicator.Estimate the deviation.Enter the estimated value andclick "recalibrate";Repeat the above steps until thetwo lines coincide.LTwo straight lines coincide3. If two lines coincide completely,tap[Yes],X axis calibration completed.[Y axis calibration]By comparing if printing lines of two extruders coincide in the direction of Y axis to judge if two extruders in the sameY axis.1. Tap[Y axis calibration],wait for two extruders heating up to the target temperature, two extruders print one line inturns.After printing completed,check if two lines coincide; In the meanwhile, a confirmation notice pops up.2. If two lines coincide completely,tap[Yes],Y axis calibration completed.3. If two lines not coincide completely,tap[No],adjust extruder position according to actual situation.After adjustmentcompleted,clean filament on the build plate,tap[Recalibration];Repeat step1 and step2 until two printed lines coincide.21
3.5 Internet Connection· Ethernet connectionConnect your Creator 3 with your PC viaa Ethernet cable, connection successfully when you seecorner.· WiFi connectionTap[Tools]-[Setting]-[WiFi],turn on WiFi to choose your WiFi. Connection successfully when you seecorner.on the righton the right· Hotspot connection1. Tap[Tools]-[Setting]-[WLAN hotspot] to turn on hotspot.You can set hotspot name and password. Turn on the hotspotsuccessfully when you seeon the right corner.2. Use laptop to search your hotspot,connect and input password.Note: If you have more than one printers,enter WLAN hotspot to modify hotspot name separately.22
3.6 FlashPrint Software3.6.1 Software Installation1. Software AcquisitionYou can choose from two methods to acquire FlashPrint software installation package:Method 1: To get the installation package from the USB stick in the toolkit.Method 2 : Enter FlashForge official website: www.sz3dp.com. Downloadsoftwareversion you needed from Support - Support center-Flashprint.FlashPrint2. Software Installation and Start-upOpen setup and follow instructions to complete installation. Start FlashPrint afterinstallation completed.3.6.2 Software InterfaceChoose machine type of Creator 3 from FlashPrint menu [Print]-[Machine Type],the main screen displays. Interfaceoverview shown as follows:12361. Menu bar6. Printer type472. Adjust zone7. 3D models583. Load model file8. Build plate front direction2394. Support setting9. Printer connection status5. Print
3.6.3 Set Dual Extruder PrintSet left extruder support filament, right extruder structure filament(right extruder as a default ), follow theprocedures below:In expert mode:1. Load the model;2. Choose support type, Tap[Supports] [Supports Options] [Linear], and check[Touch Platform Only], tap[OK];3. Auto add supports, tap[Supports] [Auto Supports], go back and save;4. Tap[Print], enter the parameter setting page;5. Regular page, select profile , such as Creator 3 PLA;6. Regular page, tap[Adapt soluble support filament] [PVA] [Adaptable];7. Tap[Save Configuration]Click [File]-[Preferences]-[Print]-choose [Expert Mode] you can set the parameters for printing.24
In basic mode:1. Load the model;2. Choose support type, Tap[Supports] [Supports options] [Linear], and check[Touch Platform Only], tap[OK];3. Auto add supports, tap[Supports] [Auto Supports], go back and save;4. Tap[Print], enter the parameter setting page;5. Suggest to use structure filament as material right and soluble support filament as material left;6. Check[Wall] in the resolution, other system default;7. Tap[Save Configuration]25
Mirror/ duplicate mode:If you want to print two same model, please choose the mirror or duplicate mode, the printer will print those two modelat same time.Load the model first, please note the mirrorand duplicate support model size is smallerthan 133mm (X axis direction)Click [Extruder], choose [Ese Dual Extruder(Dupliacte)] Or [Ese Dual Extruder (Mirror)]The interface will be show like this.26
Notes on mirror and duplicate mode:Duplicate and mirror mode:Since the heights of the left and right sprinkler heads are different after installation, the software will automatically adda compensation layer to compensate for the difference in height when slicing, so that the printing heights of the leftand right sides are the same.When the z-axis is calibrated, take the right nozzle as the reference and record the heightdifference of the left and right nozzle.Left nozzle is lower than right nozzle: right nozzle prints cal pad;Right nozzle is lower than left nozzle: left nozzle prints cal pad;The height difference is less than 0.2mm, cal pad will not be printed.Compensation layer with height difference less than 0.2mm does not print.The compensation layer(Cal pad) is printed first.Easy to remove by sticking to the raft.If the raft is not added, thecompensation layer directly acts on the model, which is difficult to remove.so we highly recommend to add a raft when choosing mirror or copy mode to print.27
4. Operation4.1 Filament4.1.1 Filament CompatibilityCreator 3 is equipped with independent dual extruders, which is suitable for PLA,ABS,PETG,Nylon(PA), PC, HIPS andPVA. Independent dual extruder filament combination extrusion situations, see below:Default left extruder as a supportDissolvable filament:Insoluble filament combination:Left extruderRight extruderLeft extruderRight CFPA-GFPA-GFPVA: Water soluble support filamentHIPS: HIPS can be dissolved in d-LimoneneCreator 3 is able to print PACF, , because of the material of the nozzle is not the hardened , the nozzle will be worn. It’sestimated that printing 1-2kg of PACF, will need to change a new nozzle and have to equip with a strong extruder.Standard device equipped with a standard feeding extruder.While Creator 3 is adopted with open type filament system, we still suggest using Flashforge filament.All the Flashforgefilament is tested professionally,and are possessed of optimized configuration files, which ensures perfect print effect.Storage of PVA /PADirect exposure to the air, it is easy subject to moisture and softening, print bad easily after softening ,so please storethe PVA in dry box when printing. It should be stored in sealed bag or dry box.4.1.2 Print SettingEach type of filament needs different setting for best print effect.If using prepared models of Flashprint,setting completed automatically under the circumstance of choosing correctextruder and filament.For better adhesiveness of print product,we suggest applying a thin layer of glue(Use the glue stick in the accessorybox) before printing.Adaptability of filament parametersDifferent filament brands have different filament characteristics. When using creator 3, it is recommended to use expertmode to find a suitable parameter to ensure better printing quality.· Thickening and increase flow rate of the first layer are beneficial to the adhesion.· When printing small models(or environment temp is higher than 25 degree) with PLA: suggest to set platformtemperature to 45 degrees.· When printing big models (or environment temp is lower than 10 degree)with PLA: suggest to set platformtemperature to 70 degrees.· Print PVA as support, suggest to set speed to 40%.28
4.2 Print Start-upPlease complete the leveling,loading and calibration correctly with the guidance of User Guide at first print.· Print from internal memory cardTap[Tools]-memory card icon on the touch screen,choose printed files saved in internal memory card already. The printfile copy by this method is not supported.· Print form USB stickTap[Tools]-USB stick icon on the touch screen,choose printed files saved in USB stick already.Support to copy the printfile to device internal memory card.· Print from Network TransmissionThe network transmission printing method is limited to the device and the computer within the same LAN, regardless ofthe use of wired network connection or wireless network connection.1.Refer to page 22 Internet connection to connect successfully.2. Tap[Tools]-[About] in turns on the touch screen, check and record Ethernet IP address:10.33.23.180(The example is forreference only, with the local IP address as the criterion.).3.Tap FlashPrint menu bar in turns [Print]-[Connect .180:8080(Theexample is for reference only, with the local IP address as the criterion).After connecting successfully, you will seeon the bottom right corner.29
· Print from hotspot connection1.Refer to Page 22 hotspot connection to connect successfully.2.Tap[Tools]-[About] in turns on the touch screen, check and record WiFi IP address:10.33.23.180(The example is forreference only, with the local IP address as the criterion.)3.Tap FlashPrint menu bar in turns [print]-[connect 0:8080(Theexample is for reference only, with the local IP address as the criterion).After connecting successfully, you will seeon the bottom right corner.· Print from FlashCloud1. Turn on WiFi or Ethernet to connect the internet.2. Tap[Tools]-[Setting]to turn on FlashCloud.3. Enter FlashCloud website: http://cloud.sz3dp.com to operate:LoginE-mailPasswordRemember passwordLoginForgot passwordRegister① Register FlashCloud account and login in on FlashCloud website: http://cloud.sz3dp.com.30
FlashCloudHomeEnMy Printer Add PrinterThe current printer list is empty. Please add a printerMy PrinterMy ModelAdd printerMy JobAll fields must be filled inNameModel LibraryRegistration CodeOKCancel② Tap[Add Printer] on[My Printer],fill in printer name and registration code.(after turning on FlashCloud, check registration code on [Tools]-[About]).FlashCloudHomeEnFlashCloudMy ModelUpload modelHomeUser2018.3.2My PrinterMy PrinterMy ModelMy ModelMy JobMy JobModel LibraryModel Library3D ModelModel DetailPrint4. Choose one model from model library or upload your STL.file,tap[Print] to enter simple model edit �首页Creator 3Creator 3Edit model我的模型MoveEnEn我的打印机Print Settings我的模型RotateTime RemainingScale0 h 0 �型库-150150-150150Y:0%0Z:21 / 0 021 / 0 StartPrint5. Choose the printer to do print job from pull-downmenu.(The printer must be added to my printer)ClosedCancel6. Tap[Start],the printer starts to print.Note: For security reason,on printer is used for one FlashCloud only, if you need to change FlashCloud account,please delete this machine with the original account.31Narmal
4.3 Model RemovalWarning! Be careful of your body position when using manual tool to remove the model from build plate. Suddentool slippage and improper body position may cause injury.Caution: Do not scratch build plate when removing the model.Scratches in build plate will cause modeling errors.· Model coolingLet build plate and model cool down themselves when printing without using glue stick,you can remove model easilyfrom build plate.· Use scraperRemove model with a scraper when model still attached to the build plate after cooling.Keep the scraper parallel tobuild plate, and insert it into model bottom,you can remove model successfully.If necessary, remove build plate from the printer,then remove model from build plate with a scraper.En· Use waterIf glue stick is used when printing, and neither of above methods is effective,wash build plate with warm water todissolve the glue after taking build plate from the printer.The model can be removed easily after glue dissolved.If PVA is used,immerse build plate and model into water todissolve PVA to remove the model.4.4 Support RemovalWhen PVA used as support material, we suggest doing follow-up processing by immersing PVA into water to removesupport.1. Immerse model into waterPut models with PVA into water to dissolve PVA.The following methods of accelerating dissolution:· Use hotter water to reduce dissolution time.If PLA is used as structure filament, make sure that the highest watertemperature will not exceed 35 to avoid PLA deforming;If is nylon,the highest water temperature will not exceed 50 toavoid burning.· Stir water to reduce dissolution time, PVA dissolves faster in running water.· Immerse model in the water for 10 minutes,then use pliers to remove most of support and put model in the wateragain,thus PVA dissolving faster.2. Wash with waterWash residual PVA with water after PVA completely dissolved.3. Dry the modelDry model completely.Do extra post-processing of model if necessary.4. Wastewater treatmentWastewarer is easily cleaned because of PVA biodegradability.When the waste water pipeline is connected to the wastewater treatment plant, the waste water can be discharged through the waste water pipeline.After disposal of wastewater, flush it with hot water for 30 seconds to remove excess PVA in the drainage pipe to avoid long-term blockage.Water is available for repeated use,but immersing multiple models may increase dissolution time, we suggest usingnew water in order to reach best
The FlashForge Creator 3 User Guide is designed for the Creator 3 users to start their printing journey with FlashForge . In case of uncertain accident, please unplug the device if you do not use it for long. ELECTRICAL SAFETY