Transcription
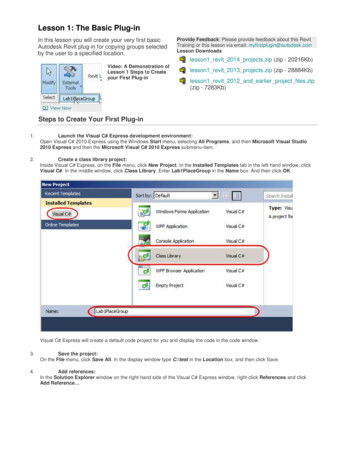
Lesson 1: The Basic Plug-inIn this lesson you will create your very first basicAutodesk Revit plug-in for copying groups selectedby the user to a specified location.Provide Feedback: Please provide feedback about this RevitTraining or this lesson via email: myfirstplugin@autodesk.comLesson Downloadslesson1 revit 2014 projects.zip (zip - 20216Kb)Video: A Demonstration ofLesson 1 Steps to Createyour First Plug-inlesson1 revit 2013 projects.zip (zip - 28884Kb)lesson1 revit 2012 and earlier project files.zip(zip - 7283Kb)Steps to Create Your First Plug-in1.Launch the Visual C# Express development environment:Open Visual C# 2010 Express using the Windows Start menu, selecting All Programs, and then Microsoft Visual Studio2010 Express and then the Microsoft Visual C# 2010 Express submenu-item.2.Create a class library project:Inside Visual C# Express, on the File menu, click New Project. In the Installed Templates tab in the left-hand window, clickVisual C#. In the middle window, click Class Library. Enter Lab1PlaceGroup in the Name box. And then click OK.Visual C# Express will create a default code project for you and display the code in the code window.3.Save the project:On the File menu, click Save All. In the display window type C:\test in the Location box, and then click Save.4.Add references:In the Solution Explorer window on the right-hand side of the Visual C# Express window, right-click References and clickAdd Reference
5.Click the Browse tab in the Add Reference dialog and browse to the Revit product installation sub-folder. (The subfolder path depends on where you have installed Revit Architecture 201x. The default path is C:\Program Files\Autodesk\RevitArchitecture 201x\Program*).* The path may vary depending on the flavour of Autodesk Revit you are using.
You will add two reference files from this folder. Select RevitAPI.dll, hold the Ctrl key and select RevitAPIUI.dll, and then clickOK. Now the two interface DLL files are referenced in your project. All the Revit APIs are exposed by these interface files andyour project can use all of those available APIs from them.6.Set the referenced files' Copy Local property value:In the Solution Explorer window you saw in step 5, click RevitAPI under Reference node. In the Properties window, clickCopy Local property, and then click the drop-down list, select False. Repeat the same steps to change RevitAPIUI's CopyLocal property value to False.7.Set target .NET Framework:Attention: Autodesk Revit 2011 supports the use of .NET Framework 3.5. Autodesk Revit 2012 and higher supports the use of.NET Framework 4.0, which Visual C# 2010 Express uses by default. The following step is needed in order to use the correctversion. If the Revit Architecture version that you are using supports .NET Framework 4.0, you can skip step 7, 8 and 9.In the Solution Explorer window, right-click Lab1PlaceGroup project, and click Property.
8.In the displaying Project Property form, click Application tab on the left-hand side of the window, click the drop-downlist below Target framework, and then click the .NET Framework 3.5 option in the list.
.43.44.45.46.47.48.The following message box appears to ask your confirmation. Click Yes to confirm the change.Add the code:Double click Class1.cs in the Solution Explorer window to show the code-editing window. Delete everything in this windowand then type the following C# code. To get the full experience of developing with Visual C# Express – including the use offeatures such as IntelliSense – we recommend you type the code from this guide rather than copying and pasting it. That said,if constrained for time you can also copy and paste into the Visual C# Express code window: although this reduces theexperience you gain from working with the code directly.using System;using System.Collections.Generic;using erationAttribute(RegenerationOption.Manual)]public class Lab1PlaceGroup : IExternalCommand{public Result Execute(ExternalCommandData commandData,ref string message,ElementSet elements){//Get application and document objectsUIApplication uiApp commandData.Application;Document doc uiApp.ActiveUIDocument.Document;//Define a Reference object to accept the pick result.Reference pickedRef null;//Pick a groupSelection sel uiApp.ActiveUIDocument.Selection;pickedRef sel.PickObject(ObjectType.Element, "Please select a group");Element elem pickedRef.Element;Group group elem as Group;//Pick a pointXYZ point sel.PickPoint("Please pick a point to place group");//Place the groupTransaction trans new Transaction(doc);
.PlaceGroup(point, group.GroupType);trans.Commit();return Result.Succeeded;}}Don't worry about the details of the code for now, you'll come back to this shortly in the next couple of lessons.11.Save the file:On the File menu, click Save All.12.Build the project:The code you have written is in human readable form. To make the code readable by a computer, you will need to translate itor “build” it.Inside Visual C# Express, in the Debug menu, click Build Solution to compile and build your plug-in. Build Success messageshows in status bar of the Visual C# Express window if the code is successfully built.Note: If you are working with Revit 2012 API, you will see a warning stating that 'Autodesk.Revit.DB.Reference.Element' isobsolete. At this point, don't worry about this warning. We will address what the code needs to be changed to, in Lesson 3.If you are working with Revit 2013 and higher API, you will need to replace the following line of code:Element elem pickedRef.Element;with the following:Element elem doc.GetElement(pickedRef);That’s it! You have just written your first plug-in for Autodesk Revit.Before you actually work with the plug-in in Revit, you will need to do one more step, which is to write anAddIn manifest.Writing an AddIn Manifest
An AddIn manifest is a file located in a specific location checked by Revit when the application starts. Themanifest includes information used by Revit to load and run the plug-in.1.Add the manifest code:Start Notepad.exe from the Windows Start menu. Copy and paste the following plug-in load settings to the Notepad editor.2.3.4. ?xml version "1.0" encoding "utf-8"? RevitAddIns AddIn Type "Command" Assembly Lab1PlaceGroup.dll /Assembly ClientId 502fe383-2648-4e98-adf8-5e6047f9dc34 /ClientId FullClassName Lab1PlaceGroup /FullClassName Text Lab1PlaceGroup /Text VendorId ADSK /VendorId VisibilityMode AlwaysVisible /VisibilityMode /AddIn /RevitAddIns 5.6.7.8.9.10.Depending on what version you are using you may need to change the path here to match your Lab1PlaceGroup.dll location onyour \Release\Lab1PlaceGroup.dll11. Save the file:On Notepad’s File menu, click Save. Enter MyFirstPlugin.addin in the File name box. Change Save as type to the All Filesoption (the file name is up to you; however the file extension must be “.addin”). Browse to the following subfolder, and thenclick the Save button.For Windows XP* - C:\Documents and Settings\All Users\Application Data\Autodesk\Revit\Addins\2011\For Windows Vista/Windows 7* - C:\ProgramData\Autodesk\Revit\Addins\2011\ (The ProgramData folder ishidden by default)* The path may vary depending on the flavour of Autodesk Revit you are using.
For example, here is the setting in Save As dialog in Windows 7 for Revit Architecture 2011.Let’s run the plug-in to see what it does in Revit.Running the Plug-in1.Start Autodesk Revit Architecture.2.Open the Hotel.rvt Project file.3.Load your plug-in into Revit and allow the plug-in to communicate with Revit:Inside Revit on the Add-Ins ribbon tab, click the External Tools drop-down list, then click Lab1PlaceGroup. This will start yourplug-in.4.Work with the plug-in:Move the cursor over Room1 in the Revit building model. When the cursor is hovering over the furniture group, its boundingbox should be highlighted as per the below picture, with a tooltip showing Model Groups : Model Group : Group 1. Click toselect this furniture group. (Note: when highlighted the room looks very similar to the group. Please carefully select the groupaccording to the message in the tooltip. If the room is selected, you will not see the expected result after the following step.)
5.Pick a point in another room, for example in Room 2. You should see the group copied to this location. The center ofthe new group is the point you selected.Congratulations! You have just written your first plug-in for Autodesk Revit. You will be reviewing the code indetail in Lesson 3.Before you move on to the next lessons, let us go back to some of the things we skipped over earlier, startingwith basics concept about programming, and the benefits it can bring to your day-to-day work.Additional TopicsIntroduction to ProgrammingThe C# code you have just executed to copy a group is only 30 lines long. Here you see a small amount ofcode working in a similar way to the internal Revit command, Create Similar. Software programming allowsyou to capture the logic of a particular functionality once and then reap the benefits over and over again,every time you want to perform this functionality.What is Programming?
A simple answer to this question is: Computer programming is the process of creating a sequence ofinstructions to tell the computer to do something. You can look at your program as a sequence of instructions.During the course of the upcoming lessons, you will look at the various lines and blocks of code and look atthem all in the context of being instructions for a computer.If you were to explain what computers are to a young child, you might say: a computer is a tool which followsinstructions you provide. Programming is one way of giving instructions to the computer. Internally, acomputer sees these instructions encoded as a series of numbers (also called machine code). The humanreadable instructions you saw at the beginning of this lesson is called source code and the computer convertsthese instructions to machine code which it can then read and execute. A sequence of such instructions (orcode), written to perform a specific task, is called a program and a collection of such programs and relateddata is called a software. Autodesk Revit is one such software product.Source code can be written in different languages, just as humans use different languages to communicatebetween ourselves. The language you will be using in this guide is called C# (pronounced “C-Sharp”).What is an API?API is the acronym for Application Programming Interface: the way a software programmer can communicatewith a software product. For instance, the Revit API is the way programmers can work with Revit, and itestablishes what functionality a software programmer can use within Revit. Such as the Revit API allows youto write instructions for Revit to execute one after the other.To put this slightly differently: commercial software companies, such as Autodesk, often distribute a set oflibraries which you can use in your own program to interact with a particular software product, such asAutodesk Revit, and extend its functionality. This set of libraries is known as the software product’s API.The type of program you write to interact with a software product and extend its functionality will depend uponhow the API has been designed and what has been exposed (through APIs) for you to work with.What is a Plug-in?A software plug-in is a type of program module (or file) that adds functionality to a software product, usually inthe form of a command automating a task or some customization of the product’s behavior. When you talkabout a plug-in for Revit – and you will also hear the term Add-In used for this product – we mean a modulecontaining code that makes use of the Revit API. Revit loads such plug-ins and uses them to adjust itsbehavior under certain conditions, such as when a particular command is executed by the user of the plug-in.
Lesson 2: Programming OverviewIn the previous lesson, you saw how you canincrease productivity in Autodesk Revit byimplementing a plug-in built from a small amount ofC# code.Provide Feedback: Please provide feedback about this RevitTraining or this lesson via email: myfirstplugin@autodesk.comYou have heard the term .NET from Lesson 1 withreference to programming with Revit. .NET is atechnology that enables communication betweensoftware, if you are interested in learning more, youwill find information in the Additional Topics sectionhere.You will now look more closely at what happenedwhen you built and executed the code in the previouslesson.What does it mean to “build” code?The code you typed into Visual C# Express in Lesson 1 was a set of human-readable instructions (sourcecode) that needed to be converted into code that could be understood and executed by the computer. The“build” you performed did just that: it packaged up the resulting executable code into a DLL (Dynamic-LinkLibrary) that can be loaded into Autodesk Revit.The following screenshot shows the output in DLL form along with the associated program debug database(which provides additional information when troubleshooting the DLL), once you have built the solution fromLesson 1 using Visual C# Express. The path to which the DLL gets compiled is specified in the Visual C#Express project settings and is set, by default, to the bin sub-folder of the Visual C# Express project folder.Choosing a Programming Language and Development ToolJust as humans use different languages to communicate, you have various language options available to youwhen creating a Revit plug-in: for the purposes of this guide we have chosen C#, a strong general-purposeprogramming language that is popular with Revit developers.There are a number of tools available for developing C# code. They range from open source tools such asSharpDevelop to Microsoft’s flagship, professional development environment, Visual Studio. In your case youwill be using Visual C# Express, a free version of Visual Studio focused on building C# applications.Visual C# Express is an Integrated Development Environment (IDE) because it is composed of various tools,menus and toolbars which ease the creation and management of your code.The project system in Visual C# Express comprises of Solution and Project files as well as Project Items, theindividual files belonging to projects. A solution is a container for one or more projects. Each project can inturn be considered a container for project items – such as source files, icons, etc. – most of which getcompiled into the resultant executable file (EXE or DLL). Visual C# Express provides a Solution Explorer thatorganizes and displays the contents of the loaded solution in a tree-view format:
The Visual C# Express interface also contains a text editor and interface designer. These are displayed in themain window depending on the type of file being edited. The text editor is where you will enter the C# code foryour Revit plug-in. This editor provides advanced features such as IntelliSense and collapsible code sectionsalong with the more classic text-editing features such as bookmarks and the display of line numbers.IntelliSense is an extremely valuable feature of the Visual Studio family that greatly improves programmerproductivity: it automatically provides suggestions for the code being written based on the objects availableand the letters that are being typed.
Clearly one of the key features of Visual C# Express is its ability to build C# code into an executable file.During the build process, the language compiler performs various checks and analyses on the code. Onesuch check is to ensure the code conforms to the syntactical rules of the C# language. The compiler alsoperforms various other checks, such as whether a variable has been appropriately defined or not. Detectederrors are reported via the Error List window, typically found at the bottom of the main window.
Reviewing your use of Visual C# ExpressIn this section, you will review the steps performed using Visual C# Express from the previous lesson.However, we will put them in the context of what you have just learned about programming in general andbuilding your code.1.In the first step, you simply launched Visual C# Express.2.You then created a new C# project of type Class Library.Since the development language used for this guide is C#, you are working with Visual C# Express, and therefore you seeVisual C# under Installed Templates portion of the New Project dialog.In the middle section of this dialog, you saw various types of applications that can be created; you selected the templateaccording to the type of application you wish to create.For plug-ins to load into Revit, they need to be Class Library assemblies (DLLs). It’s for this reason, in the second step, thatyou selected the Class Library template. The name you entered is used to identify the project within the solution.3.Your blank project was created, containing a few standard project references to core .NET components along with ablank C# class file. It’s this file that gets displayed in the text editor window.4.Saving the solution created physical files representing the contents of your class library project on the computer’s harddrive, allowing you to open and edit it at another time in the future.5.This blank project, as created by Visual C# Express, did not automatically make use of the Revit API. For it to do so,you added project references to the interface DLLs in Revit describing its API, RevitAPI.dll and RevitAPIUI.dll.
When using the Revit API, it is usual to add project referencesto the two separate interface DLLs making up the API: one deals withcore product functionality, the other with the product’s user interface.You must link your project to these files to be able to work with RevitAPI.RevitAPI.dll contains the APIs to access the Revitapplication, documents, elements, parameters, etc.RevitAPIUI.dll contains the APIs related tomanipulation and customization of the Revit user interface, includingcommand, selections and dialogsHaving added your project references, it’s important that you set one oftheir properties appropriately.By default, Visual C# Express adds project references with its CopyLocal property set to True. This means that the referenced DLLs willget copied to the project’s output folder when it is built. In your case youwanted to change this setting to False, to make sure the DLLs did notget copied along with your assembly DLL.To change this setting for the DLL, you selected the Revit API DLL(located under the References folder in the Solution Explorer on theright side of the Visual Studio interface) which populated the DLLreference’s properties in the Properties panel below. In this propertiespanel, you saw a property called Copy Local. You clicked on it tochange the value from True to False using the drop down list. Then yourepeated these steps for the other DLL as well.The reason for doing this is twofold: firstly, it’s unnecessary to copythese files – they consume disk space and take time to copy – but,more importantly, the Common Language Runtime CLR can getconfused about which copy of each DLL needs to be loaded if theyexist in multiple places. Making sure the DLLs do not get copied withthe project output means the CLR will correctly find the ones in theRevit folder.Next you added C# code using the Revit API into your project.In other words providing Revit with instructions on how to perform thefunctionality of copying a user-selected group from one place toanother.While developing code, it’s a good idea to build the solution from time to time, to check whether errors havebeen introduced in the code. The code does not necessarily have to be complete or functional when buildingthe solution. This approach can help avoid potentially lengthy troubleshooting once the code is complete, andhas the side benefit of automatically saving any edited source files before the build starts.To build a solution inside Visual C# Express, select Build Solution from the Debug pull-down menu.Tip: As a shortcut, you can use the Function key ‘F6’ to directly build the solution without accessing the menu.If the build process was successful, you would see a Build Succeeded status in the bottom left corner of theVisual C# Express interface.A quick recap: in this lesson you took a brief look at what happens when you build a project, as well as somebackground information on C# and Visual C# Express. You reviewed the steps you had taken in the previouslesson to build your basic Revit plug-in, putting it in the context of your learning about programming.Additional TopicsWhat is .NET?The .NET Framework is a software framework that sits on top of the Microsoft Windows operating system*and provides the underlying platform, libraries and services for all .NET applications. The services generallyinclude memory management, garbage collection, common type system, class libraries, etc.
* Subsets of .NET are also available on other operating systems, whether via the open source Mono projector via Microsoft Silverlight , but these are not topics for this guide: you will focus solely on the use of .NETin the context of Microsoft Windows.What does the .NET Framework Contain?The framework contains two main components:1.Common Language Runtime (CLR) – This is the agent (or execution engine) in the .NET Framework responsible formanaging the execution of code. Which is why code written to target this runtime is also known as managed code. All managedcode runs under the supervision of the CLR, but what does this mean? The CLR manages code by providing core servicessuch as memory management (which includes automatically releasing the computer’s memory for reuse on other tasks when itis no longer needed), error (or exception) handling, managing the use of multiple threads of execution and ensuring rulesaround the use of different types of object are adhered to. The CLR is really the foundation of the .NET Framework.2.NET Framework Class Library – As the name suggests, this is a library or collection of object types that can be usedfrom your own code when developing .NET applications. These .NET applications are targeted for Windows (whethercommand-prompt based or with a graphical user interface), the web or mobile devices. This library is available to all languagesusing the .NET Framework.As mentioned above, the CLR improves code robustness by making sure the executing code conforms to acommon type system (CTS). The CTS ensures that all .NET (or managed) code – irrespective of thelanguage – uses a similar set of object types and can work together in the same environment. It is this featurethat makes it possible for you to write applications in the development language of your choice and yet makeuse of components/code written by programmers using other .NET languages.Building ExecutablesWhen you built your code into a DLL, it is compiled to Common Intermediate Language (CIL – also known asMSIL) code using a language-specific compiler. CIL is a CPU-independent set of instructions that can beexecuted by the CLR on Windows operating systems. CIL is typically portable across 32- and 64-bit systemsand even – to some extent – to non-Windows operating systems. The CIL code generated from your C#source code is then packaged into a .NET assembly. Such an assembly is a library of CIL code stored inPortable Executable (PE) format (which contains both the CIL and its associated metadata). Assemblies caneither be process assemblies (EXEs) or library assemblies (DLLs).During the course of this guide, Revit plug-ins are compiled into library assembly files (DLLs) which are thenloaded and executed from within Revit’s memory space.Running Executables
During execution of the .NET assembly, CIL (residing in theassembly) is passed through the CLR’s just-in-time (JIT) compilerto generate native (or machine) code. JIT compilation of the CIL tonative code occurs when the application is executed. As not all ofthe code is required during execution, the JIT compiler onlyconverts the CIL when it is needed, thus saving time and memory.It also stores any generated code in memory, making it available forsubsequent use without the need to recompile.In the last step of this process, the native code gets executed bythe computer’s processor.If you would like more details on the process of building .NETapplications, please refer to the MSDN Library.
Lesson 3: A First Look at CodeIn this lesson, you will take your first close look at theAutodesk Revit API. You’ll spend time looking at theC# code you typed into your plug-in during Lesson 1,understanding each of the lines of code in turn.Provide Feedback: Please provide feedback about this RevitTraining or this lesson via email: myfirstplugin@autodesk.comAfter reviewing the code you will find more detailedinformation on what is meant by Object-OrientedProgramming and the concept of classes in theAdditional Topics section here.A Closer Look at the Lesson 1 CodeKeywordWhen you look at the code, one of the first things you’ll notice is the coloring: for readability Visual C#Express changes the color of certain words in the code. Words highlighted in blue are known as keywords,which can only be used in certain situations. You would not be able to declare a variable named using, forinstance: as it is reserved to mean something very specific.using System;using System.Collections.Generic;using mespacesThe first few lines of code start with the using keyword. When working with different library assemblies inyour C# project, it’s quite common for classes to share the same name – there might be multiple versions ofthe Point class in different libraries, for instance. To avoid naming conflicts, .NET provides you with theconcept of namespaces. A namespace is a way to organize classes by grouping them together in a logicalway and to help you identity the class you wish to use.To give you an example, let’s say there are two boys named John living in the same neighborhood. Onepossible way of uniquely identifying one of the Johns might be to use his last name. But if both Johns havethe same last name, such as Smith, this is no longer enough to uniquely identify them. You now need to usean additional identifier, such as the school at which they study. If this was put into .NET syntax, you might useSchoolA.Smith.John for one and SchoolB.Smith.John for the other.It’s in this way that you’re able to identify the use of specific classes in C#. The using keyword gives you directaccess to the classes contained in the included namespace, which saves the effort of having to enter the fullnamespace when typing the names of classes. It also causes the namespace’s various classes to be addedto the list presented by the IntelliSense feature.The using keyword is a directive telling the C# compiler to provide access to the contents of a specifiednamespace from the code in this source file.AttributesLet’s look at the following block of ]public class Lab1PlaceGroup : IExternalCommand{}We’ll start by talking about the first two lines inside the square ual)]
These two lines are attributes that help control the transaction and regeneration behavior of your command.1.Transaction Attribute – a transaction attribute declares the way the transaction should work. It could be either Manualor Automatic. Here, you have set the attribute to Manual.So what is a transaction? Transactions are objects that capture the changes to the Revit model. Changes to the Revit modelcan only be performed when there is an active transaction to do so. Transactions can either be committed – which means thattheir changes are written/recorded into the model – or rolled-back – which means their changes are undone.The value of TransactionMode.Manual for the TransactionAttribute requests that Revit not create a transaction automatically(besides the one Revit creates for any external command to help roll back any changes performed should the externalcommand fail). This setting also implies that you are responsible for creating, naming, committing or aborting your transactions.2.Regeneration Attribute – this attribute applies only to Revit 2011 products. A regeneration attribute sets the timingfor Revit to draw graphical objects to the computer screen. It could be either Manual or Automatic. Here, you set have theattribute to Manual.RegenerationOption.Manual requests that Revit not regenerate (or refresh) the model on the screen after each change made toit. Instead you tell Revit when the model needs to be drawn or regenerated during the command execution process. If you setthis as Automatic, Revit will try to draw every time something is drawn.IExternalCommandThe line after the declaration of our attributes declares the class.public class Lab1PlaceGroup : IExternalCommand{}A class can be thought of as a type that can be used to describe a representation of a thing or an individualobject. A class can be considered the template that describes the details of an object and is used to createindividual
lesson1_revit_2013_projects.zip (zip - 28884Kb) lesson1_revit_2012_and_earlier_project_files.zip (zip - 7283Kb) Steps to Create Your First Plug-in 1. Launch the Visual C# Express development environment: Open Visual C# 2010 Express using the Windows Start menu, selecting All Pro