Transcription
Draw Guide:A guide to using the Draw component of OpenOffice.orgTitle:Draw Guide: A guide to using the Draw component of OpenOffice.orgVersion:1.0First edition: October 2004
ContentsOverview. viCopyright and trademark information. viFeedback.viAcknowledgments. viModifications and updates.viIntroduction to Draw. 1The Workplace. 2The Toolbars. 3The Function Bar. 3The Object Bar.4The Main Toolbar.4The Color Bar. 5The Option Bar. 6The Rulers. 6The Status Bar. 7Drawing Basic Shapes. 8Drawing a segment of a straight line. 8Drawing a rectangle.11Drawing a circle.11The Basic Drawing Shapes.12The Texts. 12Rectangles and Squares. 14Circles, Ellipses and Arcs.143D Objects. 16Curves.17Lines and Arrows.18Connectors. 19Connector drawing basics. 19Connector toolbar. 21Draw Guidei
Editing Gluepoints.21Editing Objects Part I. 24Selection modes.24Changing the selection mode. 25Selecting Objects. 25Direct selection. 25Selection by framing. 25Selecting hidden objects. 26Arranging objects.26Selecting several objects. 26Moving and Dynamically Adjusting the Size of an Object. 27Dynamic movement of objects. 27Dynamic size modification of objects.27Rotating an Object. 28Inclination. 28Editing Object Points.29Direct operation. 29How curves work. 30The Bezier Curve Toolbar. 30The three kinds of tangent. 30Examples.31Editing Objects Part II.36Changing Object Attributes.36Changing Attributes using the Context Menu. 36The Object Toolbar.37Line type. 37Choosing line attributes from the object toolbar. 39Area Fill. 40Choosing area fill patterns from the object toolbar. 45The Text Object Edit Toolbar.45Manual Editing of Object Size and Position. 45Draw Guideii
Entering Position and Size data. 46Size Data Entry. 46Angle of Rotation Data Entry. 46Inclination Data Entry.47Using the Stylist. 48Applying a Style. 49Changing a Style.51Creating a New Style. 51Special Transformations.51Flip.523D Rotation Objects. 53Distort. 56Dynamic Transparency Gradient Definition.57Dynamic Gradient Definition. 58Managing 3D Objects and Bitmaps. 59Managing 3D Objects.59Rotating 3D objects. 593D effects.60Buttons available in pages. 60Favorites page. 60Geometry Management page. 62Shading page.65Illumination page. 67Texture Management page.68Materials Management page. 71Managing Bitmaps. 72The Bitmap Image Toolbar.72Bitmap Image Management Palette.73Combining Multiple Objects.78Grouping and Combining Objects.78Grouping Functions. 78Draw Guideiii
Group by common selection. 78Maintaining groups and group dissociation.78Editing individual objects in a group. 79Combination Functions. 80Shape Merge Functions. 81Merge. 81Subtract. 82Intersect.83Putting the Shape Merge Functions to use.84Aids for Object Positioning.85Aligning Objects.85Distribution of Objects. 87Managing Object Arrangement. 89Additional Tools. 92Drawing Aid Tools.92Choosing Scale and Managing Zoom Values.92Zoom using the status bar. 92Zoom Toolbar. 93Managing Layers. 94Placing Objects. 95The Magnetic Grid.96Capture Lines. 97Dynamic insertion of a capture line. 97Manual Insertion of a snap point or snap line.98Snapping to object border. 98Snapping to page.99Displaying guides.99Specific Functions. 100Duplication. 100Cross-Fading.101Exchanging Objects with Other Programs. 103Draw Guideiv
Reminder Concerning Image Formats. 103The Web export function. 104Draw Guidev
OverviewOverviewThis document describes how to use Draw, the vector drawing component of OpenOffice.org(OOo).Copyright and trademark informationThe contents of this Documentation are subject to the Public Documentation License,Version 1.0 (the "License"); you may only use this Documentation if you comply with theterms of this License. A copy of the License is available at:http://www.openoffice.org/licenses/PDL.rtfThe Original Documentation is Draw Guide: A guide to using the Draw component ofOpenOffice.org. The Initial Writer(s) of the Original Documentation is/are LindaWorthington 2004. All Rights Reserved. (Initial Writer contact(s):lindaw65@earthlink.net.The Initial Writer contact(s) is to report errors in the documentation. For questions regardinghow to use the software, subscribe to the Users Mail List and post your question l trademarks within this guide belong to legitimate owners.FeedbackPlease direct any comments or suggestions about this document Thanks to Daniel Carrera, Carol Leather and Jean Hollis Weber for reviewing this chapter.Original French document written by Michel Pinquier, translated to English by AlexThurgood and previous content revised by Jim TaylorModifications and updatesVersionDate1.028 November 2004Draw GuideDescription of ChangeFirst published version of complete Draw Guidevi
Introduction to DrawDraw is a vector graphics drawing tool. It offers a series of powerful tools that enable you toquickly create all sorts of graphics.It is perfectly integrated into the OpenOffice.org suite, and this makes exchanging graphicswith all modules of the suite very easy. For example, it is relatively simple to draw an imageand reuse it in the Writer and Impress modules. You can also work directly from withinWriter and Impress, using a subset of the functions and tools from the Draw module.The Draw module functionality is very extensive and complete. Even though it was notdesigned to rival high end graphics applications, it still possesses more functions than themajority of drawing tools that are integrated into office productivity suites.A few examples of drawing functions might whet your appetite: layer management, magneticgrid point system, dimensions and measurement display, connectors for making organizationcharts, 3D functions enabling small three-dimensional drawings to be created (with textureand lighting effects), drawing and page style integration, and Bezier curves, just to name afew.This document only describes the functions associated with Draw. Some notions such as filemanagement or the way the OpenOffice.org environment works are mentioned only briefly asthese are covered elsewhere in the guide.Draw Guide1
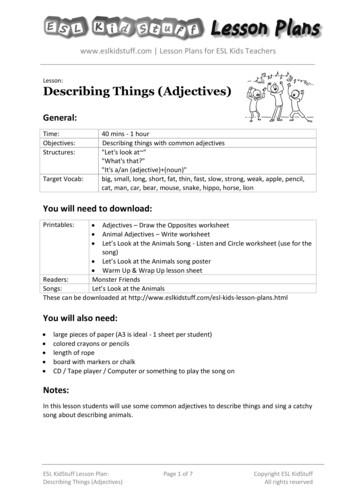
Introduction to DrawThe WorkplaceThe main components of the Draw interface have the appearance shown in Figure 1.Figure 1 - The Draw workplaceThe major area located in the center of the screen is the one in which your drawings will bemade. It is surrounded by toolbars and information areas, the number and position of whichcan vary according to the particular organization you have chosen for your workplace. Thesmall icons in each toolbar are called buttons. The picture above illustrates one of manypossibilities.Draw Guide2
Introduction to DrawThe ToolbarsThe various Draw toolbars can be displayed or hidden according to your needs. To displayor hide the toolbars, simply click on any toolbar with the right mouse button1. A menu willappear that lets you choose which of the four principal toolbars to display: the Function Bar,the Main Toolbar, the Object Bar and the Option Bar. This menu also lets you select thebuttons that you wish to appear on the corresponding toolbar. All you have to do is select theoption Visible Buttons, and then select the desired buttons for that toolbar. Each toolbar hasa different list of buttons. Two additional toolbars, plus a toolbar customizing function, areavailable from the Menu Bar by clicking View Toolbars.Many toolbar buttons are marked with a small arrow in the upper right corner of the button.The arrow indicates that this button has additional functions. If you long-click (left-click andhold), a submenu appears showing its additional functions.You may wish to keep this submenu displayed on your screen, but in a different position thanthe default location. You can make this submenu into a floating toolbar by detaching andrepositioning it. Click the submenu title bar and drag it to your desired screen location, thenrelease the mouse button. Most buttons marked with the small arrow can become floatingtoolbars. The floating toolbar capability is common to all modules of the OpenOffice.orgsuite.The tools available in the various toolbars are explained in the following paragraphs.The Function BarThe Function Bar is displayed as follows:It is the same for all of the modules of the OpenOffice.org suite and is not described in detailhere.1 All references to mouse clicks are relative to the default right-handed mouse configuration. Left-handed userscan translate the mouse clicks to their left-handed mouse configuration.Draw Guide3
Introduction to DrawThe Object BarThe Object Bar gives you a preview, and lets you modify the major characteristics of thedrawing objects that you are handling. The icons displayed will vary as a function of theobject that is selected. Sometimes more than one object bar is applicable for the selectedobject; in this case a triangle is displayed at the right end – click on this triangle to togglethrough each of the available object bars.In the example above, the available functions enable you to change the color of the linedrawn, the fill color, etc., of the object currently selected. If the selected object is text, thetoolbar will have the following appearance:The Main ToolbarThis toolbar is the most important in the Draw module. It contains all the necessaryfunctions to enable drawing of various geometric and freehand shapes and for theirorganization on the page.The toolbar is shown here horizontally, but by default it is placed vertically on the left-handside of the workspace. As for other toolbars in OpenOffice.org, the buttons having a smallrightward pointing arrow enable you to gain access to further functionality. For example, ifyou click on the icon representing a rectangle, the following window appears:It is therefore possible to choose the type of rectangle you want to draw (for example, straightor rounded, filled or empty, and so on). What's more, if you choose another option from theicon with the arrow, this new option will be displayed as the default for all followingoperations carried out using this button.Draw Guide4
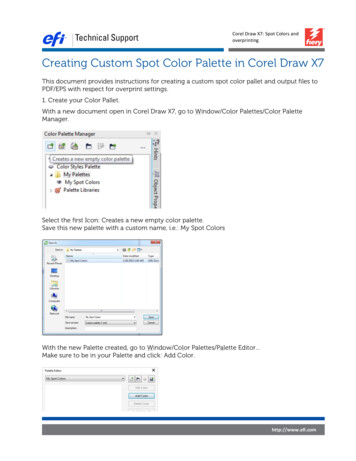
Introduction to DrawThe Color BarTo display the Color Bar, you need to use View Toolbars Color Bar. The toolbar thenappears at the bottom of the workspace.This toolbar lets you rapidly choose the color of the objects in your drawing. The first box inthe panel corresponds to transparency (no color). The color palette that is shown by defaultcan be changed via the menu Format Area as shown below. Choose the tab markedColors.If you click on the Load Color List button that is circled, the file selector asks you to choose apalette file (bearing the file extension .soc). Several palettes are supplied as standard withOpenOffice.org. For example, web.soc is a color palette that is particularly adapted tocreating drawings that are going to appear in web pages, because the colors will be correctlydisplayed on workstations with screens displaying at least 256 colors.The color selection box also lets you individually change any color by modifying thenumerical values that you can enter in the fields provided to the right of the color palette.You can also click on Edit to display a dialog box making the choice of colors easier.You can use the color schemes known as CMYK (Cyan, Magenta, Yellow, Black), RGB(Red, Green, Blue) or HSB (Hue, Saturation, Brightness).Draw Guide5
Introduction to DrawThe Option BarThis toolbar lets you activate or deactivate various mechanisms that make drawing easier. Asopposed to the other toolbars, the Option Bar isn't displayed by default. In order to display it,from the menu bar click View Toolbars Option Bar. When it is displayed, it cangenerally be found at the bottom of the screen and looks like this:The RulersOn the upper and left-hand side of the workspace, you should see the rulers. These indicatethe sizes of the objects that have been drawn. The movement of the mouse in the workspaceshows up on the rulers to help you position objects precisely.The page margins in the drawing area are also represented on the rulers. It is possible tochange the margins directly on the rulers by dragging them with the mouse.You can also directly modify the units of measurement of the rulers by clicking on one of thetwo rulers with the right mouse button:Draw Guide6
Introduction to DrawAs you can see from the illustration, the two rulers can have different units.The rulers are also used to manage handle points and capture lines that make positioningobjects easier.The Status BarThe Status Bar is located at the bottom of the screen. We shall look more closely at themiddle part of this area, since it is particularly relevant to the Draw module. The three areasof interest to us are as follows:The sizes are given in the current unit (not to be confused with the ruler units). This unit canbe defined via Tools Options Draw General. This dialog box also lets you change thescale of the page. You can also change the scale by double-clicking on the number shown inthe status bar.Draw Guide7
Drawing Basic ShapesThis chapter will teach you the basic methods for drawing simple shapes. In the remainder ofthis document, we'll use the term objects to designate the various shapes drawn (whetherthey're simple lines, rectangles or more complicated shapes). This is common notation invector drawing software.The following three sections illustrate how to draw three basic shapes: a straight line, arectangle and a circle. This illustration shows the buttons on the Main Toolbar thatcorrespond to the next three sections.Drawing a segment of a straight lineLet's get started with drawing the simplest of shapes, a segment of a straight line. To begin,click on the Lines and Arrows button on the Main Toolbar. The default line on the MainToolbar Lines and Arrows button is an arrow. To change to a line, long-click the ArrowStyle button to see a list of all the different arrow heads and tails available on line segments.Draw Guide8
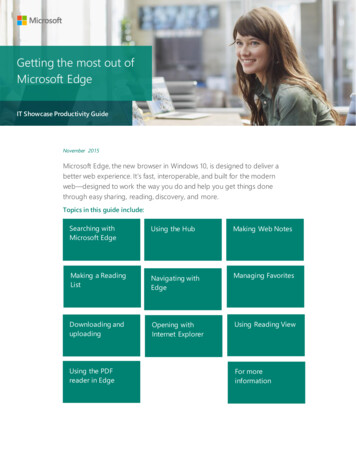
Drawing Basic ShapesTo draw a straight line segment, click the straight line button and place the mouse cursor atthe point where you wish to start drawing.Start PointDrag the mouse while keeping the button pressed down. Let go of the mouse button whenyou want to stop drawing the line. Two blue or green handle points located at each end of theline will appear, showing that this is the currently selected object. The handle colors dependon the default select mode (they will be green for simple selection and blue when in pointedit mode).While drawing the segment, if you hold down the Shift key as well, you will force the line tobe drawn at angle which is a multiple of 45 with respect to the horizontal. The star in dotsshows the angles that are permitted for the straight line when the Shift key is pressed.Draw Guide9
Drawing Basic ShapesIf you replace the Shift key with the Control key [Ctrl], the constraining angle will be 15 .You can set this angle in the Tools Options Drawing Grid dialog box.If you hold down the [Alt] key, the line will be drawn symmetrically with respect to the startpoint. This technique lets you draw straight lines by starting from the middle of the line.Note: You must press the left mouse button BEFORE you press the [Alt] key todraw your line. Pressing the [Alt] key first will cause you to move the programpanel instead of drawing a line.Start PointThe line you draw will have the default attributes (color, line type, and arrow style). You canchange the line attributes by activating (clicking) the line. Right-click and select the line, andthen make your attribute changes with the menu provided. You can reach this same dialogbox by clicking the line button on the object bar.Draw Guide10
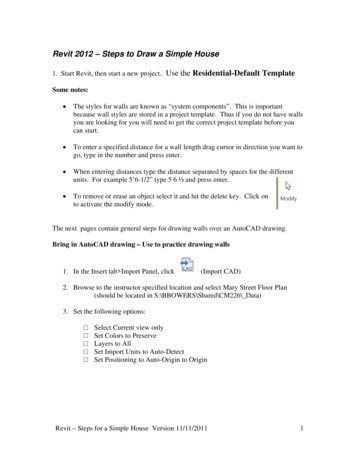
Drawing Basic ShapesDrawing a rectangleDrawing rectangles is similar to drawing straight line segments, except that you use theRectangle button from the Main Toolbar.The line drawn with the mouse shows the diagonal of the rectangle.Start PointIf you hold the [Shift] key, you will get a square and the [Alt] key enables you to draw arectangle starting from its center.Drawing a circleTo draw an ellipse or a circle, use the Ellipse button from the Main Toolbar.The ellipse or circle is defined by a rectangle that is linked to the diagonal drawn with themouse. The diameter of the ellipse or circle corresponds to the longest side of the rectangle.Start PointExtended functions shown by long-clicking the Ellipse button include circles, ellipses, ellipseand circle pies, segments, arcs, filled and non-filled closed shapes.Draw Guide11
Drawing Basic ShapesThere are three other ways to draw an ellipse or circle: Shift-circle - forces the ellipse to be a circle. Alt-circle - draws a symmetrical ellipse or circle from the center instead of draggingcorner to corner.Note: You must press the left mouse button BEFORE you press the [Alt] keyto draw your circle. Pressing the [Alt] key first will cause you to move theprogram panel instead of drawing a circle. Ctrl-circle - snaps to grid lines.The Basic Drawing ShapesThis sect
Introduction to Draw Draw is a vector graphics drawing tool. It offers a series of powerful tools that enable you to quickly create all sorts of graphics. It is perfectly integrated into the OpenOffi