Transcription
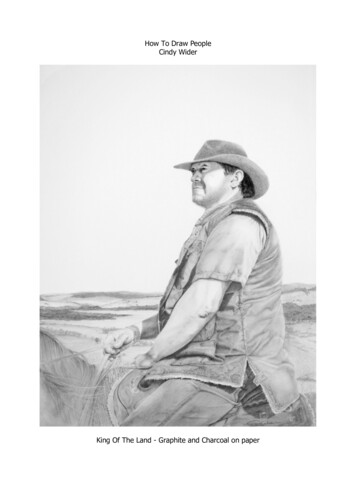
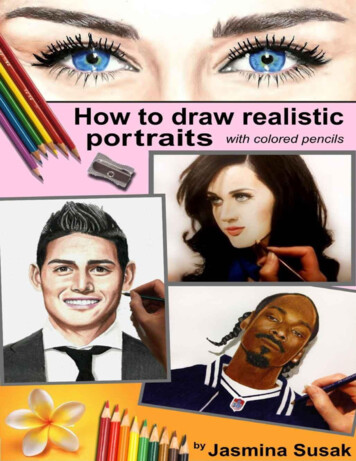
How to draw realistic portraits with colored pencilsIntroduction:In this book with 4 drawing tutorials you can find a lot of tricks and tips that you can apply to yourdrawings. The most important is to keep practicing. Drawing a realistic portraits with colored pencils isvery difficult. Some artists draw area by area, some start from the darkest parts, some from the lightestones. You have to find out what is the most appropriate for you. You should play and experiment withcolors, draw one over another and always use more pencils for the same area. I'll try to keep it simpleand helpful.We are going to draw an eyes in the shadow:To learn how to draw a tooth:To make a black skin shining:Ahashare.com
To learn how to blend colors one into another:So, let's get started:Tools:I would recommend a two types of colored pencils: for the thinner parts and hair use the harder coloredpencils such is Faber-Castell and for the skin use a soft colored pencil such is Prismacolors. It's easier ifyou use the smoothest paper. You can also use a colorless blender, but for blending the drawn areas youcan use even a white colored pencil. You don't have to get all the existing nuances of colored pencils;learn to mix them up and create a colors that you don't even have. Of course it's easier if you can afforda bigger set of pencils.In the next image I've shown you how you can get the tones of skin with drawing the colors one overanother, but of course, there are a thousands of combinations, you have to experiment with them:
Using the grid method:As a first you should always draw a sketch and make it as proportional as possible. Take time andpatience for drawing a main lines, because it is a base of your drawing. If it's difficult for you to get aproportional sketch, you can use a grid method, which many artists use. In the next image you can seehow it works, I've made one sample from my drawing. Draw a grid, with mechanical pencil using aruler, over a reference photo and draw a grid on a blank paper. Draw a main lines from the squares ofreference photo to the squares of your paper. Once you're finished with sketch, erase the grid lines.Don't press hard when drawing the grid because the grid can stay visible even after erasing.First Drawing Tutorial:A lot of you have been told me that you don't have a problems with sketch, but with shading, so I won'ttalk much about main lines. As we've already mentioned in the introduction, use a grid-method forcreating a proportional sketch:Let's start with eyes. With grey pencil draw the pupils, eyeliner and eyelashes. Leave the white color of
paper for the shining on on the pupils.If the pupils look good and on right place draw over them with black colored pencil pressing hard andgo over the same area more times. Leave untouched the white spots over the pupils. These spotsrepresent the reflections of the lights. With dark grey colored pencil draw the circles around the irisesand try to make these circles as perfect as possible. With light grey pencil draw the irises.
Now with blue and green colored pencils draw the irises over the previously drawn light grey base. Alsoleave other white spots untouched.Draw her make-up, eyeliner and eyelashes with black pencil pressing hard. Draw carefully because thecolored pencils are difficult to erase, particularly black.With dark grey pencil draw the upper eyelids and the parts of the irises directly under the false
eyelashes which create huge shadow over the eyes.With light grey pencil draw the shadow under the false eyelashes that fall over the white parts of theeyes, so called sclera.
Now it's time for the skin. For drawing the skin I'm using Prismacolor Premier colored pencils, becausethey are really soft and you can draw one color over another many times, so I can tell you exactly whichcolored pencils I used. With Dark Brown pencil draw the deep areas under the eyebrows and add SiennaBrown as you go toward the eyebrows. Try to make these colors blended into each other.
With Peach draw close to the brown areas and continue with Light Peach, which is somehow the base ofher pretty pale skin.
With Dark Brown draw her eyebrows and use Sienna Brown for the highlighted parts of the eyebrows.With the same pencils draw the nostril and the downer shape of her nose.For the lips you can use any color because she has a lipstick. You don't have to draw everything thesame as you see in the reference photo. The technique of the darker parts and the highlights is alwaysthe same no matter which color you use. Between two lips draw with Tuscan Red and the rest of the lipsdraw with red pencil.
In the next step I used a wax colorless blender from Prismacolor and I blended the two nuances sothere's no sharp edge between them anymore. Be careful if you use this tool, because it makes a drawnarea little bit darker. If you don't want it to happen, simple use white colored pencil for blending.
Draw over the highlighted areas of her lips with white colored pencil pressing hard and with brownpencil draw the shadow under the downer lip.
Under the nose draw the bigger shadow with Sienna Brown and you shouln't use a wax colorlessblender for the skin, because it doesn't look good. we'll blend it with other colors instead in thefollowing steps.
With the same pencil, Sienna Brown, draw the shadow of the hair that falls on her face. With blackcolored pencil start to draw a hair and this way to shape the face drawing around them with black.
Draw the area under her eye with Peach colored pencil and also draw the shadow of the false eyelashes.
For the shadow of the bang use more brown nuances and Peach because the light falls differentlythrough the hair. The parts when the shadow ends draw with Light Peach and draw over the wholeforehead.
We can now add some hair before we continue to draw her face so we don't have to place our hand overthe already drawn face. You can use some paper to hold your hand on that, but then also you can messup the drawn areas.
Now continue to shape her face with drawing the hair around it. If you are not sure that your main lineslook proportional, draw with grey pencils first and if everything looks good, draw with black pencilover that pressing hard.
Draw more hair on the left side and you can start to draw a hair on the right side.
Draw the hair on the right side close to the face and after drawing with black colored pencil you addsome brown or dark red. Also draw the highlights of the hair with white or light grey colored pencils tomake a hair shine.
Now with Peach colored pencil draw the area under her cheek. Next to the hair draw with brown pencil,but only a thin line.
Now draw the side of the nose and the skin between the eyebrows with Peach colored pencil. Also drawall the parts of the skin that get less light with this pencil. Peach is the darker nuance of Light Peach,logically, so you can use these two pencils to create a pale skin simplest way.
Now, when you have drawn all the areas that are little bit darker than the color of skin, draw with LightPeach starting from the forehead and draw all over the face going over the edges of the previouslydrawn areas to make the edges between these two nuances invisible. You should make a little circleswith your hand when you draw, so you can get a smoother surface and the lines of the pencil won't bethat visible.
Leave the top of the nose and cheek untouched for now. These areas are actually absolute white whenthe skin is pale.
If you have exaggerated with Light Peach, don't worry. You can always go over that with white coloredpencil. Also with white pencil draw over the edges between previously drawn Light Peach and whiteareas. Under the chin draw with black and Dark Brown colored pencils.
The rest of the neck draw with Peach colored pencil.
You can see time lapse of this drawing here:https://www.youtube.com/watch?v ZDza06kTuMM* * *Second drawing tutorial:You main lines should look like mine that you can see in the next image. Make them as proportional aspossible and use a grid if it's difficult with the naked eye. For some artists it's enough to use only a fewlines in their grid.
Let's start from the eyes. With black colored pencil draw the pupils and press hard to achieve anabsolute black color.
With darkest brown draw around the irises and under the eyelids. The rest of the irises draw with brownpencil. I'm using to draw a white shining over the pupils with white ink pen, which is very useful, but ifyou don't have one, leave these parts untouched and draw around them with black colored pencil. Withblack pencil draw eyelashes.
Now with Dark brown and Tuscan Red Prismacolor colored pencils draw the darkest parts of the skin.Draw the one over another as you can see in the next image.
With Light Peach draw the rest of the face and the parts between brown and light peach blend withPeach colored pencil. When draw the highlights of the face, such as the top of the nose, forehead,cheeks, press lightly with Light Peach and go over these areas with white colored pencil. This way theseareas will be lighter than the rest of the face.
In the previous image I didn't draw the whole face, but I draw with white colored pencils over thehighlighted areas. In the next image you can see the whole face drawn that way. You can always go overthe drawn areas with white or even dark brown pencil if needed. You can draw with Pink colored pencilbarely touching the paper and this way make it more realistic.
Now let's draw the hair. with black colored pencil draw the whole hair except the hair that shines.
With dark and light grey pencils draw the parts that are left from the previous step.
For the lips use Blush Pink and go over it with white colored pencil on the highlighted areas. Amongthe tooth draw tiny lines with light grey pencil and use the dark grey pencil for the shadow under theupper lip.
Draw the neck with Sienna Brown, Peach and Light Peach colored pencils. Also you can go over themwith Pink not pressing hard and finally blend these colors with white colored pencil.
You can draw a clothes like me in the next image or choose some white club dress which is moresimpler.
You can see me in action drawing this here:https://www.youtube.com/watch?v 2EoTO-4zKig* * *
Third drawing tutorial:Now we are going to draw a black skin and I think this is much more difficult and sensitive. Also thedarker pencils are more difficult to erase, so if we make some mistake or the drawing doesn't lookproportional we have to draw a new drawing. so make your sketch as proportional as possible. Taketime for that and don't hurry. So, if you have drawn a sketch try to start with eyes like me (you can see itin the next image). if the eyes look good and proportional the rest of the face doesn't have to have such astrict lines and proportions and this is particularly important when you draw a celebrities, becauseeveryone knows how they look.Start with the pupils and irises which are all black in this case. Make a little shining on them; leavewhite spots on them. With Chocolate Prismacolor colored pencil draw around the eyes and barely touchthe paper on the highlighted parts that are shining. Go over this with Tuscan Red, but don't press hard.You should always use more colors for the same area. It's good if you even go over with brown and pinkpencil. Try to experiment with this colors.Continue the same with around right eye.
Now, these eyes look pretty good for now, but eventually mistakes and Unproportionality can be seenonly when the whole face and hair are finished. As a next step draw the hair with black colored penciland with light grey pencil draw the shining of the hair.
With black pencil draw the eyebrows, mustache and beard. With Chocolate colored pencil continue todraw a skin next to the hair. On the left side of his face draw with white colored pencil over the drawnbrown areas. This way it will get a round shape because the light falls on the sides of his face.
Draw his forehead and also draw with white colored pencils over the brown on the highlighted parts.
Continue with the same pencils, Chocolate, over that little bit Tuscan Red and on the highlighted areasgo over with white colored pencil.
The right side of his face also draw with Chocolate Prismacolor, go over that with Tuscan Red andfinally white the edge of the face with white pencil.
With the same pencils draw his mouth. You can add some pink color over that. Draw the downer part ofthe face with the same colored pencils. As you can see in the image below, for me is also difficult toachieve a smooth texture of the skin, only if you look at it from far away you won't notice the lines.That's why we have to draw with these pencils over and over many times. If you use a wax colorlessblender, the skin will become darker, that's why I wouldn't recommend it, but you can give it a try.Actually this wax colorless blender would be perfect and wonderful for blending the skin, but it alsomake a drawn areas clumped. I rather use white, Light Peach and Pink Rose for blending the skin.
Draw his neck with the same pencils.
I added some shadow behind him with grey colored pencil, so it can look more life like.
Finally draw some clothes.
Take a look at the time lapse of this drawing here:https://www.youtube.com/watch?v ebrQM0LW53k* * *Fourth drawing tutorial:Let's make just one quick reminder about what we've learned here. draw the eyes first. Draw aroundthem with Light Peach Prismacolor colored pencil.
I've made one close-up scan so you can see the details of the eyes. I drew the eyelashes and pupils withabsolute black. I left more white spot for shining. Under the eyelashes I drew the iris with dark bluecolored pencil and the parts of the iris that is not in the shadow I drew with light blue
Drawing a realistic portraits with colored pencils is very difficult. Some artists draw area by area, some start from the darkest parts, some from the lightest ones. You have to find out what is the most appropriate for you. You should play and experiment with colors, draw one over another and always use more pencils for the same area. I'll try to keep it simple and helpful. We are going to .