Transcription
Fundamentals ofC# Programmingfor Information SystemsGeorge C. PhilipThe University of Wisconsin OshkoshUpdates for Visual Studio 2019 UsersIncluding the Preface, Chapter 1 (Sections 1.1–1.3), and Chapter 15 (Section 15.1)Contributions by Dr. Jakob IversenThe University of Wisconsin Oshkosh
PrefaceMission of the TextWelcome to Fundamentals of C# Programming for Information Systems. This book teaches thefundamentals of programming in C# to provide a solid foundation to build business and other real-worldapplications. Programming concepts are discussed in the context of familiar practical applications that usegraphical interfaces.New to This EditionA key goal of the new edition was to add significant content so that the book could be used in a twocourse sequence in programming. Four new chapters have been added: Two chapters that provide acomprehensive introduction to web applications development, and two other chapters on the concepts andpractice of object-oriented programming, including inheritance.Several other updates were made based on feedback from instructors: a second set of three comprehensiveassignments (in Chapters 3, 8, and 12), additional end-of-chapter exercises, and learning objectives foreach chapter.Target AudienceThis book is designed for introductory programming courses in IS/MIS, CIS and IT. This book alsowould fit into a computer science curriculum with an introductory course that uses a GUI-basedapplication-oriented approach to teach programming concepts. The breadth and depth of coverage makethis book suitable for a two-course sequence, particularly when students come to the first course with noprogramming background and a slower pace is desired. An approach in a two-course sequence would beto do in-depth coverage of topics like collections, databases, object-oriented programming, webdevelopment, and others presented in later chapters only in the second course.Key FeaturesA key feature of the book is that programming concepts are introduced in small chunks through examplesand illustrations accompanied by hands-on tutorials. The tutorials, which are interspersed with theconcepts, help students apply and explore what they learn immediately. Additionally, review questionsand exercises within the chapters enhance student interest and learning.Although the book is written for beginners, it is thorough and concise. Graphical illustrations andscreenshots are used throughout the book to enhance learning for both beginners and experiencedstudents.Windows forms are used from the beginning to provide GUI-based as opposed to console-based interface.Graphical user interfaces and code are built in the .Net environment using Visual Studio.SupplementsFor Students: Tutorial Starts.zip file that containsooPartially completed projects for tutorialsData files/databases used in projects
You may download the Tutorial Starts.zip file programming/student-resources/For Instructors: Instructor resources includeoooooCompleted tutorialsPowerPoint slides for all chaptersTest bankPartially completed projects for tutorialsData files/databases used in projectsTo access instructor resources, please complete the request form /instructors-material/Installing Visual StudioYou are encouraged to use the free version, Visual Studio Community 2019 or Visual Studio Community2017. The 2015 version generally works well, except that you won’t be able to run a few programs thatuse certain features available only in C# version 7.1 or greater. The instructions given in this textbook onusing Visual Studio are based on VS Community 2017. Sections 1.1–1.3 of Chapter 1 include instructionsand windows that are updated for VS Community 2019.You may download Visual Studio Community from the following website:https://www.visualstudio.com/downloads/To install Visual Studio, open the downloaded .exe file and run it.Overview of the Content and OrganizationEvery possible sequence of topics seems to put constraints on the quality of illustrative examples andapplications that can be used in a chapter. The organization of chapters in this book attempts to minimizesuch problems and to enhance the ability to build on prior chapters. However, except for the foundationalChapters 1–5, there is significant flexibility in choosing specific topics and the depth of coverage. Assuggested by the dependencies summarized below, there is some flexibility in the sequencing too.Chapters 1–5 cover the Visual Studio environment and introductory programming concepts, includingmethods. These chapters, which provide the foundational knowledge, should be covered in sequencebefore other chapters, though certain topics like working with dates and times (Section 2.4) may bepostponed or skipped.Chapter 6 presents the application of the GUI controls ScrollBars, RadioButtons, CheckBoxes,ComboBoxes and ListBoxes.Chapter 7 provides a detailed presentation of one-dimensional arrays, and Chapter 8 presents accessingsequential files and using arrays in combination with files. Chapter 6 is not a prerequisite for Chapters 7or 8. GUI is presented early on in Chapter 6 to motivate students with more interesting graphicalinterfaces. It should be noted that the comprehensive assignment (Assignment 2) specified at the end ofChapter 8 requires the use of several GUI controls.Chapter 9 introduces collections, and discusses the List and Dictionary collections in more detail. Chapter8 (“Sequential Files and Arrays”) is a prerequisite for this chapter. Because of the close relationship
between collections and arrays, collections are presented in this book immediately following Chapter 8 onarrays.Chapter 10 discusses the application of ListView and TabControl. The dependency of this chapter onChapter 9 (“Collections”) is very low. The prerequisite for this chapter includes Chapters 6 and 8.Chapter 11 presents multiform applications, Menus and ToolStrips. This chapter has some dependency onprevious chapters, except Chapter 10.Chapter 12 provides in-depth coverage of accessing databases from C# programs. Chapter 6 is aprerequisite for this chapter. In addition, the ListView control presented in Chapter 10 is used in anexample in the last part of this chapter, and it is required in the third comprehensive assignment(Assignment 3) at the end of this chapter. Assignment 3 also requires the use of MainMenu controldiscussed in Chapter 11. Other than that, the dependence of Chapter 12 on Chapters 7–11 is relativelylow.Chapter 13 provides an introduction to object-oriented programming (OOP) principles and techniques.The initial part of this chapter may be used for an introduction to OOP early in the semester.Chapter 14 describes the concept of inheritance, implementation of inheritance, subclasses and superclasses, overriding methods and polymorphism. Chapter 13 is a prerequisite for this chapter, and it alsorelies on collections from Chapter 9.Chapter 15 presents the concepts of web applications development, and develops simple web applicationsusing the ASP.Net platform in the Visual Studio environment. Only the basic programming knowledgepresented in Chapters 1–3 is required for this chapter.Chapter 16 describes how to access SQL Server databases and develop multipage web projects. Basicprogramming concepts presented in Chapters 1–6, the concept of collections from Chapter 9, and basicdatabase concepts including binding controls to a database and filtering records (Chapter 12) are used inbuilding the application.
AcknowledgmentsI am thankful for the valuable assistance provided by many people in the preparation of this book. I wishto thank Dr. Jakob Iversen, The University of Wisconsin–Oshkosh, for authoring Chapters 13 and 14 onObject-Oriented Programming.I was fortunate to work with Beth Lang Golub, editor and president of Prospect Press, who was flexibleand supportive of my goal to offer a good quality programming textbook at a reasonable price. Specialthanks go to Susan Hegedus, Kathy Bond Borie and Rachel Paul for their painstaking attention to detail inediting this book, and to Annie Clark for the cover design.I wish to acknowledge the contributions of the following reviewers for their valuable guidance inimproving the presentation and contents of this book:Janet Bailey, University of Arkansas at Little RockWei Kian Chen, Champlain CollegeClinton Daniel, University of South FloridaSilvana Faja, University of Central MissouriJoni L. Jones, University of South FloridaDavid Pumphrey, Colorado Mesa UniversityManonita M. Ratwatte, University of Oklahoma (Retired)Theadora Ross, University of Arkansas at Little RockDavid M. Weber, Northern Arizona UniversityThanks are also due to the instructors who provided valuable feedback on the first edition of this bookthrough user surveys:Janet Bailey, University of Arkansas, Little RockJeff Dickson, Oregon Institute of TechnologyRuth Lamprecht, Virginia Union UniversityPanos Linos, Butler UniversityZiping Liu, Southeast Missouri State UniversityRobert Pilgrim, Murray State UniversityKris Rosenberg, Oregon Institute of TechnologyDoug Titus, University of North FloridaAbout the AuthorDr. George Philip is Professor Emeritus of Information Systems at the College of Business, TheUniversity of Wisconsin–Oshkosh. He has more than twenty-five years of teaching and consultingexperience in the information systems field, including computer programming in multiple languages. Healso served as chair of the Information Systems Team, and director of the M.S. in Information Systemsprogram. He has published numerous articles in this field.
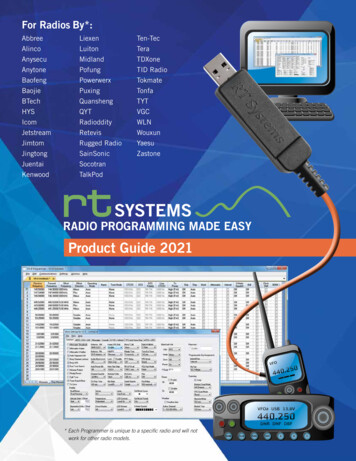
Chapter 1Introduction to Visual Studio and ProgrammingWelcome to programming in the C# language. In this chapter, you will learn to develop simple programsin the Visual Studio development environment, and to work with different types of data.Learning ObjectivesAfter studying this chapter, you should be able to: Identify the inputs, processes and outputs of a software system.Describe the steps involved in developing a computer program.Describe the terms: syntax, logic and runtime errors, machine language, low-level language, highlevel language, compiler and interpreter.Develop a simple form in Visual Studio to accept user input, do calculations and displayformatted output.Work with Label, TextBox, Button, ListBox and MessageBox.Develop simple programs that use constants, variables and expressions.Use the try-catch method to catch errors.Topics1.11.21.31.41.51.61.7Introduction to ProgrammingIntroduction to Visual StudioVisual Studio EnvironmentAdding Controls to a FormThe Code Editor WindowIntroductory Programming ConceptsData Types1.81.91.101.111.12Working with VariablesDoing CalculationsFormatting and Displaying Output in a LabelAdditional Concepts: Constants, Scope ofVariables and ListBoxException Handling: Catching Errors1.1 Introduction to ProgrammingProgramming is the process of developing computer programs. If a computer program seems like amystery to you, it is just a set of instructions telling the computer how to do a task, like looking up theprice of an item or finding the Chinese restaurants in a city.Unfortunately, computers cannot understand normal English. So, programs have to be written usingspecial commands and statements according to strict rules. A key aspect of programming is breakingdown what you want the computer to do, into detailed instructions. Like the directions that a GPS givesyou to get to a place, the instructions in a program need to be precise.Typically, a program uses one or more data items to produce some results. For example, a program thatprocesses an order might use the item number and order quantity to compute the subtotal, sales tax andtotal cost, as represented in Figure 1-1.
Figure 1-1: Inputs, process and outputs of a programItem#QuantityProcessOrderSubtotalSales taxTotal costThe program, represented by the block “Process Order,” may include multiple subtasks like look up theunit price, check inventory and compute results.The data that are used by a program are called the input to the program, and the results produced arecalled the output of the program. In addition to processing input data to produce the output, a programmight write data to and read data from storage devices like a flash drive or a hard drive, as represented inFigure 1-2.Figure 1-2: A general representation of a software systemInputProcessOutputStorageHow Do I Go About Developing a Program?To understand the process of developing a program, let’s use a simplified order-processing system as anexample. To develop good programs and do so efficiently, follow these steps:1. Define the purpose, and identify the input, process and output of the program.2. Design and develop the graphical user interface (GUI).3. Identify the components and logic of the program.4. Design and develop files/databases, if any.5. Write and test the code.Let’s look at these steps in more detail.1. Define the purpose, and identify input/process/outputBefore you can write the program, you need to lay some groundwork. In this step, you identify what theuser wants the program to do, including the input, process and output of the program.Depending on the size and complexity of the program, this could involve extensive analysis of therequirements, including interviews with users; examination of current forms, reports and transactions; andidentifying processes like checking inventory and looking up price in an order.Here is an example of a simplified statement of the purpose of the order processing program:Purpose:Compute and display the subtotal, sales tax and total cost for an orderThe output of the program often follows from the purpose. For this example, the output would beOutput:subtotal, sales tax, total cost
The process specifies not only what the program should do (e.g., compute total cost) but also how itshould be done (e.g., how to compute total cost), as follows:Process: (What?)(How?)Look up unit price, look up sales tax rate,compute subtotal, sales tax and total costsubtotal: unit price * order quantitysales tax: subtotal * sales tax ratetotal cost: subtotal sales taxSpecifying the process also would include identifying the sources of data, like the product file to get theunit price and sales tax file to get the sales tax rate.The input specifies the data items that are needed to carry out the process to produce the output. Theinput for this order-processing system would beInput:item number, order quantityNote that unit price and sales tax rate are not included in the input because the program looks them up. Areal-world system would be a lot more complex. Typically, the process would include additional subtaskslike handling orders when inventory is insufficient, and output may include various reports. In suchsystems, graphical methods like Data Flow Diagrams and UML diagrams are used to represent theprocesses and the data accessed by them.2. Design and develop the graphical user interface (GUI)After identifying the input, process and output of a program, you design and create the user interface—that is, how the user would interact with the program, and how the program would communicate with theuser. This is the fun part where you bring in your creativity.Typically, you use forms to interact with the program. As you will learn in the next section, forms havevarious types of objects, called controls, such as Button, TextBox and Label. In this step, you identify thetype of controls to be used, specify their names and captions as appropriate, and design the layout. Figure1-3 shows an example of the GUI for a simplified order-processing system where the user doesn’t providethe unit price and sales tax rate.Figure 1-3: GUI for an order-processing system3. Identify the components and logic of the programThis step identifies the major subtasks of the program. For example, in order to process an order, theprogram needs to do the following subtasks:
Get Item# and quantityLook up unit price and tax rateCompute subtotal, sales tax and total costDisplay subtotal, sales tax and total costAgain, a real-world program may have to do additional subtasks, like checking the inventory to make surethere is sufficient quantity on stock.For relatively simpler programs, after identifying the subtasks, you may go directly to writing theprogram for each subtask. However, for tasks involving more complex logic, it might help to develop anoutline of the logic of performing the subtasks. The representation of the logic of a program in plainEnglish is called pseudo code. You also may represent the logic graphically using a flowchart, asdiscussed in Chapter 3.4. Design and develop files/databasesIf data is read from or written to files and/or databases, these are designed and developed prior to writingthe program. Depending on the application, this step may have to be done in parallel with previous steps.5. Write and test the codeThe final step is to write and test the code. You can program in a variety of languages. C#, Java, VisualBasic, Python and PHP are among the popular languages. You will use C#, which is a popular languagefor developing desktop and web applications.Programing may involve iteratively developing an application by going through the above steps multipletimes.Syntax, Logic and Runtime ErrorsThe programming statements you write have to follow strict rules of the language, called the syntax. Theprogram wouldn’t compile if it had any syntax error, like a missing semicolon at the end of a statementor a misspelled key word. Compiling is the process of translating the program you write, called thesource code, to another language before running a program, as described in the next section. So, yourfirst task is to make sure that there are no syntax errors. The good news is that Visual Studio provides alot of help in identifying syntax errors.After the syntax errors are eliminated, the program may run. But, it’s still too early to celebrate becausethe results could be incorrect due to errors in the program logic, just like you can write a grammaticallycorrect sentence that doesn’t convey the intended message. Errors that cause a program to produceincorrect or unintended results are called logic errors. A tax-filing software using the wrong tax rate anda billing software overcharging a customer are examples of logic errors.There are errors other than logic errors that can occur at runtime. These are called runtime errors.Runtime errors cause the program to crash (unless the program catches and handles such errors) becausethe program asks the computer to do something it is unable to do, like accessing a file with an invalid pathor dividing a number by zero.The process of identifying errors (bugs) is called debugging. Testing programs to identify and eliminateerrors is an extremely important part of developing software.
Review Questions1.1Consider Google as a software system. What would be the input, process and output for Google?1.2Consider a software system that enrolls students into classes. Identify some key inputs that thesystem needs every time a student enrolls in a class, and the subtasks (process) that need to beperformed. What are some outputs the system should produce for students and instructors?1.3List the major steps in developing a program.1.4Incorrect punctuation in a program is an example of what type of error?1.5A payroll program uses the wrong formula to compute overtime pay. What type of error is it?1.6True or false: A program that doesn’t have any syntax errors should produce the correct results.1.2 Introduction to Visual StudioIn this section, you will learn how to use Visual Studio (VS) to create the user interface and write C#programs. Visual Studio is an integrated development environment (IDE) for developing applications in avariety of languages, including C#, Visual Basic, C , Python and HTML/JavaScript. VS supportsdevelopment of desktop and web applications for Windows, Android and iOS. A major strength of VisualStudio is that it provides a user-friendly environment for developing applications.Installing Visual StudioYou are encouraged to use the free version, Visual Studio Community 2019 or Visual Studio Community2017. The 2015 version generally works well, except that you won’t be able to run a few programs thatuse certain features available only in C# version 7.1 or greater. The instructions given in this textbook onusing Visual Studio are based on VS Community 2017. This document gives the updated instructions forVS Community 2019. Please note that windows that are different only in appearance, not in content, arenot updated.You may download Visual Studio Community from the following website:https://www.visualstudio.com/downloads/To install Visual Studio, open the downloaded .exe file and run it.Components of Visual StudioThough you have the choice to write programs in a variety of languages, the CPU can understand onlyMachine Language, which is extremely difficult for humans to understand. Machine Language requiresdetailed instructions that consist of patterns of bits (0 and 1), like 10001010, and are dependent on themachine (the specific type of computer). Because of the need to write detailed machine-dependentinstructions, Machine Language is called a low-level language.Except in special cases, programs are written in high-level languages, like C#, which require fewerstatements, are less dependent on the hardware and are easier to understand because they use words ratherthan patterns of bits.Programs written in high-level languages are translated to Machine Language before they are run.Different languages use different methods to translate and run programs. Many languages use a specialsoftware called a compiler to translate the source code to Machine Language. The compiler typically
produces a separate executable Machine Language program that can be run any number of times withouthaving to compile every time it is run.Some programming languages use an interpreter that translates each statement to Machine Languageand runs it without producing an executable program. So, every time the program is run, it needs to betranslated to Machine Language.Visual Studio uses a compiler, but it translates the source code to an intermediate language, which istranslated to Machine Language and run using another software, as described later in this section. Thus,Visual Studio translates your statements to Machine Language in two steps:First, a compiler converts the source code into a language called Microsoft Intermediate Language (IL).The compiled code, along with references to prebuilt programs (called classes), is stored in an executablefile called Microsoft Intermediate Language (IL) Assembly. Such files have the extension .exe or .dll.Next, another software called Common Language Runtime (CLR) translates the assemblies fromIntermediate Language to Machine Language and executes the programs. The process of translating andrunning the source code may be represented as follows:C# projectCompilerIntermediate Language (IL)AssemblyCLROutputThe products that support developing and running programs within the Visual Studio family include thefollowing:1. An Integrated Development Environment (IDE)An IDE provides an environment to develop programs, which includes code editors for VisualC#, Visual Basic, Visual J#, Visual C , HTML and XML, and designers for Windows formsand web forms.In Visual Studio, a software application typically is organized into Projects that may contain oneor more forms.Forms provide the user interface that allows users to input data for the program, to interact withthe program and to display results.2. A compiler that translates the source code into Microsoft Intermediate Language (MSIL)3. .Net Framework, which includesa. the Common Language Runtime (CLR) that translates the assemblies from IntermediateLanguage to Machine Language and executes the programs, andb. .Net Framework Class Library that includes a large number of prebuilt programs calledclasses.Running a program, as described earlier, consists of (1) the compiler translating the source code (theproject) into Microsoft Intermediate Language Assembly and (2) the Common Language Runtimetranslating the assemblies from Intermediate Language to Machine Language and executing the programto produce the output. Next, we will look at how to work with Visual Studio to develop C# programs.Review Questions1.7What is the only programming language that the CPU can understand?
1.8What is a compiler?1.9What is an interpreter?1.10What is Microsoft Intermediate Language Assembly?1.11What is the function of Common Language Runtime in Visual Studio?Creating an Application in Visual StudioTo become familiar with the Visual Studio environment, let’s create an application for an ice creamparlor, consisting of a simple Windows form to compute and display the cost for an order of ice cream.We will follow the five steps identified earlier to develop it:1. Define the purposePurpose:Input:Process:Output:Compute and display the total cost for an order of ice creamUnit price, number of scoopsCompute total costTotal cost: unit price * number of scoopsTotal cost2. Design and develop the Graphical User Interface (GUI)Figure 1-4 presents the design of the form that shows the user interface to let the user enter the number ofscoops and unit price to display the cost. You will create the form in Tutorial 1.Figure 1-4: Windows form to compute ice cream cost3. Identify the components and logic of the programThe major subtasks includeGet number of scoops and unit priceCompute costDisplay cost4. Design and develop files/databasesThis application doesn’t involve the use of files or databases.
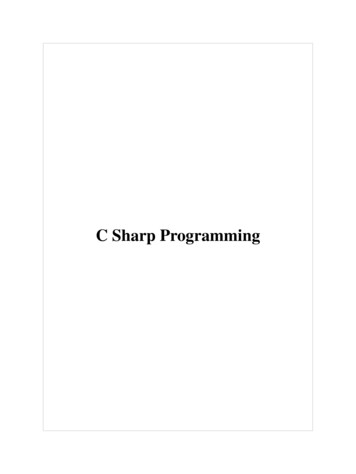
5. Write and test the codeTo understand the process of developing the entire application, including the code, let’s create the formpresented in step 2 and write the code for the tasks identified in step 3.Creating a Windows FormIn Visual Studio, forms are created within a Project. Typically, all forms within a Project relate to acommon task. Creating a project also creates a Solution, which is a container for one or more projects.Each project we discuss in this book is in a separate solution that has the same name as the project.Tutorial 1 creates the project and the form to compute the cost of an order of ice cream.Tutorial 1: Creating a Form: Ice Cream CostStep 1-1: Open Visual Studio Community. You will see a start page that resembles the one in Figure 1-5,except that the list of recently opened projects will be different.Figure 1-5: Visual Studio start pageStep 1-2: Create a new project.Click Create a new project on the start page. You will see the Create a new project window thatdisplays a list of available project templates on the right side of the window. To narrow down thelist, type WinForms in the search box and select C# for language type, as shown in Figure 1-6.
Figure 1-6: Create a New Project windowSelect Windows Forms App (.NET Framework).Click Next. You will see the Configure your new project window, shown in Figure 1-7.Figure 1-7: Configure your new project windowStep 1-3: Configure the projectFor Project name, enter Ch1 IntroProgramming.
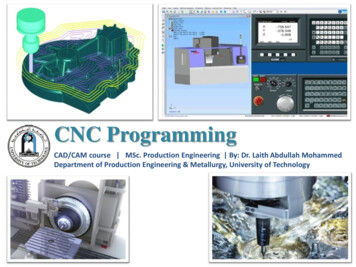
Select the Location where you want to store the project. The instructions in this book assume thatyour project folder is C:\VC.Check the CheckBox for Place solution and project in the same directory, so that both the Projectand the Solution will be created in the same folder (If there are multiple Projects within aSolution, it would be better to have separate directories for the Solution and Projects.) Note thatthe default name for the Solution is the same as that of the Project.).Click Next. You will see the Additional information window, as shown in Figure 1-8Figure 1-8: Additional information windowClick Create. The Visual Studio development environment appears, as shown in Figure 1-9,except that the Toolbox and Properties windows may not be open.1.3 Visual Studio EnvironmentThis section introduces the various windows and the environment within Visual Studio.Figure 1-9 shows the default form named Form1 in the Designer window, the Toolbox on the left, andthe Solution Explorer window and the Properties window on the right.
Figure 1-9: Visual Studio environmentThe appearance of the form will vary with the version of Visual Studio and Windows you use.The Designer window allows you to create the user interface by adding controls to a form.The Toolbox contains the components to build the user interface. The items within the Toolbox (e.g.,ComboBox, TextBox and Label) are called controls. If the Toolbox is not open, select View Toolboxfrom the menu.The Solution Explorer window shows the name of the Solution, which is a container of projects; thename of the project (or projects, if there are multiple projects); and the names of the files within eachproject. If the name of the Solution is not displayed, selectTools, Options, Projects and Solutions, General and check Always Show SolutionThe Properties window displays and lets you set the properties of the currently selected object in theDesigner window. For example, the Name field in the Properties window shows that the name of the formis Form1. If the Properties window is not open, select View Properties Window.A brief description of each property is displayed at the bottom of the properties window when you clickon the property, as shown in Figure 1-10. Make sure you expand the description area to make thedescription visible. If the description is not displayed, right click the property and check Description.
Figure 1-10: Description of propertiesDisplaying a closed windowIf any window is not displayed, select View from the menu, and select the corresponding window.Changing the docking position of a windowYou may change the docking position of a window, such as the Prop
1.2 Introduction to Visual Studio 1.9 Doing Calculations 1.3 Visual Studio Environment 1.10 Formatting and Displaying Output in a Label 1.4 Adding Controls to a Form 1.11 Additional Concepts: Constants,