Transcription
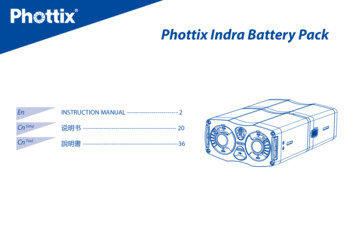
EnINSTRUCTION MANUALPhottix Indra Battery PackEnINSTRUCTION MANUAL ------------------------- 2Cn Simp说明书 ---------------------------------------------- 20Cn說明書 rad1
Thank you for purchasing a Phottixproduct:Note: Before using the Phottix Indra Battery Pack,please read this instruction manual carefully.The Phottix Indra Battery Pack is a professional powersupply for flashes with an external power port. Withthe Phottix Indra Battery Pack flash recycling times canbe reduced to 1/4th of the time needed when usinginternal batteries, allowing you to shoot faster and missfewer shots. When used, for example, with the PhottixMitros TTL Transceiver Flash for Canon, the PhottixIndra Battery Pack can provide eight times as manyflashes compared with the internal batteries. Reliableand durable, it is equipped with both overcharge andover-discharge protection systems to help extend thebattery life. With the removable backup Li-ion cell, itpromises great power performance.2For your safety The AC Charging Unit and the Indra BatteryPack contains high voltage electronic parts.Do not disassemble or attempt to repair them.Keep this product out of the reach of children. Do not touch the metal parts of the ACcharging unit. The Li-ion cell has a lifespan based onuse. When the Indra Li-ion cell is no longerfunctional contact local authorities for properdisposal and replace the cell with a new one. Never use this product near combustiblegases, solvents or in an environment with ahigh electrical charge. Make sure all plugs and cables are wellconnected during charging and use.
En Faulty electrical contacts or short circuitsmay cause the Battery Pack to overheat. If thishappens turn off the Battery Pack immediatelyand all disconnect devices. Do not expose the Li-ion cell to hightemperatures over 45 C (e.g. left in a car trunk). This product is not waterproof. Keep awayfrom rain, snow and high humidity conditions. Do not clean either the Battery Pack body orany accessories with organic solvent or alcoholbased liquid. Use only a Phottix Indra original Li-ion cell.Third party cells could cause damage to theunit. The fast recycle times made possible whenusing the Phottix Indra Battery Pack couldINSTRUCTION MANUALdamage your flash if continuously shootingat high power settings. Some flashes haveoverheating protection settings, some do not.Consult your flash manual and use cautiously. If the Battery Pack voltage is very low therewill be no output. Charge the Battery Packbefore use. When powering flashes or other products, itis normal for the Phottix Indra Battery Pack tobecome hot. Do not touch the metal contacts on theBattery Pack or the cell with metal objects. Charge the Battery Pack regularly to extendthe battery life time. Use caution in touching the casing after use.It may still be hot and could cause burns.3
Consult local authorities on the proper disposalor recycling of a Phottix Indra Battery Pack.4
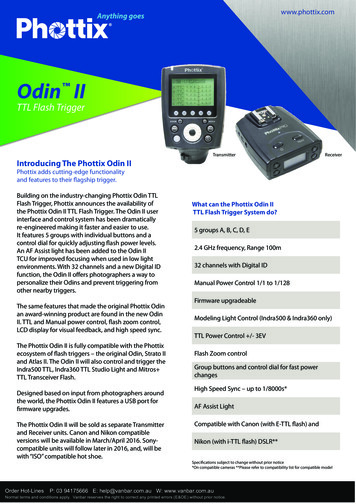
EnINSTRUCTION MANUALPartsBattery Pack1. Output Port 12. Output Port 23. USB Output Port4. Output Toggle Switch5. Output Indicator6. Battery Level Indicators7. Cable Locking Lever8. Carrying Strap Slot9. Body10. Locking Latch Release Button11. Li-ion Cell5
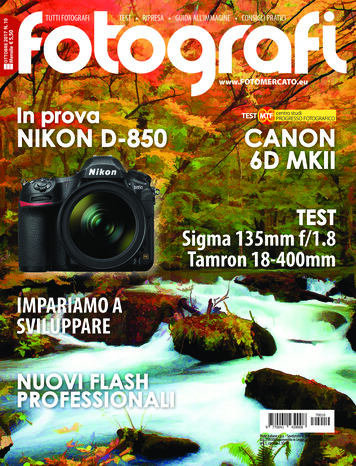
BodyLi-ion Cell1. Negative Electrical Contacts1. Positive Electrical Contacts Slot2. Positive Electrical Contacts2. Charging Port3. Locking Slot3. Negative Electrical Contacts Slot4. Mounting Slot6
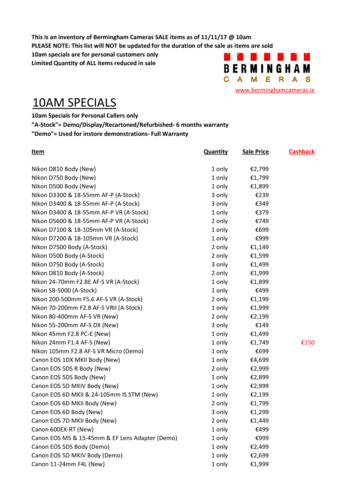
EnAC Charging Unit1. Charging Unit2. Charing Indicator3. Output Charging ConnectorINSTRUCTION MANUALPlease note: When using only one output port, please cover theunused output port to avoid possible short circuits. Install AA batteries when using hot shoe flashes withthe Phottix Indra Battery Pack. Only use compatible flash power cords, noncompatible flash power cords may cause damage tothe flash. When powering two flashes at the same time, morepower is used. Recycling time with two flashes isslower than with one flash. When the Phottix Indra Battery Pack over heat sit willno longer supply power to external flashes. The outputindicator(s) on the Battery Pack will start flickering.This overheating protection will last 4-5 minutes andafter this time the Indra Battery Pack can be usedagain. After the overheating protection is triggered7
any flashes attached to the Indra Battery Pack will switchto internal batteries power. (See you flash manual formore details).Recycling time will become slower.Note: when powering two studio lights, firing at 1/1output levels and at a speed of once per 5s, at the sametime, after about 120 shots, the Phottix Indra BatteryPack will trigger the overheating protection.button downwards with one hand.2. With the other hand hold the Body of the Phottix IndraBattery Pack and pull it to the left. This will separate thetwo parts. (See picture 1) Turn off the Battery Pack when not in use. If left onbattery power will continue to drain even if no devices areattached. Over-discharge will cause damage to the unit.Assembling and disassembling thePhottix Indra Battery PackTo disassemble1. Hold the Li-ion cell and slide the locking latch release8picture 1To assemble1. Hold the Li-ion cell in one hand and use the other hand
EnINSTRUCTION MANUALto hold the body of the Battery Pack.To charge the battery pack2. Push it to the right until the lock engages with aclick, this ensures it is locked. (See picture 2)Use an original Phottix AC Charging Unit only.Note: when the Li-ion cell is properly assembled ontothe body of the Battery Pack, the Output Indicator(orange), the Battery Level Indicators (green) and theUSB indicator (red) will all light up and flash 3 times.picture 21. Insert the output charging connector of the ACCharging Unit into the charging port on the BatteryPack.2. Connect the AC power cord of the AC Charging Unitto the mains power supply. (See picture 3)picture 39
When charging, the charging indicator on the ACCharging Unit will light red. It will turn green when fullycharged. (See picture 4)Please turn off all switches on the Phottix Indra BatteryPack and the flashes before connecting the flash powercords.To power a single flash1. Align the plug of the flash power cord with the BatteryPack output port. Make sure to use a compatible flashpower cord.Picture 4To connect the flashesA compatible Phottix flash power cord is required foruse with Canon, Nikon, Sony, and Phottix Mitros seriesflashes as well as the Phottix Indra 500 TTL Studio Light.The Phottix Indra Battery Pack can power a single flash ortwo flashes at the same time.102. Slide the cable locking lever up and insert the cord intothe port until the lock engages with a click. (See picture 5)
EnINSTRUCTION MANUALPicture 6Picture 7Picture 53. Insert the other end of the cord into the externalpower port on the flash. (See picture 6 and 7)To power two flashes at the same timeThe Phottix Indra Battery Pack can power two flashesat the same time. A compatible flash or studio lightpower cord is required.1. Insert the flash power cords into the output ports onthe Phottix Indra Battery Pack.11
2. Insert the other end of the cords into the externalpower ports on the flashes. (See picture 8)toggle switch to the “OFF” position. The output indicatorwill go out after 2 seconds.2. Slide the cable locking lever to the “UNLOCK” positionand pull the cable out of the output port. (See picture 9)Picture 8To disconnect the flashes1. Before disconnecting the flash, move the output12Picture 9Using the Battery Pack1. Install batteries in the flash properly (See picture 10)
EnINSTRUCTION MANUALand make sure the battery power is strong enoughto power on the flash. If the power of the internalbatteries is not sufficient, the Indra Battery Packcannot power the flash.cut off automatically after 10 seconds, and the Batteryindicators will go out. If a device has been detected byeither of the output port, the corresponding outputwill start powering, and the corresponding Outputindicator (orange) and the Battery level indicators willlight up simultaneously. (See picture 11)Picture 10Picture 112. Make sure all the power cords are well connectedto the Battery Pack. When the output toggle switch isturned on, the Battery level indicators will light green.If no device has been detected, both output ports willNote: If the output toggle switch is not turned on,there will be no output from both output ports.However, there will be output from the USB outputport if a device has been connected to it.13
3. There are 2 power levels for option on the Indra BatteryPack, “High Speed” and “Standard”. If “High Speed” isselected, the Indra Battery Pack will charge the flash(es)very fast. To extend usage time and reduce load intensityof the Battery Pack, please use Standard output powerlevel unless faster recharge times are required. (Seepicture 11)USB PoweringThe 5V output USB port can be used to charge mobiledevices, such as tablets, smartphones and media players.Picture 12If no device is connected to the USB port, there will be nooutput from the USB output. If an external mobile deviceis connected and charging, the USB indicator will lightred. When fully charged, the USB indicator will turn off.(See picture 12)When using the Indra Battery Pack, the battery levelindicators on the Battery Pack will light up to display thepower capacity left in the Li-ion cell. (From left to right,see picture 13)4 LED indicators light up 80%14
EnINSTRUCTION MANUAL3 LED indicators light up 60%Battery capacity indication (part):2 LED indicators light up 40%4 LED lights ( 80%)1 LED indicators light up 20%1 LED indicator flashes 20%When the battery capacity is less than 10%, the BatteryPack will stop powering and need to be charged.2 LED lights ( 40%)1 LED lights ( 20%)Picture 1315
Technical SpecificationCell typeLi-Ion polymer batteriesCycle life3.7V/10000mAh*4 14.8V/10000mAh, approx. 400-cyclerecharge3.7V/5000mAh*4 14.8V/5000mAh, approx. 400-cyclerechargeCharging time10000mAh: approx. 5.5 hrs5000mAh: approx. 2.5 hrsRecycle time(at 1/1 flashpower levels;the Studio LightFlash-ready indicator lights red)16H mode10000mAhS modePhottix Indra 500 TTL Studio LightSingle/Two flashes: 1s/2.3sPhottix Mitros/Mitros FlashSingle flash: 0.26sPhottix Indra 500 TTL Studio LightSingle/Two flashes: 1.4s/5.4sPhottix Mitros/Mitros FlashSingle flash: 0.38s
EnH modePhottix Indra 500 TTL Studio LightSingle/Two flashes: 1.4s/4.9sRecycle time(at 1/1 flashpower levels;the Studio LightFlash-ready indicator lights red)5000mAhAdapter modelXVE-1680300Rated input(adapter)100V-240V , 50/60Hz, Max. 2.5 ARated output(adapter)16.8VBattery packoutput330V14.8VS modeINSTRUCTION MANUALPhottix Mitros/Mitros FlashSingle flash: 0.42sPhottix Indra 500 TTL Studio LightSingle/Two flashes: 2.6s/10.9sPhottix Mitros/Mitros FlashSingle flash: 0.92s, 3.0A, 0.4A (Flash), 3A (Battery)17
USB outputFlash count5V,2APhottix Indra 500 TTLStudio Light (WithModeling light used)5000mAh400 full power flashes10000mAh800 full power flashesPhottix Mitros/Mitros TTL Flash5000mAh2200 full power flashes10000mAh4200 full power flashesCooling methodnatural coolingOperating temperature-15 C-65 COperating humidity35﹪ 95﹪RHWeightBattery Pack (battery included, cords excluded): about 1168.7g (5000mAh)AC charging Unit (AC power cord excluded): about 257.6gDimensionBattery Pack: 189.5*112*60mm (5000mAh)AC charging unit: 108*48*30mmPlease note: Product specifications and external design are subject to change without further notice.18
EnINSTRUCTION MANUAL19
感谢您购买 Phottix 产品在使用 Phottix Indra �。Phottix Indra ��闪光灯的充电时间缩短为普通电池的 1/4, 能加快拍摄速度和减少漏闪。使用 Phottix Indra �置电池的 8 倍以上(以 PhottixMitros �靠 命,可卸式电池备用更省心。 请勿触摸交流充电器上的金属部分。 锂 离 子 电 池 组 具 有 一 定 的 使 用 寿 命。 当Indra ��购买新的电池组替换。 �荷环境下使用本产品。 �插头、插座可靠稳固连接。 ��开所有设备。安全须知 ��。禁止让儿童接触本产品。20 请勿将移动电源电池组放置在超过 45 的高温环境下,比如汽车尾箱内。 �等高湿度的场合。
CnSimp �洁电源主体及其附件。 请务必使用 Phottix �能会损坏供电电路。 使用 Indra ��册谨慎使用。说明书 �时间触摸,以免有灼伤的危险。 有关 Phottix Indra �方当局。 ��。 Phottix Indra �有适当的温度,属正常现象。 �面的金属触点。 �用寿命。21
部件名称移动电源(组装后)1. 输出插座 12. 输出插座 23. USB 输出插座4. 输出拨动开关5. 输出指示灯6. 电量指示灯7. 电源线锁扣8. 吊带扣9. 移动电源主机身10. 电池组锁扣11. 电池组22
说明书CnSimp移动电源主机身电池组1. 负极触电1. 正极卡槽2. 正极触电2. 充电端口3. 锁扣固定槽3. 负极卡槽4. 支架固定口23
交流充电器1. 电池充电器2. 充电指示灯3. 充电输出插头请注意 : ��短路。 当 Phottix Indra �灯内需安装 AA 电池。 �光灯输入线,否则可能损害闪光灯。 ��时间比使用一个闪光灯要长。24 当 Phottix Indra ��闪烁,这样的过热保护现象持续 4-5 分钟后,Indra �保护程序启动后,连接在 Indra 长。
�,1/1 输出,速度 5 秒 1 次,拍摄 120 张左右启动过热保护。 ��度放电可能会损坏电池组。Phottix Indra 移动电源的拆装拆开(图一)1. �组锁扣卡位。2. ��装1. �源主机身。2. ��二)25
��以及 USB �� Phottix 原装交流充电器。1. �组的充电口。2. 6
闪光灯供电 ��源的输出接线口。 �用于佳能、尼康、索尼及 Phottix Mitros系列闪光灯、Phottix Indra 500 TTL ��请务必关闭 Phottix Indra 移动电源及闪光灯开关。(图五)27
�闪光灯供电插座上。(图六、七)1. 先握住电源连接线的插头插在 Phottix Indra 移动电源供电插座上。2. �个闪光灯供电Phottix Indra 。28(图八)
CnSimp拆卸闪光灯电源连接线1. ��输出指示灯约 2s 后熄灭。说明书使用移动电源1. ��能开机,那么 PhottixIndra 移动电源将不能供电。(图十)2. 拨 动 移 动 电 源 上 的 闪 光 灯 输 入 线 锁 扣 环 �九)(图十)(图九)2. 确认 Phottix Indra 输出端在 10s29
不需快速充电,建议选择 STANDARD 标准输出强度。(图十一)USB 供电5V 的 USB ��不打开移动电源上的拨动开关,除 USB ��靠连接。303. Phottix Indra 移动电源的开关有 2 级供电输出强度可选,由 HIGH SPEED 和 STANDARD 标识输出状态。选择 HIGH SPEED 可快速为闪光灯充电或同时为USB �,当外接负载充电时,USB �电,当外接设备被充满电后,USB 指示灯熄灭。(图十二)
CnSimp说明书2LED 长亮 40 1LED 长亮 20 1LED 闪烁 20 当电池容量 10 �示:4LED 长亮 80 3LED 长亮 60 (图十三)31
部分示意图如下:4LED 长亮 80 2LED 长亮 40 1LED 长亮 20 32
�电池电池组寿命3.7V/10000mAH*4 mAH*4 ��间10000mAH 大约5.5小时5000mAH �光指示灯亮红10000mAh灯时为准)H modeS modePhottix Indra 500 TTL 影楼灯单/双灯:1s/2.3sMitros /Mitros闪光灯单灯:0.26sPhottix Indra 500 TTL 影楼灯单/双灯:1.4s/5.4sMitros /Mitros闪光灯单灯:0.38s33
H ��亮红 5000mAh灯时为准)S modePhottix Indra 500 TTL 影楼灯单/双灯:1.4s/4.9sMitros /Mitros闪光灯单灯:0.42sPhottix Indra 500 TTL 影楼灯单/双灯::2.6s/10.9sMitros �XVE-1680300额定输入100V-240V , 50/60Hz, Max. 2.5 4.8V34, 3.0A, 0.4A (Flash), 3A (Battery)
CnSimp移动电源USB输出5V说明书, 2APhottix Indra 500TTL 影楼灯闪光次数Mitros Ah800次全功率闪光5000mAh2200 次全功率闪光10000mAh4200 �度-15 C-65 C工作湿度35﹪ 通知。35
感謝您購買 Phottix 產品在使用 Phottix Indra �。Phottix Indra ��閃光燈的充電時間縮短為普通電池的 1/4, 能加快拍攝速度和減少漏閃。使用 Phottix Indra �置電池的 8 倍以上(以 PhottixMitros �靠 命,可卸式電池備用更省心。 請勿觸摸交流充電器上的金屬部分。 鋰 離 子 電 池 組 具 有 一 定 的 使 用 壽 命。 當Indra ��購買新的電池組替換。 �荷環境下使用本產品。 �插頭、插座可靠穩固連接。 ��開所有設備。安全須知 ��。禁止讓兒童接觸本產品。36 請勿將移動電源電池組放置在超過 45 的高溫環境下,比如汽車尾箱內。 �等高濕度的場合。
CnTrad �潔電源主體及其附件。 請務必使用 Phottix �可能會損壞供電電路。 使用 Indra ��冊謹慎使用。說明書 �時間觸摸,以免有灼傷的危險。 有關 Phottix Indra �方當局。 �� Phottix Indra �有適當的溫度,屬正常現象。 �面的金屬觸點。 �用壽命。37
部件名稱移動電源(組裝後)1. 輸出插座 12. 輸出插座 23. USB 輸出插座4. 輸出撥動開關5. 輸出指示燈6. 電量指示燈7. 電源線鎖扣8. 吊帶扣9. 移動電源主機身10. 電池組鎖扣11. 電池組38
說明書CnTrad移動電源主機身電池組1. 負極觸電1. 正極卡槽2. 正極觸電2. 充電埠3. 鎖扣固定槽3. 負極卡槽4. 支架固定口39
交流充電器1. 電池充電器2. 充電指示燈3. 充電輸出插頭請注意 : ��短路。 當 Phottix Indra �燈內需安裝 AA 電池。 �光燈輸入線,否則可能損害閃光燈。 ��時間比使用一個閃光燈要長。40 當 Phottix Indra ��閃爍,這樣的過熱保護現象持續 4-5 分鐘後,Indra �保護程式啟動後,連接在 Indra 長。
�,1/1 輸出,速度 5 秒 1 次,拍攝 120 張左右啟動過熱保護。 ��度放電可能會損壞電池組。Phottix Indra 移動電源的拆裝拆開(圖一)1. �組鎖扣卡位。2. ��裝1. �源主機身。2. ��二)41
��以及 USB �� Phottix 原裝交流充電器。1. �組的充電口。2. 2
閃光燈供電 ��源的輸出接線口。 �用於佳能、尼康、索尼及 Phottix Mitros系列閃光燈、Phottix Indra 500 TTL ��請務必關閉 Phottix Indra 移動電源及閃光燈開關。(圖五)43
�閃光燈供電插座上。(圖六、七)1. 先握住電源連接線的插頭插在 Phottix Indra 移動電源供電插座上。2. �個閃光燈供電Phottix Indra 。44(圖八)
CnTrad拆卸閃光燈電源連接線1. ��輸出指示燈約 2s 後熄滅。說明書使用移動電源1. ��能開機,那麼 PhottixIndra 移動電源將不能供電。(圖十)2. 撥 動 移 動 電 源 上 的 閃 光 燈 輸 入 線 鎖 扣 環 �九)(圖十)(圖九)2. 確認 Phottix Indra 出端在 10s 後45
速充電,建議選擇 STANDARD 標準輸出強度。(圖十一)USB 供電5V 的 USB ��不打開移動電源上的撥動開關,除 USB ��連接。463. Phottix Indra 移動電源的開關有 2 級供電輸出強度可選,由 HIGH SPEED 和 STANDARD 標識輸出狀態。選擇 HIGH SPEED 可快速為閃光燈充電或同時為兩個USB �外接負載充電時,USB �電,當外接設備被充滿電後,USB 指示燈熄滅。(圖十二)
CnTrad說明書2LED 長亮 40 1LED 長亮 20 1LED 閃爍 20 當電池容量 10 �示:4LED 長亮 80 3LED 長亮 60 (圖十三)47
部分示意图如下:4LED 長亮 80 2LED 長亮 40 1LED 長亮 20 48
�電池電池組壽命3.7V/10000mAH*4 mAH*4 ��間10000mAH 大約5.5小時5000mAH �光指示燈亮紅10000mAh燈時為准)H modeS modePhottix Indra 500 TTL 影樓燈單/雙燈:1s/2.3sMitros /Mitros閃光燈單燈:0.26sPhottix Indra 500 TTL 影樓燈單/雙燈:1.4s/5.4sMitros /Mitros閃光燈單燈:0.38s49
H ��亮紅 5000mAh燈時為准)S modePhottix Indra 500 TTL 影樓燈單/雙燈:1.4s/4.9sMitros /Mitros閃光燈單燈:0.42sPhottix Indra 500 TTL 影樓燈單/雙燈::2.6s/10.9sMitros �XVE-1680300額定輸入100V-240V , 50/60Hz, Max. 2.5 4.8V50, 3.0A, 0.4A (Flash), 3A (Battery)
CnTrad移動電源USB輸出5V說明書, 2APhottix Indra 500TTL 影樓燈閃光次數Mitros Ah800次全功率閃光5000mAh2200 次全功率閃光10000mAh4200 �度-15 C-65 C工作濕度35﹪ 通知。51
www.phottix.comPrinted in China52
Phottix Indra 500 TTL Studio Light Single/Two flashes: 1s/2.3s Phottix Indra 500 TTL Studio Light Single/Two flashes: 1.4s/5.4s Phottix Mitros/Mitros Flash Single flash: 0.26s Phottix Mitros/Mitros Flash Single f