Transcription
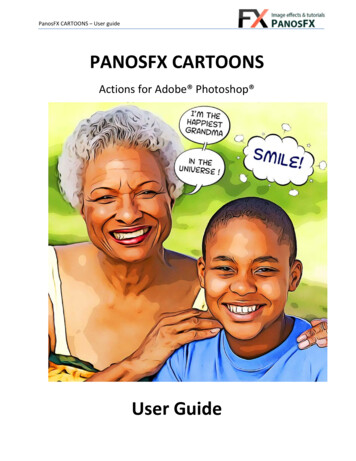
PanosFX CARTOONS – User guidePANOSFX CARTOONSActions for Adobe Photoshop User Guide
PanosFX CARTOONS – User guideCONTENTS1.2.3.4.5.THE BASICS . 11.1.About the effects . 11.2.How the actions are organized . 11.3.Installing the actions in Photoshop . 2BEFORE RUNNING THE ACTIONS . 32.1.Selecting the right photos . 32.2.Photos with transparency . 4THE “CARTOONIZER” (CORE) ACTIONS . 53.1.The two “Cartoonizer” actions . 53.2.Optimal image size . 53.3.The layers: . 5THE OTHER ACTIONS . 64.1.The “Dramatic Contrast” action . 64.2.The “Add dots pattern” action . 74.3.Perform selective color adjustments . 84.4.Create Grayscale versions . 94.5.The “Speech Balloons” . 94.6.The “Pop Art” effects. 12CARICATURES . 195.1.Turning a face into a caricature (in Photoshop CC‐2015.5 or newer) . 19
PanosFX CARTOONS – User guide1. THE BASICS1.1. About the effectsThe “PanosFX Cartoons” is a set of Photoshop actions, which you can use to turn your photos into beautifulcartoons. The effects also include various elegant speech balloons, as well as pop art backgrounds and collages.1.2. How the actions are organizedThe actions are grouped in 4 groups: The first group is called “CREATE THE CARTOON”. Itcontains the 2 core actions, called “Cartoonizer”:oThe first action is called “Cartoonizer (for PS CC2015.5 or newer)”. To run this action, you needto have Photoshop CC‐2015 or newer, and agraphics card supported by Adobe.oThe second action is called “Cartoonizer (forCC, CS6, CS5, CS4, CS3)”. This action runs inPhotoshop CC (any version), and in PS CS6,CS5, CS4, and CS3. The second group is called “SPICE IT UP”. It contains 4actions that let you improve the looks of the cartooncreated with the previous action. The third group contains 16 actions, which let youplace 16 speech balloons to the cartoon. The actions in the fourth group let you create beautifulpop art effects. To use these actions, you will need touse a photo with a transparent background (e.g. aperson or an animal extracted from the background).1 Panos Efstathiadis all rights reserved
PanosFX CARTOONS – User guide1.3. Installing the actions in PhotoshopOnce you download the product file, navigate to your "Downloads" folder.Find and unzip the ”PanosFX‐CARTOONS‐v.1.0.5.zip” file. This will create a folder called " PanosFX‐CARTOONS‐v.1.0.5", which contains the action file "PFx CARTOONS.atn"LOADING THE ACTIONS IN PHOTOSHOP:Method 1: Double‐click the "PFx CARTOONS.atn" file; the actions will be loaded automatically into Photoshop'sActions Panel.Method 2: Open Photoshop and go to the actions panel (if it’s not visible, select: Window Actions). Click the panel’s menu button (at the top‐right panel corner) and select "Load Actions" from the pop‐upmenu. Navigate inside the "PFx Cartoons" folder and load the PFx CARTOONS.atn file; the action will be loadedautomatically into the actions panel.USAGE:Open one photo. Select one of the two "Cartoonizer" actions and hit the Play button at the bottom of the actionspanel. Before running the actions, I recommend you resize the largest size of the photo (selecting the menucommand: Image Image Size), using a value between 1800‐2500 pixels.Please read this PDF user guide for more information.2 Panos Efstathiadis all rights reserved
PanosFX CARTOONS – User guide2. BEFORE RUNNING THE ACTIONS2.1. Selecting the right photosNot all photos are appropriate for these effects. To create a beautiful cartoon, prefer photos that meet thesestandards:Avoid photos of people (or animals, objects) taken from a distance. Face portraits make great cartoons!Avoid photos taken under poor lighting conditions or photos taken under direct sunlight. Prefer photos takenunder soft light conditions!Avoid blurred photos!3 Panos Efstathiadis all rights reserved
PanosFX CARTOONS – User guide2.2. Photos with transparencyYou can use the “Cartoonizer” actions on flat photos as well as on photos with transparency. You can thereforeload a JPG photo, or a layered PSD photo with transparency, or a PNG‐24 photo with transparency. The actionswill preserve any transparent pixels.So, what’s the big deal about using a photo with transparent background?If your photo has a transparent background, you can use the actions in the “POP ART TOUCHES” group to createvarious pop art inspired effects. For example, you can insert a sunburst type of background behind the cartoon.You can extract a person / animal / object from its background using the “Quick Selection Tool”:We will refer to the pop art effects later in this manual.4 Panos Efstathiadis all rights reserved
PanosFX CARTOONS – User guide3. THE “CARTOONIZER” (CORE) ACTIONS3.1. The two “Cartoonizer” actions The ”Cartoonizer” for Photoshop CC‐2015 or newer, requires the 64‐bit version of Photoshop CC‐2015.1or newer. The cartoons produced by this action have a softer appearance.Your system must be equipped with a graphics card supported by Adobe.NOTE: Please download and install the latest driver version for your graphics card, from these sites:NVIDIA: http://www.nvidia.com/Download/index.aspxAMD: http://support.amd.com/en‐us/downloadINTEL: https://downloadcenter.intel.com/ The ”Cartoonizer” for Photoshop CC, CS6, CS5, CS4, CS3 runs in the 32 & 64‐bit versions of Photoshop CC,CS6, CS5, CS4, and CS3.3.2. Optimal image sizeThe action produces best results with photos whose size is in the range from 3 to 8 Megapixels.When the action begins, it lets you change the size of the photo. If your photo is very big (or very small) try to setits largest side (width or height) to approximately 2500 pixels. As a general rule, begin with setting the largest sidefrom 2000 to 4000 pixels.The “Cartoonizer” action creates two different documents on your work area, allowing you to choose the cartoonyou prefer mostly. The first cartoon is richer in details, while the second has a flatter look.3.3. The layers:When the “Cartoonizer” action completes, a layers group called “Cartoonlayers” is created. Click to expand its contents: it contains 3 layers that makeup the overall effect.These layers are smart objects. You can double click on the smart filters andchange the default settings to your preference.At the bottom of the layers stack you can find two more layers: the “OriginalPhoto” and the “Background”. Both layers are turned off.You can compare the original image vs. its cartoon version, by holding downthe Alt key (Mac: option) and clicking on the small box to the left of the“Original Photo” layer.5 Panos Efstathiadis all rights reserved
PanosFX CARTOONS – User guide4. THE OTHER ACTIONSHaving created the cartoon using the “Cartoonizer” action, you can now use the actions in the other groups, tospice up the image. You can tweak the dark tones, apply selective color changes, add a halftone pattern, speechballoons, pop art backgrounds, and so forth.4.1. The “Dramatic Contrast” actionRun this action to emphasize the dark tones. This can create an interesting result in certain cartoons:6 Panos Efstathiadis all rights reserved
PanosFX CARTOONS – User guide4.2. The “Add dots pattern” actionHaving created the cartoon using the “Cartoonizer” action, you can now add a halftone pattern using the “Adddots pattern” action.The action will actually add two different patterns, each one placed on its own layer.At the beginning you will be presented with the “ColorHalftone” filter settings. To create bigger dots, simplyenter a higher value than 4 in the Max.Radius field.In the next step the action will open the Halftone Pattern filter settings.Move the Size slider to your liking and press OK to add the secondpattern:The action has created two 2 extra layers in the layers panel. They arecalled “Dots Pattern” and “Dots Pattern II”.You can turn off these layers, change their opacity / blending mode, oreven delete them.7 Panos Efstathiadis all rights reserved
PanosFX CARTOONS – User guide4.3. Perform selective color adjustmentsThe second action in the “SPICE IT UP” group is called “Selective color adjustment”.This action lets you give a more abstract look, by e.g. adding red tones to the shadows, make the skin tones lesswarm, perform general tone adjustments, etc.You can use the Selective Color adjustments layer to changedramatically the appearance of the cartoon.Begin with tweaking the black/ white / neutral tones. Youcan adjust the red tones to tweak the skin colors. You can bebold in your adjustments. After all, cartoons know few rules!8 Panos Efstathiadis all rights reserved
PanosFX CARTOONS – User guide4.4. Create Grayscale versionsUse the “Grayscale” action to create B&W versions of your cartoons.The action creates a Black & White adjustment layer. Move the varioussliders to preference to create a grayscale version that you like.4.5. The “Speech Balloons”The actions in the “SPEECH BALLONS” group let you add 16 different vector speech balloons, to the cartoon. Youcan run the same action as many times as you wish, to add multiple speech bubbles of the same type.9 Panos Efstathiadis all rights reserved
PanosFX CARTOONS – User guideIf necessary, drag a middle handle, to resize the balloon along the horizontal (or the vertical) axis:NOTE: All balloons are smart objects. Therefore you can resize them freely, again and again.Use the corner handles to resize / rotate the balloon:You can also right click on the balloon, andselect the two “Flip” commands to flip theballoon horizontally and/or vertically:10 Panos Efstathiadis all rights reserved
PanosFX CARTOONS – User guideHow to change the balloon color:A quick way is to apply a Color Overlay style to the balloon layer:Select “Layer Layer Style Color Overlay” from the menu (or click the fx button in the layer panel) and pick acolor of your preference (make sure the Blend Mode is set to Multiply):A more elaborate way to change the colors of the balloon and its outline is to double click the balloon layer (it’s asmart object).This will open a new document. Double click the “Color” layer thumbnail, to change theballoon color (default white).Double click the “Outline” layer thumbnail, to changethe color of the outline (default black).When you finish, press ctrl‐w (Mac: cmd‐w) and click “Yes” to save your changes and update the cartoon.11 Panos Efstathiadis all rights reserved
PanosFX CARTOONS – User guide4.6. The “Pop Art” effectsTo use the actions in the fourth group (“POP ART TOUCHES”) you need to have a photo where the photographicobject has been extracted from its background:To extract an object from the background, pick the Quick Selection Tool:Carefully select the background. To subtract pixels from the selection, hold down the Alt key (Mac: option) whileclicking. You can also use any of the other selection tools (such as the Magic Wand Tool) to create a more preciseselection.Having selected the background, hold down the Alt key (Mac:option) and click the Add a mask icon, on the layers panel:This will mask out the background:TIP: To fine‐tune the selection, hold down Shift and select the menu command Select Select and Mask. This will open the“Refine Mask” window.Now run one of the two “Cartoonizer” actions.12 Panos Efstathiadis all rights reserved
PanosFX CARTOONS – User guideThe action completes and the photo is turned into a cartoon:The action preserved the transparent background pixels. It’s time to use the pop art actions.13 Panos Efstathiadis all rights reserved
PanosFX CARTOONS – User guideThe “Collage (4 photos)” action.The “Collage (4 photos)” action will turn the cartoon into a pop art collage, which shows 4 different versions ofthe photo, placed over colored tiles:You can easily change the colors of each one of the 4 tiles, by double clicking the respective color fill layer in thelayers panel.14 Panos Efstathiadis all rights reserved
PanosFX CARTOONS – User guideThe “Collage (9 photos)” action.The “Collage (9 photos)” action will turn the cartoon into a pop art collage, with 9 different versions of the photo:You can easily change the colors of each one of the 9 tiles, by double clicking the respective color fill layer in thelayers panel.15 Panos Efstathiadis all rights reserved
PanosFX CARTOONS – User guideThe “Sunburst backgrounds” actions.This “Sunburst” actions place a pop‐art inspired, sunburst background, behind the cartoon:There are two “Sunburst” actions. Each action produces 3 different backgrounds, with customizable colors (2 x 3 6 different backgrounds).You can go back and amend the background colors, when the action completes.16 Panos Efstathiadis all rights reserved
PanosFX CARTOONS – User guideThe 6 “Sunburst” backgrounds17 Panos Efstathiadis all rights reserved
PanosFX CARTOONS – User guideThe “Halftone background” action.This action places a halftone pattern graphic behind the cartoon:The action lets you select the two pattern colors (default: red & yellow) and define the maximum dot radius.When it completes, a layer group called “Halftone background”is created.It contains 2 layers: “Color 1” and “Color 2”. Click on the layerthumbnails, to change the colors to your preference:18 Panos Efstathiadis all rights reserved
PanosFX CARTOONS – User guide5. CARICATURES5.1. Turning a face into a caricature (in Photoshop CC-2015.5 or newer)Adobe introduced the face‐aware Liquify tool in Photoshop CC 2015.5. You can use this amazing technology toturn one or more faces into caricatures, prior to using the Cartoons actions.You need to have a photo showing at least one human face, which is facing forwards. Select Filter Liquify fromthe menu. Use the settings on the right, to modify the facial features.If Photoshop recognizes more than one faces in the photo,you can select the face that you want to change, from thedropdown list:Adjust the settings and press OK to apply. Repeat as many times as you wish, to create a funny face. Finally runthe Cartoon action.19 Panos Efstathiadis all rights reserved
PanosFX CARTOONS – User guideIf you have any questions, please use the contact form at panosfx.comPanos Efstathiadiswww.PanosFX.com20 Panos Efstathiadis all rights reserved
to have Photoshop CC‐2015 or newer, and a graphics card supported by Adobe. o The second action is called “Cartoonizer (for CC, CS6, CS5, CS4, CS3)”. This action runs in Photoshop CC (any version), and in PS CS6, CS5