Transcription
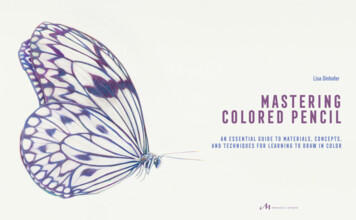
Lisa DinhoferMASTERINGCOLORED PENCILAn Essential Guide to Materials, Concepts,and Techniques for Learning to Draw in Color
WORKBOOK EXERCISE:CREATING COLOR PENCIL GRIDSThroughout the exercises and homeworkassignments we will be working with the twocharacteristics of the medium—the “color”and the “pencil” delivery of the pigment—separately and simultaneously. This soundscontradictory but is inevitable since the pencilitself cannot be separated from the color.I developed this series of exercises that usea simple grid format to show the versatility ofthe colored pencil. These grids are a teachingtool that demonstrates how the pencils work,including texture, color, and density.For the following grids I chose groups ofspecific pencils. They form what is knownas a warm/cool palette. (We will get into thevariants of color itself in the next chapter,starting on page 47.)Note: These are primary color variants—red, blue, and yellow. Each color has differentproperties. Again, I will go into detail in thenext section. Right now it is important to getto know your pencils and experience what theycan do.Supplies Prismacolor Premier, wax-based pencils2 Blues: Ultramarine Blue, True Blue2 Reds: Poppy Red, Alizarin Crimson2 Yellows: Canary Yellow, Lemon Yellow1 White and 1 Blender pencilSolvent (turpenoid, gamasol, Zest-it, oralcohol)Coloring the GridsHere, and throughout the book, I’ll present one completed exercise grid, and one36MASTERING COLORED PENCILblank template grid, so you can do the sameexercise yourself. I encourage you to do theseexercises. They are a very fast way to acquire aworking vocabulary of color pencil technique.Here is a breakdown of the process.1. Label Your GridBefore applying the colored pencils on thegrid, please label your grid following theexample of the completed grids that follow.It is important to label your exercise becausethese grids will be a reference for the particular color. Plus, once the grid is complete, youmay not remember what utensil made whicheffect.You can repeat this grid for any wax-basedcolor pencil.2. Row 2: Colored Pencil Plus White forBurnishingIn the second row of the grid, you’ll use colorpencil plus a white pencil. Using your whitepencil is not just for a value change, althoughit will step down the intensity of your color.As you will observe, the white pencil will alsoremove your stroke lines. This is known as burnishing. You are putting another layer of waxon the page and smoothing the surface. Colorthe squares in the second row with your colorpencil first, moving left to right, from darkestto transparent as you did in step 2. Then goover each square with the white pencil. Thepressure of the white pencil should be uniformacross the row.3. Row 1: Weight of Your Hand for Pure Colorbring out different effects. In the top rowof the grid, the color is pencil only. This rowacts as your control of the color. In the firstbox (far left) press down hard on your pencilin order to lay down the densest amount ofwax and pigment. In the second box (center)use a medium weight of your hand to createa middle tone. In the third box (far right) usea light hand, hardly pressed down. The whiteof the page should be apparent with a slightfilm of color. The three boxes together shouldfeel like a gradation of color across the surfacefrom dense to transparent.Note: Repeat this process throughout thegrid. Each subsequent line should have, fromleft to right, a dense tone, middle tone, and alight tone of color pencil.4. Row 3: Colored Pencil Plus Blender forBlendingThe blending pencil is devoid of color. It is ashaft of pure wax. The blender will enhanceyour color and put another layer of wax on thepaper. Blending will not remove your strokeentirely but will soften it. Color the third rowof the grid with your color pencil as you didin step 2. Then use your blender, pressinguniformly over the applied color. Notice howthe blending pencil enhances the color as wellas softening your stroke.5. Row 4: Colored Pencil Plus SolventColor the fourth row of the grid as you didthe first three rows, then apply the solvent.The solvents for a wax pencil are: turpenoidor gamsol (petroleum derivatives), Zest-it (acitrus derivative), or alcohol. I recommendturpenoid or gamsol. The solvent melts thewax and forms a wash. The effect can be verypainterly. It is also a good way to lay downa large swath of color quickly. Your paper isnot protected by a primer (like gesso), so it isimportant that you skim the surface of yourcolor with the solvent rather than saturatingit. The solvent may destroy your paper if youuse too much. Use a cotton swab, sponge, orbrush to apply the solvent.Lisa Dinhofer, Bugs onParade, 2011, coloredpencil on paper, 9" 31"(23 79 cm)Choosing the configuration of your picture plane(the boundaries of whichare the four corners ofyour page) is essential.Here I wanted to stressthe march of the insects. Ichose a long narrow pieceof paper to enhance theconcept of the march.How hard you press down on the pencil willpencil vocab u lar y37
PRIMARY COLOR GRIDSCOOLWARMPENCILMASTERING COLORED PENCILVIOLETMULBERRYSPRING GREENTRUE BLUEULTRAMARINE38PENCIL BLENDERPENCIL SOLVENTLEMON YELLOWCANARY YELLOWPENCIL SOLVENTPENCIL WHITEORANGESPANISH ORANGEPENCIL BLENDERPENCILCRIMSON REDPOPPY REDPENCIL WHITECOOLTRUE GREENWARMSECONDARY COLOR GRIDSpencil vocab u lar y39
SurfacesColor pencils can be used on many differentsurfaces. Paper, of course, but you can also experiment on clay boards, gesso canvas boards,or 2- or 4-ply museum board. Any hard, flat,prepared surface will do.For this book we will concentrate on working on a paper surface. I find paper to be veryversatile—the surface can be as smooth as amirror or rough as a sandy, pebbly beach—thechoice is yours. As described in the Suppliessection (page 19), paper comes in differentweights (how thick is it) and different textures(smooth to rough). The heavier (thicker) thepaper, the longer you can work on it and themore punishment it can take—i.e., you canerase many times, add solvent, add layersof pigment, and burnish and blend withoutdamaging the paper. (We will explore othertechniques that work on different surfaces asthe book progresses.)The illustrations at right show five different papers of varied weights and textures.I have done a sample on each paper type inorder to show the differences in texture andwhat the pencil can do.90-pound vellum (from a pad)40-pound Fabriano Artistico, Extra White, hot press paper300-pound cold press paper40-pound rough paper2-ply museum boardBlank Grid Templatepencil vocab u lar y41
Colored Pencil Reference BookOne of the most useful tools in my own studiois the colored pencil reference book. I developed it to solve a basic problem I was having.I like to work my pencils down almost to thenib, and thereby sharpen away the pencil’s color name and reference number. When I foundI needed a particular pencil to complete a pieceor a passage, I had absolutely no idea what thename or the reference number of that pencilwas. I would try to match the color in my artsupply store, which sometimes worked but often didn’t. After several frustrating experiences I decided to create a reference book where Iwould color a grid with the pencil and recordthe color name and reference number underit. Why didn’t I just use the color chart fromthe pencil’s manufacturer? Because a printedcolor chart does not give you the exact color ortexture of the pencil. Creating this referencebook takes quite a bit of time and is not forthe faint of heart. In fact it is something forthe totally obsessive person, like me.The cover and page 37 of my personal colored pencilreference book.MAKING A COLORED PENCILREFERENCE BOOKSupplies 1 small landscape sketchbook I used a 31 ₂" 51 ₂" book. You can put two colors on each page. Prismacolor has150 colors, so you’d need at least 75 pages for your references. 1 ruler (to map out your grid) 1 fine point ink pen (to draw your grid) 1 pushpin All your color pencils1. Label your book along with your name and contact information. On the firstpage, record the pencil company name and pencil type, for example: PrismacolorPremier. Keep each manufacturer separate. You can divide into sections, or useseparate books for each manufacturer.2. Draw your grid using the pen and ruler. I make a nine-box grid three boxesacross by three boxes down. In each row, I show the gradation of the color fromtransparent to dense (light, middle tone, heavy). The first row is for pencilalone, the second row for pencil and blender, and the third row for pencil withwhite.3. Your grids should be the same size from page to page. I didn’t want to measurea new grid for every page, so I used a pushpin to pierce each corner of the gridthrough to the next page. You can use these pin dots for ruler placement as youdraw the new grid. The more pressure you put on the pin the more pages youwill mark.4. Under each grid, record the name and reference number printed on the pencil,for example, Ultramarine, PC 902.5. Color your grid as outlined in step 2 above.Uses for the Colored Pencil Reference BookThere are two main uses for this book. The first is to figure outthe name and reference number of any pencil, so it can bereplaced. The second is to see what this particular colored pencilcan do. As you get further into this medium, knowing the rangeof the color and the texture of a particular pencil will becomeimportant.42MASTERING COLORED PENCILpencil vocab u lar y43
How to Use the Reference BookHOMEWORK ASSIGNMENT #1:DRAW YOUR BREAKFASTWhen your pencil is sharpened past the name and number, take the nib and a swatch of scrap paper and color asquare at the edge of the paper. Place the colored swatchagainst the reference grid. Compare the colors until youfind the right one. Now you know the exact pencil youneed to purchase.Every time I give this assignment someone will inevitably say, “Idon’t eat breakfast.” My reply is, “You don’t eat at all during the day?”Breakfast is simply breaking your fast from the night before. So,think about whatever breaks your fast and draw that.Purple color reference swatchLaying the purple swatch on the grid.Edward Zimmerman, 2015, colored pencil, 6¼" 7" (16 18 cm)Success: Ned's success lies in his color choices. The two dominant colorsare primaries, yellow and blue. They are equal and opposite at the sametime. This creates a dynamic interaction on the page.Satoko Takahashi, 2015, colored pencil, 11" 14" (28 10 cm)Success: Satoko’s success lies in her choice of subject: an iconic fastfood sandwich. This choice is personal and universally recognizable atthe same time, a reflection of the time in which we live.Identifying the correct color for the pencil.44MASTERING COLORED PENCILpencil vocab u lar y45
1 White and 1 Blender pencil Solvent (turpenoid, gamasol, Zest-it, or alcohol) Coloring the Grids Here, and throughout the book, I’ll pres-ent one completed exercise grid, and one blank template grid, so you can do the same exercise yourself. I encourage you to
