Transcription
KWP PrimedEngineered Wood PanelInstallation InstructionsWith or Without Battenswww.kwpproducts.com
STORAGECompliance with KWP installation, storage and maintenance requirements and with the applicablebuilding codes in your region is mandatory. Problems caused by failure to comply with theserequirements and codes may not be covered under applicable warranties.WARNINGPrimed EngineeredWood PanelDo not install products which appear to be or which you believe to be non-conforming.Before you begin, consult the applicable building codes in your region for requirements regardingthe installation of siding, weather barrier (house wrap), caulking, etc.Follow the manufacturer’s instructions for installing the weather barrier and applying caulking. Store off the ground, on a flat surface on pallets to avoid sagging and contact with the ground. Siding must be covered and protected from the elements with a water resistant coverprovided by KWP. Allow siding to adjust to atmospheric conditions prior to installation.Installation Instructions With or Without BattensDo not store KWP Primed panel or trim in a heated building. This can affect the humidity content inthe wood and make it susceptible to buckling.INSTALLATIONSTUD SPACING AND WALL CONSTRUCTIONKWP always requires the use of a weather resistant barrier behindKWP Primed Engineered Wood Panel. KWP will not be liable or responsible for anydamage occurred for failure to use a weather resistant barrier.In order to ensure adequate ventilation and wall drainage, the KWP Primed EngineeredWood Panel installed as board and batten system must be installed either on a wallcomposed of double furrings; vertical furrings installed at 16” OC followed by horizontalfurrings installed at 12” OC.The KWP Primed Engineered Wood Panel installed vertically or as board and batten systemmust be nailed at every 16’’ horizontally and 12” vertically using the required fasteners.As an alternative to using furring strips, KWP Primed Engineered Wood Panel can beinstalled over non-compressible drainable housewrap to provide drainage behind siding.
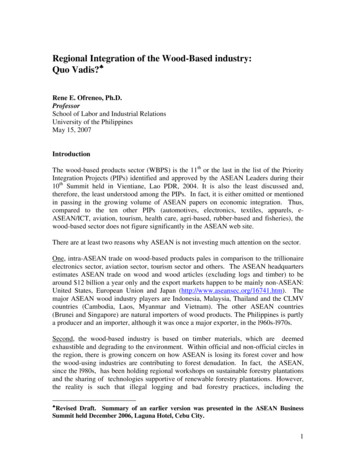
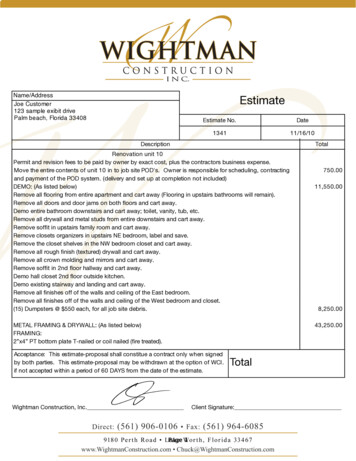
INSTALLING KWP PRIMED ENGINEERED WOOD PANEL VERTICALLY OVER RIGIDFOAM INSULATION ON FURRING STRIPSfurring strip with a specific gravity greater than or equal to 0.55.STRIPSVertical furring strips create a ventilated space between the siding and theVertical furringbarrier.strips createa ventilatedspacesidingbehindand thewater-resistantThis spaceallows anywaterbetweenthat maytheinfiltratethewater-resistant barrier.This spacemay infiltratebehindratherthe sidingdue to driving rain, wind or morningsidingdue toallowsdrivinganyrain,waterwind thator morningdew to escapethan dthesiding.Italsoallows watervapour from insidebehind the siding. It also allows water vapour from inside the building releasedbythewater-resistantbuilding releasedby thewater-resistantbarrier theto escapethebarrierto escapewithout damagingwall. without damaging the wall.FURRING STRIP SPECIFICATIONSFURRINGSTRIP1x4 nominalsizeSPECIFICATIONSkiln-dried, Southern Pine furring strip with a specific gravitygreaterthan orequalto 0.55. Southern Pine furring strip with a specific gravity1x3, raightand undamaged.greater than or equal to 0.55.Furringstripsmust be new, straight and undamaged.Ifthesidingisbeinginstalledasparta renovationproject,replace all existing furringIf the siding is being installed as part of aofrenovationproject,all compliantexisting furringstripswith refernew compliantstrips.stripsreplacewith newstrips.Pleaseto your localbuilding code.KWP siding shall be Installed to safely resist all loads, including wind loads, of the locals gwinda loads,of thatthe meetslocals adoptedbuildingcodes.The beinstallationof tosidingshallresultallin loads,a systemthat providesload paththe requirementsfor thetransfer of ofloadsfromshalltheir resultpoint codes. Theinstallationsidinga systemthata load path that meetselementsto the structure.mechanicalconnectionof thepointfurringofstripto structuretheload-resistingtherequirementsfor theThetransferof loadsfrom theiroriginthrough istheresponsibilityof a designprofessional.KWP assumesno liabilityloss orstripdamagecaused by isthetheelementsto thestructure.The mechanicalconnectionof fortheanyfurringto structuredesign of the mechanicalconnectionof the furringstrip to thenostructureexpresslyby caused by theresponsibilityof a designprofessional.KWP assumesliabilityandforisanyloss orreleaseddamagethe purchaserowner fromconnectionany such lossofortheliability.designof the ormechanicalfurring strip to the structure and is expressly released bythe purchaser or owner from any such loss or liability.INSTALLING FURRING STRIPSInstall furring strips vertically and secure themINSTALLING FURRING STRIPSfirmly to the structure using two nails or angleInstall everyfurringstripsNailsverticallyand securethem firmly to the structure using two nails or anglescrews12-16”.must havea netration of 1 1/4” in the structure.penetration of 1 1/4” in the structureInstall horizontal furring strips at every 12” oc.FURRING STRIPat the bottom The openingshould be open tothe outside except forWATER-RESISTANT BARRIERthe anti-rodenttrim.DON’T DO:1/4”TO1”VENTILATED STRIPFURRINGFURRING STRIPSMUST STRIPSEXTENDMUST EXTENDBEYONDBEYOND FOUNDATIONFOUNDATIONAnti-Rodent TrimFOUNDATION1/4” TO 1”8” FROMGROUNDImage APage 5Image BInstallation Instructions With or Without BattensEco-side Bold & Rustics INSTALL GUIDEINSTALLINGFURRING2.3Installing FurringStripsPrimed EngineeredWood PanelWhen installing KWP Primed Engineered Wood Panel over foam plastic or fibreglasssheathings, the following precautions must be followed:Trim and KWP Primed Engineered Wood Panel must be installed over a minimum 1x4 nominal sizeSouthern Pine furring strip with a specific gravity greater than or equal to 0.55. Furring stripsmust be installed and secured firmly to the structure using two nails or angle screws every 12-16”.Nailsmust havea minimumof on1 1/4”theinsulationstructure.2.2InstallingKWP trimand KWP penetrationEco-Side sidingrigid infoamover furring stripsEnsurethat ringshanksof thenail overfullyfoamengagetheorwoodstructuralpanel breglasssheathings,A water-resistantbarrier(WRB)is required in accordance with building code requirements.thefollowing precautionsmustbe followed:Drainage plane (example: furring strips. drainage mat or drainage board) may be required betweenTrimandlapWRB,siding consultmust be installedoverrequirements.a minimum 1x4 nominal size Southern Pinepanelandlocal code
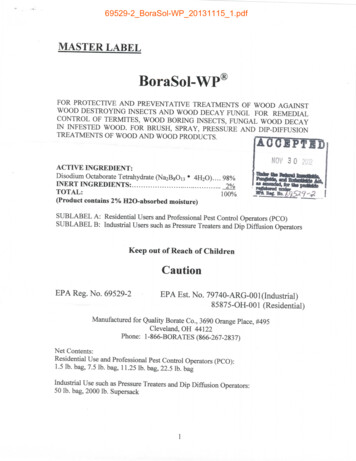
KWP Primed Engineered Wood Panel can be installed in a Board and Battenmanner following the below requirements.KWP Primed Engineered Wood Panel must be installed over a minimum 7/16 Category woodstructural panel, that contains the consensus Standard DOC PS 1 or PS 2.KWP Primed Engineered Wood Panel installed or installed as Board and Batten may onlyspan one plate-to-plate.Due to expected plate shrinkage, each vertical application is not tospan beyond one floor to ceiling distance, or, one floor to top of gable distance (see figure 1)Primed EngineeredWood PanelBattens may be a minimum of 0.5 x 1.5 inches (13x38mm) (actual size)Caution: when selecting a batten less than 2.5 inches (64mm) (actual size)wide it may be difficult for batten to conceal mail heads on vertical siding.- Vertical nail heads that are not covered by battens are an aesthetic issue andnot covered by KWP’s limited warranty.When installing directly over a minimum of 7/16” wood structural panel, KWP primedpanels must be installed over non- compressible drainable housewrap to provide drainagebehind siding.Installation Instructions With or Without BattensThe opening at the bottom should be open tothe outside except for the anti-rodent trim.The siding must be fastened by nailing about3/4” (19.05mm) from the top edge of siding ateach stud or vertical furring strip located overthe stud, leaving no more than 16” (400 mm)between nails.Anti-Rodent TrimIf KWP Primed Engineered Wood Panel applied adjacent to patios, roof line, porches, etc. the KWPPrimed Engineered Wood Panel must have a clearance of a minimum of 2’’ above the surface. Furringstrips must extend beyond the concrete foundation line by 1/4” to 1” to ensure the overlap of thesiding and the foundation.NOTE: When installing KWP Primed Engineered Wood Panels with other siding products likestucco, brick or cultured stone veneers, it is important to use a capillary break so moisture absorbed into these materials cannot be transferred into the primed panels.Separate KWP Primed Engineered Wood Panels from these materials with a minimum of5/16” (4.88 mm) space for horizontal or vertical joints. (See image 6 and 7)
s INSTALL GUIDEABOVE WINDOWS & DOORSDRIP CAPA minimum 1/2” spacing between flashing and the KWPPrimed Engineered Wood Panel is required in order toallow for adequate drainage and air flow.Space nails 8” (200 mm) O.C. along edge of KWP PrimedEngineered Wood Panel abovewindows.BELOW WINDOWSPrimed EngineeredWood PanelSpace nails 8” (200 mm) O.C. along edge of KWP Primed Engineered Wood Panel underDRIPwindows. Do not force siding into place as this will cause buckling. ALWAYS LEAVE A 5/16” (4.88 mm)space where KWP Primed Engineered Wood Panel meets trim or other materials to allow forexpansion and fill with caulking.(See fig. 8)ge of siding under windows. Do not forcekling. ALWAYS LEAVE A 3/16” (4.88 mm)r materialsto allow for expansion and fillBELOW ROOFLINESEco-side Bold & RusticGAP 1/8”(3.175 mm) CAULK0.98Installation Instructions With or Without BattensSpace nails 16” (400 mm) O.C. along edge of KWP Primed Engineered Wood Panel under rooflines.Do not force KWP Primed Engineered Wood Panel into place as this will cause buckling.dgesidingceCUTOF N
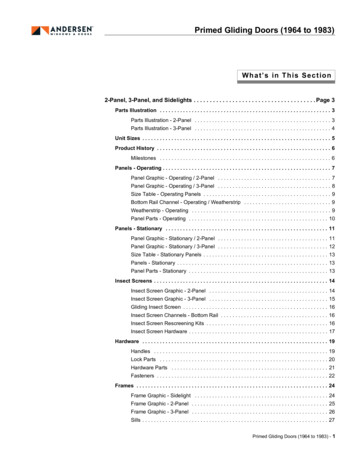
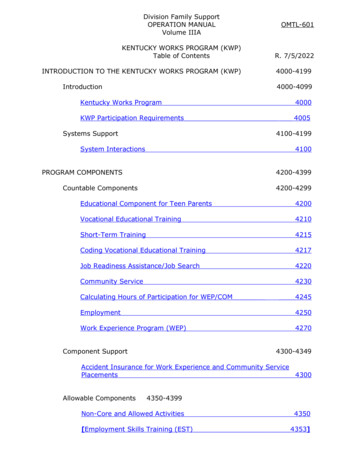
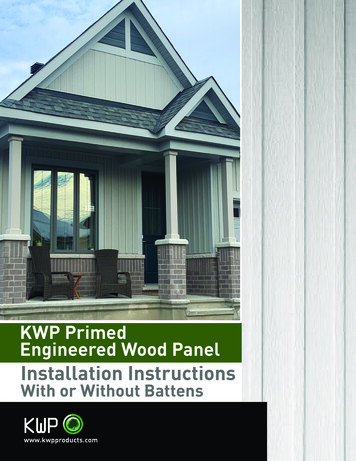
NAILINGFastener spacing for KWP Primed Engineered Wood Panelinstalled as board and batten5/16” (7.94Fastened with two nails at both ends, with additional fasteners spaced a maximum of6 inches (152mm) o.c. along alternating edges (fig 2, 3)Fastener spacing for BattensFor Canada onlyInstallation Instructions With or Without BattensEco-side INSTALL GUIDEPrimed EngineeredWood PanelKWP offers 2” (50 mm) spiral color-matched nails.Nail length will be determined by wall constructionand in all cases must allow a minimum of1 ¼” (32 mm) penetration into solid backing or1 1/8” (28 mm) if spiral nails are used. There mustnot be more than 16” (400 mm) O.C. spacing betweennails. Nailing should always start at one end of theKWP Primed Engineered Wood Panel and proceedtoward the other end to prevent rippling. Ensure thatstrips are aligned at corners of the building. Do notINCORRECTCORRECTcountersink nail heads.Particular attention is necessary when using an airnailing gun. Nails should have a minimum ¾” spacing from the top.Staples can be used and should be a Galvanised or Stainless 7/16”, 16 gauge staple with a length of1.75” minimum.Fastened with two nails at both ends, with additional fasteners spaced a maximum of 12inches (309mm) o.c. along alternating edges of the length of the batten. (fig 4 )Exception: For Battens less than 2.5 inches (64mm) wide, 1 nail is required at each end,with additional fasteners spaced a maximum of 24 inches (305mm) o.c. along alternatingedges (fig. 5 )Note:Do not bridge floors with Primed Engineered Wood Panel installed or with Battens (fig 6 )Create a horizontal joint between floorsHorizontal joint must be flashed with sloped metal Z-FlashingKWP Primed Engineered Wood Panel must be applied in a manner that will not allowmoisture intrusion or water buildup.Page 8
FIGURE 1Two Story One Floor to CielingHorizontal Joint Between FloorsOne Story One Plate to PlateBattenPrimed Panel4” (102 mm)wide adhesive flashingFIGURE 3Preferred BattenAttachment 2.5” (64mm) wide orgreaterAlternate BattenAttachment Less Than2.5” (64mm) wideMin. 3/16” (5 mm gap)Min. 3/16” (5 mm gap)1 1/2”2 1/2”( 64 mm ) batten( 38 mm ) battenPrimed Panel installed vertically3/16” (5 mm) coverageat bottom nail3/8” (10 mm)WRBWALLBattenWALL SHEATHINGWRBWater Resistant BarrierBattenWRBPrimed PanelWALL SHEATHINGFIGURE 2WATER RESISTANT BARRIERPrimed Panel iMin. 3/8” (10 mm) spacewith sloped metal Z-flashingFLOOR SHEATHINGWATER RESISTANT BARRIERWATER RESISTANT BARRIERWRBWALLWATER RESISTANT BARRIER
FIGURE 4FIGURE 5PREFERRED BATTENPREFERREDBATTEN2.5” (64” mm) wideor greater wide2.5” (64”mm)ALTERNATE BATTEN LESS THAN2.5” (64” mm) wideLAP SIDING ORLAP OVER LAP24” o.c.(610 mm)STAGGERED MAX.24” o.c.(610 mm)MAX.12” o.c.(305 mm)STAGGERED MAX.BATTTEN3/8” (10 mm)from endsand edges
WATER RESISTANT BARRIERFIGURE 6
FIGURE 7PLAN VIEWimum 3/8” (10 mm) spaceh sloped metal Z-FlashingorneWALL SHEATHINGWater Resistant Barrier4” (102 mm) wide adhesive FlashingWRBPrimed PanelBattenZ-FlashingBrick, Stucco orCultured Stone
NATURE AT ITS BEST.All KWP Naturetech wood products and accessoriesare backed by a worry-free, KWP 50 25 year warranty.www.KWPproducts.com La marquemarque dede lala gestiongestionLaforestière responsableresponsableforestièreNaturetech & Primed Engineered Wood Panel are registered trademarks of KWP Inc. All rights reserved.Important: Specifications and colors are subject to changes without notice. Please refer to actual color chips for accurate color representation.KWPBBINSTEN-21A 2021 KWP
panel. Use a siding gauge or tape measure when installing Eco-Side to adjust the overlap. A siding gauge can be found at any building materials store. Use a level to ensure your siding is properly aligned. 1" min. overlap Min. 3/4" nail spacing from top Sheathing if required Siding must extend below plate Min. 6" finish grade clearance