Transcription
CHEM 202 LABORGANIC CHEMISTRY LABORATORY IFall 2008Monday, Tuesday, Wednesday, Thursday 1:15 – 4:05pmCarr Lab LL04 and LL101. COURSE INSTRUCTORSProfessor: Megan NunezOffice: Carr G02DE-mail: menunez@mtholyoke.eduOffice Telephone: x2449Professor: Darren HamiltonOffice: Carr G02AE-mail: hamilton@mtholyoke.eduOffice Telephone: x34272. LABORATORY INSTRUCTORSDr. Maisie Joralemon ShawOffice: Carr G22AE-mail: mshaw@mtholyoke.eduOffice Telephone: x2398Professor Sheila BrowneOffice: Carr G02BEmail: sbrowne@mtholyoke.eduOffice Telephone: x20203. RULES FOR THE COURSEGoals: Chemistry 202 Lab provides an important technical foundation for firsthand experimental work in classical and modern organic chemistry. The courseemphasizes invaluable techniques and skills such as recrystallization, extraction,and chromatography.Contract: The Laboratory Class Participation Rules appear on the next twopages. You must sign both copies. Remove the first copy and hand it to yourlaboratory instructor. Keep the second copy in the manual for your records.Organic Chemistry I Laboratory Manual (prepared by D. G. Hamilton, Aug. 2006, revised by M. Joralemon Shaw, Aug. 2008)1
Department of Chemistry Laboratory Class Participation RulesThe laboratory classes that accompany courses in the chemistry departmenthave been developed to provide full exposure to the range of experimentaltechniques that all chemistry students should experience. To fully acquire,develop and practice these skills requires full and active participation in allelements of the laboratory classes. Adherence to the following rules by allparticipants in laboratory classes is mandatory:1. Students must fully complete ALL of a course's laboratory experiments inorder to pass the course: this means full, punctual, participation in alllaboratory exercises and timely submission of all accompanying laboratoryreports. Only in extraordinary circumstances, and with a written noteincluding a valid explanation, will a student be excused for not conducting anexperiment and submitting the corresponding laboratory report.2. Laboratory reports are due at 1:15 pm, one week after the experiment isperformed. All laboratory reports handed in late without a legitimate excusewill have 10% of the maximum grade possible deducted from the total gradefor each day it is late. Thus, a report handed in several days late will have avery low recorded grade, but note that submission of all lab reports is stillrequired to pass the course.3. Attendance in a laboratory class other than the one to which a student hasbeen assigned is NOT permitted, unless both the instructor of the assignedlab session and the instructor of the lab session the student wishes to attendreceives notification via email, phone, or in writing from the student’s doctor,advisor, or course instructor BEFORE the lab session they wish to attend.4. Compliance to all safety rules is mandatory.By signing below you confirm that you have read and understood these rules andwill abide by their implications. Sign this page and hand it to your laboratoryinstructor.Printed name:Class year:Signature:Date:Organic Chemistry I Laboratory Manual (prepared by D. G. Hamilton, Aug. 2006, revised by M. Joralemon Shaw, Aug. 2008)2
Department of Chemistry Laboratory Class Participation RulesThe laboratory classes that accompany courses in the chemistry departmenthave been developed to provide full exposure to the range of experimentaltechniques that all chemistry students should experience. To fully acquire,develop and practice these skills requires full and active participation in allelements of the laboratory classes. Adherence to the following rules by allparticipants in laboratory classes is mandatory:1. Students must fully complete ALL of a course's laboratory experiments inorder to pass the course: this means full, punctual, participation in alllaboratory exercises and timely submission of all accompanying laboratoryreports. Only in extraordinary circumstances, and with a written noteincluding a valid explanation, will a student be excused for not conducting anexperiment and submitting the corresponding laboratory report.2. Laboratory reports are due at 1:15 pm, one week after the experiment isperformed. All laboratory reports handed in late without a legitimate excusewill have 10% of the maximum grade possible deducted from the total gradefor each day it is late. Thus, a report handed in several days late will have avery low recorded grade, but note that submission of all lab reports is stillrequired to pass the course.3. Attendance in a laboratory class other than the one to which a student hasbeen assigned is NOT permitted, unless both the instructor of the assignedlab session and the instructor of the lab session the student wishes to attendreceives notification via email, phone, or in writing from the student’s doctor,advisor, or course instructor BEFORE the lab session they wish to attend.4. Compliance to all safety rules is mandatory.By signing below you confirm that you have read and understood these rules andwill abide by their implications. Sign this page and hand it to your laboratoryinstructor.Printed name:Class year:Signature:Date:Organic Chemistry I Laboratory Manual (prepared by D. G. Hamilton, Aug. 2006, revised by M. Joralemon Shaw, Aug. 2008)3
4. LAB SAFETY GUIDELINESIn the organic laboratory, we will work with a wide range of solvents, organicmolecules, acids, and bases which could be harmful if you were to come intodirect contact with them. The following safety rules must be followed withoutexception:(a) Be aware of the location of exits from the building, and the location of eyewash stations, the fire extinguishers, and safety shower. The emergencyphone number is 1911.(b) You must always wear safety goggles in the lab.(c) Do not wear sandals in the lab. Anyone wearing any form of open–toedshoes will be sent back to their room to change.(d) Do not wear shorts, skirts, or dresses in the lab. Anyone wearing anyform of clothing that leaves the legs uncovered will be sent back to theirroom to change.(e) No food or drink is allowed in the lab.(f) Never leave a reaction unattended.(g) No work can be done unless an instructor or TA is present.(h) Do not touch common items with your gloved hand(s). This includesdoorknobs, computer keyboards, the hallway, etc.(i) You should never pour solvents in the sink, or put solid chemicals into atrash can. All non–halogenated waste must be poured into the nonhalogenated waste container, and halogenated waste must be poured intothe halogenated waste container. Solid organic materials are discarded inthe solid waste container. There is also a container for broken glassware inthe laboratory.(j) Be alert to hazards and prepared for emergencies. If you are ever unsureof whether something is safe, immediately consult with your instructor or TA.5. LABORATORY REPORTSLab Preparation Write-ups (Pre-Labs): It is necessary that you study theexperiment that you are to do prior to arriving to the laboratory. You should readthe lab manual carefully and try to understand the overall content and purpose.Your performance in the laboratory will benefit enormously with proper advancework, and so will your grade!Report Format: Reports will be written down in a laboratory notebookcontaining carbon–copy duplicate pages (these notebooks are available from theBlanchard campus store). The original copy will remain in your notebook forreference later in the course (and as a back–up copy), and the carbon copy willbe turned in for grading.Organic Chemistry I Laboratory Manual (prepared by D. G. Hamilton, Aug. 2006, revised by M. Joralemon Shaw, Aug. 2008)4
(a) Experiment Number and Title:Name: Last Name, First NameLab Section:Date:Lab Partner’s Name:(b) Procedural Outline: Include a short summary of the overall experimentalplan you are going to run. If the experiment involves an organic reaction,you need to draw the structures of the reactants and products in full. Also,a table should be set up listing the following for each compound to beused: amount, molecular weight, number of moles consumed or produced,and pertinent physical properties (bp, mp, density). You should also noteany hazards involved with the experiment.Part (a) and (b) must be completed before the lab begins. Each notebookwill be checked before lab starts.(c) Observations/Data: Accurately record what you do and what you observe.(d) Discussions/Conclusions: Write your conclusions, lessons, and comments.(e) Answers to Questions: Provide answers to the questions at the end ofeach experiment. The questions are usually related to practical elementsof the experiments and you should try to look at them during the laboratorysessions and talk your ideas over with your Instructor or TA.6. LABORATORY PERFORMANCESince technique is an important part of the laboratory, you will be graded onyour laboratory performance. However, it is recognized that you will beperforming many of these techniques for the first time therefore, this componentwill be based on the following.(a) Preparation: This grade will be given based on the quiz, having parts (a)and (b) of the report completed in your notebook upon entering the lab,coming to lab in the proper lab attire, and observation of your organizationduring the experiment.(b) Lab Skills: This grade will be given based on your execution of theexperiment by observation of your technique, willingness to help others,working within the safety guidelines, and the ability to overcome setbacksin the experiment.(c) Results: When appropriate your results will be a factor. The results maybe the percent yield of a product, the purity of a product, or theidentification of an unknown.Organic Chemistry I Laboratory Manual (prepared by D. G. Hamilton, Aug. 2006, revised by M. Joralemon Shaw, Aug. 2008)5
7. GRADINGYour grade is based on 400 total points. Reports are due at the beginningof the following week’s lab. Late lab reports will be reduced by two points forevery day it is late. You must complete and submit all 11 lab reports in orderto pass this course.(a) Lab reports: 20 points for each lab, 11 lab reports Total 220 points for lab reports(b) Lab performances: 20 points for each lab and 15 points for overallperformance Total 180 points for lab performancesNote: Lab performances include the quiz (5 points for each) and lab skills(10 points for each). The lab quiz will exactly be done at 1:25 PM. If you werelate, you cannot take it and lose those 5 points, and you will also lose the pointsfor the pre-lab part (parts a and b).Organic Chemistry I Laboratory Manual (prepared by D. G. Hamilton, Aug. 2006, revised by M. Joralemon Shaw, Aug. 2008)6
Schedule for Chem 202 Lab: Fall 2008WeekDateTitle of Experiment1Sept. 8 - 12Exp. 1 Check-in / Safety / Melting PointDetermination2Sept. 15 - 19Exp. 2 Recrystallization3Sept. 22 - 26Exp. 3 Chromatography Part A: TLC4Sept. 29 - Oct. 35Oct. 6 - 10Exp. 3 Chromatography Part C and D:HPLC and GC6Oct. 13 - 17No Experiment --- Mid Semester Break (Oct. 11 - 14)7Oct. 20 - 24Exp. 4 Liquid- Liquid ExtractionExp. 5 Resolution of Enantiomers (1)8Oct. 27 - 31Exp. 5 Resolution of Enantiomers (2)9Nov. 3 - 710Nov. 10 - 14Exp. 7 Substitution: Kinetics of Solvolysis oft-Butyl Chloride11Nov. 17 - 21Exp. 8 Elimination: Competitive ProductFormation in a Dehydration Reaction12Nov. 24 - 28No Experiment --- Thanksgiving Recess (Nov. 26 - 30)13Dec. 1 - 5Exp. 9 IR Spectroscopy and Mass Spectroscopy14Dec. 8 - 12Check-out / Evaluations / ReviewExp. 3 Chromatography Part B: ColumnChromatographyExp. 6 Bromination of StilbeneLast day of classes: Dec. 12 (Fri.)Final exams: Dec. 15 - 19December recess: Dec. 20 - Jan. 1Spring semester starts: Jan. 29 (Wed.)Organic Chemistry I Laboratory Manual (prepared by D. G. Hamilton, Aug. 2006, revised by M. Joralemon Shaw, Aug. 2008)7
Experiment #1: Melting Point DeterminationPURPOSETo introduce the technique of melting point determination.INTRODUCTIONThe melting point of a solid can be easily and accurately determined with onlysmall amounts of material and, in combination with other measurements, canprovide rapid confirmation of identity.The most accurate method ofdetermination is to record a cooling curve of temperature versus time. However,this approach requires quite large amounts of material and has been exclusivelyreplaced by the capillary method.Capillary Melting Point DeterminationThe method involves placing a little of the sample in the bottom of a narrowcapillary tube that has been sealed at one end. The determination is made usinga Melting Point Apparatus that simultaneously heats both the sample tube anda thermometer. The temperature range, over which the sample is observed tomelt, is recorded. Some pure materials have a very narrow melting range,perhaps as little as 0.5–1.0 C, while more typically a 2–3 C range is observed.Data is typically recorded as, for example, mp 232–234 C. Though formallydenoting the melting range, this piece of data is almost universally referred to asa melting point (mp).The rate of heating, controlled by a dial, should be kept relatively low,especially for samples with a low melting point, to ensure that the thermometerreading represents, as accurately as possible, the true temperature experiencedby the sample tube (since the transfer of heat within the apparatus is relativelyslow). With this fact in mind, it is sensible when recording a melting point of anunknown material to perform a trial run where the temperature is increasedrelatively rapidly in order to ascertain a rough melting range. The determinationis then repeated by heating rapidly to within around twenty degrees of theexpected melting point and then very carefully (slowly) increasing thetemperature the remaining few degrees until the melting point is reached. Ofcourse, if the melting point of the material is known with some confidence, forinstance if the determination is being made to confirm identity, then the trial run isunnecessary.Although a pure solid might be expected to have a single, sharp meltingpoint, most samples are observed to melt over a narrow range of a few degreesOrganic Chemistry I Laboratory Manual (prepared by D. G. Hamilton, Aug. 2006, revised by M. Joralemon Shaw, Aug. 2008)8
Celsius. The observation of a melting range may be a result of the heatingprocess involved in capillary measurements (mentioned above), may reveal thepresence of inhomogeneities in the macroscopic nature of the solid sample, ormay indicate the presence of other substances in the sample (contaminants orby–products of the method used to prepare the materials).Melting Points as Criteria of PurityThermodynamics tells us that the freezing point of a pure material decreasesas the amount of an impurity is increased. The presence of an impurity in asample will both lower the observed melting point, and cause melting to occurover a broader range of temperatures. Generally, a melting temperature rangeof 0.5–1.0 C is indicative of a relatively high level of purity. It follows that for amaterial whose identity is known an estimate of the degree of purity can be madeby comparing melting characteristics with those of a pure sample.Melting Points as a Means of Identification and CharacterizationFor pure samples a clear difference of melting point between two materialsreveals that they must possess different arrangements of atoms, orconfigurations. If two materials are found to have the same melting point thenthey may, but not necessarily, have the same structure. Clearly, the recording ofa melting point is a desirable check of purity and identity but must be combinedwith measurements from other analytical techniques in order to unambiguouslyidentify a material and assess the purity. Part of the need for additionalverification derives from the subjective nature of capillary melting pointdetermination.Even when heating is very finely controlled, to ensureconsistency of sample and thermometer temperature, the human element ofvisual inspection of the melting point introduces significant variation.Mixed Melting PointsMixtures of different substances generally melt over a range of temperaturesthat concludes at a point below the melting point of either of the purecomponents—each component acts as an impurity in the other. Two puresubstances, with sharp melting points, can be shown to be different by mixingthem and recording the lowered melting point range. This type of experimentprovides a means by which to confirm a proposed identity for an unknownsample: if a sharp melting point is observed for a mixture of the unknown with agenuine sample then it is highly likely that the samples are identical.Melting Points and Molecular StructureMelting points are notoriously difficult to predict with any accuracy orconfidence. Systematic variations of melting point with variation in structure arenot as obvious or predictable as with boiling points. However, the sometimesOrganic Chemistry I Laboratory Manual (prepared by D. G. Hamilton, Aug. 2006, revised by M. Joralemon Shaw, Aug. 2008)9
surprising variations are often only highlighted in very closely related moleculesand the obvious general rule can be applied: melting points do generally increasewith increasing molecular weight.The difficulties involved in predicting melting points are a result of theproblems associated with predicting molecular packing in crystals. Many,potentially conflicting, factors play a role in determining melting points includingmolecular shape, interactions between groups within the molecule, and thedegrees of freedom the molecule possesses within the crystal.PROCEDUREFor the melting point determinations you will use the melting point instrumentshoused in the laboratory. There are three experiments to perform. For the firsttwo experiments you should work in pairs. The capillary melting point tubesshould be filled by crushing the sample to a fine powder on a watch glass withthe end of a glass rod, and then introducing this powder to the tube by pressingthe open end into the powdered sample. Once a 2–3 mm depth of powder hasbeen introduced the tube should be inverted and the sealed end tapped on ahard surface until the sample rests squarely at the bottom. Your laboratoryinstructor will demonstrate these techniques.Part 1One member of each pair should determine the melting point of urea, theother the melting point of cinnamic acid (recall that by melting point we imply therange over which melting is observed to take place). For both samples the rangeshould be very close to 132.5–133.0 C. Record your own and your partner’svalues.Part 2Mixtures of urea with cinnamic acid have been prepared in molar percentageratios of 100:0, 97:3, 95:5, 80:20, 60:40, 50:50, 40:60, 20:80, 5:95, 3:97 and0:100 ratios: each student pair in your laboratory class will be assigned two ofthese sample ratios. Carefully record the melting point range for your mixedsamples, paying particular attention to carefully note the exact point at whichmelting begins, the exact point at which melting is complete, and any changes inappearance at or near the melting temperature range. Record your data on thechalkboard along with that from each of the other groups. Once all the data hasbeen collected plot both the beginning of melting and complete meltingtemperatures versus the molar percentage ratios of urea to cinnamic acid.Organic Chemistry I Laboratory Manual (prepared by D. G. Hamilton, Aug. 2006, revised by M. Joralemon Shaw, Aug. 2008)10
Part 3Working individually, determine the melting point of an unknown sampleprovided by your TA or instructor (reminder: a crude melting point run will benecessary to determine the approximate melting temperature). Confirm theproposed identity of your unknown sample by performing a mixed melting pointdetermination with an authentic sample of the suspected material. Recall thatthe melting point will not be lowered or broadened if the materials are identical,i.e. if you have correctly identified your unknown. Your sample will be oneof the compounds listed in Table 1-1.Table 1-1. Melting point data for the possible unknown enzoic acidBenzamideGlucose pentaacetateBenzilic acidAdipic acidSalicylic acidSulfanilamideSuccinic acidp–TerphenylMelting Point ( C)113.5 – 114.0114.0 – 116.0121.0 – 122.0121.5 – 122.0128.0 – 130.0131.0 – 134.0150.0 – 153.0152.0 – 154.0158.5 – 159.0165.0 – 166.0184.5 – 185.0210.0 – 211.0CLEAN UPPut all used tubes in the solid waste container marked for this purpose.Organic Chemistry I Laboratory Manual (prepared by D. G. Hamilton, Aug. 2006, revised by M. Joralemon Shaw, Aug. 2008)11
REPORTRecord all of the melting point ranges for the three parts of the experiment inthe results section of the report. In the discussion section describe what isrevealed by each measurement about the sample in question (refer to thediscussion in this script for some reminders).QUESTIONS1. Why should samples for melting point determination be finely powdered?2. Why is it important that the heating rate be carefully controlled once near thesuspected melting point of a sample?3. Describe and analyze the trend lines for the initial and final meltingtemperatures versus composition revealed by the graph you generated inPart 2 of this experiment. To what extent do you think it would be possible toemploy this graph to determine the composition of an unknownurea/cinnamic acid sample?Organic Chemistry I Laboratory Manual (prepared by D. G. Hamilton, Aug. 2006, revised by M. Joralemon Shaw, Aug. 2008)12
Experiment #2: RecrystallizationPURPOSETo introduce the technique of recrystallization through the recrystallization ofcrude cholesterol. To recyrstallize an unknown compound and determine theidentity via melting point determination.INTRODUCTIONPurification of a solid by recrystallization from a solvent relies on the fact thatdifferent substances are soluble to differing extents in a given solvent. In thesimplest case all of the impurities present in a solid sample will be so much moreinsoluble in the chosen solvent that all that remains in solution is the puredissolved product (the solute). It has often been said that recrystallization is anart: the master crystallizer knows just when to add a little more solvent, just whento stop heating, and seems to be able to conjure beautiful crystalline samplesfrom nasty materials. This is all true. However, most of us are able to achievegood results by following some simple guidelines.RecrystalizationThe process of recrystallization can be broken down into a number of discretesteps:1. Choosing the solventThe choice of solvent is crucial, but how do we decide which solvent will workbest? An essential characteristic of a successful solvent is that the compound besoluble in the hot solvent but insoluble when the solvent is cold. The impuritiesare either insoluble in the solvent at all temperatures or remain at leastmoderately soluble in the cold solvent. In order to select a solvent system, testscan be performed with small amounts of material in test tubes: a few drops ofsolvent are added and if the material proves insoluble then the tube is heated tosee if the material will dissolve at a higher temperature—if so, then a goodsolvent for recrystallization of that material may have been identified. If thematerial appears insoluble at high temperature a little more solvent can beadded, drop by drop, to ascertain whether dissolution of the solute will occur in alarger volume of solvent. A solvent should be rejected if: the material appearsreadily soluble in the cold solvent, is not soluble to any appreciable extent in thehot solvent even when the volume of solvent is increased, or requires animpractically large volume in order to fully dissolve the crystals. An appropriatechoice of solvent for the crystallization process will pretty much ensure success,all that follows is manipulation.Organic Chemistry I Laboratory Manual (prepared by D. G. Hamilton, Aug. 2006, revised by M. Joralemon Shaw, Aug. 2008)13
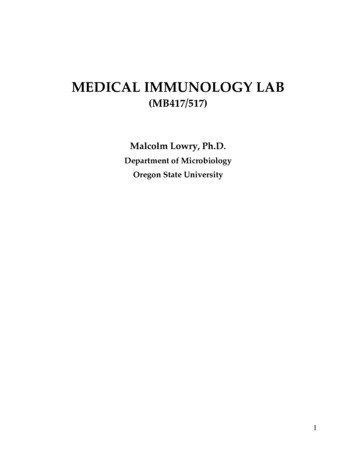
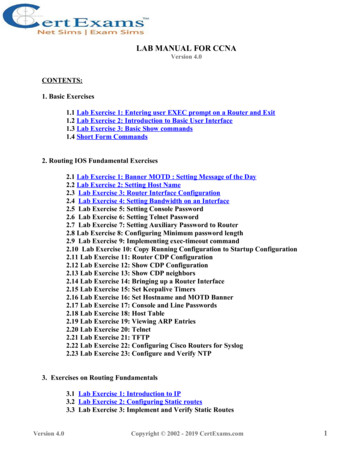
2. Dissolving the sampleAn Erlenmeyer (conical) flask should be used of such a size that it is onlyfilled to around half–way when all the solvent has been added. The solid sampleis introduced, together with around 75 % of the amount of solvent thought to berequired, it is always advisable to err on the side of using less solvent at thisstage. The flask is heated on a hotplate until the solute has dissolved, additionalsolvent can be added to the hot solution as necessary to ensure completedissolution. A boiling (wooden) stick should be added to provide a point forbubbles to form and facilitate an even boiling process. By a process of gradualaddition of solvent to the flask, until all the material has dissolved, you will ensurethat the hot solution is saturated and will deposit crystalline material once it iscooled. Do not forget that some insoluble impurities may be left suspended insolution, you must judge when all of the desired material has dissolved and onlythe unwanted impurities are left as a suspension.3. Hot filtrationIf some insoluble impurities remain suspended in solution it is necessary tofilter the solution while it is still hot, see Figure 2-1. To ensure that the funnel iskept hot, some of the solvent is placed in an Erlenmeyer flask with a boiling stick,on a hotplate. The funnel, equipped with filter paper, is placed above the flask,using a ring clamp, and the vapor from the warm solvent is allowed to warm thefunnel. Care should be taken to allow some space between the filter funnel andthe flask to avoid a build up of pressure in the flask. The hot solution is gravityfiltered through the warm funnel and a watch glass may be placed on top of thefilter funnel to prevent heat loss during filtration.Figure 2-1. Hot filtration set up.Organic Chemistry I Laboratory Manual (prepared by D. G. Hamilton, Aug. 2006, revised by M. Joralemon Shaw, Aug. 2008)14
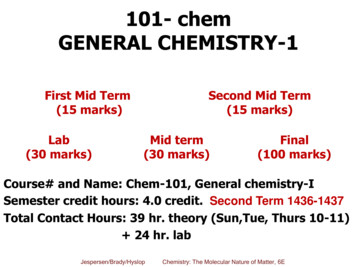
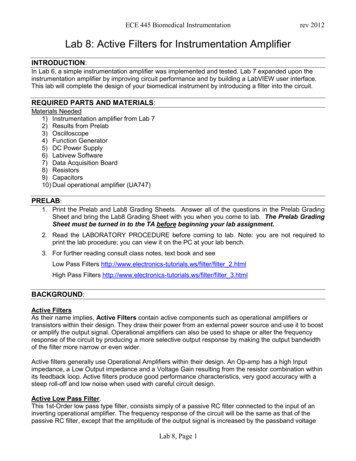
4. CoolingCooling the filtered solution will allow crystals to form. The rate of cooling hasa role in determining the size of the crystals: fast cooling will tend to generatemore crystals of relatively small dimensions, slow cooling might allow largercrystals to form. Usually the best compromise of speed, convenience, andcrystal quality, is simply to let the solution cool to room temperature on thebench. To ensure maximum recovery of material the solution should be cooledin an ice–water bath after the solution has been allowed to cool to roomtemperature. In some particularly stubborn cases, crystal formation can beencouraged by providing a nucleation point, from which the crystals may grow.This can be achieved by scratching the inner wall of the flask with a glass stirringrod (or spatula), or if available a small amount of pure crystals can be added tothe flask.5. Cold filtrationWhen the crystallization process is judged to be complete the crystals need tobe collected by suction filtration, see Figure 2-2. Both the funnel and suctionflask should be chosen so that neither will become more than half full during thefiltration process. It is preferable that all of the crystalline material is transferredto the funnel as a suspension in the crystallization solvent, however it issometimes hard to get all of the crystals moving freely by swirling the flask andoccasionally it will be necessary to add more ice–cold solvent in order to transferthe last of the crystalline material. It may also be necessary to dislodgecrystalline material from the sides of the flask with a spatula prior to filtration.Figure 2-2. Typical set up for suction, or vacuum filtration.Organic Chemistry I Laboratory Manual (prepared by D. G. Hamilton, Aug. 2006, revised by M. Joralemon Shaw, Aug. 2008)15
6. Washing the crystalsOnce the suction filtration process is complete the collected crystals shouldbe washed with a little more ice–cold solvent to remove final soluble impuritieswhich would otherwise be left on the surface of the crystals. The solvent used forthis final washing should be as cold as possible to minimize losses from thecrystals redissolving: recall that your precious crystals are soluble in warmsolvent so you’ll lose material if you wash with solvent that is not cold.7. Drying the crystalsOnce the crystals have been collected on the suction funnel they can usuallybe satisfactorily dried by continuing to draw air over them for a few minutes. Thealmost dry crystals should then be spread on a filter paper to allow the last tracesof volatile solvent to evaporate.The descriptions given above are long and detailed and cover most of thepitfalls that can be encountered when faced with recrystallizing a material. Theycan be summarized to form a more useful running order for a typical procedure:1. Identify a good candidate solvent.2. Dissolve the sample in the minimum volume of hot solvent.3. If solid impurities remain suspended in solution, filter the hot saturatedsolution under gravity keeping the filter funnel hot.4. Cool the saturated solution, first in air and then in an ice–water bath.5. Filter the cold solution under vacuum, if necessary dislodge and transferremaining crystalline material with a little more cold solvent.6. Wash the crystals with a small volume of cold solvent.7. Dry the crystals under vacuum, and then in the air.PROCEDUREThere are two parts to the experiment. You will work in pairs throughout.Safety Considerations: No solvents or solids should ever be poured into thesinks or thrown in the trash. All solvents must be discarded in the appropriatewaste container. Ask your instructor or TA if you are ever unsure.Organic Chemistry I Laboratory Manual (prepared by D. G. Hamilton, Aug. 2006, revised by M. Joralemon Shaw, Aug. 2008)16
Part 1: Recrystallization of Crude Cholesterol from MethanolAdd 1.0 g of crude cholesterol to a 125 mL Erlenmeyer flask, add around 10mL of methanol and heat the fl
Organic Chemistry I Laboratory Manual (prepared by D. G. Hamilton, Aug. 2006, revised by M. Joralemon Shaw, Aug. 2008) 4 4. LAB SAFETY GUIDELINES In the organic laboratory, we will work with a wide range of solvents, organic molecules, acids, and bases which could be h