Transcription
Create Kumikoat the TablesawCOPYRIGHT 2019 by The Taunton Press, Inc. Copying and distribution of this article is not permitted. Fine Woodworking #274 - Mar/Apr 2019W274FA.indd 641/9/19 9:21 AM
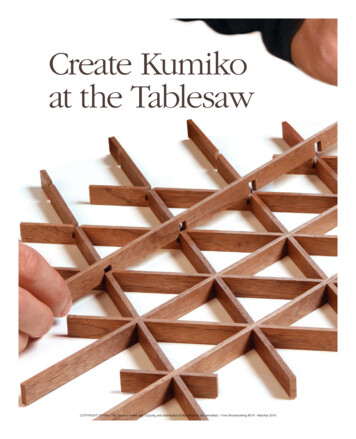
Smart jigs simplifythis complex designB YM I K EF A R R I N G T O NIwas first captivated by Japanese kumiko latticework onthe back cover of FWW #226, which featured a stunning cabinet by John Reed Fox. Fox’s piece had a pattern known as asa-no-ha, based on a square grid with 90 lap joints. (Michael Pekovich covered the how-to for thatpattern in a Master Class in FWW #259.) After figuring outthe square design, I explored others and found that manyof my favorites are built on a grid of equilateral triangles.While triangular gridwork is more challenging to produce than a 90 lattice, I developed a simple tablesaw sledthat makes the complex joints quick and repeatable. I alsouse a planing jig so that each strip will have a uniformthickness—especially important with this three-way joinery. The infill pieces are more straightforward, made easyby a couple of planing jigs very similar to those Pekovichuses. Using this approach, you’ll produce gridwork andinfill so clean and snug that it doesn’t need glue (though Ido use a tiny bit). The kumiko process is fun and fulfilling,which is probably why the craft has survived for centuries.There still is a learning curve. Don’t give up. Your firstattempt will be rough, the second will be better, and bythe third you’ll have nailed it.A word about design and woodThe foundation of any kumiko pattern is the gridwork,which can be scaled to suit everything from large shojiscreens down to door panels, lamp shades, and coasters.65COPYRIGHT 2019 by The Taunton Press, Inc. Copying and distribution of this article is not permitted. Fine Woodworking #274 - Mar/Apr 2019W274FA.indd 651/9/19 9:22 AM
Set up for successMAKE AN ACCURATE TABLESAW SLEDThe triangular gridrequires a precisethree-way joint ateach junction. Thissimple tablesawsled delivers cleanjoints and perfectgridwork.Angled fences,MDF, 3 4 in. thickby 11 2 in. wideIndexing key, 1 8 in.thick by 5 16 in. wideby 2 in. long60 Groove for indexingkeys, 1 8 in. wide by3 16 in. deep23 in.60 End fences, solidwood, 1 in. thickby 11 4 in. wideBase, MDF, 3 4 in.thick by 14 in. wideby 23 in. longHardwood miter-slotrunner, glued intogrooveGroove for runner, 3 4 in.wide by 1 8 in. deep, inset11 2 in. from edge14 in.A groove for theindexing keys.Mark the path ofthe blade, andthen measure 2 in.from that to setthe spacing of thegridwork. Flip overthe base and cut ashallow groove atyour layout mark.Add the fences.Screw on thestraight fences atfront and back,and then attachthe angled fences.Drill slightlyoversize clearanceholes in the angledfences, and usethe 60 corner ofa drafting triangleto set the angle ofeach fence as youscrew them down.Insert the keys. Trim the strips so they’ll stick uponly 1 8 in. or so, bevel their ends, and insert one inthe groove in front of each angled fence.66FINE WOODWORKINGPhotos: Asa Christiana; drawings: Dan ThorntonCOPYRIGHT 2019 by The Taunton Press, Inc. Copying and distribution of this article is not permitted. Fine Woodworking #274 - Mar/Apr 2019W274FA.indd 661/11/19 10:20 AM
RIP AND PLANE THE STRIPSNothing works without straight-grained strips, planedto uniform thickness with the aid of a block-plane jig.Rip strips slightly oversize.Make the strips a hair thickerthan the width of the blade’skerf.The main variable is thepitch, which is the distancebetween the lap joints. Apitch of 2 in. to 3 in. is agood starting point for mostprojects. Another variable isthe thickness of the strips,which is tied directly tothe kerf of the sawbladeused to make the threeway joints. Blades that arefull-kerf (1 8 in.) and thinkerf (typically 3 32 in.) bothwork great. For larger patterns, you might choose a two-blade stack, or a thickblade made for joinery. As for the width of the strips,1 2 in. is a good rule of thumb.Kumiko looks best with woods that are lighter in color with straight grain. Quartersawn or riftsawn materialis best, with tight, subtle grain. I often use maple, butI’ve had success with fir, alder, walnut, and cedar, too.Prep the block-plane jig. Plane along spacer and screw it in. If thestrips come out a little thick, adda piece or two of blue tape on thebottom side.Block plane rests in 1 8-in.-wideby 3 16-in.-deep rabbets.Spacer determinesthickness of strip.Plane to perfection. Farrington’s blockplane rides in the narrow rabbets andproduces perfectly thicknessed strips.Be sure to plane both sides of each strip.Check to be sure.Use the tablesawsled to cut a notchin an extra strip toconfirm the stripsare the correctthickness. The stripshould slip intothe notch with nostruggle and noslop. Getting this fitjust right is criticalto success.Prepping perfect stripsFor a clean look, I try to make all the kumiko stripsfrom a single board—or two at most, one for the gridwork and one for the infill. The thickness of the boardbecomes the width of the strips and therefore thefinished thickness of the kumiko panel.For clean, tight joints, you need very smooth, uniform strips. Make sure your board is four-square soyou can rip strips off both long edges and so theMARCH/APRIL 2019n67COPYRIGHT 2019 by The Taunton Press, Inc. Copying and distribution of this article is not permitted. Fine Woodworking #274 - Mar/Apr 2019W274FA.indd 671/9/19 9:22 AM
Notch the stripsFarrington’s tablesaw sled notches the strips in two ways to create clean, strong, three-wayjoints. Note: The red stripe is a reminder to keep fingers and thumbs clear of the blade.Notch has adouble bevel.Top and bottom stripshave a single notchtwo-thirds the widthof the stock.TOP AND BOTTOM STRIPS2 3Top and bottom notchesare at opposing angles.Center strip has a pairof notches one-thirdthe width of the stock.THE CENTER STRIPS1 3CENTER STRIPUse the rear fencefor both notches.Center strips are notched on both sides. Set the blade height to cut a hair over athird of the way through a strip. Make the first cuts with the strip bumped against thekey (above), flipping the strip to notch both sides. Then place those two notches ontothe index key to make the next two notches, and so on down the strip (below).ends of the strips will cleanly contact the stops on thetablesaw sled. Cut off any planer snipe.After milling the board, it’s time to rip off strips. It’scritical that the finished thickness of these strips precisely matches the kerf of the sawblade used to cutthe joinery. So I rip the strips slightly oversize at thetablesaw and then plane them to perfect thicknesswith a block-plane jig (see drawing, p. 67). Rip plentyof extra strips to use for calibrating the jigs.The block-plane jig has an MDF base and two runners with rabbets that guide the handplane. The depthof the rabbets must be the same, as any inconsistencywill transfer to your strips. Once the jig is together, Iadd a spacer to the bottom for the strips to rest on.The thicker the spacer, the thinner the strips will be.To reduce the thickness of the strips you can add apiece or two of blue tape to the bottom of the spacer.Each layer of tape reduces their thickness by a tiny,consistent amount. Don’t add too many or the spacerwill get squishy. You are looking for a nice slip fitwhere the strip fits easily into a test kerf.Watch the grain direction to avoid tearout as youplane strips, and make sure to plane both sides of eachstrip so they need no further surface prep.Tablesaw sled tames the three-way jointsThe triangular grid requires a tricky three-way joint ateach junction. Normally this is done with fine handsaws, but my tablesaw sled with a 60 fence notchesthe strips to create a clean, strong joint.Start by cutting and planing a runner for one of thetablesaw’s miter slots. I use quartersawn hardwood.68FINE WOODWORKINGCOPYRIGHT 2019 by The Taunton Press, Inc. Copying and distribution of this article is not permitted. Fine Woodworking #274 - Mar/Apr 2019W274FA.indd 681/9/19 9:23 AM
-e-y.,ruhs.the top and bottom strips2.1.For each notch use the rearfence and then the forwardfence to create a double bevel.Top and bottom strips are notched in both directions. Start with the tip againstthe key as before (above), then use the key to make a row of evenly spaced notches.Now notch those same strips on the opposite fence (below). It helps the overall resultsto press the strip against this key in the opposite direction you pressed it on the firstfence.It’s critical that there be no slop; in fact, the runnershould slide with a little friction. When cutting outthe rest of the jig’s parts, make sure their sides areperfectly parallel.Next, cut a small dado in the base for the miter-slotrunner, and glue it into place. This ensures that therunner is parallel with the edges. To determine thepitch of your kumiko, or the distance between thejoints (in this case 2 in.), mark where the blade willcut through the sled, measure over from that mark,and cut a kerf 3 16 in. deep in the top face of the sledfor the index keys.The trickiest part is attaching the two fences at theexact same angle. You can do it with an inexpensivedrafting triangle and careful work (see p. 66). Eachfence should be very close to 60 , but it’s even moreimportant that both are set to the same angle. Screwbut don’t glue the fences. I drill slightly oversize clearance holes to allow for minor adjustment if needed,and use screws with flat-bottom heads (not countersunk) that won’t shift the fences as I tighten them.Next, cut off two small pieces from the strips youplaned earlier and insert one into the key slot in frontof each fence. Now drop the runner into the miter slot,cut through the whole sled, and it’s ready to be used.When using this sled your fingers can get very closeto the blade, so I spray-paint a stripe on the fences tomark the danger zones.Notch and assemble your triangular gridWith the sled ready to go, set the blade slightly higherthan one-third of the height of a strip, and cut all of thewww.finewoodworking.comMarch/april 201969COPYRIGHT 2019 by The Taunton Press, Inc. Copying and distribution of this article is not permitted. Fine Woodworking #274 - Mar/Apr 2019W274FA.indd 691/9/19 9:23 AM
Assemble the gridMate top and bottomstrips with centerstrips. Just a dot ofglue in each is all youneed. The deepernotched strips godown first and thedouble-notched onesgo next. Then the lastdeep-notched strips goon, tightening the jointsand forming triangles inall directions.SOnline ExtraWatch Farrington put together oneof his kumiko creations in the videoat FineWoodworking.com/274.center strips for the three-way joint. They have opposing notcheson each side, all made at the fence closest to you. The sled workslike a box-joint jig: You bump the strip against the key for the firstcut, and then place the notch over the key for successive cuts.Next, tackle the top and bottom strips of the joint. These areidentical, with single, two-way notches that work in both directions. Adjust the sawblade so it cuts just slightly over two-thirds ofthe height of your strips, and make two cuts on each strip, boththrough the same notch, using both fences on the sled.This two-way notch is where you’ll find out if your sled is ac-70curate. If it is, the opposing cuts will form a little point in theexact center of the thickness of the strip. If not, go back and checkthe fences with your triangle. Often simply reattaching them willsolve the problem. When these last cuts look good, notch all ofthe top and bottom strips.At this point you’ll have a small pile of center strips with cutsmade one-third of the way through on both sides and a largerpile of top and bottom strips with cuts made two-thirds of theway on one side. Using a small handsaw, break these piecesdown into usable sizes. Kumiko is almost always used in a frameFINE WOODWORKINGCOPYRIGHT 2019 by The Taunton Press, Inc. Copying and distribution of this article is not permitted. Fine Woodworking #274 - Mar/Apr 2019W274FA.indd 701/9/19 9:24 AM
SQUARE IT UPMost grids go into square frames. To square off the trianglesat two ends of the pattern, you’ll need to insert filler piecesas shown.Filler piecesSquare end30 bevelsSimple sticks. Usethe 30 planingjig to create acentered point onone end, then trimthe square endas needed. Whenthe fit is just right,add a dot of glueat both ends. Usea straightedgeto check thealignment of thesmall filler sticks,and adjust asneeded.of some kind, so I build the pattern with a big squareor rectangle in mind.Assembly is straightforward. Starting with the bottompieces, add a dot of glue with a toothpick, press thecenter pieces in one by one, and then finish off thegrid with the top pieces.Trimming kumiko for a square frameFor most applications, you’ll need the edges of thegridwork to end up square. This is a little trickier withthe triangular kumiko than a square grid. You’ll needto add little pieces to square the triangular spacesalong two edges of the pattern, and then cut the straygrid pieces off all four edges with a flush-cutting saw.Try your first infill pattern: asa-no-haAsa-no-ha is a common kumiko pattern, used in bothsquare and triangular grids. Intended to representoverlapping hemp leaves, it is simple yet beautiful,and a great place to start down the rabbit hole of thiswonderful craft. The three infill pieces are identical inasa-no-ha, meaning that if you have a uniform grid,you should be able to dial in the infill planing jigs andkeep them right there for the entire pattern.The jigs are simple guides for a wide chisel or smallhandplane—either will work. I use them with an adjustable-mouth block plane (No. 601 2). For whateverreason, I can plane small pieces all day with this plane.I make the jigs from two thick pieces of hardwood—usually poplar—with one rabbeted to hold the infillstrips. Then I carefully align the pieces, screw themtogether, and cut the desired angle on the end withmy miter saw. As for the stop, some folks hold it downwith a drywall screw, but I prefer using a pan-headwww.finewoodworking.comSaw off theexcess. Use aflush-cutting saw—riding the edgesof the pattern—tocut off the extramaterial and forma clean rectangle.MARCH/APRIL 201971COPYRIGHT 2019 by The Taunton Press, Inc. Copying and distribution of this article is not permitted. Fine Woodworking #274 - Mar/Apr 2019W274FA.indd 711/9/19 9:24 AM
Filling out the gridA variety of designs can be created by fitting beveled pieces into each triangle of the grid. Simpleplaning jigs outfitted with sliding stops make it easy to bevel the parts at the precise length.Jig, hardwood, 21 2 in. thickby 23 8 in. wide by 8 in. long30 bevelsRabbet to fit widthof kumiko strips.60 bevelsSliding stopEnd beveled to 30 , 45 , or60 for various infill patternsThe asa-no-ha pattern is a classic design created by filling each trianglewith three pieces of equal size.Start at thepointy end. Setthe stop on the30 jig so thepiece overhangsa bit. Then flip thepiece over andplane both sidesto create an evenpoint.Plane the blunt ends last. Set the stop on the 60 jig andflip the pieces like before to create a centered point. This enddetermines the fit, so creep up on it at first. With practice you’llbe able to dial in the setting for these three identical piecesand leave it there for the rest of the infill. Don’t force thepieces or you could distort the whole grid. When you’re happy,add a dot of glue to the ends to lock them in.72FINE WOODWORKINGCOPYRIGHT 2019 by The Taunton Press, Inc. Copying and distribution of this article is not permitted. Fine Woodworking #274 - Mar/Apr 2019W274FA.indd 721/9/19 9:25 AM
30 bevels60 threeway lapbolt that goes into a threaded insert. That makes fineadjustments easier and helps the jig last longer.Each identical piece of the asa-no-ha pattern hastwo 30 bevels at one end, forming a 60 point thatfits into a corner of the gridwork, and two 60 bevelsat the other, forming a 120 point where all threeinfill pieces meet. When building the 30 planing jig,I turn it 90 on the chopsaw, which lets me make theextreme angle cut at 30 instead of 60 . To do that Ibuild an L-shaped cradle for the saw base. One couldalso cut this high angle on a tablesaw sled.To create perfect infill, start by cutting a few of yourstrips intentionally long. Set up the stop block on the30 jig and plane both sides of the piece to create asharp point on the end. Now set the stop block on the60 jig and do the same to the other side of the piece,and then repeat the process on two more pieces.At this point the infill will not fit into your gridwork.Move the stop blocks and do more trimming until thethree pieces come together nicely in the center. Keepin mind that material is coming off the ends of allthree pieces as you make adjustments, so a little goesa long way. The goal is a nice friction fit, but not onethat requires much force to assemble.Once you have the fit precise, you’ll be able to cutall the other infill at the same settings. With practiceand experience, you’ll get there.I hope you give this traditional art form a try. It willtest your patience at first, become very satisfying before long, and make your woodworking stand out inthe end. Mike Farrington is a furniture maker in Aurora, Colo.www.finewoodworking.comThe tsuno asa-no-ha is a variation ofthe asa-no-ha pattern. The center jointis the same three-way lap joint used tomake the gridwork.30 bevels45 bevels60 bevels60 bevelsSakura is a very common and beautifulpattern. The pieces making up the ringhave a 90 notch cut with a V-groove bit.15 bevel75 bevel90 lapKasane-rindo is the author’s favorite.The outside points are beveled at 15 onjust one face. The lap joint is 90 .MARCH/APRIL 201973COPYRIGHT 2019 by The Taunton Press, Inc. Copying and distribution of this article is not permitted. Fine Woodworking #274 - Mar/Apr 2019W274FA.indd 731/11/19 10:21 AM
terns, you might choose a two-blade stack, or a thick blade made for joinery. As for the width of the strips, 1 2 in. is a good rule of thumb. Kumiko looks best with woods that are lighter in col-or with straigh