Transcription
Bring Home the BakeryTMINSTRUCTION MANUALProfessional Bread Makerwww.breadman.comRECIPES INCLUDEDsee reverse sideBK1060BC
Please Read and Save this Instruction ManualIMPORTANT SAFEGUARDSWhen using electrical appliances, basic safetyprecautions should always be followed including thefollowing: Read all instructions. Do not touch hot surfaces. Use handles or knobs. To protect against electrical shock do not immersecord, plugs, or appliance in water or other liquid. Close supervision is necessary when any appliance isused by or near children. Unplug from outlet when not in use and beforecleaning. Allow to cool before putting on or taking offparts. Do not operate any appliance with a damaged cord orplug, or after the appliance malfunctions or has beendamaged in any manner. Contact Consumer Servicesfor examination, repair or electrical or mechanicaladjustment. Or, call the appropriate toll-free numberon the cover of this manual. The use of accessory attachments not recommendedby the appliance manufacturer may cause fire, electricshock or injury. Do not use outdoors. Do not let cord hang over edge of table or counter, ortouch hot surfaces, including the stove. D o not place on or near a hot gas or electric burner, orin a heated oven. Extreme caution must be used when moving anappliance containing hot oil or other hot liquids. To disconnect, press and hold the STOP (0) button forseveral seconds; remove plug from wall outlet. Do not use appliance for other than intended use. Avoid contacting moving parts.SAVE THESE INSTRUCTIONSThis product is for household use only.Care Line:CustomerUSA/Canada1-800-231-9786Caution, hot surfaces: This appliancegenerates heat and escaping steamduring use. Proper precautionsmust be taken to prevent the riskof burns, fires or other injury topersons or damage to property.POLARIZED PLUG (120V Models Only)This appliance has a polarized plug (one blade is wider thanthe other). To reduce the risk of electric shock, this plug isintended to fit into a polarized outlet only one way. If the plugdoes not fit fully into the outlet, reverse the plug. If it still doesnot fit, contact a qualified electrician. Do not attempt to modifythe plug in any way.TAMPER-RESISTANT SCREWWarning: This appliance is equipped with a tamper-resistantscrew to prevent removal of the outer cover. To reduce therisk of fire or electric shock, do not attempt to remove theouter cover. There are no user-serviceable parts inside.Repair should be done only by authorized service personnel.ELECTRICAL CORDa) A short power-supply cord (or detachable power-supplycord) is to be provided to reduce the risk resulting frombecoming entangled in or tripping over a longer cord.b) Longer detachable power-supply cords or extension cordsare available and may be used if care is exercised in theiruse.c) If a long detachable power-supply cord or extension cord isused,1) The marked electrical rating of the detachable powersupply cord or extension cord should be at least as greatas the electrical rating of the appliance,2) If the appliance is of the grounded type, the extensioncord should be a grounding-type3-wire cord, and3) The longer cord should be arranged so that it will notdrape over the countertop or tabletop where it can bepulled on by children or tripped over.Note: If the power supply cord is damaged, it should bereplaced by qualified personnel; in Latin America, by anauthorized service center.Accessories/Parts(USA / Canada)1-800-738-0245For online customer serviceand to register your product, go towww.prodprotect.com/applica
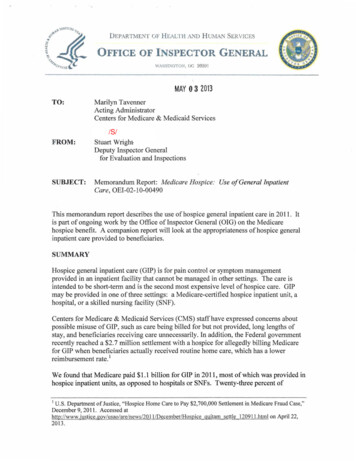
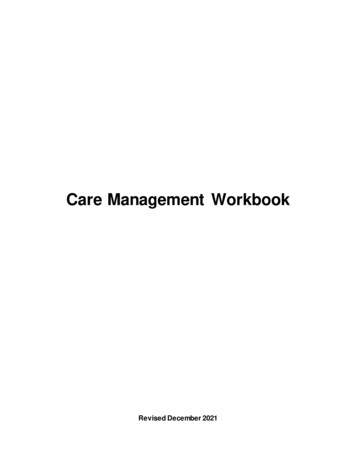
POWER OUTAGE7-Minute Power Failure Back-UpYour Professional Bread Maker has a 7-minute power failureback-up feature. If the electricity goes out, the memory willstore your cycle selection for up to 7 minutes. If the powercomes back on within this time, bread making will resumewhere it left off.If the bread maker loses power for more than 7 minutes andyou are using any dairy products, perishables or meat in yourbread, you should discard the contents of the recipe and startagain with new fresh ingredients due to health and sanitaryconsiderations. For nonperishable recipes you may try startingthe bread maker at the beginning of the cycle again. However,this may not always produce an acceptable loaf of bread.If you are not sure when the outage occurred, remove the doughand discard.1Product may vary slightly from what is illustrated.1. Lid handle2. Removable lid (Part # BK1060S-01)3. Viewing window4. Automatic fruit & nut dispenser (not shown)5. Steam vents (both sides)6. Control panel (not shown)7. Baking chamber† 8. Bread pan (Part # BK1060S-02)† 9. Collapsible kneading paddle (Part # BK1060S-03)† 10. Measuring cup (Part # BK1060S-04)† 11. Measuring spoon (Part # BK1060S-05)† 12. Kneading paddle removal key (Part # BK1060S-06)Note: † indicates consumer replaceable/removable parts†2837512119 10
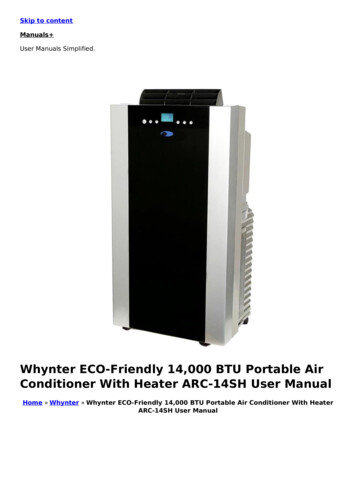
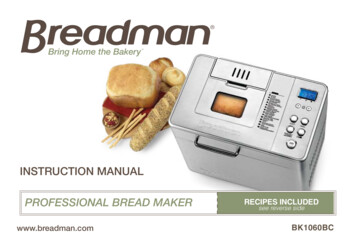
CONTROL PANEL 1. Display WindowShows selection and timer setting.2. TIMER AND BUTTONSUse this pair of buttons to adjust the bake only timeand to set delay bake timer; buttons add or subtracttime displayed in the display window. Increases time in 10-minute intervals. Decreases time in 10-minute intervals.3. LOAF SIZE BUTTONSelects loaf size: 1-lb., 1½-lb. or 2-lb. Loaf size defaultis 2-lb. Rapid loaf is preset to 2-lb.4. MENU BUTTONSelects cycle. Each time the MENU button is pressed,the number for the cycle selected and the programtime will appear in the display window.5. BAKE ONLY BUTTONUse this button to activate the BAKE ONLY cycle; thenadjust the time as needed with the and buttons.6. CRUST COLOR BUTTONSelects crust color: light, medium or dark. Crustcolor is preset to medium.7. START/STOP (I/O) BUTTONPress and hold for several seconds to cleardisplay, reset cycle or to simply stop baking.Note: When using Rapid bake, your crust color willbe set to medium.KNEADING AND BAKING CyclesNote: If at any time during bread making process you need to turnbread maker off, press and hold the START/STOP (I/O) button forseveral seconds, then unplug the unit.Note: If bread is not removed immediately after baking and START/STOP (I/O) button is not pressed, a controlled 60-minute Keep Warmmode will begin (except during Quick Bread, Dough and Jam). For bestresults, remove bread immediately after baking process is complete.WhiteUsed for breads that primarily include white bread flour, althoughsome recipes may include small amounts of whole wheat flour.Whole WheatUsed for recipes with significant amounts of whole wheat or rye flour,oats or bran. Whole wheat cycle begins with rest period during whichflours or grains absorb liquid ingredients. Soaking causes flour orgrain to soften and helps ingredients to combine. Generally, wholewheat and multi-grain breads are shorter and denser than white,French or sweet.FrenchTraditionally, French bread has a slightly crispier crust and lightertexture than white bread. Recipes usually do not include butter,margarine or milk.SweetUsed for recipes that contain eggs, fruit juice, additional sugar oradded sweet ingredients such as coconut flakes, raisins, dried fruit orchocolate. Baking temperature is reduced to prevent burning.Quick BreadUsed for recipes that contain baking powder or baking soda, ratherthan yeast, to make bread rise. Cake recipes made from scratch mustbe specially designed for this cycle.Low CarbUsed for recipes that are lower in carbohydrates.Gluten-FreeUsed for gluten-free recipes.DoughUse to prepare dough for making bread, rolls or pizza which areshaped and allowed to rise before baking in a conventional oven. Thissetting blends and kneads the dough and takes it through the first rise.ARTISAN DOUGHArtisan breads (or country breads) represent the best in breadbaking. They use the freshest ingredients, usually including freshherbs and interesting seed and nut additions. The longer risingtime (the entire cycle in the bread machine is 5:15 hours) at coolertemperature settings (preset in the machine) allow the flavor of theflour to dominate. Consider using ingredients such as, organic flours,unrefined sea salt and spring water. Sugar and fat are often not usedin these breads. The final shaping, rising and baking of the bread allowfor your creativity and bring a very personal touch to the results.JamUse to prepare preserves, marmalade, chutneys and ketchup.Add fruit, sugar and lemon juice for homemade preserves –a great topping for homemade bread, waffles and ice cream.Bake OnlyUsed if crust is too light or you wish to bake pre-made dough – alsoespecially useful if your bread is not quite done. Check every fewminutes. Bakes for up to 1 hour, 30 minutes.RapidUsed for White, Whole Wheat and French cycles to decrease time toapproximately 1 hour. Choose recipe, then simply add ½ tsp. to amountof yeast listed for a 2-lb. loaf. Bread may be shorter and denser thanbread made using the longer program.
KNOW YOUR INGREDIENTSFlour & OTHER GRAINS All-Purpose FlourAll-purpose flour is a blend of refined hard and soft wheat flours ideally suited for making quickbreads and cakes.BranBran (unprocessed) is coarse outer portion of wheat or rye grains that is separated from flourby sifting or bolting. It is often added to bread in small quantities for nutritional enrichment,heartiness and flavor. It is also used to enhance bread texture.Bread FlourBread flour typically has higher gluten concentration than all-purpose flour. Using bread flourwill produce loaves with better volume and structure.Cornmeal and OatmealCornmeal and oatmeal come from coarsely ground white or yellow corn and from rolled orsteel-cut oats. They are used primarily to enhance flavor and texture of bread.Cracked WheatCracked wheat has very coarse texture. It comes from wheat kernels cut into angularfragments. It gives whole grain breads a nutty flavor and crunchy texture.Rye FlourRye flour must always be mixed with high proportion of bread flour, as it does not containenough gluten to develop structure for high, even-grained loaf.Self-Rising FlourSelf-Rising Flour is NOT RECOMMENDED for use with your bread maker. Self-rising flourcontains leavening ingredients that will interfere with bread and quick bread making.7 Grain Cereal Blend7 grain cereal blend is a blend of cracked wheat, oats, bran, rye, cornmeal, flax seeds andhulled millet. It is used primarily to enhance flavor and texture of bread.Vital Wheat GlutenVital Wheat Gluten is manufactured from wheat flour that has been treated to remove nearlyall of the starch to leave a very high protein content. (Gluten is the protein in wheat that makesdough elastic.) Vital Wheat Gluten is available at most health food stores. It can be used in smallportions to increase volume and lighten texture.Whole Wheat FlourWhole wheat flour is milled from the entire wheat kernel, which contains the bran and germ.This high fiber flour is richer in nutrients than all-purpose or bread flour. Breads made with thisflour are usually smaller and heavier than white loaves. Many recipes mix whole wheat flourwith bread flour or vital wheat gluten to produce higher, lighter-textured bread.Tips on Flour StorageKeep flour in a secure, airtight container. Store rye and whole wheatflours in a refrigerator, freeze or a cool area to prevent them frombecoming rancid. Allow flour to come to room temperature beforeusing.Note: Flours, while visibly similar, can be very different in how they areground, milled, stored, etc. You may have to experiment with differentbrands of flour to help you make the perfect loaf. See RECIPE TIPS toassist with these experiments.YeastActive yeast, through a fermentation process, produces carbon dioxidegas necessary to make bread rise. Yeast feeds on carbohydrates insugar and flour to produce this gas. Three different types of yeast areavailable: fresh (cake), active dry and quick-acting. Quick, rapid riseand bread machine yeasts are quick-acting. Fresh (cake) yeast is NOTRECOMMENDED for use with your bread maker.Tips on YeastEnsure your yeast is fresh by checking its expiration date. Ideally,yeast should be used several months before the expiration date. Oncea package or jar of yeast is opened, it is important that the remainingcontents be immediately resealed and refrigerated or frozen for futureuse. Often dough that fails to rise is due to stale yeast.Note: Basic bread and dough recipes in this booklet were developedusing active dry yeast. You may use chart below to substitute anyquick-acting yeast (quick rise, fast rise or bread maker yeast) for activedry yeast.Conversion Chart for Bread Machine Yeast¾ tsp. bread machine yeast ½ tsp. quick-acting yeast1 tsp. bread machine yeast ¾ tsp. quick-acting yeast1½ tsp. bread machine yeast 1 tsp. quick-acting yeast2¼ tsp. bread machine yeast 1½ tsp. quick-acting yeast1 tbsp. bread machine yeast 2 tsp. quick-acting yeastRapid CyclesRapid cycle settings for White, Whole Wheat and French decrease timefor making your favorite bread in approximately 1 hour. Choose recipe,then add an additional ½ tsp. of bread machine yeast to the recipe. Thebread may be shorter and denser.
ADDITIONAL INGREDIENT NOTESImportant: Exact measurements for ingredients are the most important part of baking. It is the key to getting great texture and consistencyin your bread. Make sure to measure all ingredients exactly.Baking Powder10Double-acting baking powder is a leavening agent used in quick breads and cakes. This type of leavening agent doesnot require rising time before baking, as chemical reaction works when liquid ingredientsare added and again during baking process.Baking SodaBaking soda is another leavening agent, not to be confused or substituted for baking powder.It also does not require rising time before baking, as chemical reaction works during baking process.EggsEggs add richness and velvety texture to bread dough and cakes. When recipe calls for egg(s),large egg(s) at room temperature should be used.FatsButter, margarine and oil shorten or tenderize the texture of yeast breads. French bread gets unique crust and texture from the lack of added fat. However, breads that call for fat stay fresh longer.If butter is used directly from refrigerator, it should be cut into small pieces for easier blendingduring kneading process.LiquidsAll liquids should be warm 80ºF/27ºC to 90 F/32 C for all recipes. Liquids, such as milk, water or a combination ofpowdered milk and water, can be used when making bread. Milk will improve flavor,provide velvety texture and soften the crust, while water alone will produce a crispier crust. Vegetableor fruit juices and potato water may be used for flavor variety.SaltSalt is necessary to balance flavor in breads and cakes; it also limits growth of yeast. Changing the amount of salt ina given recipe may result in shorter, gummier bread. When first making a type of bread, do not increase or decreaseamount of salt shown in the recipe.SugarSugar is important for color and flavor of breads. It also serves as food for yeast since it the supports fermentationprocess. Recipes in this book that call for sugar require granulated sugar.Important: Do not substitute powdered sugar. Artificial sweeteners cannot be used as substitute,as yeast will not react properly with them.CLIMATE CHANGES & BAKING In high-altitude areas (over 3,000 feet), dough tends to rise fasteras there is less air pressure. Therefore, less yeast is necessary. In dry climates, flour is drier and requires slightly more liquid. In humid climates, flour is wetter and will absorb less liquid, so lessliquid is required.How to UseThis product is for household use only.Important: Your bread maker has an intelligent fuse system designedto protect the motor from overheating. It will automatically shutoff the motor if there is an overheat risk. If this occurs, unplug theappliance, wait a minimum of 20 minutes for it to cool down, and plugin again following the instructions.GETTING STARTED Remove packing materials and any stickers. Please go to www.prodprotect.com/applica to register yourwarranty. Place bread maker on dry, stable, level surface away from heat andareas where cooking grease or water may splatter on unit. Do notplace near edge of countertop. If placing beneath cabinets, makesure there is enough room to open the lid without interference.Important: Your bread maker will bake up at 2½-lb. loaf.Do not put larger quantities of ingredients into bread pan. Bread willnot mix and bake correctly and bread maker may become damaged.(See maximum ingredient amounts.) Before first use, operate on Rapid White cycle without addingingredients to burn off manufacturing oils. (Follow instructions inusing your bread maker.) Note: During first use, bread maker may smoke and/oremit an odor from mineral oils used in manufacturing. This isnormal.MAXIMUM INGREDIENT AMOUNTS Bread cycles: approximately 5 cups Quick breads: 4 cups Dough cycle: 42/3 cups Jam: 3 cups of fruit mixtureBread Pan tipsInserting bread panNote: Remember to insert kneading paddles first, then add allingredients in the order listed BEFORE inserting the bread pan intobaking chamber.Important: The collapsible kneading paddle may fall wheningredients are added. This is normal. It will stand up when kneadingbegins. When inserting bread pan into bread maker, make sure to set firmlyin place.Removing bread pan To remove bread pan from baking chamber, hold handle with anoven mitt and lift straight up firmly.Important: When you remove bread pan after baking, be sure to wearoven mitts to prevent burning. After removing loaf (by turning bread pan upside down and shakinggently), check to see that kneading paddle is removed from loaf. If itis stuck in bread, allow bread to cool; then use the paddle removalkey to remove it, taking care not to scratch the kneading paddle.Allow bread to cool before removing the kneading paddle.11
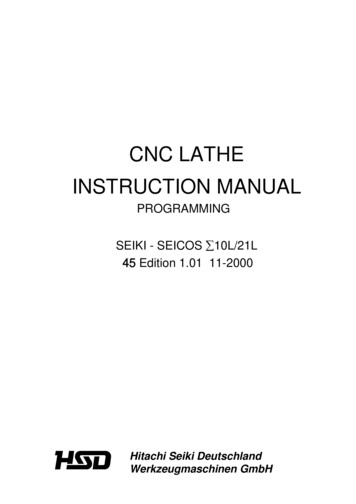
Checking Dough ConsistencyAlthough your bread maker will mix, knead and bake breadautomatically, when baking bread from scratch, it is recommendedthat you learn to recognize condition of your dough. The ratio of flour toliquid is the most critical factor in any bread recipe, yet the most easilyremedied. After 5 to 8 minutes in Knead 2, open bread maker to checkconsistency of dough. Dough should be in a soft, tacky ball (feel stickylike scotch tape). If it is too dry, add 1 tsp. of liquid at a time. If it is toowet, add 1 tbsp. of flour at a time.Using your bread makerNote: Depending on the cycle or recipe used, some steps may notapply or there may be additional steps. Refer to the respectiverecipes instructions in the recipes portion of this booklet, as wellas the specific cycle instructions located at the end of these usageinstructions.1. Open lid and remove bread pan. Lift bread pan straight up and outusing the handle (B).Caution: Do not turn or shake bread panwhile taking it out. If the bread pan isbent, temperature sensor may not workproperly.2. Position kneading paddle on the driveshaft. Match flat side of drive shaft to flatpart of hole in kneading paddle (C). MakeBsure paddle is secure.3. Place ingredients into the bread pan.Note: As you add ingredients into the breadpan, the collapsible kneading paddle mayfall; this is normal. The paddle will stand upautomatically once the cycle is started.Important: Add ingredients to bread pan inthe order listed in the recipe.Important: Always add yeast last.C124. Make small indentation on top of dryYeastingredients (not so deep it reaches thewet layer) and add yeast (D).Important: Indentation for yeast isDryimportant, especially when using the delaybake timer. It keeps yeast away from thewet ingredients until the kneading processLiquidbegins. (Liquid ingredients will prematurelyDactivate the yeast.)5. Insert the bread pan into the bakingchamber (E). Press down on rim of breadpan until it snaps securely into place.6. Close the lid. If your recipe includesextra ingredients such as fruits or nuts(listed after the yeast in the recipe), addthese to the automatic fruit and nutdispenser.EImportant: Do not exceed 2/3 cup capacity.Important: Do not pour liquids or spices into dispenser. Always makesure fresh fruit or vegetables are not wet;pat dry before putting them in the dispenser.7. Plug into standard electrical outlet. Bread maker will beep andprogram 1 and 3:25 will appear in the display window.8. Press MENU to choose desired cycle (F1). Each time MENU ispressed, unit and display will move to the next cycle.Note: As the MENU button is pressed, the Rapid cycle setting willfollow the regular cycle setting for White, Whole Wheat and French.9. Press CRUST COLORto choose crust color (F2). Breadmaker is preset for medium crust.Note: CRUST will not be activated for the following cycles:Jam, Dough, Artisan Dough, Bake Only, Rapid10. Press LOAF SIZEtoselect loaf size (F3). Breadmaker is preset to 2 lb.Note: Loaf size cannot be activatedfor the following cycles:Jam, Dough, Artisan Dough, Rapid,Gluten Free, Low Carb 11. Press START/STOP (I/O) buttonto begin kneading cycle (F4). The time remaining will begin to count down in display window.FBread making time and loaf sizewill be shown in display window.Note: During kneading cycle, yeast will activate and viewing windowmay begin to fog. (This will clear eventually so you can view theprogress.)12. When your bread is finished baking,bread maker will beep and “3:25” willappear in display window. Press START/STOP (I/O) and open lid. Using ovenmitts, remove bread pan (G).Important: Remember, bread pan andloaf are both very hot! Be careful not toplace either on tablecloth, plastic surface Gor other heat-sensitive surface that mayscorch or melt.Note: If bread is not removed immediately after baking and START/STOP (I/O) is not pressed, the Keep Warm mode will begin. Breadmaker will automatically turn off after 60 minutes. For best results,remove bread immediately after baking.Note: Keep Warm does not apply to the following cycles:Jam, Dough, Artisan Dough, Bake Only13. Turn bread pan upside down and shaketo release bread (H). Place bread uprighton wire rack to cool at least 20 minutesbefore slicing.Note: The collapsible kneading paddle isdesigned to stay in the bread pan instead ofsticking in your bread. Check to see if thepaddle stayed in the pan. If not, follow theHcaution statements below when removing.Caution: Be sure to remove kneadingpaddle from the bread before serving.Caution: Bread pan, kneading paddle and bread will be very hot.Allow bread to cool before removing the paddle and always use thepaddle removal key.14. Unplug unit and allow to cool completely before cleaning. (SeeCARE AND CLEANING INSTRUCTIONS.)Important: Make sure to clean the inside of the baking chamberthoroughly after each use.15. Once bread has cooled (approximately 2 hours) store in an airtightcontainer.SLICING AND STORING BREADFor best results, place bread on wire rack and allow to cool at least20 minutes before slicing. Use electric knife or serrated knife for evenslices.Store unused bread, tightly sealed (sealable plastic bags or plasticcontainers work well) at room temperature for up to 3 days. For longerstorage, (up to 1 month) place bread in sealed container in freezer.Since homemade bread has no preservatives, it tends to dry out andbecome stale faster. Leftover or slightly hardened bread may be cutinto ½-inch or 1-inch cubes and used in recipes to make croutons,bread pudding or stuffing.13
USING 15-HOUR DELAY BAKE TIMERImportant: Delay baking does not activate JAM cycle. Do not usedelay bake timer if your recipe includes perishables, such as, eggs,fresh milk, yogurt or other dairy products and meats, etc. To presetyour bread maker, follow these steps:To preset your bread maker, follow these steps:1. Add ingredients in the order listed as usual, taking care not to letyeast and liquid ingredients contact one another.Note: If your recipe contains salt, add it with the liquid ingredients,taking care to keep it away from the yeast.2. Close bread maker lid and plug it in.3. Press MENU to select baking cycle. Standard cycle time will beshown in display window.4. Press to add time in 10-minute intervals. (Use to subtracttime.) Amount of time set is shown in display window. To fast forward time, continually press . To fast reverse, continually press . For example, if it is 8:00 AM and you want bread ready at 1:00 PM,press until the display reads 5:00 – meaning it will finish bakingin 5 hours. This is the hour difference between 8:00 AM and1:00 PM.Note: Actual baking times will not change.5. Press LOAF SIZEto choose loaf size, press CRUST COLORto choose crust color, then press START/STOP (I/O) tobegin timer. The colon (:) in time display begins to flash, letting youknow timer is started. When your bread is finished baking, breadmaker will beep and “0:00” will appear in display window. PressSTART/STOP (I/O) and open lid.6. If you make an error after you’ve activated program and want tostart over, press and hold START/STOP (I/O) for several seconds.Timer will clear and you can begin again.14BAKE ONLYThe BAKE ONLY cycle offers the flexibility to vary time. You can bakepre-made dough or dough purchased at the store using this cycle. Youmay also use this cycle if crust color is too light or if your sweet breadis not quite done. Check every few minutes.1. Press the BAKE ONLY button to activate cycle. Adjust the amount oftime you need up to 1 hour using the and buttons.2. Press START/STOP (I/O) button to begin baking.SPECIAL GLAZES FOR YEAST BREADSSelect 1 of the following special glazes to enhance your bread: Melted Butter Crust: Brush melted butter over just-baked breadfor a softer, more tender crust. Milk Glaze: For a softer, shiny crust, brush just-baked bread withmilk or cream. Sweet Icing Glaze: Mix 1 cup sifted confectioner’s sugar with 1 to2 tablespoons of milk, water or fruit juice until smooth. Drizzleglaze over raisin or sweet bread when they are almost cool.Note: If desired, generously sprinkle with your choice of nuts or seedsafter glazing.DOUGH CYCLETips for Best Results If using delay bake timer, make sure yeast is on top of flour, awayfrom liquids.Important: Never allow dough to remain in bread maker after cycle iscomplete; it may over rise and damage machine. Rising times for dough after it is shaped and placed in baking panwill vary due to recipe, temperature and humidity level of yourkitchen. Optimum temperature for rising is 80 – 85 F. Rising is themost essential feature in bread making. Bread maker allows dough to have first rise or fermentation beforedough is removed. Fermentation conditions gluten, (becomingpliable and elastic with a soft, smooth quality) develops flavor andleavens product. Sometimes a double rising is beneficial especially for whole grainor 100% whole wheat bread. Let dough rise once in bread maker.Remove from bread maker, punch down, let rise again, punch downand let rest 10 minutes. Resting allows gluten to relax and makeshandling easier. Shape as desired and allow to rise until doubled involume. If only 1 rise is desired, remove from bread maker, let rest,shape and rise as above. Baker’s Tip: Dough has doubled in volume when an indentationremains after tip of a finger is pressed lightly and quickly intodough. If indentation springs back, cover and let rise a few moreminutes and check again.SPECIAL TIPS FOR MAKING DOUGHImportant: For use only with the Dough Cycle. Always allow optimum rising of shaped dough. Use pastry brush to apply glaze. Bake as directed in recipe.Apply Just Before Baking:Egg Yolk GlazeFor shiny golden crust, mix 1 slightly beaten egg or egg yolk with1 tbsp. water or milk.Egg White GlazeFor shiny, chewy crust, mix 1 slightly beaten egg white with1 tbsp. water.If desired, sprinkle chopped nuts or fruit and/or seeds after glazing.Lightly FlouredSprinkle enough flour onto work area so dough can be handled withoutsticking.Shaped RollsImportant: Once rolls are shaped, cover and let rise until doubledbefore baking.Cloverleaf RollsShape into ½-inch balls. Place 3 balls in each greased muffin tin.Crisscross RollsShape into balls, setting 2 aside. Combine balls and roll into a ¹ 8-inchthick square. Cut strips ¹ 8-inch wide and 2-inches long. Brush topof roll with beaten egg. Place 1 strip across top of each ball. Repeatprocess, placing second strip in opposite direction across top of eachball.Traditional RollsShape into balls. For “pull apart” rolls, place dough balls with sidestouching in 8 or 9 inch round or square greased baking pan. For“individual” rolls place dough balls 2-inches apart.Crescent RollsOn lightly floured board, roll dough to 12-inch circle. Spread withsoftened butter. Cut into 16 wedges beginning at wider end.Place rolls 2 inches apart on greased baking sheet with pointsunderneath; curve rolls slightly. If desired, brush with melted butterjust before baking.RosettesOn lightly floured board, roll about 1 ½ oz piece of dough into 14 inchrope. Tie in a loose knot, leaving 2 long ends. Tuck one end underknot and second end into the top center of the loose knot. Place2 inches apart on lightly greased baking sheet.ARTISAN DOUGH CYCLETips for Best Results Consider using more refined ingredients such as, organic flours,unrefined sea salt and spring water. Make sure you are using the freshest ingredients, including freshherbs, seeds or nuts. If using delay bake timer, make sure yeast is on top of flour, awayfrom liquids.Important: Never allow artisan dough to remain in bread maker aftercycle is complete; it may over rise and damage machine.15
Rising times for dough after it is shaped and placed in baking panwill vary due to recipe, temperature and humidity level of yourkitchen. Optimum temperature for rising is 70 – 75 F. Rising is themost essential feature in bread making. Bread maker allows dough to have first rise or fermentation beforedough is removed. Fermentation conditions gluten
GLUTEN-FREE Used for gluten-free recipes. DOUGH Use to prepare dough for making bread, rolls or pizza which are shaped and allowed to rise before baking in a conventional oven. This setting blends and kneads the dough and takes it through the first rise. ARTISAN DOUGH Artisan breads (or country bre