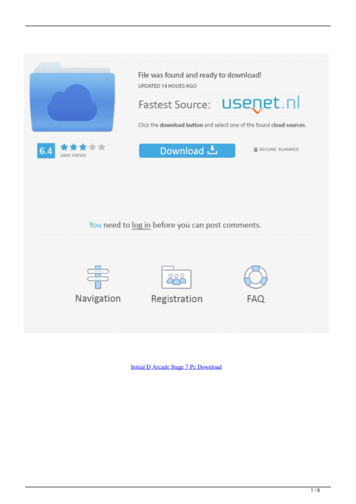
Transcription
Jumpstarts dead batteries in secondsArranca baterías agotadas en segundosOWNER’S MANUALMANUAL DEL PROPIETARIOCHARGE PRIOR TO INITIAL USE. COMPLETELY RECHARGE AT LEAST ONCE EVERY MONTH.THIS UNIT CAN BE LEFT PLUGGED IN AT ALL TIMES TO ENSURE A FULL CHARGE WHEN NEEDED.CARGUE ANTES DEL USO INICIAL. CÁRGUELO COMPLETAMENTE AL MENOS UNA VEZ AL MES.ESTA UNIDAD PUEDE SER DEJADA CONECTO EN TODOS LOS TIEMPOS DE ASEGURAR UNACARGA LLENA CUANDO SEA NECESARIO.Model: PSX2Copyright 2011 Powerstation, LLCAll Rights ReservedModelo: PSX2Derechosde autor 2008,2011 Powerstation,LLC srightsreservedLLC
CONTENTSWarning Information1–4Introduction5Features5Getting to know your PSX26-7Operation8-9Charging before initial use8Standard recharging of the PSX2812V DC recharging of the PSX29Use of the PSX2Jumpstarting precautions9-139-10Using the jumpstart11Using the integrated work light12Using the compressor12Inflating a tire or object12Inflating other objectsOperating DC appliances12-1313Replacement Parts13Notes29NOTICE:If you experience any problems with the PSX2, please DO NOT returnthe unit to the place of purchase. Please call PowerStation’s Technicalsupport staff toll free at 1-800-837-5994.
WARNING INFORMATIONThis manual contains information regarding safety, operation, maintenanceand storage of this product.Please carefully read and understand this manual before using this productto avoid possible injury or property damage.Keep this manual for future reference.WARNINGRISK OF FIRE, EXPLOSION OR BURNS.This unit has no user-serviceable parts within the housing.Have a qualified technician complete any service work.WARNINGNever allow the jumpstart’s red and black cable clamps to toucheach other or a common metal conductor. Such contact couldcause damage to the unit and/or create a sparking/explosionhazard.WARNINGConnect red clamp to the positive ( ) battery terminal. The blackclamp should be attached to the engine block of stalled vehicle.Do not connect black clamp to the negative (-) battery terminal;doing so could cause damage to the unit and/or create asparking/explosion hazard.WARNINGDo not try to jumpstart a battery for more than six seconds.Before repeating the jump starting cycle, allow the unit to coolfor three minutes.WARNINGThe jumpstarting cable connection has enough energy to causea spark, create an explosion hazard or cause burns if a metalobject contacts both terminals. Do not turn on the jumpstartingfunction without having cables properly attached to the vehicle’sbattery.WARNINGDo not leave the compressor unattended while operating.The compressor must be allowed to cool for ten minutesfollowing each ten minutes of continuous use.WARNINGDo not expose the PSX2 to temperatures greater than 104 F(40 C). The operational temperature range for the sealed leadacid battery is 5 F to 122 F (-15 C to 50 C) when discharged(or in use) and 32 F to 104 F (0 C to 40 C) when charged and5 F to 104 F (-15 C to 40 C) during storage.030211PSX2 Owners Manual Page 1
WARNING INFORMATIONWARNINGWARNINGcontinuedRISK OF FIRE, EXPLOSION OR BURNS (continued).Do not use this unit where there are combustible fumes orgases. Do not use in an enclosure containing automotive-stylelead acid batteries.RISK OF PERSONAL INJURY, DEATH OR DAMAGE TOEQUIPMENT.ALWAYS wear approved eye protection when using thisequipment.WARNINGMake sure the jumpstart is safely secured when transporting.If the unit is not properly secured during an accident the unitcould hit the driver or passengers.WARNINGDo not exceed recommended air pressure of object beinginflated.WARNINGCAUTIONSHOCK HAZARD.Keep away from children. Do not insert foreign objects into theDC power socket, ventilation slots, or any opening in the unit.Do not expose the unit to water, snow, spray or excessivemoisture.CAUTION.Contains a sealed lead acid battery. Keep dry. Do not drop.See owners guide for proper charging procedures. Dispose ofbattery according to local regulations.CAUTIONNever attempt to jumpstart a frozen battery. Graduallywarm the frozen battery to a minimum of 40 F (4 C)before jumpstarting.CAUTIONTo avoid possible damage and/or a shortening of the unit’sworking life, protect the unit from direct sunlight, direct heat,and/or moisture.CAUTIONThe jumpstart function is designed to be used only on vehiclesor boats with 12V electrical systems.CAUTIONThis unit is not designed to be used in the place of a vehiclebattery.CAUTIONThis unit is not designed to be used as a battery charger.030211PSX2 Owners Manual Page 2
WARNING INFORMATIONcontinuedINSTRUCTIONS FOR JUMPSTARTING AN ENGINE:WARNINGBatteries contain acid and produce explosive gasesNote: Consult the owner’s manual for complete instructions. SHIELD THE EYES ANDFACE FORM THE BATTERIES AT ALL TIMES. Be sure the vent caps are tight and level.Place a damp cloth, if available, over any vent caps on both batteries. Be sure the vehiclesdo not touch and that both electrical systems are off and at the same voltage. Theseinstructions are for negative ground systems only.1. Connect the positive ( ) cable to the positive ( ) terminal of the dischargedbattery that is wired to the starter or solenoid.2. Connect the other end of the positive cable to the positive terminal of thebooster battery.3. Connect the black negative (-) cable to the other terminal (negative) of thebooster battery.4. MAKE THE FINAL CONNECTION ON THE ENGINE BLOCK OF THESTALLED VEHICLE (NOT TO THE NEGATIVE POST) AWAY FROM THEBATTERY. STAND BACK.5. Start the vehicle and remove the cables in the reverse order of connection (the engine block (black) connection is the first to disconnect).BATTERY BOOSTER CABLE INSTRUCTIONS FOR JUMP STARTINGAN ENGINE:WARNINGBatteries contain and produce explosive gases.These instructions are designed to minimize the explosion hazard. Keep sparks,flames, and cigarettes away from the batteries at all times. Wear safety glasses,and protect the eyes at all times.Do not lean over the batteries during this operation.Both the battery to be jumped and the booster source must be the same voltage(6 or 12 V, etc.).Power sources other than batteries should not exceed 16 V DC for use with the12 V systems, and 8 V DC for use with a 6 V DC system.030211continuedPSX2 Owners Manual Page 3
WARNING INFORMATIONcontinuedBATTERY BOOSTER CABLE INSTRUCTIONS FOR JUMP STARTINGAN ENGINE (continued):Position the vehicle with the booster battery, or other power source, adjacentto the vehicle with the discharged battery so that the booster cables can beconnected easily between both vehicles. Make certain that the vehicles do nottouch each other.1. Turn off all electrical loads on all vehicles and set the parking brake. Placethe automatic transmission in “PARK” (manual transmission in “NEUTRAL”).2. Determine whether the discharged battery has the negative (-) or the positive( ) terminal connected to the ground. The ground lead is connected to theengine block, the vehicle frame, or some other good metallic ground. Thebattery terminal is connected to the starter is the one that is not grounded.All vehicles manufactured in the USA after 1955 have the negative batteryterminal grounded. All European and Asian passenger vehicles manufacturedafter 1971 have the negative battery terminal grounded.3. On a negative ground system, connect the positive ( ) cable to the positive( ) terminal of the discharged battery wired to the starter solenoid. Do notallow the positive cable clamps to touch any metal other than the batterypositive ( ) terminals.4. Be sure that the vent caps are tight and level on both batteries. Place adamp cloth over any vent caps on each battery making certain it is clear offan blades, belts, and other moving parts.030211PSX2 Owners Manual Page 4
INTRODUCTIONThank you for purchasing the PowerStation PSX2. The PSX2 is a user-friendly &versatile product designed to instantly jumpstart vehicles, provide portableinflation and 12V DC power. The PSX2 also brings light to any situation with anintegrated work light.The PSX2 is an ideal companion to accompany all your jumpstarting, inflationand portable power needs.FEATURES High current EHP battery provides 1,000 Amps peak power, 400 Ampsstarting power. Starts cars, trucks, recreational vehicles, and boats without the needof a host vehicle or an AC power source. 12V DC power outlet provides power for appliances designed to plug intoa vehicle or boat 12V power socket. Solid-state, integrated charger allows for re-charging of the PSX2 batteryfrom any 120V AC power source. Internal charger allows for this unit to be plugged in at all times when not in use. Sealed, maintenance-free heavy duty battery is safe to use, transport,and store. 32 inch (82cm) heavy-duty industrial welding cables and 400 amp clampsfor maximum starting power. Battery volt meter for quick assessment of PSX2 internal battery state ofcharge. High-impact molded case provides durability and convenient transport. LED work light for roadside repairs or emergency situations. High volume air compressor and adaptors can address a wide range ofinflation needs. Pressure gauge displays air pressure in PSI. “Cables Reversed” indicator lights indicate reverse polarity warning. Includes 12V DC power cable and 120V AC charger cable.030211PSX2 Owners Manual Page 5
GETTING TO KNOW YOUR PSX2A. WARNING FIRST AID:If battery acid comes in contact with skin, immediately flush with clean water, thenwash thoroughly with soap and water. If irritation or localized pain occurs, seekimmediate medical attention. For eyes, flush immediately with clean water for 15minutes minimum. Seek medical attention IMMEDIATELY!BATTERY DISPOSAL:This unit contains a sealed, non-spillable lead-acid battery, which must be recycled ordisposed of properly. Contact your local waste management authority, toll free hotline800-253-2687 or visit the website, www.earth911.org for disposal locations in yourlocal area. Under normal conditions and when used as instructed, yourPowerStation battery should provide years of dependable service.Figure 1A. 12V DC outletB. Air inlet adaptors,12V DC power cable,and 120V AC chargercable storageC. Air inlet adaptors (3)D. 12V DC power cableE. 120V AC charger outletand charger cableF. Air compressor and hosestorageB.B.C.F.D.120V AC CHARGERAlways wear eye protection whenusing your 140 PSI compressor unit.Always follow vehicle / tiremanufacturer’s recommendation forproper inflation. DO NOTOVER-INFLATE. When inflatingtires, always lock the air hoseconnector over the inflation valvebefore moving the “ON/OFF” switchto the “ON” position. Air pressurealready present will be registered onthe built-in air pressure gauge. Runcompressor for only 10 minuteintervals, allowing 10 minute restsbetween intervals to prevent thecompressor from overheating.NOTE: Failure to follow theseinstructions may causepermanent injury or damage.E.E.030211PSX2 Owners Manual Page 6
GETTING TO KNOW YOUR RGECABLESREVERSEDM.CABLEPOWER e 2G. Battery test buttonH. VoltmeterI. Work lightJ. Compressor gaugeQ.K. Compressor ON/OFF buttonL. Work light ON/OFF buttonM. Indicator lights: cable power on / charging / full charge / cables reversedN. Positive clampO. Negative clampP. Jumper cable ON/OFF switchQ. Cables reversed LED indicator lightCABLES030211REVERSEDPSX2 Owners Manual Page 7
OPERATIONCAUTIONRead all operating instructions before using your PSX2.This section will guide you through: Charging the PSX2 before initial use Standard recharging of the PSX2 Jumpstarting a vehicle Using the integrated work light Using the compressor Operating 12V DC outletCharging the PSX2 before initial useWe recommend charging the PSX2 on a regular basis. The initial charge couldtake up to 72 hours.Note: The PSX2 charger is fully automatic and maintains the battery charge as long asthe PSX2 remains plugged into a wall socket with 110V power. Leaving your PSX2plugged in will not damage the battery and ensures a fully charged battery at all times.Note: If the battery is fully discharged, up to 72 hours may be needed to completelyrecharge. If you store your PSX2 for extended periods of time without use, completelyrecharge at least once every month. The PSX2 is equipped with a sensor that preventsovercharging.CAUTIONDo not use the PSX2 as a power source while recharging.Use the following step-by step guide to recharging your unit.Standard Recharging of the PSX2We recommend charging the PSX2 on a regular basis. Even when not in regularuse, the PSX2 should be charged at least once per month to maintain optimumperformance. The PSX2 is equipped with an internal charger that allows the unit tobe plugged in at all times when not in use.Charge your PSX2 after each use.To recharge the PowerStation internal battery using AC power:1. Ensure that all elements of the unit are off and that nothing isconnected to the 12V DC outlet.2. Plug the AC charger cable into the AC charger access point on the unit.At this time the red “Battery Charging” indicator will illuminate.3. Plug the AC charger cable into a standard wall AC outlet.4. Allow unit to charge until the red “Battery Charging” indicator turns offand the green “Full Charge” indicator is illuminated.5. The charge level can be checked by first disconnecting the AC chargercable from the wall outlet and pressing the battery test button.030211PSX2 Owners Manual Page 8
OPERATIONcontinuedTo Recharge using a 12V DC power source:(Do not exceed 2 hours)Note: Only use the DC charging option when an AC power source is notavailable.1.Insert the DC charging cord into the cigarette lighter receptacle onthe boat or vehicle.2.Insert the other end of the DC charging cord into either one of the12V DC power outlets on the side of the unit.Note: The jumpstart on/off switch can be left in the off position.CAUTIONIt is possible to over charge the battery when re-charging usingthe DC outlet. Over charging the battery can cause permanentdamage and decrease battery performance. Only charge usingDC supply if a 120V AC outlet is not available. Do not exceed 2hours of DC charge time.USE OF THE PSX2The following section will guide you through the useof your PSX2.Please note that while using various features of the PSX2 simultaneously ispermissible, this will increase the load on the battery, thereby reducing run-timebefore recharging is necessary.Jumpstarting precautionsWARNING030211RISK OF FIRE, EXPLOSION OR BURNS.Electrolyte inside lead acid batteries contains sulfuric acid whichcan burn skin and harm or destroy clothing. Wear eyeprotection any time you are jumpstarting a battery and keepbaking soda mixed with water available to neutralize acid. Makesure that long hair is put up securely, do not wear loose fittingclothing or jewelry, these could become caught in movingengine parts or create a short circuit resulting in personal injuryor loss of life.PSX2 Owners Manual Page 9
USE OF THE PSX2continuedRISK OF FIRE, EXPLOSION OR BURNS (continued).CAUTIONBefore connecting the jumpstart cables, check thejumper cables power switch to confirm that it is in theOFF position. The reverse polarity warning function doesnot protect the PSX2 or your vehicle from damage if thecables are not correctly connected and the jumpercables power switch is in the ON position. If the red“cables reversed” LED illuminates and the warningbuzzer sounds when the cables are attached to thevehicle battery, STOP! Make certain the Red positiveclamp on the jump start is connected to the Positivebattery terminal in the vehicle and the Black negativeclamp is grounded to the vehicle.WARNINGNever allow the jumpstart’s red and black cable clamps to toucheach other or a common metal conductor. Such contact couldcause sparking, an explosion and/or damage to the unit.WARNINGConnect red clamp to the positive ( ) battery terminal.The black clamp should be attached to the engine block or othernon-moving metal part of stalled vehicle. Do not connect blackclamp to the negative (-) battery terminal. Doing so could causedamage to the unit and/or create a sparking/explosion hazard.WARNINGDo not try to jumpstart a battery for more than six seconds.Allow the unit to cool for three minutes after each six secondjumpstart.WARNINGThe jumpstarting cable connection has enough energy to causea spark, create an explosion hazard, or cause burns if a metalobject contacts both terminals. Keep the jumpstart switch in theOFF position, except when executing the jump start procedure.Do not turn on the jumpstarting function without having cablessecurely attached.030211PSX2 Owners Manual Page 10
USE OF THE PSX2continuedUsing the JumpstartThe PSX2 can be used to jumpstart any standard size vehicle or boat witha single 12V starting battery. If you have any questions regarding how to jumpstart your vehicle, consult the vehicle owners manual or the vehicle manufacturer before using the PSX2 jump start function.The following steps should be read completely before starting thisprocedure and then carefully followed throughout the procedure:1.Be sure that the PSX2 jumper cables power switch is in the OFFposition (see Figure 2 on page 7 for location P).2.Ensure safety of immediate area. See warnings at the beginningof this manual for further details.3.Turn off the vehicle or boat, as well as all attached accessories suchas lights, radios, et cetera.4.Be sure that the emergency brake is engaged. Manual transmissionvehicles should be in neutral. Automatic transmission vehiclesshould be in park.5.If jumpstarting a boat engine, purge the engine compartment andvent fumes per boat manufacturer instructions before proceeding.6.Position the PSX2 on a secure, level surface in reach of the batterybut away from all electrical and moving parts of the engine. Pleasenote, some engine components may be hot enough to cause severeburns or damage the PSX2.Connect the red positive ( ) clamp (see Figure 2 on page 7 for locationN) of the PSX2 to the positive ( ) terminal of the battery (never leanover the battery when making connections to jumpstart).7.8.Connect the black negative (-) clamp (see Figure 2 on page 7 forlocation O) of the PSX2 to the engine block, cylinder head, or otherheavy, yet stationary metal engine part.If cables are attached to the incorrect battery terminal theCables Reversed LED (see Figure 2 on page 7 for location Q)will switch on and a warning tone will sound. If this occurs,WARNINGcorrect the connection before proceeding to the next step.Failure to do so may cause sparking, personal injury and/orharm to the vehicle or jumpstart unit. Check to be sure thatthe cables are clear of all moving engine parts.030211PSX2 Owners Manual Page 11
USE OF THE PSX2continued9.Turn the jumper cables power switch to the “ON” position. Crank theengine. Do not crank for more than six seconds. Allow the PSX2 tocool for at least 3 minutes between six second jumpstart cycles.10. After successfully starting the engine, turn the jumper cables powerswitch back to the “OFF” position.11. Remove the black negative (-) clamp and return to its stored position.12. Remove the red positive ( ) clamp from the battery and return to itsstored position.Using the integrated work lightTo use the integrated work light, simply press the work light power buttonlocated directly below the work light (see Figure 2 on page 7 for location L).Using the compressorThe air compressor in the PSX2 is designed as a convenient portable inflationdevice. After ten minutes of continuous use, turn off the compressor and allow itto cool for ten minutes. Continue use, if necessary, following this ten minutes on/ ten minutes off cycle (see Figure 2 on page 7 for location K).WARNINGAllowing the compressor to run in excess of 10 minutes canresult in permanent damage to the compressor, jump startunit, property or personal injury. Make sure the compressorventilation slots on the front of the unit are free of debris andair can circulate around the compressor motor while in use.Inflating a tire or object using the compressor1. Secure the inflator nozzle to the valve stem using the thumb latch (seeFigure 1 on page 6 for location F).2. Switch on the compressor via the switch on the front of the PSX2(see Figure 2 on page 7 for location K).3. Check the pressure gauge (see Figure 2 on page 7 for location J).Once desired psi is reached, remove the valve connector by releasingthe thumb latch.4. Turn off compressor via the switch on the front of the PSX2 .Inflating other objects1. Place the appropriate inflation accessory nozzle on the valveconnector and secure with the thumb latch (see Figure 1 on page 6 forlocation C).2. Insert the accessory into the deflated object.3. Turn on compressor via the switch on the front of the PSX2. Oncedesired psi is reached, remove the valve connector from the inflatedobject. Release the inflation accessory by releasing the thumb latchand gently pulling the accessory out of the valve connector.4. Turn off compressor via the switch on the front of the PSX2.030211PSX2 Owners Manual Page 12
USE OF THE PSX2continuedNote: If the maximum pressure of the item being inflated is not known,then allow the compressor to run only until the desired fullness is reached.Over-inflating an item could result in damage to the PSX2 or the item beinginflated. Never leave the compressor running unattended.Operating 12V DC appliancesTo power a 12V DC appliance with your PSX2 please follow these steps: Plug in appliance to the 12V outletTurn on applianceAfter use is completed, turn off appliance, unplug appliance from the unitRe-charge the PSX2 as soon after use as possibleCheck the battery voltage regularly when using the 12V outlet. Do not allowthe battery voltage to drop below 11V before recharging or damage tothe battery can occur.Notes: The 12V DC outlet is always on. No other switches need to be on to use this outlet. The combined load should not exceed 15 Amps. Outlet will switch off automatically ifoverloaded. The PSX2 will NOT automatically turn off power to the DC outlet. Continuing to use 12VDC appliances after the battery has been depleted can permanently damage the unit. Do not operate 12V DC appliances while charging your PSX2. Doing so may damage theunit and/or your DC appliance. 12V DC appliances vary greatly according to the amount of power they consume. Thewattage consumed by a 12V DC appliance will impact the length of time the PSX2 willoperate the appliance before the need to recharge the PSX2. The greater the wattageconsumed, the lesser the duration of the PSX2 battery charge. The 12V DC outlet isequipped with an internal circuit breaker which will automatically cut power to the outletif: the DC appliance causes a direct short or if the appliance draws excessive amperage.This circuit breaker is designed to automatically reset once the fault has been correctedand the breaker has cooled to a normal operating temperature.REPLACEMENT PARTSThe following replacement parts are available for the PSX2:PARTNUMBERDESCRIPTIONRSPS151120V AC power cordRSPS15212V DC power cordRSPS155Inflation accessoriesOnly parts identified by part number are available for purchase.If you experience any problems with the PSX2, please DO NOT returnthe unit to the place of purchase. Please call PowerStation’s Technicalsupport staff between the hours of 8:30 AM to 5:30 PM EasternStandard Time toll free at 1-800-837-5994.030211PSX2 Owners Manual Page 13
CONTENIDO15-18Información de endo su PSX220-21Operación22-23La carga previo al uso inicial22La recarga estándar del PSX222La recarga con 12V DC del PSX22323-27El uso del PSX2Precauciones de arranque23-24Usando el arrancador25Usando la luz integrada de trabajo26Usando el compresor26Inflando una llanta u objeto26Inflando otros objetos27Operando los dispositivos DC27Partes de repuesto28Notes29AVISOSi usted experimenta cualquier problema con el PSX2, por favorNO devuelva la unidad a su lugar de compra. Llamegratuitamente por favor al personal de soporte técnico dePowerStation al 1-800-837-5994.030211Página 14 del manual del propietario PSX2
INFORMACIÓN DE ADVERTENCIAEste manual contiene información sobre la seguridad, operación, mantenimientoy almacenamiento de este producto.Para evitar lesiones potenciales o daños a la propiedad, por favor lea ycomprenda este manual antes de usar este producto.Mantenga este manual para consulta futura.ADVERTENCIARIESGO DE INCENDIO, EXPLOSIÓN O QUEMADURAS.Esta unidad no cuenta con ninguna pieza dentro de la carcasa queel usuario puede reparar por sí solo. Asegúrese que un técnicocalificado lleve a cabo cualquier trabajo de mantenimiento.ADVERTENCIANunca permita que las grampas de los cables rojos y negrostengan contacto uno con otro ni con ningún conductor demetal. Dicho contacto podría ocasionar daños a la unidad y/ocrear un riesgo de chispas/explosión.ADVERTENCIAConecte la grampa roja al borne positivo ( ) de la batería. Lagrampa negra debe estar sujetada al bloque del motor delvehículo calado. No conecte la grampa negra al borne negativo(-) de la batería; esto podría ocasionar daños a la unidad y/ocrear un riesgo de chispas/explosiciónADVERTENCIANo intente arrancar una batería por más de 6 segundos. Antesde repetir el ciclo de pasos de arranque, deje que se enfríe launidad por tres minutos.ADVERTENCIALa conexión del cable de arranque cuenta con suficiente energíapara ocasionar una chispa, crear un riesgo de explosión uocasionar quemaduras si algún objeto de metal tenga contactocon ambos bornes. No prenda la función de arranque sin tenerlos cables adecuadamente sujetados a la batería del vehículo.ADVERTENCIANo deje desatendido el compresor durante la operación.Se debe permitir que se enfríe el compresor por diez minutosdespués de cada diez minutos de uso continuo.ADVERTENCIANo exponga el PSX2 a una temperatura mayor a 104 F (40 C).El rango de temperatura operacional para una batería selladade ácido/plomo es de 5 F a 122 F (-15 C a 50 C) cuando estédescargada (o en uso) y de 32 F a 104 F (0 C a 40 C) cuandoesté cargada y de 5 F a 104 F (-15 C a 40 C) durante sualmacenamiento.030211Página 15 del manual del propietario PSX2
INFORMACIÓN DE ADVERTENCIAcontinuaciónADVERTENCIARIESGO DE INCENDIO, EXPLOSIÓN O QUEMADURAS.No use esta unidad donde se encuentren gases ni humoscombustibles. No use en un área encerrada que contengabaterías de ácido/plomo estilo automotriz.ADVERTENCIARIESGO DE LESIONES, PERSONALES, LA MUERTE ODAÑOS AL EQUIPO SIEMPRE.lleve puesto protección de ojos aprobada al momento de usareste equipo.ADVERTENCIAAsegúrese que el arrancador esté seguramente sujetadodurante el transporte. Si la unidad no esté adecuadamenteasegurada durante algún accidente, la unidad podría pegarles alchofer o a los pasajeros.ADVERTENCIANo exceda la presión de aire recomendada para el objeto quese pretende inflar.ADVERTENCIAPRECAUCIÓNRIESGO DE CHOQUE.Manténgalo fuera del alcance de los niños. No inserte objetosforáneos en el enchufe de alimentación DC, las ranuras deventilación ni en cualquier abertura en la unidad. No exponga launidad a agua, nieve, aspersión ni humedad excesiva.PRECAUCIÓN.Contiene una batería sellada de ácido/plomo. Manténgala seca.No la deje caer. Consulte la guía del propietario para los procedimientos de carga. Deseche la batería según regulación local.PRECAUCIÓNNunca intente arrancar una batería congelada. Caliente labatería congelada gradualmente hasta un mínimo de 40 F (4 C)antes de arrancarla.PRECAUCIÓNPara evitar posibles daños y/o disminuir la vida útil de trabajode la unidad, proteja la unidad contra la luz directa del sol, elcalor directo y/o la humedad.PRECAUCIÓNLa función de arranque está diseñada para usarse sólo en aquellosvehículos o barcos con sistemas eléctricos de 12 voltios.PRECAUCIÓNEsta unidad no está diseñada para usarse en lugar de la bateríadel vehículo.PRECAUCIÓNEsta unidad no está diseñada para usarse como cargador debatería.030211Página 16 del manual del propietario PSX2
INFORMACIÓN DE ADVERTENCIAcontinuaciónINSTRUCCIONES PARA PASAR CORRIENTE O PUENTEAR UN MOTOR:ADVERTENCIALas baterías contienen un ácido y producen gases explosivosNota: consulte el manual del usuario para las instrucciones completas. PROTEJA SUSOJOS Y CARA DE LAS BATERÍAS EN TODO MOMENTO. Asegúrese que las tapas dedesahogo estén fijas y niveladas. Coloque un trapo húmedo, si lo tiene, sobre cualquierade las tapas de desahogo en ambas baterías. Asegúrese que los vehículos no entren encontacto; además, revise que los sistemas eléctricos de ambos estén apagados y con elmismo voltaje. Estas instrucciones son sólo para los sistemas de tierra negativos.1. Conecte el cable del positivo ( ) al terminal del positivo ( ) en la bateríadescargada que está cableado al arranque del motor o solenoide.2. Conecte el otro extremo del cable positivo al terminal de la batería de recarga.3. Conecte el cable negro del negativo (-) al otro terminal (negativo) de labatería de de recarga.4. HAGA LA ÚLTIMA CONEXIÓN AL BLOQUE DEL MOTOR DEL VEHÍCULOQUE NO ARRANCA (NO AL BORNE NEGATIVO), LEJOS DE LA BATERÍA.APÁRTESE.5. Encienda el vehículo y retire los cables en el orden contrario al que losconectó (la conexión al bloque del motor, de color negro es la primera quedebe retirar).INSTRUCCIONES DE ARRANQUE PARA DEL CABLE DE ARRANQUEDE LA BATERÍA:ADVERTENCIALas baterías contienen y producen gases explosivos.Estas instrucciones están diseñadas para minimizar el peligro de explosión.Mantenga las chispas, los humos y los cigarros lejos de las baterías en todomomento, Lleve puesto gogles de seguridad y proteja los ojos en todomomento.No se sobrecargue encima de las baterías durante esta operación.La batería que será cargada y la fuente de arranque de respaldo deben ser delmismo voltaje (6 ó 12 V, etc.).Las fuentes d
030211 PSX2 Owners Manual Page 4 WARNING INFORMATION continued BATTERY BOOSTER CABLE INSTRUCTIONS FOR JUMP STARTING AN ENGINE (continued): Position the vehicle with the booster battery, or other power source, adjacent to the vehicle with the discharged battery so that the boos