Transcription
ROUTINE BLOOD TESTINGMany diagnostic and laboratory tests include the direction toperform routine blood testing and/or routine urine testing.The protocol for those tests is presented here and will becross-referenced within the many tests requiring them.BeforeExplain the procedure to the patient.Tell the patient if fasting is necessary. (Fasting is mostcommonly required with glucose and lipid studies.)If fasting is required, instruct the patient not to consumeany food or fluids. Only water is permitted. Fastingrequirements usually vary from 8 to 12 hours.Instruct the patient to continue taking medications unlesstold otherwise by the healthcare provider.During Collect the blood in a properly color-coded test tube(Table A, page xiv), which indicates the presence orabsence of additives. Tube stopper colors may vary withdifferent manufacturers. If uncertain, verify with thelaboratory.After Apply pressure or a pressure dressing to the venipuncturesite. Assess the site for bleeding. Patient teaching
ROUTINE URINE TESTINGMany diagnostic and laboratory tests include the direction toperform routine blood testing and/or routine urine testing.The protocol for those tests is presented here and will becross-referenced within the many tests requiring them.BeforeExplain the procedure to the patient.Inform the patient if food or fluid restrictions are needed.DuringRandom, fresh, or spot specimen: Instruct the patient to urinate into an appropriate nonsterile container.24-hour specimen:1. Begin the 24-hour collection by discarding the firstspecimen.2. Collect all urine voided during the next 24 hours.3. Show the patient where to store the urine.4. Keep the urine on ice or refrigerated during the collectionperiod. Foley bags are kept in a basin of ice. Some collections require a preservative. Check with the laboratory.5. Post the hours for the urine collection in a prominentplace to prevent accidentally discarding a specimen.6. Instruct the patient to void before defecating so that urineis not contaminated by stool.7. Remind the patient not to put toilet paper in the urinecollection container.8. Collect the last specimen as close as possible to the end ofthe 24-hour period. Add this urine to the collection.After Transport the specimen promptly to the laboratory. Patient teaching
MOSBY’SDIAGNOSTIC ANDLABORATORY TESTREFERENCETwelfth EditionKathleen Deska Pagana, PhD, RNProfessor EmeritusDepartment of NursingLycoming CollegeWilliamsport, , Pagana Keynotes & PresentationsTimothy J. Pagana, MD, FACSMedical DirectorThe Kathryn Candor Lundy Breast Health CenterSusquehanna Health SystemWilliamsport, PennsylvaniaTheresa Noel Pagana, MD, FAAEMEmergency Medicine PhysicianVirtua Voorhees HospitalVoorhees, New Jersey
3251 Riverport LaneSt. Louis, Missouri 63043MOSBY’S DIAGNOSTIC AND LABORATORY TEST REFERENCE,⠇⠇⠇⠇⠇⠇⠇⠇⠇ISBN: 978-0-323-22576-2TWELFTH EDITIONCopyright 2015, 2013 by Mosby, an imprint of Elsevier Inc.Copyright 2011, 2009, 2007, 2005, 2003, 2001, 1999, 1997, 1995, 1992 by Mosby,Inc., an affiliate of Elsevier Inc.All rights reserved. No part of this publication may be reproduced or transmitted in anyform or by any means, electronic or mechanical, including photocopying, recording, or anyinformation storage and retrieval system, without permission in writing from the publisher.Details on how to seek permission, further information about the Publisher’s permissionspolicies and our arrangements with organizations such as the Copyright Clearance Center andthe Copyright Licensing Agency, can be found at our website: www.elsevier.com/permissions.This book and the individual contributions contained in it are protected under copyright by thePublisher (other than as may be noted herein).NoticeKnowledge and best practice in this field are constantly changing. As new researchand experience broaden our understanding, changes in research methods, professionalpractices, or medical treatment may become necessary.Practitioners and researchers must always rely on their own experience and knowledgein evaluating and using any information, methods, compounds, or experiments describedherein. In using such information or methods they should be mindful of their own safetyand the safety of others, including parties for whom they have a professional responsibility.With respect to any drug or pharmaceutical products identified, readers are advisedto check the most current information provided (i) on procedures featured or (ii) bythe manufacturer of each product to be administered, to verify the recommended doseor formula, the method and duration of administration, and contraindications. It isthe responsibility of practitioners, relying on their own experience and knowledge oftheir patients, to make diagnoses, to determine dosages and the best treatment for eachindividual patient, and to take all appropriate safety precautions.To the fullest extent of the law, neither the Publisher nor the authors, contributors,or editors assume any liability for any injury and/or damage to persons or property as amatter of products liability, negligence or otherwise, or from any use or operation of anymethods, products, instructions, or ideas contained in the material herein.ISBN: 978-0-323-22576-2Content Strategist: Jamie RandallContent Development Manager: Jean Sims FornangoPublishing Services Manager: Hemamalini RajendrababuProject Manager: Manchu MohanDesigner: Karen Pauls/Renee DuenowPrinted in the United States of AmericaLast digit is the print number:9â 8â 7â 6â 5â 4â 3â 2â 1
With love and adoration,we dedicate this book to our grandchildren:Ella Marie GaulJocelyn Elizabeth GaulTimothy William GaulJustin Aquinas GaulJuliana Kathleen PericciLuke Michael PericciJohn Henry Bullen, V
reviewersCrystal Botkin, MPH, CNMT, PETAssistant Professor and Clinical CoordinatorNuclear Medicine Technology ProgramDoisy College of Health SciencesSaint Louis UniversitySt. Louis, MissouriNoelle C. Bowdler, MDClinical Professor of Obstetrics and GynecologyUniversity of Iowa Hospitals and ClinicsIowa City, IowaEileen M. Burd, PhD, D(ABMM)Director, Clinical MicrobiologyEmory UniversityAtlanta, GADisaya Chavalitdhamrong, MDDivision of Gastroenterology, Hepatology and NutritionDepartment of MedicineUniversity of FloridaGainesville, FloridaLaurence M. Demers, PhD, DSc, DABCC, FACBDistinguished Professor Emeritus, Pathology and MedicineM.S. Hershey Medical CenterPennsylvania State UniversityHershey, PennsylvaniaSandra C. Hollensead, MDEmerita Professor of Pathology and Laboratory MedicineSchool of MedicineUniversity of LouisvilleLouisville, KentuckyFrederick L. Kiechle, MD, PhDMedical Director, Clinical PathologyPathology Consultants of South BrowardMemorial Healthcare SystemHollywood, Floridaiv
reviewersâ vChuany Mark Lu, MD, PhDProfessor of Laboratory MedicineUniversity of CaliforniaChief, Hematology and Hematopathology/LaboratoryMedicine ServiceVeterans Affairs Medical CenterSan Francisco, CaliforniaAlexander J. McAdam, MD, PhDAssociate Professor of PathologyHarvard Medical SchoolBoston, MassachusettsRavinder Jit Singh, PhDDirector of Endocrine LaboratoryMayo ClinicRochester, Minnesota
prefaceThe 12th edition of Mosby’s Diagnostic and Laboratory TestReference provides the user with an up-to-date, essential reference that allows easy access to clinically relevant laboratory anddiagnostic tests. A unique feature of this handbook is its consistent format, which allows for quick reference without sacrificingthe depth of detail necessary for a thorough understanding ofdiagnostic and laboratory testing. All tests begin on a new pageand are listed in alphabetical order by their complete names. Thealphabetical format is a strong feature of the book; it allows theuser to locate tests quickly without first having to place them inan appropriate category or body system. The User’s Guide toTest Preparation and Procedures section outlines the responsibilities of health care providers to ensure that the tests are accurately and safely performed. Use of this guide should eliminatethe need for test repetition resulting from problems with patientpreparation, test procedures, or collection techniques. Every feature of this book is designed to provide pertinent informationin a sequence that best simulates priorities in the clinical setting.The following information is provided, wherever applicable,for effective diagnostic and laboratory testing:Name of test. Tests are listed by their complete names. Acomplete list of abbreviations and alternate test names followseach main entry.Type of test. This section identifies whether the test is, forexample, an x-ray procedure, ultrasound, nuclear scan, bloodtest, urine test, sputum test, or microscopic examination of tissue. This section helps the reader identify the source of the laboratory specimen or location of the diagnostic procedure.Normal findings. Where applicable, normal values are listedfor the infant, child, adult, and elderly person. Also, where appropriate, values are separated into male and female. It is importantto realize that normal ranges of laboratory tests vary from institution to institution. This variability is even more obvious amongthe various laboratory textbooks. For this reason, we have deliberately chosen not to add a table of normal values as an appendix,and we encourage the user to check the normal values at theinstitution where the test is performed. This should be relativelyeasy because laboratory reports include normal values. Resultsare given in both conventional units and the International Systemof Units (SI units) where possible.viâ 
prefaceâ viiPossible critical values. These values give an indication ofresults that are well outside the normal range. These resultsrequire health care provider notification and usually result insome type of intervention. The Joint Commission is looking atthe timely and reliable communication of critical laboratory values as one of its patient safety goals.Test explanation and related physiology. This section provides a concise yet comprehensive description of each test. Itincludes fundamental information about the test itself, specificindications for the test, how the test is performed, what diseaseor disorder the various results may show, how it will affect thepatient or client, and relevant pathophysiology that will enhanceunderstanding of the test.Contraindications. These data are crucial because they alerthealth care providers to patients to whom the test should notbe administered. Patients highlighted in this section frequentlyinclude those who are pregnant, are allergic to iodinated or contrast dyes, or have bleeding disorders.Potential complications. This section alerts the user topotential problems that necessitate astute assessments andinterventions. For example, if a potential complication is renalfailure, the implication may be to hydrate the patient beforethe test and force fluids after the test. A typical potential complication for many x-ray procedures is allergy to iodinated dye.Patient symptoms and appropriate interventions are describedin detail.Interfering factors. This section contains pertinent information because many factors can invalidate the test or make thetest results unreliable. An important feature is the inclusion ofdrugs that can interfere with test results. Drugs that increase ordecrease test values are always listed at the end of this sectionfor consistency and quick access. A drug symbol ( ) is used toemphasize these drug interferences.Procedure and patient care. This section emphasizes therole of nurses and other health care providers in diagnostic andlaboratory testing by addressing psychosocial and physiologicinterventions. Patient teaching priorities are noted with a special icon ( ) to highlight information to be communicated topatients. For quick access to essential information, this section isdivided into before, during, and after time sequences.Before. This section addresses the need to explain the procedure and to allay patient concerns or anxieties. If patientconsent is usually required, this is listed as a bulleted item.
viiiâ prefaceOther important features include requirements such as fasting,obtaining baseline values, and performing bowel preparations.During. This section gives specific directions for clinicalspecimen studies (e.g., urine and blood studies). Diagnosticprocedures and their variations are described in a numbered,usually step-by-step format. Important information, such aswho performs the test, where the study is performed, patientsensation, and duration of the procedure, is bulleted foremphasis. The duration of the procedure is very helpful forpatient teaching because it indicates the time generally allotted for each study.After. This section includes vital information that thenurse or other health care provider should heed or conveyafter the test. Examples include such factors as maintainingbed rest, comparing pulses with baseline values, encouragingfluid intake, and observing the patient for signs and symptomsof sepsis.Abnormal findings. As the name implies, this section liststhe abnormal findings for each study. Diseases or conditions thatmay be indicated by increased ( ) or decreased ( ) values arelisted where appropriate.Notes. This blank space at the end of the tests facilitates individualizing the studies according to the institution at which thetest is performed. Variations in any area of the test (e.g., patientpreparation, test procedure, normal values, postprocedural care)can be noted here.This logical format emphasizes clinically relevant information.The clarity of this format allows for quick understanding of content essential to both students and health care providers. Colorhas been used to help locate tests and to highlight critical information (e.g., possible critical values). Color is also used in theillustrations to enhance the reader’s understanding of many diagnostic procedures (e.g., bronchoscopy, fetoscopy, ERCP, pericardiocentesis, TEE). Many tables are used to simplify complexmaterial on such topics as bioterrorism infectious agents, bloodcollection tubes, hepatitis testing, and protein electrophoresis.Extensive cross-referencing exists throughout the book, whichfacilitates understanding and helps the user tie together or locaterelated studies, such as hemoglobin and hematocrit.New to this edition are standard guidelines for routine bloodand urine testing located on the inside front cover for easy access.A list of abbreviations for test names is included on the book’sendpapers. Appendix A includes a list of studies according to body
prefaceâ ixsystem. This list may familiarize the user with other related studiesthe patient or client may need or the user may want to review.This should be especially useful for students and health care providers working in specialized areas. Appendix B provides a listof studies according to test type. This list may help the user readand learn about similarly performed tests and procedures (e.g.,barium enema and barium swallow). Appendix C provides a listof blood tests used for disease and organ panels. Appendix D provides a list of symbols and units of measurement. Finally, a comprehensive index includes the names of all tests, their synonyms andabbreviations, and any other relevant terms found in the tests.Many new studies, such as galectin-3, nicotine and metabolites, pepsinogen, and thromboelastography, have been added.All other studies have been revised and updated. Outdated studies have been eliminated.We sincerely thank our editors for their enthusiasm and continued support. We are most grateful to the many nurses andother health care providers who made the first eleven editions ofthis book so successful. Thank you so much. This success validated the need for a user-friendly and quick-reference approachto laboratory and diagnostic testing.We invite additional comments from current users of thisbook so that we may continue to provide useful, relevant diagnostic and laboratory test information to users of future editions.Kathleen D. PaganaTimothy J. PaganaTheresa N. Pagana
contentsList of figures, xiUser’s guide to test preparation and procedures, xiiDiagnostic and laboratory tests, 1Tests presented in alphabetical orderAppendicesAppendix A: List of tests by body system, 1003Appendix B: List of tests by type, 1015Appendix C: Disease and organ panels, 1026Appendix D: Symbols and units of measurement, 1030Bibliography, 1032Index, 1036x
list of figuresFigure 1Figure 2Figure 3Figure 4Figure 5Figure 6Figure 7Figure 8Figure 9Figure 10Figure 11Figure 12Figure 13Figure 14Figure 15Figure 16Figure 17Figure 18Figure 19Figure 20Figure 21Figure 22Figure 23Figure 24Figure 25Figure 26Figure 27Figure 28Figure 29Figure 30Figure 31Figure 32Figure 33Figure 34Figure 35Figure 36Figure 37Figure 38Figure 39Figure 40Figure 41Figure 42Figure 43Ultrasound of the abdomen, 2Amniocentesis, 53Immunofluorescent staining of antinuclear antibodies, 88Arthroscopy, 125Bilirubin metabolism and excretion, 143Bone marrow aspiration, 169Bronchoscopy, 194Cardiac catheterization, 216Chorionic villus sampling, 255Hemostasis and fibrinolysis, 264Colposcopy, 274Cardiac enzymes after myocardial infarction, 309Cystoscopic examination of the male bladder, 326Ureteral catheterization through the cystoscope, 327Disseminated intravascular coagulation, 346Ductoscopy, 354ECG planes of reference, 360Electrocardiography, 361Endoscopic retrograde cholangiopancreatography, 386Esophageal function studies, 400Fetoscopy, 437Glucose tolerance test, 480Hematocrit, 498Holter monitoring, 525Hysteroscopy, 549Laparoscopy, 578Liver biopsy, 591Lumbar puncture, 602Transbronchial needle biopsy, 605Stereotactic breast biopsy, 625Oximetry, 674Papanicolaou (Pap) smear, 683Paracentesis, 685Pericardiocentesis, 702Rectal ultrasonography, 754Lung volumes and capacities, 774Renal biopsy, 793Renovascular hypertension, 801Rectal culture of the female, 831Urethral culture of the male, 832Thoracentesis, 884Fibrin clot formation, 894Transesophageal echocardiography, 922xi
user’s guide to test preparation and proceduresHealth care economics demands that laboratory and diagnostic testing be performed accurately and in the least amount oftime possible. Tests should not have to be repeated because ofimproper patient preparation, test procedure, or specimen collection technique. The following guidelines delineate the responsibilities of health care providers to ensure safety of test proceduresand accuracy of test results. Guidelines are described for the following major types of tests: blood, urine, stool, x-ray, nuclearscanning, ultrasound, and endoscopy.Blood testsOverviewBlood studies are used to assess a multitude of body processesand disorders. Common studies include enzymes, serum lipids,electrolyte levels, red and white blood cell counts, clotting factors,hormone levels, and levels of breakdown products (e.g., bloodurea nitrogen).Multiphasic screening machines can perform many blood testssimultaneously using a very small blood sample. The advantages ofusing these machines are that results are available quickly and thecost is lower when compared with individually performing each test.Appendix C provides a list of current disease and organ panels. For example, the basic metabolic panel and the comprehensive metabolic panel have replaced the Chem-7 and Chem-12panels. These changes are the result of federal guidelines thathave standardized the nomenclature for chemistry panels.Guidelines Observe universal precautions when collecting a bloodspecimen. Check whether fasting is required. Many studies, such asfasting blood sugar and cholesterol levels, require fastingfor a designated period of time. Water is permitted. If ordered, withhold medications until the blood is drawn. Record the time of day when the blood test is drawn. Someblood test results (e.g., those for cortisol) vary accordingto a diurnal pattern, and this must be considered whenblood levels are interpreted. In general, two or three blood tests can be done per tubeof blood collected (e.g., two or three chemistry tests fromone red-top tube of blood).xii
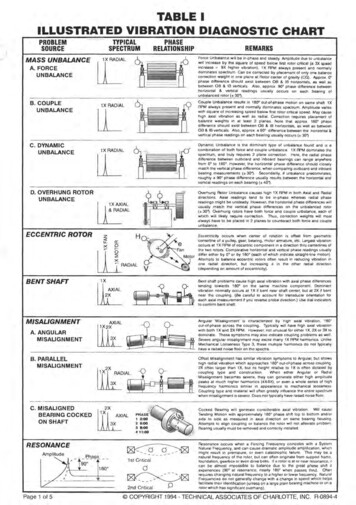
Note the patient’s position for certain tests (e.g., renin,because levels are affected by body position). Collect the blood in a properly color-coded test tube.Blood collection tubes have color-coded stoppers to indicate the presence or absence of different types of additives(preservatives and anticoagulants). A preservative preventschange in the specimen, and an anticoagulant inhibits clotformation or coagulation. Charts are available from the laboratory indicating the type of tube needed for each particular blood test. A representative chart is shown in Table A,p. xiv. Follow the recommended order of draw when collectingblood in tubes. Draw specimens into nonadditive (e.g.,red-top) tubes before drawing them into tubes with additives. This prevents contamination of the blood specimenwith additives that may cause incorrect test results. Fill thetubes in the following order:1. Blood culture tubes (to maintain sterility)2. Nonadditive tubes (e.g., red-top)3. Coagulation tubes (e.g., blue-top)4. Heparin tubes (e.g., green-top)5. Ethylenediaminetetraacetic acid (EDTA) tubes (e.g.,lavender-top)6. Oxalate/fluoride tubes (e.g., gray-top) To obtain valid results, do not fasten the tourniquet forlonger than 1 minute. Prolonged tourniquet applicationcan cause stasis and hemoconcentration. Collect the blood specimen from the arm without an intravenous (IV) device, if possible. IV infusion can influencetest results. Do not use the arm bearing a dialysis arteriovenous fistulafor venipuncture unless the physician specifically authorizes it. Because of the risk of cellulitis, do not take specimens fromthe side on which a mastectomy or axillary lymph nodedissection was performed. Follow the unit guidelines for drawing blood from anindwelling venous catheter (e.g., a triple-lumen catheter).Guidelines will specify the amount of blood to be drawnfrom the catheter and discarded before blood is collectedfor laboratory studies. The guidelines will also indicate theamount and type of solution needed to flush the catheterafter drawing the blood to prevent clotting.user’s guide to test preparation and proceduresuser’s guide to test preparation and proceduresâ xiii
Top colorAdditivePurposeTest examplesRedClot activatorAllows blood sample to clotSeparates the serum for testingRed/BlackClot activator &gel for serumseparatorHeparin/ethylene diaminetetraaceticacid (EDTA)Heparin/EDTAEDTASerum separator tube for serumdeterminatives in chemistry andserologyProvides low levels of trace elementsChemistryBilirubinBlood urea nitrogenChemistry, serologyOxalate/fluoridePrevents glycolysisGreenHeparinBlue (Light)Sodium citrateBlackSodium citrateYellowCitrate dextrosePrevents blood from clotting whenplasma needs to be testedPrevents blood from clotting whenplasma needs to be testedBinds calcium to prevent bloodclottingPreserves red cellsRoyal BlueTanPurple orlavenderGrayContains no leadPrevents blood from clottingTrace metals, toxicologyLead ryAmmoniaProthrombin timePartial thromboplastin timeWestergren erythrocyte sedimentationrate (ESR)Blood cultures, blood banking studiesxivâ user’s guide to test preparation and proceduresTABLE Aâ Common blood collection tubes
Do not shake the blood specimen. Hemolysis may resultfrom vigorous shaking and can invalidate test results. Usegentle inversions. Collect blood cultures before the initiation of antibiotictherapy. Blood cultures are often drawn when the patientmanifests a fever. Often two or three cultures are taken at30-minute intervals from different venipuncture sites. Skin punctures can be used for blood tests on capillary blood.Common puncture sites include the fingertips, earlobes, andheel surfaces. Fingertips are often used for small children,and the heel is the most commonly used site for infants. Ensure that the blood tubes are correctly labeled anddelivered to the laboratory. After the specimen is drawn, apply pressure or a pressure dressing to the venipuncture site. Assess the site forbleeding. If the patient fasted before the blood test, reinstitute theappropriate diet.Urine testsOverviewUrine tests are easy to obtain and provide valuable informationabout many body system functions (e.g., kidney function, glucose metabolism, and various hormone levels). The ability of thepatient to collect specimens appropriately should be assessed todetermine the need for assistance.Guidelines Observe universal precautions in collecting a urine specimen. Use the first morning specimen for routine urinalysisbecause it is more concentrated. To collect a first morning specimen, have the patient void before going to bedand collect the first urine specimen immediately uponrising. Random urine specimens can be collected at any time.They are usually obtained during daytime hours and without any prior patient preparation. If a culture and sensitivity (C&S) study is required or if thespecimen is likely to be contaminated by vaginal discharge orbleeding, collect a clean-catch or midstream specimen. Thisrequires meticulous cleansing of the urinary meatus withan antiseptic preparation to reduce contamination of thespecimen by external organisms. Then the cleansing agentmust be completely removed because it may contaminateuser’s guide to test preparation and proceduresuser’s guide to test preparation and proceduresâ xv
xviâ user’s guide to test preparation and procedures the specimen. Obtain the midstream collection by doing thefollowing:1. Have the patient begin to urinate in a bedpan, urinal,or toilet and then stop urinating. (This washes the urineout of the distal urethra.)2. Correctly position a sterile urine container, and havethe patient void 3 to 4 ounces of urine into it.3. Cap the container.4. Allow the patient to finish voiding.One-time composite urine specimens are collected over aperiod that may range anywhere from 2 to 24 hours. Tocollect a timed specimen, instruct the patient to void anddiscard the first specimen. This is noted as the start time ofthe test. Instruct the patient to save all subsequent urinein a special container for the designated period. Remindthe patient to void before defecating so that urine is notcontaminated by feces. Also, instruct the patient not to puttoilet paper in the collection container. A preservative isusually used in the collection container. At the end of thespecified time period, have the patient void and then addthis urine to the specimen container, thus completing thecollection process.Collection containers for 24-hour urine specimens shouldhold 3 to 4â ›L of urine and have tight-fitting lids. Theyshould be labeled with the patient’s name, the starting collection date and time, the ending collection date and time,the name of the test, the preservative, and storage requirements during collection.Many urine collections require preservatives to maintaintheir stability during the collection period. Some specimensare best preserved by being kept on ice or refrigerated.Urinary catheterization may be needed for patients whoare unable to void. This procedure is not preferred becauseof patient discomfort and the risk of patient infection.For patients with an indwelling urinary catheter, obtain aspecimen by aseptically inserting a needleless syringe intothe catheter at a drainage port distal to the sleeve leadingto the balloon. Aspirate urine and then place it in a sterileurine container. The urine that accumulates in the plasticreservoir bag should never be used for a urine test.Urine specimens from infants and young children are usually collected in a disposable pouch called a U bag. Thisbag has an adhesive backing around the opening to attachto the child’s perineum. After the bag is in place, check the
child every 15 minutes to see if an adequate specimen hasbeen collected. Remove the specimen as soon as possibleafter the collection, and then label it and transport it to thelaboratory.Stool testsOverviewThe examination of feces provides important information thataids in the differential diagnosis of various gastrointestinal disorders. Fecal studies may also be used for microbiologic studies,chemical determinations, and parasitic examinations.Guidelines Observe universal precautions in collecting a stool specimen. Collect stool specimens in a clean container with a fitted lid. Do not mix urine and toilet paper with the stool specimen.Both can contaminate the specimen and alter the results. Fecal analysis for occult blood, white blood cells, or qualitative fecal fat requires only a small amount of a randomlycollected specimen. Quantitative tests for daily fecal excretion of a particularsubstance require a minimum of a 3-day fecal collection.This collection is necessary because the daily excretion of feces does not correlate well with the amount offood ingested by the patient in the same 24-hour period.Refrigerate specimens or keep them on ice during the collection period. Collect stool in a 1-gallon container. A small amount of fecal blood that is not visually apparentis termed occult blood. Chemical tests using commerciallyprepared slides are routinely used to detect fecal blood.Numerous commercial slide tests use guaiac as the indicator. These guaiac tests are routinely done on nursing unitsand in medical offices. Consider various factors (e.g., other diagnostic tests andmedications) in planning the stool collection. For example, if the patient is scheduled for x-ray studies with bariumsulfate, collect the stool specimen first. Various medications (e.g., tetracyclines and antidiarrheal preparations)affect th
The 12th edition of Mosby’s Diagnostic and Laboratory Test Reference provides the user with an up-to-date, essential refer-ence that allows easy access to clinically relevant laboratory and diagnostic tests. A unique feature of this handbook is its consis-tent for