Transcription
IntroductionThis book is aimed at the beginner. Inside you will find many exercises which,with a little patience and determination, will help you get to grips with thebasics of drumming. I cannot emphasise the importance of working with a goodtutor to avoid developing bad habits. YouTube is a fantastic resource fortutorials, but you can’t beat one-to-one lessons for real feedback on yourplaying.The exercises in this book range in difficulty from the Initial level to Grade 2 ofthe Trinity Drum Kit Syllabus, with most of the patterns based aroundsimple backbeats. These kinds of beats are very common in popularmusic and learning to play them with feel and commitment is a rite ofpassage for every drummer!Practising with a metronome is essential in order to develop a good sense oftime. However, once you have mastered a few of the patterns, try playing alongto some well-known songs too. See if you can keep up with the beat. If youcan’t, find a slower track. Remember as a drummer your primary roll is that of atimekeeper.Start listening to great drummers for inspiration. You might never be able toplay as well as them and you should never, ever worry about that. What youwill gain is an understanding of feel, playing in time and the realisation thatevery drummer’s style is unique to them.
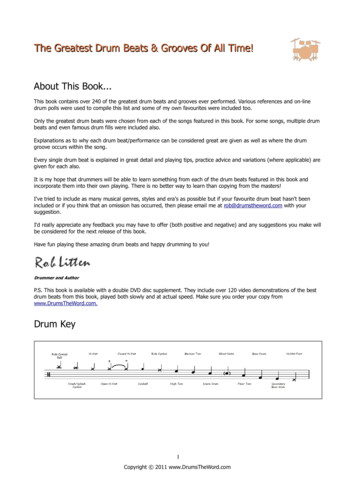
A Standard 5 Piece Drum KitA standard kit comprises the following drums:1 x Snare Drum (14”)1 x Bass Drum (22”)2 x Toms (12” and 13”)1 x Floor Tom (16”)And the following cymbals:1 x Hi Hat Cymbals (14”)1 x Crash Cymbal (16”)1 x Ride Cymbal (20”)Fig 1: Parts of the drum kit.Drum kits are often marketed as ‘Rock’ or ‘Fusion’ sizes. The sizes of thedrums above fall into the rock category. Fusion sizes are smaller, typicallywith a 20” Bass Drum, and 10”, 12” and 14” Toms.
How to Hold Drumsticks1. To start, lay a drumstick in front of you with the tip pointing away. Pinch the stickabout 1/3 of the way along, using your thumb and forefinger, palm facing downwards.Step 12. Next, roll the stick across your forefinger so that it is now between the first andsecond joints of the index finger but touching the first joint (Steps 2 & 3).Step 2Step 33. Now that you are holding the stick with the thumb and index finger, palm stillfacing down, curl the other fingers loosely around the stick (Step 4). Don't grab thedrumstick tightly, since as you hit the drum, the stick should pivot around your indexfinger.Step 4Step 54. Finally, tilt your hand at a slight angle to the right for the right hand, and to the leftfor the left hand (Step 5). This will enable you use the 3 curled fingers to bounce thestick, and is also a more natural hand position. For the matched grip, of course, thedrumsticks are held with left hand a mirror image of the right, forming capital ‘A’shape (Step 6).Step 6
NOTATION
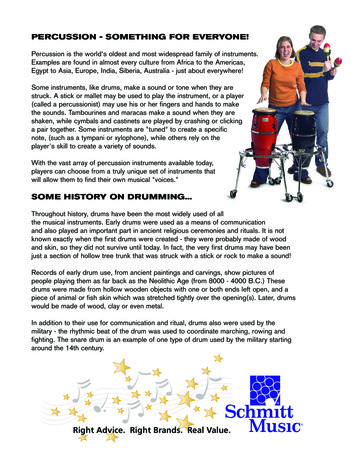
Reading MusicIn order to understand how to read music, it is necessary to become familiar withthe principles of musical notation; the set of visual symbols and instructionswhich musicians translate into a musical performance. Whilst musical notationis a vast subject, you don't need to know a lot to get started.Drum LegendMusic for the drum kit is written on a stave comprising five horizonal lines.Different elements of the drum kit are positioned on these lines, or the spacesbetween them. As can be seen in the legend below, drums are represented by dots,and cymbals by crosses.Fig 2: Drum legend showing the positions of the drums and cymbals on the stave.Drum kits can vary in size dramatically. Rock and metal drummers often havelarge kits, sometimes with two bass drums and multiple toms. At the other end ofthe spectrum, jazz drummers often settle for much smaller kits, with just a coupleof toms.Fig 3: Drum kits vary in size. Compare Terry Bozzio’s kit (left) to my kit (right).
As a consequence, drum notation is not standardised, but some common practisesexist. Usually, higher pitched instruments (e.g., 1st and 2nd toms, and cymbals) areplaced near the top of the stave, whilst those with lower pitches (e.g. bass drumsand floor toms) are positioned near the bottom.Parts of the Stave1. These two short vertical lines make up the neutral clef. This is requiredbecause drum classed as non-pitched percussion.2. Music written on the stave is divided into bars to make it easier to read. Abar line is used to indicate the end of each bar.3. Each bar contains a fixed number of notes, determined by the two numbersat the beginning of a stave; the time signature (see over page).4. To indicate the end of a piece or section of music, a double bar line isplaced at the end of the stave.Different types of notes have different durations or values; some are long andsome are short, and each note has an equivalent rest. The U.K. and U.S. namesfor notes are given below, with the U.S. names in italics.6
Although drums and percussion instruments use the same kinds of notes as all theother instruments, duration is less important to drummers because drums cannotsustain sounds in the same way as, say, a piano or a violin. A semibreveperformed on a drum sounds the same as a semiquaver!NB: Drummers get around this by playing closed rolls, where the notes are played very closetogether to produce a long, continuous sound.Time SignaturesTime signatures comprise two numerals, one on top of the other. As a beginner,it’s sufficient to understand the top numeral as the number of beats in the bar.Fig 4: The time signature 4/4For many years, I didn’t understand time signatures much beyond this; themeaning of the bottom numeral remained a total mystery! The penny finallydropped after I learnt about the American method of naming notes. This explainsnotes as fractions of the whole note. By dividing the whole note by two, we endup with two 1/2 notes (or minums, in the U.K.); divide the whole note by four andwe get four 1/4 notes (or crotchets in the U.K.).The bottom numeral ‘4’ in the time signature 4/4 implies 1/4 notes. So, the timesignature 4/4 means there are ‘4’ (top numeral) 1/4 notes in the bar.Fig 5: Four 1/4 notes or crotchets in a bar of 4/4In 12/8, the bottom numeral refers to 1/8 notes. The top numeral tells us thereare 12 of them to the bar. To reiterate, this is using the U.S. system. In the UK, abar of 12/8 is said to contain twelve quavers, because 1/8 notes and quavers arethe same thing. Notice how the quavers are beamed together in groups of three.Fig 6: Twelve 1/8 notes or quavers in a bar of 12/8
COUNTING
Note Reference Page9
Snare Drum Counting ExercisesThe following exercises are for snare drum only, so a single line stave is allthat’s required. You will also come across the repeat symbols: two linesfollowed by two dots at the start and end of a section of music:Start of repeatEnd of repeatTechnically, any music written in between these two symbols is performedtwice; but for now, play these exercises several times before moving on.Practise TipsExercise 1: Counting Crotchets Set the metronome to. Count 1,2,3,4 aloud as you play. Counting is provided in the first two lines. Always count evenly. Some bars contain crotchet rests . You do not play rests, but you mustcount them!Exercise 2: Crotchets and Quavers Set the metronome to. This time, count 1 2 3 4 (saying, ‘1 and 2 and 3 and 4 and’) as you play.This is how we count quavers.Exercise 3: Introducing the Quaver Rest Set the metronome to. Again, count 1 2 3 4 aloud as you play. Some bars contain quaver rests . Remember, you do not play rests, butyou must count them.Exercise 4: Common Rhythmic Groupings This exercise introduces semiquavers into the mix. These should becounted 1e a 2e a 3e a 4e a (saying, ‘1e and a’, etc.). Alternate your sticking throughout. Learning to quickly recognise these rhythms will aid with sight reading.10
11
12
13
14
BACKBEATS
BackbeatsHave you ever clapped along to a piece of music? The chances are you wereclapping along to the backbeat; an emphasis placed onbeats 2 and 4. In rock and pop, it is common for the backbeat to be played onthe snare drum, but it can be accented by any instrument.Practise TipsExercises 5 and 6: Backbeat Patterns There are four different stages to this exercise. Work through each stage,repeating several times before attempting the final one (5.4). These exercises introduce the hi-hat and bass drum. Make sure hands and feet are aligned when played together. Count the slowly and evenly, saying ‘1 2 3 4 ’. Don’t rush! As always, it is recommended that you use a metronome when practising;however, with the final stage of this exercise, make sure you can play itfirst, then set the metronome to a tempo you feel comfortable with, i.e.,not too fast to begin with.Exercises 7: Bass Drum Variations These exercises explore different ways of varying the bass drum pattern. Many of these patterns are found in rock and pop songs and are essentialfor any drummer wishing to play that kind of music.Exercises 8: Two Bar Patterns These exercises are each two bars long. Play each line four times, then move straight onto the next line. Try adding a crash cymbal on beat one of the first bar. Watch out for the extra snare drums!NB: These exercises can also be played on the ride cymbal.16
17
18
19
20
Drum FillsPut simply, a drum fill is anything that isn’t the main beat of a song. They areusually placed at the ends of verses and choruses to give the song forwardmomentum. When a fill is used as the intro to a song, it is usually to quicklygrab the listener’s attention.Drum fills are not just an excuse for the drummer to play as many notes aspossible; they provide musical signposts. Often drum fills convey informationabout the song’s structure. When fills are used throughout a piece of music, it isoften to signal the conclusion of each musical phrase or chord progression. Adrum fill placed at the end of a song’s verse may be used to generateanticipation of the chorus.NB: Sometimes fills become famous, like the intro to Led Zepplin’s ‘Rock ‘n’ Roll’ or thetom fill in Phil Collin’s ‘In the Air Tonight’.Practise TipsEach of the following exercises combines a simple backbeat pattern with a fill.Although the beat is written for the hi-hat, feel free to try it on the ride cymbal.Exercise 9: Introducing Fills Practise looping each of these exercises, ensuring that movement betweenthe two patterns (the beat and fill) is smooth. Count evenly and don’t forget to use a metronome. Exercises 9.4 and 9.5 begin with a crash cymbal. When looping, practisemoving from the floor tom in the fill to the crash.Exercise 10 & 11: Four Bar Phrases with Fills In these exercises, groups of quavers and semiquavers are used to createinteresting fills around the kit. The bar where the fills are to be played utilises slash notation:Slashes are often used in drum charts in bars that are left open tointerpretation. Refer back to Exercise 4 to help with counting these rhythms. 21
22
23
24
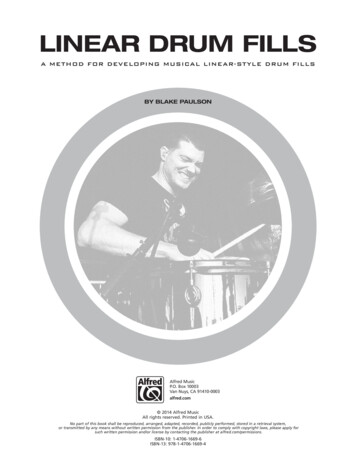
Hi-Hat PedalThere are three main ways to play the hi-hat: a) with a stick; b) with the footpedal (stepped hi-hat) or; c) a combination of both stick and foot pedal to createopen hi-hat patterns.Fig 7: Hi-hat stand, showing cymbals in ‘open’ position.Most of the patterns this book has covered so far have focused on playing aclosed hi-hat with a stick. The hi-hat is said to be closed when the top andbottom cymbals are pulled together by pressing down on the foot pedal.Different effects can be achieved by varying the pressure of the foot on thepedal. For example, when the foot presses down firmly, playing on the cymbalswith a stick will produce a ‘tight’ hi-hat sound. Slackening off the pressure alittle produces a loose or ‘trashy’ sounding hi-hat, where the two cymbals areloose enough to rattle against each other.Pulsing the foot on the pedal causes the cymbals to play against each other, toproduce a ‘chick’ sound. This is referred to as ‘stepped hi-hat’. Among otherthings, this can be used to keep a metronome-like pulse through a rhythm or,when placed on beats 2 and 4, to support the backbeat.
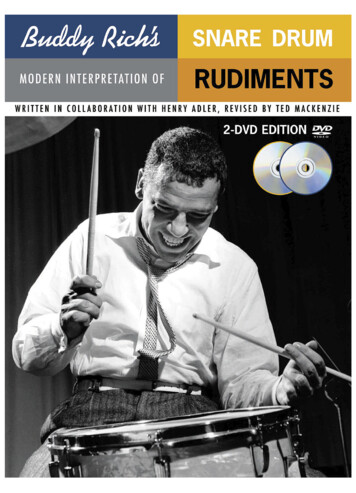
Fig 8: Stepped hi-hats played on the backbeat.In music notation, open hi-hats are indicated by a small circle over the hi-hatnote; closed hi-hat are shown by a cross. Playing open hi-hat patterns requires adegree of co-ordination; from a closed position, the foot pedal needs to lift asthe stick comes down to play the hi-hat cymbal.In some patterns, the hi-hat maybe opened and closed consecutively. When thisoccurs make sure the ‘chick’ sound of the closing hi-hat coincides with the stickplaying the cymbal.Fig 9: Hi-hat notation: a small circle indicates ‘open’ and a cross is used for ‘closed’.Practise TipsExercise 12 & 13: Stepped Hi-Hat Patterns which require co-ordinating all four limbs are not easy! Ifnecessary, leave out the stepped hi-hat at first; learn to play the otherelements and then add the stepped hi-hat when ready.Exercise 14: Open Hi-Hat To achieve a good hi-hat sound, don’t open the cymbals so wide that youonly play the top cymbal. Allow a finger space between both cymbals sothat they rattle together when struck.
27
28
29
Published ByDr Richard Hemmings 2020www.leicesterdrumschool.co.uk
Drum Legend Music for the drum kit is written on a stave comprising five horizonal lines. Different elements of the drum kit are positioned on these lines, or the spaces between them. As can be seen in the legend below, drums are represented by dots, and cymbals by crosses. Fig 2: Drum leg