Transcription
;Visual C# Programming BasicsIn this tutorial you will learn how to make applications for Windows in C#. You will learn howto use Visual Studio to build simple applications, how to use most of the Windows Formscontrols, and several tips on how to publish your application.Made by Davide Vitelaruhttp://davidevitelaru.com/
2VISUAL C# PROGRAMMING BASICS
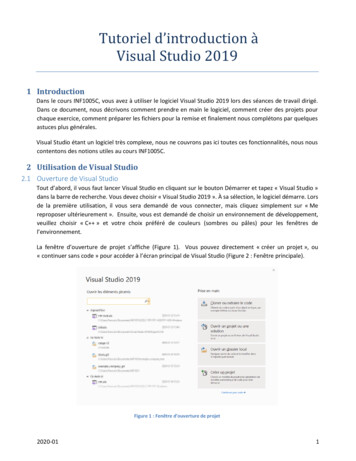
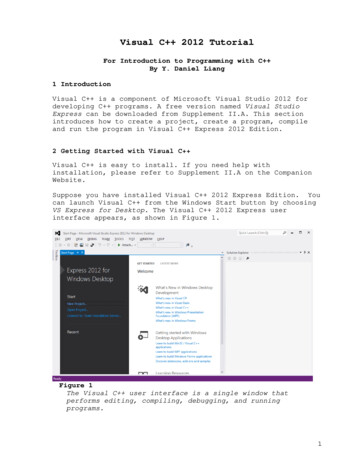
VISUAL C# PROGRAMMING BASICS 3General RequirementsTo follow this tutorial you will need the following items:‐Knowing the basics of at least one programming language (To know what variables,arrays, functions, etc are)‐A computer running Windows XP/Vista/7‐Microsoft Visual C# Express (Click for download)You can also use Microsoft Visual Studio Professional, but this is a commercial version of the Visual C#Express, and it has more features. We will not use most of them in this tutorial though.If you are interested in some specific part of this tutorial, check out the table of contents onthe last page because you might find what you are looking for.Quick Start – Your first applicationIn this chapter, you will learn how to make an application in Visual Studio from start to finish. How to codeit, design it and publish it.Step 1 – Creating the projectTo start, open Visual C# Express or Visual Studio and create a new project by pressing on the “NewProject” icon in the upper left corner.In the window that opens you can select your project type, depending on what you want to program in C#.To make a simple Windows application, select “Windows Forms Application”, name your project“Calculator” (because this is what we are going to do) and press “OK”.
4VISUAL C# PROGRAMMING BASICSYou now created a new project. You might get all scared by Visual C#’s interface because it is verycrowded and you don’t know what most of the controls do. Let’s take a look at the interface for a bit: thefirst thing that pop’s into your eyes is the form right in the middle. It is an empty form and what you haveto do is to take controls from the “Toolbox”, the panel from the left, and put them on it.You can see different type of controls in the “Toolbox”: buttons, textboxes, progress bars, and you can takeall of them and place them on your form. Don’t place anything on your form now, if you did, select themand delete them.On the right you have your “Solution Explorer”. When you create a new project, you automatically create anew solution. A solution is a collection of multiple projects, let’s say we make an application called“Calculator” (cause this is what we actually do), and “Calculator” is an application project inside the“Calculator” solution. If we want to create a setup for “Calculator”, we create the setup project inside thesame solution. You will learn what everything in the solution explorer means later.Step 2 – Designing the formWhat we want to create is a simple calculator application. What it will do is to add two numbers insertedby the user. To start, we will need three text‐boxes: Two for the two numbers that the user wants to addand the third for the result. We will also need a button so that the user can press it and receive he’s result.To do all this, click on the “Text Box” control in the toolbox, and then click on your form. As you can see, atext box appeared on your form. Repeat this step again and create two more text boxes. Align the textboxes the same way I did:
VISUAL C# PROGRAMMING BASICS 5Now, select the button control from the toolbox and create a button on the form.Good, we now created all the controls we need for our application. But, there is a problem, why is thebutton named “Button1”? Because this is how it is by default, to change that, we need to change itsproperties. By default, the properties window is not opened in Visual C#. To open it, go to “View” and clickon “Properties”.The properties panel (obviously) shows the select controls properties, such as height, width, color, text,etc In this case, we only need to change the text since the button can be resized with using the mouse.Click on the button (Make sure you don’t double click it, or its code will open. If that happens, close the tabwith the code from the top of the middle‐panel). Once clicked, the button’s properties will appear in the“Properties” window. Scroll down and go to “Text”. To its right you will see “Button1”. Change that to“Add”, and press enter.
6VISUAL C# PROGRAMMING BASICSYour button now has “Add” written on it. Very good, this way you can edit every item’s properties, eventhe text boxes’.Also, you might notice that the form’s name is “Form1”. Try to do something about it.How To: Click on an empty space on the form, change the form’s text property to “Calculator”.Step 3 – Debugging the applicationOf course, we added the controls on our form, but the button doesn’t do anything since we didn’t “tell” itdo to anything. You can see your program running by pressing the “Debug” button, the green arrow in thetoolbar ( ). When you click the debug button, you application will start. It should look something likethis:You probably tried to click the button already, and noticed how well he is doing his job. Debugging is thebest method to test your application before publishing it. Every time you make a change to it, you debug itto see if it worked. Once you finish the application, you build the entire project turning everything into oneexecutable, and probably make a setup for your application.Step 4 – Coding the applicationTo make the application work, you obviously have to write some code. If you are still debugging yourapplication, close it and go back to your project. Now, double‐click on your button to open the codewindow. As you can see, everything is tabbed in the project. You can always go back to the form designerby clicking its tab on the top.With all the amount of code that you have in front of you, you might get scared (again!). Don’t worry youwill get used to it, and to even more than that. If you are reading this tutorial, let’s hope you already knowthe basics of another programming language, if not it will be hard for you to search Wikipedia for everyword you don’t understand, but it would be useful.The first statements in the code import some items from the .NET Framework. What is that you might ask,the .NET Framework is a large library of coded solutions to common programming problems thatmanages the execution of programs written specifically for the framework. To be clearer, it is a large
VISUAL C# PROGRAMMING BASICS 7amount of code already written for you, so you can build programs with a pretty user interface and otherthings. It helps you very much because it reduces the amount of things that you need to learn to create theentire user interface. We should all thank Microsoft for System.Windows.Forms;By “import some things” from the .NET Framework, I meant importing some classes. Those classes can bethe forms, the user controls, and all the other things that helped us by now creating the program. You willlearn the meaning of them later.For now, let’s see the rest of the code:namespace Calculator{public partial class Form1 : Form{public Form1(){InitializeComponent();}private void button1 Click(object sender, EventArgs e){}}}The “public Form1()” statement is a class that is executed when we start the program; actually, when weopen the form named “Form1.cs” (“.cs” is from C Sharp). In case you did not know, in C# the code isusually put between curly braces just like in Java and C .The “private void button1 Click(object sender, EventArgs e)” is that class that is executed whenwe click the button. Inside it, we will write the code that will add the two values from the text boxes.Note: In C#, two slashes (//) represents the beginning of a comment. A comment is a piece of code that is notexecuted by the compiler, it is used to help you organize you code, and so that other programmers willunderstand what every piece of code means. We will use comments inside our codes for better explanation.To make that button add the two values and return the sum we need, we have to grab the text contentfrom the two text boxes, turn it to integers, add them, and change the text of the third text box to the sum.It is very simple:double val1, val2; //We declare two double type variables//We assign to the first variable the value of the text box//Since the text box cand hold a string, it must be converted//to a double to assign it to "val1".
8VISUAL C# PROGRAMMING BASICS//Note that we assign using “ ” as an operatorval1 ") converts the string put into the brackets//and assigns it to a double//Same thing for the second variableval2 Double.Parse(textBox2.Text);//Now we are doing the exact oposite, we take the two//double values and we convert their sum to a string//using the .ToString() commandtextBox3.Text (val1 val2).ToString();Now that we finished you might want to debug your project and see if it works.What we did is easy to explain; we declared two variables and assigned the values of the two text boxesafter we converted them from strings to integers. Then, we changed the text of the third text box into thesum of the two variables, and we converted it to a string in the same time. And we did all of this at the clickof a button.Step 5 – Publishing you applicationWhat you have to do is to create an icon for your application, change its publishing settings and make asetup for it, but we will skip these steps as they are not related to basic C# programming.Note: Check out the “Advanced Visual C# Programming” tutorial once you finish this one.Understanding Visual C#Great, now that you made your first application you can go even deeper into C# and understand how mostthings work, and some extra things that will make your application work better.Control namesFirst of all, one important thing that you have to know is that every item on your form has a name. And Iam not talking about “Text Box” or “Button”, but about their “Name” property.
VISUAL C# PROGRAMMING BASICS 9Go back to your forms designer and click on the first text box. In the property window, you will see that itsname property is “textBox1”. In our previous code, we took the value from this text box by the followingmethod:val1 Double.Parse(textBox1.Text);How does this work? Let’s forget about the conversion for a few seconds, and see what we actuallyassigned to the variable (considering that the text box already holds a double value).val1 textBox1.Text;We assigned the specific property of a control to a variable. The correct syntax is:variable control.property;This is how it always works. Of course, we can do the exact opposite and assign to the control’s property acertain variable just like we did earlier:textBox3.Text (val1 val2).ToString();The names are used to distinguish between the controls on the form.You can do the same thing with buttons, just click on a button, and change its name property. It isrecommended that you rename your buttons so that you know what each of them does.Events and classesWhen you double click a button, you are automatically redirected to your code where a new functionappears. That function will be executed when you click the button. You can run any other function whenyou click the button, all you have to do change the event that occurs when you click it. To do that, go to itsproperty window, and click on the “Events” button (). On the left side of the table that just appearedbellow you will see the events, and on the right side you will see what happens (What function isexecuted) when that event occurs.As you can see, when we Click the button, the button1 Click function is executed. That function has beenautomatically written for you when you double‐click the button. Of course, the same function can beexecuted no matter what event occurs, for example, go to the MouseHover event, and type button1 Clickto its left. From now, you don’t have to click the button, all you have to do is place the cursor above it andthe button1 Click function will run, adding the two numbers.You can also declare a new function to do the job, and call it when you click the button. Type somewherebelow the button1 Click function:double AddNumbers(double val1, double val2){}This is how we declare a new function in C#. The correct syntax is:
10VISUAL C# PROGRAMMING BASICSvalue returened function name(parameter type parameter name){code}The AddNumbers function will return the sum of the two numbers. Type inside the two curly braces:return val1 val2;“return” is used to specify what value the function will return when it is called. To call this function, deletethe code in the button1 Click function and type:private void button1 Click(object sender, EventArgs e){double val1 double.Parse(textBox1.Text);double val2 double.Parse(textBox2.Text);textBox3.Text AddNumbers(val1, val2).ToString();}As you can see, we can assign a value to a variable when we declare it. We used the AddNumbers functionto add the two numbers.How does this work?button1 Click – Function isexecuted:Form12val12val24Button is clickedAddNumbers (val1, val2)return val1 val2
VISUAL C# PROGRAMMING BASICS 11Note how the button1 Click function passes the values to the AddNumbers and then assigns them to thethird text box.Debug your application and you will notice that it will work. The best part in using function to do your jobis that you can use them multiple times without you having to write the same code all over again.If you have too many functions, you source code might get really crowded. In this case you might want tocreate a class to hold all of them in one place.To create a class in your project, right click on your project icon in the “Solution Explorer” and add a newclass:Name it “Calculator.cs”. Once you create it, it will appear in the solution explorer, it will automaticallyopen, and you will have .Generic;System.Linq;System.Text;namespace Calculator{class Calculator{}}Inside the class, cut/paste the AddNumbers function, and change the following line:public double AddNumbers(double val1, double val2)We typed “public” before declaring the function so we can use it outside this class.Now, go back to “Form1.cs” and declare the class right on top of the Main function:Calculator Calc new Calculator();
12VISUAL C# PROGRAMMING BASICSThe correct syntax is:ClassName WhatNameYouWantToUse new ClassName();Now that we declared the class, we need to use the function from it named “AddNumbers”. To do that,change the following line of the button1 Click function:textBox3.Text Calc.AddNumbers(val1, val2).ToString();This way, you can use the class on multiple forms.Homework: Make a new button and a new function named “MultiplyNumbers”, and make it multiply the twonumbers when the button is pressed.Note: to multiply two numbers in C#, you can use the “*” operator. (“ to subtract, and \ to divide”).Try doing it by yourself before reading the code.Code:Calculator.cspublic double MultiplyNumbers(double val1, double val2){return val1 * val2;}Form1.csprivate void button2 Click(object sender, EventArgs e){double val1 double.Parse(textBox1.Text);double val2 double.Parse(textBox2.Text);textBox3.Text Calc.MultiplyNumbers(val1, val2).ToString();}
VISUAL C# PROGRAMMING BASICS 13Solutions and ProjectsIt is time to learn how the solution explorer works.File typesAll you have to care about in the solution explorer are the forms,classes and references.The forms have the following icon:and they are actually acollection of two classes, one handles the design but you don’twrite in that file, instead you arrange the control using thedesigner that writes the code by itself in the designer class, andthe other one is the code class. Right‐clicking on the form iconwill give you the option to open either the code or the designer.The classes have the following icon:and they are justindependent files with code. “Program’s” is the main class ofyour project, and you must not modify it.The references are all inside this folder:, and they usually represent the pieces of the .NETFramework that you are using. Also, if you are using any other class library it will appear there.Resources usually represent the images that you imported into your project. They can be found all in thisfolder:.File systemYou might ask yourself after you work at an application “Where exactly is my application?”. To find theexecutable created as a result of you building your project, go to your documents folders, in “Visual Studio2008” (Depending on the version you have) and go to:Projects/ Project Name / Project Name /bin/Debug/ Project Name .exeOther project typesThis chapter is not that important and you can skip it if you are not interested in other types of projects.WindowsAs you have noticed when you created a new project, there are many other types of projects. This is whatwe have in the Windows category:The “Windows Forms Application” project is what we previously made. It is just a simple application witha user interface. On the other hand, the “Console Application” is a simple C# application project withoutthe user interface, it works inside the console.
14VISUAL C# PROGRAMMING BASICSThe “Class Library” is actually a project full of classes. Once you compile the project, you will end up with a“.DLL” file (Dynamic Link Library). You can add that file as a reference to your project so you can use theclasses inside the library.The other project types are advanced and you will learn what they are good for at the right time.WebThere are also other categories of Visual C# project types:Web projects – These are for ASP.NET Web Developers:SilverlightSilverlight development – In case you want to program Silverlight applications:XNA GamesAlso, last but not least, XNA projects for game‐making using C#:For the last two project categories you must install plug‐ins. Don’t worry, they are free to download fromthe internet, how you will learn to use them is the biggest problem.Setup ProjectsIn case you have Visual Studio Professional installed, under “Other Project Types” in “Setup andDeployment” you have this:The setup project is the easiest way to create a decent and customizable setup for your project.
VISUAL C# PROGRAMMING BASICS 15Visual C# SyntaxThis chapter will show you some basic C# code for doing different operations.Variables & Operationsstring MyString "123456";int MyInt 24;double MyDouble 15.6;MyString "dav"; //Simple assigningMyString MyDouble.ToString(); //Double to string conversion;//Int to string to double conversionMyDouble double.Parse(MyInt.ToString());//This is because you need a sting between thos brackets.MyInt Int32.Parse(MyDouble.ToString());//Same here;MyInt 1234;//This is the operation, that means you//assign to "MyInt" MyInt 1234;//Equivalent: MyInt MyInt 1234;MyDouble double.Parse(MyInt.ToString()) 15;Loopsbool ok true;// boolean can hold true or false valuesint i 0;//while. do loopwhile (ok true){i ; //This adds one unit to iif (i 1000) ok false;}//for loopfor (i 0; i 1000; i ){if (i 5000) break; //break is used to end the loop}Decisions//if . then conditionint i 4;bool ok false;if (i / 2 2){ok true;}else{i ;}string String "1234"; //Notice that C# is case-sensitive
16VISUAL C# PROGRAMMING BASICS//This is the switch-case command//it works like multiple if'sswitch (String){//This happens when no other value worksdefault: break;//In CASE String is "12345", this is what happenscase "12345":{i 1;break; //Always remember to break}case "412":{i 4;break;}}File System.Text;System.Windows.Forms;System.IO; //Notice how we are using the system IO for file operationsnamespace Calculator{public partial class Form1 : Form{public Form1(){InitializeComponent();}private void button1 Click(object sender, EventArgs e){string FilePath "C:\\Users\\Bubby\\Documents\\1234.txt";//Remember to use \\ instead of \ because it will throw you an error//Writing to filesStreamWriter Name new StreamWriter(FilePath);Name.WriteLine("First line");Name.Write("Second line, but not ended");Name.Close(); //NEVER forget to close//Reading from filesStreamReader OtherName File.OpenText(FilePath);string Something OtherName.ReadLine(); //Reading a linestring AllContent OtherName.ReadToEnd(); //Reading everything to endOtherName.Close();}
VISUAL C# PROGRAMMING BASICS 17Windows Forms ControlsIn this chapter you will learn how to use most of the controls that you can find in your toolbox. We are stillgoing to work on the calculator project until we reach some control that we can’t use in such a project.Also, keep in mind that you will learn to use some easy control in this chapter, for more difficult controls,see the “Advanced Visual C# Programming” tutorial.FormsThis is a must‐read item because you will need to know how to make your form look better. For start, ourmain form in calculator named “Form1” is resizable, even if it has only 4 controls in it. Once you resize it, itlooks ugly so go to its properties in FormBorderStyle and change it to “Fixed Single”. This way you can’tresize it anymore.Even though you can’t resize it, you can still maximize it (annoying, isn’t it?) so go to its MaximizeBoxproperty and change that too false.In case you want to make and application with multiple forms, go to your project, right click and add anew “Windows Form”.Still, the first form that will open is Form1 so, if you want to open the other form, make a new button, andon its Click event write:private void button2 Click(object sender, EventArgs e){Form2 NewForm new Form2();NewForm.Show();}Of course, this works in case your form is named “Form2” and you can name the variable after it the wayyou want. This is just like declaring a class.To close the form you’re in, type “Close();”, but this will also close your application if you are in yourmain form. If you just want to hide it, use “Hide();”.LabelsLabels are just pieces of text that you put on a form to guide the user. In your “Calculator” project, drag 3labels on your form. From the property windows you can change their color (ForeColor) their text (Text),their alignment (TextAlign), font (Font), and many more Check BoxA check box is usually used to check if an option is enabled or not. In this case we can use it toenable/disable the “Add” button.Drag a check box on your form. Then double‐click on it to open the function that occurs when it’s check ischanged and type:private void checkBox1 CheckedChanged(object sender, EventArgs e){if (checkBox1.Checked true){button1.Enabled true;}else
18VISUAL C# PROGRAMMING BASICS{button1.Enabled false;}}This will disable the button if it is unchecked and enable it if it is checked. As you can see, the “.checked”property is a Boolean type variable.Combo BoxesThese are usually used to select one item or a certain option. In this case we will use it to choose whetherwe add or multiply the numbers. Drag and drop a new text box on your form, and click on the arrow in theupper right corner (that is inside a red square in the picture) and click “Edit Items”:Then add the items you would like in the windows that opens.We can use it by checking if its value (Text property) is “Add” or “Multiply” when clicking the button:private void button1 Click(object sender, EventArgs e){double val1 double.Parse(textBox1.Text);double val2 double.Parse(textBox2.Text);if (comboBox1.Text "Add"){textBox3.Text Calc.AddNumbers(val1, val2).ToString();}else{textBox3.Text Calc.MultiplyNumbers(val1, val2).ToString();}}Link LabelThe link label is basically a simple label that can be clicked just like a button. The main difference is thatthe cursor changes when you hover on it so the user knows that it can be clicked.Picture BoxTo change the picture of a picture box, go to its properties in “Image”. I recommend changing it’sbackground image instead of the real image that it’s holding since it can be stretched and tiled, but in thiscase you could use a panel for this job.Radio ButtonsRadio buttons work just like check boxes, but it doesn’t allow you to have more than one option selected.Fortunately, if you add more to the form, only one of them can be checked at once.If you want more radio buttons but for something different, just make a new panel and put them in thereso that they won’t un‐check when you click the other buttons.
VISUAL C# PROGRAMMING BASICS 19ContentsGeneral Requirements. 3Quick Start – Your first application . 3Step 1 – Creating the project . 3Step 2 – Designing the form . 4Step 3 – Debugging the application . 6Step 4 – Coding the application . 6Step 5 – Publishing you application. 8Understanding Visual C# . 8Control names . 8Events and classes. 9Solutions and Projects. 13File types . 13File system. 13Other project types . 13Windows. 13Web. 14Silverlight. 14XNA Games . 14Setup Projects . 14Visual C# Syntax. 15Variables & Operations . 15Loops. 15Decisions . 15File Operations . 16Windows Forms Controls .
To start, open Visual C# Express or Visual Studio and create a new project by pressing on the “New Project” icon in the upper left corner. In the window that opens you can select your proj