Transcription
Cricut KICKOFF HANDBOOKCricutKICKOFF HANDBOOKHow to successfully setupand get started with yourCricut cutting machine!CoachSET UP YOUR CRICUT FOR SUCCESS WITHJenniferMakerCopyright JenniferMaker Page 1 visit jenniferMaker.com
Cricut KICKOFF HANDBOOKAbout this HANDBOOKDo you have a Cricut cutting machine or thinking of getting one, but aren’tquite sure where to start? I can help you kick off your creativity with Cricut!I will walk you through the selection andsetup, then get you started with your firstproject using your Cricut cutting machine,whether you have a Cricut Joy, a CricutExplore Air 2, a Cricut Explore 3, an originalCricut Maker, or a Cricut Maker 3. Use thishandbook along with my step-by-step videosat cricutkickoff.com.Feel free to print this handbook out and keepit next to your Cricut as you are setting itup. If you need more pages than what I’veincluded in here, just print out extras forwhatever you need! I’ve kept the amount ofcolor as low as possible on each page so you don’t have to use too much ink.If you have any questions about using this handbook, please join me in myCricut group at jennifermaker.com/cricutcrafters or email me athello@jennifermaker.comFor more Cricut help, join me at https://jennifermaker.com/cricutcraftersHappy making,JenniferVersion 2.0 - December 26, 2021 Copyright 2021 by JenniferMaker Creative LivingCricut and Cricut Design Space are registered trademarks of Provo Craft. Use of them does not imply any affiliation with orendorsement by them.All rights reserved. This book or parts thereof may not be reproduced in any form, stored in any retrieval system, or transmitted in anyform by any means—electronic, mechanical, photocopy, recording, or otherwise—without prior written permission of the publisher, exceptas provided by United States of America copyright law.Copyright JenniferMaker Page 2 visit jenniferMaker.com
Cricut KICKOFF HANDBOOKHANDBOOK pagesTopicWhat is it?PageMy Lesson LinksLesson 1: Connect With Your CricutMy Cricut MachineSetup ChecklistMy Design Space AccountLesson 1 TranscriptsLesson 1 Questions & AnswersLesson 2: Know the Tools to UseMy BladesMy Pens & MarkersMy MatsMy Favorite BrandsWhere Is It?My Supply InventoryMy Tool InventoryLesson 2 TranscriptsLesson 2 Questions & AnswersLesson 3: Dive Into Design SpaceCricut Design Space Map for iOSCricut Design Space Map for AndroidCricut Design Space Map for DesktopYour First ProjectProject IdeaMy File OrganizationFavorite Cricut Design Space TipsMy Favorite Image FontsMy Favorite Writing FontsMy Favorite Web SitesMy Favorite SettingsMy Favorite Heat SettingsProject InformationLesson 3 TranscriptsLesson 3 Questions & AnswersBeyond the Lessons: Worksheets & NotesSupport RecordShopping ListNotesWhere to find all of my lessons!My machine and deviceMy model, color, serial number, etc.What to do when setting up or movingEmail and password remindersWhere to get the full transcripts to readQuestions that get asked a lot about setupUnderstand what to use when and howWhat blades exist and which ones I haveWhat pens exist and which ones I haveWhich mats exist and which ones I haveMaterial types and where I found itA list of things I have and where I store itWhat I have, what color it is, where I got itWhat I love, how much it cost, model numberWhere to get the full transcripts to readQuestions that get asked a lot about toolsWhat I connect to Design Space withWhere everything is on my iPad and iPhoneWhere everything is on my AndroidWhere everything is on my computerChecklist of what to do in the first projectWhat is it, where is it, what do I need for itWhere I save my filesMy best tips I’ve found on using Design SpaceThe fonts I like the best for imagesThe fonts I like the best for writing/drawingMy go-to spots for help and designsMy best settings for various materialsThe type, temperature, and time I useWhere I found it, what I used to make itWhere to get the full transcripts to readQuestions that get asked about Design SpacePages to help you track info and notesWhy I contacted support, what we didWhat I need to get and if I got it or notAll my notes on these lessons & my 313233343536373839404142CoachReady to learn more? Get the Cricut Coach Playbookfor over 100 step-by-step diagrams showing you exactlywhat to do in Cricut Design Space for fast, easy projectseverytime! Details at jennifermaker.com/cricutcoachCopyright JenniferMaker Page 3 visit jenniferMaker.com
Cricut KICKOFF HANDBOOKMY LESSON LINKSBelow are links to each lesson video — check them off as you complete them!Lesson 1: Connect With Your CricutJoin me in my craft room to unbox, set up, and connect your Cricutright along with me.oooooCricutCricutCricutCricutCricutJoy: https://jennifermaker.com/cklesson1aExplore Air 2: https://jennifermaker.com/cklesson1bMaker: https://jennifermaker.com/cklesson1cExplore 3: https://jennifermaker.com/cklesson1dMaker 3: https://jennifermaker.com/cklesson1eLesson 2: Know the Tools to UseLearn which mats, blades, tools, and materials work in your Cricut andwhen to use which ones.o Cricut Joy: https://jennifermaker.com/cklesson2ao Cricut Explore (all): https://jennifermaker.com/cklesson2bo Cricut Maker (all): https://jennifermaker.com/cklesson2cLesson 3: Dive into Design SpaceGet to know Cricut Design Space for your device, then make & cut apersonalized project!o iPhone/iPad with Joy: https://jennifermaker.com/cklesson3ao Android with Explore Air 2: https://jennifermaker.com/cklesson3bo Desktop/Laptop with Maker 3: https://jennifermaker.com/cklesson3cCopyright JenniferMaker Page 4 visit jenniferMaker.com
Cricut KICKOFF HANDBOOKLESSON 1CONNECT WITHYOUR CRICUTMy cutting machine is lore OneExplore Air or Air 2Explore 3MakerMaker 3My device to connect is a:ooooMac desktop or laptop running MacOS 10.15 or laterWindows desktop or lapt running Windows 8 or lateriPhone or iPad running iOS 14 or laterAndroid running 9.0 or higherCopyright JenniferMaker Page 5 visit jenniferMaker.com
Cricut KICKOFF HANDBOOKMY CRICUTModel: Color:Purchase Location: Order #:Purchase Date: Tracking:Tip: Tape your proof of purchase receipt or invoice to this page in the event you need it for your one-year limited warranty.)Serial Number (on bottom of machine listed as S/N):What Came With My Cricut (or Bought With It at the Same Time):Different machines and bundles will come with different things. Mark off what came with yours so you know what you have!)q USB Cableq Power Adapterq Premium Fine Point Blade and Housingq Additional Premium Fine Point Blades (Qty: Cap Color: )q Deep Point Blade and Housingq Rotary Blade Drive Housingq Knife Blade Drive Housingq Scoring Tool (q with q without QuickSwap Housing)q Engraving Tool (q with q without QuickSwap Housing)q Debossing Tool (q with q without QuickSwap Housing)q Perforation Tool (q with q without QuickSwap Housing)q Wavy Edge Tool (q with q without QuickSwap Housing)q Scoring Stylus (color: )q LightGrip Cutting Mat (Blue), 12” x 12” (Qty: ) 12” x 24” (Qty: )q StandardGrip Cutting Mat (Green), 12” x 12” (Qty: ) 12” x 24” (Qty: )q StrongGrip Cutting Mat (Purple), 12” x 12” (Qty: ) 12” x 24” (Qty: )q FabricGrip Cutting Mat (Pink), 12” x 12” (Qty: ) 12” x 24” (Qty: )q Cricut Pen(s) (Size: Color(s): )q Materials for First Project (q Cardstock q Vinyl q Fabric)q Basic Tool Kit (Color:Tools Included: q Spatula q Scraper q Scissors q Sharp Hook Tool q Needle Point Tweezers)q Cricut Tools, Weeding Kit (Color(s): )q Vinyl, Self Adhesive (Color(s): Qty: )q Vinyl, Iron-On (Color(s): Type(s): Qty: )q Cardstock (Color(s): Type(s): Qty: )q Transfer Tape (Type: Qty: )q Help Booklet (Title: )q Cricut Cartridge Adapter USB (for Cricut Makers only)q Carrying Case (Color: )qqqqqqCopyright JenniferMaker Page 6 visit jenniferMaker.com
Cricut KICKOFF HANDBOOKSETUP CHECKLISTWhen you first set up your Cricut, or when you move or travel with yourCricut, here's what to remember to do:q Find or clear off a good surface for your Cricut, at least 24" x 24" (more is better). Irecommend your surface not be either too high or low — desk-height is ideal.q Look for an outlet within six feet of your chosen location (or get an extension cord).q Move your desktop/device within 10-15 feet of your Cricut if you plan to use Bluetooth(within six feet if you plan to use the USB cord available on Explores or Makers only).q Check your Internet strength and stability. If it’s not strong enough, you may have issuesconnecting or problems with projects stalling while you cut.q Remove your Cricut from the box or carrying case.q Position your Cricut so there is at least 10” of clearance behind it for your mat to move.If you’re going to use the 24” long mats, you’ll want at least 22” in front and behind it.q Plug in the power cable to both your Cricut and to your wall/extension cord/power strip.Make sure your power strip is plugged in and turned on.q Open and press the power button on your Cricut.q USB users: Plug your USB cable into your Cricut, and then into your desktop or laptop.q Bluetooth users: Go to your Bluetooth settings and connect to your Cricut (the pairingcode is simply 0000).q Put the necessary blade and/or accessory in your Cricut clamp(s).q Put your other Cricut materials, like mats, tools, and materials, nearby so they arehandy. Mats can be stored under the Cricut machine and tools can go in the accessory cupor under the lift-up door on Explores and Makers.qqqqCopyright JenniferMaker Page 7 visit jenniferMaker.com
Cricut KICKOFF HANDBOOKMY DESIGN SPACE ACCOUNTDesign Space Email Address: Password:Cricut Access Subscription Start: Renews On:Favorite Image Codes:Favorite Cartridges:Cartridges I’ve Linked:Images/Cartridges I’ve Purchased:Important Notes:Copyright JenniferMaker Page 8 visit jenniferMaker.com
Cricut KICKOFF HANDBOOKLESSON ONE TRANSCRIPTSDownload the transcripts for all videos in this lesson with the following links:oooooCricutCricutCricutCricutCricutJoy: 1Explore: lore1Explore 3: lore3Maker: er1Make 3r: er3Note that transcripts were created for us by an automated program and may contain small mistakes. We havetried to correct and update these whenever possible, but we may have missed a few words here and there.Here is an example of a lesson onetranscript so you can decide if it will behelpful:Hello, everyone. My name is Jennifer Maker, andtoday, we are setting up a new Cricut Maker cuttingmachine. This is the Cricut Kickoff Lesson One, andwe are going to set up this Maker together step bystep. Pull up a chair in my craft room and let’s getstarted.Now the Cricut Maker is a computer-guidedcutting machine that cuts more than 300 differentmaterials, everything from vinyl, paper, and fabricsto basswood, leather, and matte board. The CricutMaker is my favorite machine. I got it the day itcame out in summer 2017, I believe, and I still usethat very same machine to this day. You can see myvery first Cricut right here back behind me. Can yousee that? Yes, it’s right there.The Cricut Maker is the top of the line cuttingmachine, and it has 10 times the cutting power ofthe Explore cutting machine. It also has the adaptivetool system with a wide range of tools for cutting,scoring, writing, debossing, engraving, and a wholebunch of cool things like that.So here I have a brand new and still sealed in thebox Cricut Maker cutting machine. I’m going to openthe box, see what’s inside, show it everyone, showit to you so you can see with me. We’re going toconnect it to a variety of devices, including an iPad,an Android, a Windows laptop, and a Mac desktopcomputer, so basically everything, and then we’ll doa test cut. My goal is to get you set up and able tocut by the end of this video. It’s really easy, and youcan totally do this.Now I do have something special for everyone, atotally free printable handbook that goes along withthese free lessons. You can download it right now atCricutKickoff.com. Just register for the class, andyou’ll get the printable handbook. I’ll be referringto it as we go along during today’s lesson. So are youready to unbox this marvel? It’s an awesome machine.Let’s get this big box opened and set her up.All right, inside we have like a double lid. There wego. We have a box. It says, “Let’s get started” righthere. Cool. Awesome, okay. So what’s inside this box?I want to see. Inside, materials for your first project.This is nice presentation. Isn’t that pretty? This lookslike a tool. That looks like the rotary blade. See that?Little beautiful thing, I love their rotary blade, and abooklet right here, and this is the welcome book. Sothis is very pretty. I really like this packaging.All right, so let’s set this aside. We’re going to lookat that, and it’ll tell us what to do. These lift rightout like this. All right, so it looks like it’s in a littlewrapper here, so what we need to do is lift this upand out of the box. There we go. All right, so insidehere, we have the power supply. This is the powersupply, so I’ll set this aside, and a mat, two matsright here. So we’ll set these over here as well.Is there anything else in here that we’re missing?Always look inside your box. If you get a bundle,sometimes there will be, I don’t know, somethingin here or underneath or something, but I don’t seeanything else. I put my box off to the side.View the full transcripts for this lesson at:jennifermaker.com/cklesson-transcriptsCopyright JenniferMaker Page 9 visit jenniferMaker.com
Cricut KICKOFF HANDBOOKLESSON ONE QUESTIONSHere are answers to commonly-asked questions for Cricut Kickoff lesson 1:Q: Can I set up my Cricut to work with multiple devices?A: Yes, you can setup Cricut Design Space to work with your Cricut on all devices that support Design Space.Q: Can I have more than one Cricut ID?A: Yes, you can. I have several myself, though the extras are only for testing or demonstration purposes. Mostpeople just use one.Q: Can I hook my Cricut up to a Chromebook?A: Cricut does not officially support the Chromebook, but you may be able to download the Design Space appfor Android from the Google Play store on your Chromebook. No guarantee it will be available and/or continueto work, however.Q: Can I use a Kindle Fire with my Cricut?A: No, you cannot.Q: I need a laptop so I can connect with my Cricut. What kind of laptop should I get?A: Look for a laptop that uses Windows 8 or later OR macOS 10.15 or later, has an Intel Dual-Core orequivalent AMD processor (Windows) or a 1.83 GHz CPU (Mac), at least 4GB of RAM, an available USB port (orthe ability to attach an adapter for one), and a minimum 1024px x 768px screen resolution.Q: Do you have to use the USB cord to plug in your laptop or desktop if it is Bluetooth ready?A: You CAN skip the USB cord and simply connect to Bluetooth on your laptop or desktop instead. Cricut’ssetup guide does not mention this is an option, but if you go to your Bluetooth settings and look for a newdevice when your Cricut is powered on, you will see a new Cricut appear — pair with it (remember to type0000 if it asks for a pin) and you’ll then be able to view it in Design Space. Just keep in mind that it will notbe recognized as being connected during step 3 of the New Machine Setup sequence, so you will not be ableto do the test cut without the USB cord connected (at least as of the time I am writing this).Q: I really want to use my USB cord, but it won’t reach my computer. What do I do?A: You can buy an USB extension cable here: https://makeracademy.com/cricutdiscount#extrasQ: What do I do if I do not have Bluetooth on my computer?A: You can buy an inexpensive Bluetooth adapter here: https://makeracademy.com/cricutdiscount#extrasQ: Is it better to use USB or Bluetooth when I have a choice?A: I find the USB cable speeds things up for me, so I usually use the USB cable if I have the option.Q: Can the cutting mat be inserted from the back of the Cricut?A: No, only the front.Q: Can a cutting mat be turned 180 and then inserted in the front of the Cricut?A: Yes, you can insert both ends of a Cricut mat.Q: Where is my fine point blade?A: It comes pre-installed in your Cricut’s clamp. Be sure you remove any packing material around the bladebefore you attempt to use it.Don’t see your question here? Come ask us in our Facebook group at jennifermaker.com/cricutcraftersCopyright JenniferMaker Page 10 visit jenniferMaker.com
Cricut KICKOFF HANDBOOKLESSON 2KNOW THETOOLS TO USEBasic tools and supplies to have on hand:o Blade(s)o Mat(s)o Pen(s)o Weeding tool, scraper tool, and spatulao Craft knife and self-healing mato Cardstocko Adhesive Vinyl (Permanent & Adhesive)o Iron-On Vinyl (HTV)o Infusible Inko Iron or EasyPressCopyright JenniferMaker Page 11 visit jenniferMaker.com
Cricut KICKOFF HANDBOOKMY BLADESBladeMaterials I Cut With ItNotesFine PointqEXPLORE & MAKERJOYDeep CutqEXPLORE & MAKERbondedfabricqEXPLORE & MAKERFOILqEXPLORE & Rscoringdouble(02)qMAKERCopyright JenniferMaker Page 12 visit jenniferMaker.com
Cricut KICKOFF HANDBOOKMY BLADESBladeMaterials I Cut With )qMAKERwavy edge(31)qMAKERq engraving(41)qMAKERCopyright JenniferMaker Page 13 visit jenniferMaker.com
Cricut KICKOFF HANDBOOKMY PENS & MARKERSPENTYPE & COLORNotesq EXTRA Fine Pointq FINE POINTq MARKERSq GELq METALLICq INFUSIBLE INKq FABRICCopyright JenniferMaker Page 14 visit jenniferMaker.com
Cricut KICKOFF HANDBOOKMY MATSMATSIZE & CONDITIONNotesq BLUE LIGHT GRIPq GREEN STANDARDGRIPq PURPLE STRONGGRIPq PINK FABRIC GRIPCopyright JenniferMaker Page 15 visit jenniferMaker.com
Cricut KICKOFF HANDBOOKMY FAVORITE BRANDSAdhesive Vinyl: Where I Find It:Iron On Vinyl: Where I Find It:Stencil Vinyl: Where I Find It:Specialty Vinyl: Where I Find It:Transfer Tape: Where I Find It:Cardstock (Solid): Where I Find It:Cardstock (Patterned): Where I Find It:Kraft board: Where I Find It:Vellum: Where I Find It:Glue: Where I Find It:Spray Adhesive: Where I Find It:Hot Glue: Where I Find It:Pens: Where I Find It:Markers: Where I Find It:Sealer: Where I Find It:Glitter: Where I Find It:Tape: Where I Find It:Where I Find It:Where I Find It:Where I Find It:Where I Find It:Copyright JenniferMaker Page 16 visit jenniferMaker.com
Cricut KICKOFF HANDBOOKMY FAVORITE BRANDSBrand: Where I Find It:Brand: Where I Find It:Brand: Where I Find It:Brand: Where I Find It:Brand: Where I Find It:Brand: Where I Find It:Brand: Where I Find It:Brand: Where I Find It:Brand: Where I Find It:Brand: Where I Find It:Brand: Where I Find It:Brand: Where I Find It:Brand: Where I Find It:Brand: Where I Find It:Brand: Where I Find It:Brand: Where I Find It:Brand: Where I Find It:Brand: Where I Find It:Brand: Where I Find It:Brand: Where I Find It:Brand: Where I Find It:Copyright JenniferMaker Page 17 visit jenniferMaker.com
Cricut KICKOFF HANDBOOKWHERE IS IT?Itemwhere I store it?Where I bought it?Need more?Copyright JenniferMaker Page 18 visit jenniferMaker.com
Cricut KICKOFF HANDBOOKMY SUPPLY INVENTORYNametype/colorbought atamount paidCopyright JenniferMaker Page 19 visit jenniferMaker.com
Cricut KICKOFF HANDBOOKMY TOOL INVENTORYNameOriginal PricePurchase Date Model/Serial #Copyright JenniferMaker Page 20 visit jenniferMaker.com
Cricut KICKOFF HANDBOOKLESSON TWO TRANSCRIPTSDownload the transcripts for all videos in this lesson with the following links:o Cricut Joy: 2o Cricut Explores (all): lore2o Cricut Makers (all): er2Note that transcripts were created for us by an automated program and may contain small mistakes. We havetried to correct and update these whenever possible, but we may have missed a few words here and there.Here is an example of a lesson two transcript so you can decide if it will be helpful:Hello everyone! My name is Jennifer Maker, andtoday I’m teaching you all about the tools, supplies,and accessories you can use with your Cricut Makercutting machine! This is the Cricut Kickoff Lesson 2,and we’re going to through all of these fun thingstogether, one by one.In Lesson 1, you saw that your basic Cricut Makercutting machine comes with a few things beyondthe machine, power cord, and USB cable. In thebox was a blue mat, a black pen, a rotary blade,and some cardstock. And there was also a fine-pointblade was in the Cricut Maker machine. But there’sa lot more tools, supplies, and accessories, andunderstanding them, and knowing when to use whatwhen, goes a LONG way toward making what youlove with your Cricut.Before we get too far, I want to remind you aboutmy free Cricut Kickoff printable handbook that goesalong with these lessons! You can download it rightnow at cricutkickoff dot com -- just register for theclass and you’ll get the handbook! I’ll be referringto it as we go along during today’s lesson.So please pull up a chair in my craft room, and let’sget started.CRICUT BLADESLet’s begin with your BLADE. The Cricut Maker hasa LOT of different blades -- It’s the most versatileof all the Cricut cutting machines. Let me show youeach one and explain what it is used for.The basic, all-purpose blade is the fine point bladethat came with your machine. The blade is madefrom German carbide steel and is very sharp, soalways handle it with care. This is the blade you’ll usemost of the time. It’s either silver or gold, and it lookslike this. This thick shank here is called the housing,and the blade itself pokes out at the end. You’ll usethe fine point blade for cutting cardstock, vinyl, andreally most materialsThe blade in the pink housing is the bonded fabricblade. But here’s the thing -- even though it says it’sspecifically for bonded fabric, I don’t believe there isany difference between it and the regular fine pointblade other than the pink color. And because you havea Cricut Maker with a rotary blade, you probably donot want this blade at all. You CAN use it, but therotary blade does a better job of cutting fabric.The blade in the black housing is the deep cut bladeallows you to cut thicker materials. The deep cutblade has a steeper blade angle of sixty degrees andit’s made of a harder, more durable steel. I use thedeep cut blade to cut cardboard, chipboard, magnets,basswood, balsa wood, stiffened felt, and foamsheets.This one with the blue housing is not so much of ablade as a tool -- this is the Foil Transfer Tool andit comes with three interchangeable tips in fine,medium, and bold. This Foil Transfer tool is usedto transfer Cricut’s foil transfer sheets onto yourprojects. You can learn more about the Foil Transfertool on my blog and YouTube channel.But that’s not all! In your box was a blade that looksView the full transcripts for this lesson at:jennifermaker.com/cklesson-transcriptsCopyright JenniferMaker Page 21 visit jenniferMaker.com
Cricut KICKOFF HANDBOOKLESSON TWO QUESTIONSHere are answers to commonly-asked questions for Cricut Kickoff lesson 2:Q: Can you buy replacement blades?A: Yes.Q: Do you recommend buy a set of blades?A: No. Just keep your blades clean and they will last a long time.Q: Are the silver and gold blade holders interchangeableA: Yes, the silver and gold housing are both for the Fine Point Blade, making them interchangeable.Q: Do you need the black housing to use the deep cut blade?A: Yes.Q: Would you use rotary blade for vellum?A: Cricut recomments the Fine Point blade for vellum, but you could try the rotary blade if that does notwork.Q: Can I reinforce the back of a mat if the Maker cut too deeply into it?A: You can try taping it with packing tape, but do not add any extra depth to it with anything thicker.Q: When do you move the star wheels and when do you leave them the way they are?A: The white star wheels on your roller only need to be moved when Design Space tells you to. Otherwise, youcan leave them as is.Q: What is the difference between the deboss tool and the scoring tool?A: The scoring tool has a smooth nub to indent the paper, while the debossing tool has a small roller ball.Q: Do you use Infusible Ink pens IN the machine or for coloring by hand after you print a mandala orwhatever you are making?A: You can use Infusible Ink pens both in your Cricut and for coloring by hand — you choice!Q: What do you mean by solid core vs white core cardstock?A: Solid color is dye throughout the whole paper and will appear as the same color when viewed on the edgeas from the front or back. White color is printed on the front and/or back only and will apepar white whenviewed from the edge of the paper.Q: Can you damage your mat with the scraper tool?A: Yes, if you apply too much paper, you can scratch the mat and even remove adhesive. Use light pressure.Q: What is bonded fabric?A: Fabric you have bonded a piece of fusible interfacing to the back of. This allows it to be cut on an Explore.Q: I want to buy some Cricut tools and supplies. Can you get me a discount?A: Yes! You can get my discount code and affiliate link here: https://makeracademy.com/cricutdiscountDon’t see your question here? Come ask us in our Facebook group at jennifermaker.com/cricutcraftersCopyright JenniferMaker Page 22 visit jenniferMaker.com
Cricut KICKOFF HANDBOOKLESSON 3DIVE INTODESIGN SPACEI am connecting to Design Space with:o iPhone running iOS version:o iPad running iOS version:o Android phone running version:o Android tablet running version:o Mac desktop with MacOS version with GB of RAMo Mac laptop with MacOS version with GB of RAMo Windows desktop with Windows version with GB of RAMo Windows laptop with Windows version with GB of RAMooCopyright JenniferMaker Page 23 visit jenniferMaker.com
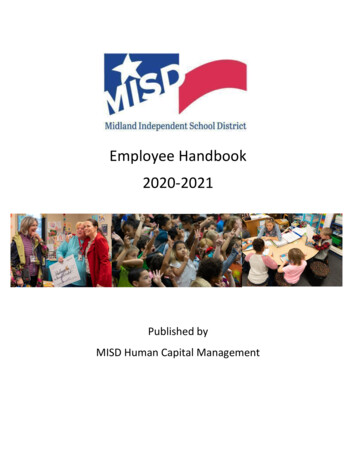
Cricut KICKOFF HANDBOOKCRICUT DESIGN SPACE DESKTOPCANVAS MAP (version 6.17)Project Name(asterisk means you haveunsaved glegrid linesNewproject(change tocut, draw,print, etc.)EditmenuSelecteverythingon nge SizeLayer (click infields tochange)OffsetsliderMake ItPositionon yourcanvasUnlock/lockaspectratios(click here whenready to make ngroupRulerDouble-click text to apesmenuUploadSVG files& pect ratiosZoom in/outScrollside to sideContextualmenu(right click toview)TemplateResizeArrange menuAlign menuOperationSlice 1 layer Weld layersfrom tenContourAttach layerstogether tocut togetherFlattenlayers forprint & cutText menuCopyright JenniferMaker Page 24 visit jenniferMaker.com
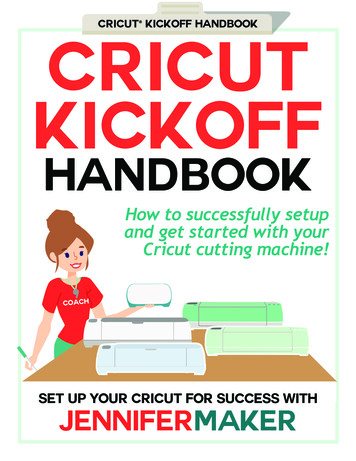
Cricut KICKOFF HANDBOOKCRICUT DESIGN SPACE IOSCANVAS MAP (version 5.2.1)Note: The screen shown below is from an iPad.Zoom in/out(use twofingers andspread out tozoom out,or pinch in tozoom in)Back toHomeDouble-tap text to editRulerProject NameSavemenu(asterisk means you haveunsaved changes)DeleteMake It(tap here whenready to make s(highlighted)Duplicate layerHide layerDeletelayerUnlock/lockaspect ratiosResizeInsert Insert UploadFont Shape SVG& PNG(browse & Add& select TextImagemenuimages fromCricut andthose youuploaded)ActionsmenuEditmenuSynccolorsLayersp
Feel free to print this handbook out and keep it next to your Cricut as you are setting it up. If you need more pages than what I’ve included in here, just print out extras for whatever you need! I’ve kept the amount of color as low as pos