Transcription
RCForb (Client) User’s ManualOperating with RCForb Client Overview
Installation & First Run (Client)Download and InstallYou may download the latest public release of RCForb (Client) fromhttp://download.remotehams.com/.Locate the downloaded file and double-click on “RCForb Client.exe” to start setup.You should now see a License Agreement dialog, review and accept, and then click on next.You can then customize the installation location of RCForb (Client). Click on Next.
You can now choose to install a desktop icon or any additional installation options.Click on Install to begin installation.If you do not want to start RCForb (Client) at this time,you may un-check the “Start RCForb (Client)” option.On First RunYou will be asked for yourRemoteHams Username &Password, on first run.If you choose so, you may continue as aguest by clicking on the button labeled“Continue as Guest”.
Configuring Your Audio SettingsIn RCForb Client, goto Options - AudioSettings to configure the default audio settings to beused when connecting with remotes. Any of thesettings you adjust in this dialog will be saved as aglobal setting. You can temporarily change thesesettings while connected to a remote. It isrecommended to configure your audio properly hereto avoid manually adjusting all the time. You cantemporarily change audio settings while connected toa remote.Audio Settings DialogMake sure you select the proper Audio Devices for your Microphone and Speakers. You can testyour selections by clicking on Test Speakers or Test Microphone buttons.Testing Your SpeakersClick on Test Speakers to check yourspeaker volume level.You can adjust the volume level ifneeded. *Note, click Test Speakers todouble check the correct audio deviceis selected for “Speakers”.
Testing Your MicrophoneClick on the Test Microphonebutton to test your microphonelevels. This will record 6 secondsof audio, then play it back.*Note, adjusting the Microphoneslider adjusts the system’s level.Same result as controlling themicrophone level from withinWindows itself.Temporarily Changing Your Audio Settings While Connected to a RemoteTo change your microphone or speaker device, you must restart the VoIP stream by clicking onthe Stop button then Play button for the newly selected audio device to take effect.It is possible to adjust your volume or microphone level without restarting the VoIP stream.
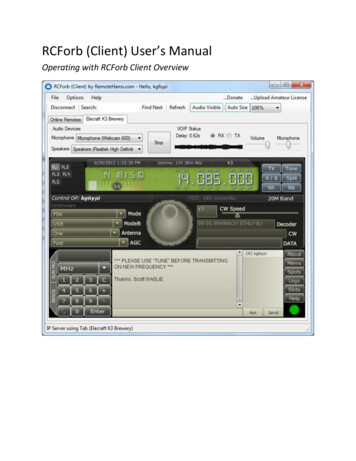
Finding a Remote (Connect)In RCForb Client’s Toolbaryou will find a “Search” field.Enter an OrbID or any a text stringto search against. If multiplematches are found, the nextmatch is selected.To connect to a remote, select the remote desired, and then click on “Connect” button in thebottom right of the online list. You may also double click on the remote to establish aconnection.Identifying TX Capable RemotesIn the screenshot above, you can see the “TX” column for the remotes listed. If there is a check,this remote supports TX. You will need to contact the radio owner, to obtain TX permission.Disconnecting from a RemoteIn RCForb Client’s Toolbar you will finda “Disconnect” button. Click on thisbutton to disconnect from the currentremote. *If the Online Remotes tab is selectedwhen this button is clicked, all remoteconnections will be disconnected.
Using a Remote (RX & TX)Tuning Around (RX)Every radio has different features andoptions available. In general you canassume every radio has frequency controland mode control.Frequency can be controlled by thenumber pad or by clicking on a digit in thefrequency (note the arrows about eachdigit). Tuning is also possible with thetuning knob by dragging with your mouseor spinning the wheel on your mouse.Mode control is usually available as aDropdown. Just click on the dropdown tosee a list of available options.Requesting Club MembershipSome remotes may require you to be a member of ham radio club before you are allowed touse the club’s remote base. If you attempt to a tune a remote that requires Club Membershipyou will be notified with a message and a Request button will become available.*Note, more to come on Club Integration
Transmitting on a Remote (TX)Locating the TX buttonIn the highlighted area you will find all theavailable buttons. If the remote supportsTX, you should see a “TX” button.Operating TX is very simple, just click onthe TX button to “key” the remote radio.Then click on the TX button again, to “unkey” the remote radio.Getting Approved for TXBefore you request TX permission on any remote, upload an original digital copy of your HamRadio License. Use your scanner or digital camera to create a digital copy. Make sure the fileformat is in JPG (Jpeg) and less than 1MB. The remote owner will verify the copy for operationin their country. For all USA based remote’s, any foreign operator must have CEPT approvalvisible on their license and have a reciprocal agreement with the FCC to be allowed transmitpermission. For remotes based outside the USA, the rules may vary.To Request TX permission, click on the TX button. A dialog will show up explaining that you donot have permission to use TX features and will have a Request button. Click on the RequestButton to send a TX Request.Using the Space Bar to Transmit (TX)TX Operation by pressing the space bar is possible but it must be “bound” to the TX button. Thespace bar is not always “bound” to the TX button. To “bind” the space bar to the TX button, youmust first click on the TX button. As long as the TX button is the last item you have clicked onthe Space Bar will be “bound”. For example, if you click on the chats box, you must click on theTX button again to “bind” the space bar.
the TX button to “key” the remote radio. Then click on the TX button again, to “un-key” the remote radio. Getting Approved for TX Before you request TX permission on any remote, upload an original digital copy of your Ham Radio License. Use your scanner or di