Transcription
Client for Open Enterprise ServerRelease NotesOctober 20201Naming ConventionsClient for Open Enterprise Server refers to the version of the Client for Windows 7, Windows 8,Windows 10, Windows Server 2008 R2, Windows Server 2012, Windows Server 2016, and WindowsServer 2019.Client for Open Enterprise Server refers to the support pack release of the Client Windows 7,Windows 8, Windows 10, Windows Server 2008 R2, Windows Server 2012, Windows Server 2016,and Windows Server 2019 product.2What’s New in Client for Open Enterprise ServerThe following changes are included: Section 2.1, “What’s New in Client for Open Enterprise Server 2 SP5,” on page 1 Section 2.2, “What’s New in Client for Open Enterprise Server 2 SP4,” on page 2 Section 2.3, “Client Integration with Advanced Authentication,” on page 3 Section 2.4, “Client Updated With SHA-2 Certificates,” on page 4 Section 2.5, “Rebranding Changes,” on page 42.1What’s New in Client for Open Enterprise Server 2 SP5Platform SupportClient for Open Enterprise Server 2 SP5 (IR2) and later supports Windows 10 update (version 20H2).NCP Encryption SupportThe feature NCP Encryption on OES is a security feature that increases the security of datatransmitted across networks between the NCP server and clients.The Client for Open Enterprise Server 2 SP5 and later provides support for NCP Encryption capabilityon the OES 2018 SP2 or later server. The following are the new parameters introduced in the ClientProperties to support this functionality: NCP Encryption Cipher StrengthFor more information on the parameters, see Advanced Settings in the Client for Open EnterpriseServer Administration Guide.For information on the NCP server side configuration for NCP Encryption, see Managing NCPSecurity Configurations in the OES 2018 SP2: NCP Server for Linux Administration Guide.
Multi Factor Authentication EnhancementThe Advanced Authentication capability on the Client for Open Enterprise Server 2 SP5 is enhancedto support the Multi Factor Authentication (MFA) on the OES 2018 SP2 server. For more informationon the NCP server side configuration for MFA, see Managing NCP Security Configurations in theOES 2018 SP2: NCP Server for Linux Administration Guide.Server Platform SupportThe Client for Open Enterprise Server 2 SP5 supports the Open Enterprise Server (OES) 2018 SP2release.Enhanced eDirectory Password Expiration HandlingPreviously, the eDirectory password expiry was handled after the execution of the eDirectory loginscripts on the user’s desktop. Now, the eDirectory password expiration is handled during the login ofthe user and changing the passwords during the grace login period. If the Password Expiry Warning option is enabled, the user is alerted to change the passwordbefore the actual expiry date. If the Force Grace Login Password Change option is enabled, the user must change thepassword before the expiry of the grace login. Else the user will not be able to login.In cases where the eDirectory account also defines the Windows account, updating the eDirectorypassword prior to the Windows account improves Domain Services for Windows and other domainaccount synchronization scenarios.2.2What’s New in Client for Open Enterprise Server 2 SP4 LDAP Contextless Login: Client for Open Enterprise Server 2 SP4 (IR13) and later supportsTLS 1.1 and TLS 1.2 encrypted connections only if the LDAP server supports (TLS 1.1 or TLS1.2) them. This improvement allows connections to avoid the vulnerabilities of TLS 1.0 andearlier versions of the transport layer protocol. The Client for Open Enterprise Server 2 SP4 (IR12) and later provides support for the followingAdvanced Authentication features: Offline Logon: Allows to perform an Advanced Authentication logon on a workstation byusing the previously cached logon information. This feature can be used in two modes andthe Client for Open Enterprise Server credential provider supports both these modes:1. Force Offline Login Manually - Provides a check box Offline logon during logon. Forinformation on configuring this mode, see Configuring to Force Offline Login Manuallyin the Advanced Authentication - Windows Client guide.2. Enforced Cached Login - An offline logon is always attempted first using the cachedlogon information and then connects to the Advanced Authentication server in thebackground. For information on configuring this mode, see Configuring the EnforcedCached Login in the Advanced Authentication - Windows Client guide.NOTE: This feature allows the user to logon with Advanced Authentication for ComputerOnly Logon scenario. It is not possible to perform an offline logon to eDirectory. A networkconnectivity is always required for an eDirectory login. Custom Messages: The Client for Open Enterprise Server credential provider nowsupports receiving custom messages defined in the Advanced Authentication serverpolicies. For information on configuring Custom Messages, see Custom Messages in theAdvanced Authentication - Administration guide.2Client for Open Enterprise Server Release Notes
Platform Support: Client for Open Enterprise Server 2 SP4 (IR12) and later supports WindowsServer 2019 and is tested and certified for the latest Windows 10 Update (version 1903). Multi-factor Authentication: The Client for Open Enterprise Server 2 SP4 (IR11) and laterprovides an enhanced integration of Client for Open Enterprise Server with AdvancedAuthentication Client for Windows. The highlights are: The Client for Open Enterprise Server Credential Provider is used as the credential providerto perform both eDirectory and Windows account logon through the AdvancedAuthentication methods. An option to use the NetIQ Advanced Authentication Credential Provider is also available inClient 2 SP4 (IR11), which was possible in the previous Client releases from Client 2 SP4(IR6) to Client 2 SP4 (IR10) with Advanced Authentication. A new tab, Advanced Authentication is available in the Show Advanced Options dialogduring logon to specify the Advanced Authentication logon details.NOTE: The Client for Open Enterprise Server 2 SP4 (IR11) release is focused only on theenhanced Advanced Authentication integration behavior with the Client, and does not containany other fixes or changes that are not related to Advanced Authentication. Dependent Products: The Client for Open Enterprise Server 2 SP4 (IR9) and later includes thefollowing version of the dependent products: NetIQ Modular Authentication Services (NMAS) 9.0.4.1 Novell International Cryptographic Infrastructure (NICI) 3.0.3For information on installing Client for Open Enterprise Server, see Advanced InstallationOptions in the Client for Open Enterprise Server Administration Guide. File Compression Configuration: Beginning with Client for Open Enterprise Server 2 SP4(IR9), the compression attributes are available for files too. The Don't Compress and ImmediateCompression attributes can now be enabled or disabled on files, directories, and volumes in theOES Info tab of the Properties window. Platform Support: Client for Open Enterprise Server 2 SP4 (IR8) and later supports Windows10 RS4 Update. OES 2018 Support: With the OES 2018 support, users on Client for Open Enterprise Server 2SP4 (IR7) and later can perform salvage and purge operations on NSS files having 64-bit ZIDnumbers using the client. File Caching: Client for Open Enterprise Server 2 SP4 (IR7) and later supports write cachingfor network files along with the existing read caching capability. This provides increasedefficiency in reading and writing data to network files. For information on the File Cachingparameter settings, see Advanced Settings in the Client for Open Enterprise ServerAdministration Guide.2.3Client Integration with Advanced AuthenticationClient for Open Enterprise Server 2 SP4 (IR6) and later provides optional installation-time integrationwith the Advanced Authentication Client for Windows, and also optional functionality to require thatthe Advanced Authentication Client must be used when initiating an eDirectory login. This enablesClient for Open Enterprise Server Release Notes3
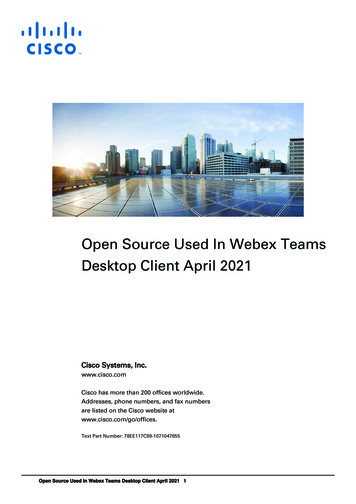
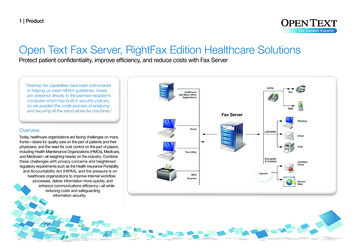
you to perform multi-factor authentication to Windows using Advanced Authentication Client followedby seamless eDirectory login through the Client. For more information on Installing and ConfiguringAdvanced Authentication Client, see Client for Open Enterprise Server Administration Guide.Further integration capabilities for Client for Open Enterprise Server and Advanced Authenticationare being explored and planned to be delivered in the upcoming releases of Client for OpenEnterprise Server.For more information on Advanced Authentication, see Advanced Authentication documentation site.2.4Client Updated With SHA-2 CertificatesClient for Open Enterprise Sever 2 SP4 (IR3) and later is signed using a new Micro Focus SHA-2certificate, due to Windows’ deprecation of SHA-1 certificates.For successful installation of Client on Windows 7 and Windows Server 2008 R2, ensure to install theMicrosoft Security Update KB3033929 to add support for SHA-2 certification.2.5Rebranding ChangesNovell is now part of Micro Focus. Products across the portfolio are now being rebranded to reflectMicro Focus or a more appropriate name. This corporate change impacts the name of products andcomponents, user interfaces, logos, and so on. As a result of this corporate change, the new namefor Novell Client is Client for Open Enterprise Server.The documentation update to reflect these changes (such as names and screenshots) is being donein a phased manner. Until all the guides in the documentation library are modified, Novell Client andClient for Open Enterprise Server are used interchangeably.The screenshot provides an overview of the change to the user interfaces, logos, and so on.However, all the client functionality remains the same.4Client for Open Enterprise Server Release Notes
Figure 1 Overview of Client for Open Enterprise ServerFor more information, see Rebranding Changes in the Client for Open Enterprise ServerAdministration Guide.3Installation Section 3.1, “Supported Windows Platforms,” on page 6 Section 3.2, “Supported Server Platforms,” on page 6Client for Open Enterprise Server Release Notes5
Section 3.3, “Installing the Client for Open Enterprise Server,” on page 6 Section 3.4, “Uninstalling a Later Version of Client for Open Enterprise Server to Reinstall aPrevious Client Version,” on page 7 Section 3.5, “The Total Path to the Installation Set Must Not Exceed 214 Characters.,” on page 83.1Supported Windows PlatformsThe Client for Open Enterprise Server is supported on the following platforms: Windows 10 (x86 or x64)(Enterprise Edition, Education Edition, or Professional Edition) Windows 8.1 Windows 8 (x86 or x64) excluding Windows 8 RT Windows 7 SP1 (x86 or x64) Windows 7 (x86 or x64)(Ultimate Edition, Enterprise Edition, or Professional Edition) Windows Server 2019 (x64) Windows Server 2016 (x64) Windows Server 2012 R2 Windows Server 2012 (x64) Windows Server 2008 R2 SP1 (x64) Windows Server 2008 R2 (x64)The Client for Open Enterprise Server is also supported in Remote Desktop Services and DesktopVirtualization environments.NOTE Ensure Windows 7 and Windows Server 2008 R2 are installed with Microsoft security updateKB3033929 to add support for SHA-2 certification. The Client for Open Enterprise Server might run but is not supported on Windows Starter, HomeBasic, and Home Premium editions.3.2Supported Server PlatformsThe Client for Open Enterprise Server supports Open Enterprise Server (OES) 2018 SP2, OES 2018SP1, OES 2018, OES 2015 SP1, OES 2015, OES 11 SP2, OES 11 SP1, OES 11, OES 2, andNetWare 6.5.On Windows Server platforms, the Client for Open Enterprise Server might run but is not supportedon Datacenter Edition, Web Server Edition, or on Server Core installations using any edition.3.3Installing the Client for Open Enterprise ServerTo install the Client, run the setup.exe file located in the C:\Micro Focus\Client for OpenEnterprise Server 2 SP4 (IRx) directory.6Client for Open Enterprise Server Release Notes
3.4Uninstalling a Later Version of Client for Open Enterprise Server toReinstall a Previous Client VersionThe NMAS client installed with Client for Open Enterprise Server includes NICI as a requireddependency. Uninstalling the Client automatically uninstalls the NMAS client, but intentionally doesnot uninstall NICI because other applications on the workstation besides NMAS or the Client may stillbe using NICI services.If you uninstall the Client for Open Enterprise Server with the intention of installing a previous versionof the Client, it is recommended that you also uninstall NICI (and NICI for Windows x64, if runningWindows x64) before re-installing the previous Client.Attempting to install the initial an earlier Client without first removing NICI can result in one or more ofthe following issues: During installation of the Client on Windows 7 x64, the NMAS Challenge/Response method willreport a 1603 error. This is because the NMAS client included in the initial release cannot resolveits required dependencies using the newer version of NICI still present on the machine. When starting up, the Windows welcome screen on Windows x64 displays an error, such as Theprocedure entry point CCSX Authenticate could not be located in the dynamiclink library ccswx64.dll. The NICI installer of the older NICI version can damage the existing newer NICI installation. Forexample, attempting to install NICI 2.7.3 or NICI 2.7.4 when NICI 3.0.3 is already present.Subsequent attempts to use NICI can report -1471 0xFFFFFA41 NICI E SELF VERIFICATIONerrors due to the damaged NICI installation. The Client for Open Enterprise Server 2 SP4 (IR9) and later contains NICI 3.0.3. Earlier versionsof Client for Open Enterprise Server contains NICI 2.77.3. If you are intending to uninstall NICI2.77 or later and re-install NICI 2.76, an additional step is necessary. The Novell NICI installerintentionally leaves behind certain NICI files, including CCSW32.DLL and CCSWX64.DLL. Due to anissue in the NICI 2.76 for Windows x64 installer, re-installing NICI 2.76 on Windows x64 isunable to overwrite the CCSWX64.DLL file left behind by the NICI 2.77 or later installers.To uninstall a later version of NICI and re-install NICI 2.76 on Windows x64, in addition touninstalling the NICI product, you will need to rename or delete the CCSWX64.DLL from theWindows SYSTEM32 directory.IMPORTANT: If you omit this step, NICI 2.76 will still appear to install correctly, but attempting tologin to eDirectory using NMAS will fail with a NICI-specific NICI E SELF VERIFICATION (1471) error. When this issue happens, or before this issue happens, rename or delete theCCSWX64.DLL in the Windows SYSTEM32 directory and then run the Novell Client 2 SP2 or earlierinstallation again to re-install NICI 2.76 successfully.If you fail to follow these guidelines, features that require NMAS will not function, due to one or all ofthe above conditions.These guidelines and issues also apply to installing the Client on a Windows Server 2012 machinewhere eDirectory 8.8 SP5 or later has already been installed. eDirectory on Windows Server 2008includes NICI 2.7.6 or later, and installing previous versions of the Client which include NICI 2.7.4 orearlier can cause the NICI installation to become damaged.Client for Open Enterprise Server Release Notes7
3.5The Total Path to the Installation Set Must Not Exceed 214Characters.The path to any and all files within a Client for Open Enterprise Server installation set must notexceed 256 characters.Currently this means the directory path into which you extract the installation set must not exceed 214characters. This limit is relative to the traditional MAX PATH or 256-character limit in Windowsapplications, but also takes into account additional path space that is needed for running theinstallation.If the installation set is being accessed from a remote network location, for example\\servername\volumename, the length of the network server and volume name also counts againstthe maximum depth, due to underlying processing that makes use of the real path to the installationset. Even if a mapped drive letter and/or the map root feature is used for accessing the installationset, the limit is measured as if a UNC path had been used.4Upgrading Client Interim Release1 In the Micro Focus Product Download site, select Client for Open Enterprise Server (NovellClient) from the Browse by Product drop-down list.2 Under Patches, click Search Patches.3 On the Patch Finder page, select the product as Novell Client. A list of Client releases that arereleased for different platforms are displayed.4 Expand the Client release for the required platform to view the list of Current patches andSuperseded patches available.5 Click the required IR release from the list and click proceed to download.For more information on upgrading the client, see the Details section of that release.6 Execute the .exe and unzip the files, then continue with the installation as prompted.5Compatibility with Windows 10 Secure BootThe Client for Open Enterprise Server 2 SP4 (IR4) and later provides enhanced compatibility withWindows 10 and the UEFI Secure Boot feature. On the Windows 10 July 2016 (build 10493) and laterreleases, and also on Windows 10 July 2015 (build 10240, before any Windows updates are applied),if the Client for Open Enterprise Server is running on a Windows machine where UEFI Secure Boot isenabled, then the machine fails to boot and instead launches Automatic Repair mode. To avoid thisissue, install the Client for Open Enterprise Server 2 SP4 (IR4) on any Windows 10 machine whereSecure Boot is enabled, rather than installing any previous version of the Client.If you have already encountered this issue and your Windows 10 machine is booting into AutomaticRepair mode, or if you must continue to use an earlier version of the Client for Open EnterpriseServer but still need to avoid this issue, refer to the TID 7017838 (https://www.novell.com/support/kb/doc.php?id 7017838) to resolve the problem.8Client for Open Enterprise Server Release Notes
6Known Issues Section 6.1, “The Client on Microsoft Surface Pro 4 or Later Does Not Reconnect After theWorkstation Wakes Up,” on page 10 Section 6.2, “Additional Advanced Authentication Login is not Prompted for Additional eDirectoryLogin Attempts Through Login Script,” on page 10 Section 6.3, “Client for Open Enterprise Server 2 SP4 (IR11) Does Not Support AuthenticationChain,” on page 10 Section 6.4, “Deferred Write or Time Stamp Changes Might Not Reflect in Directory Listings,” onpage 10 Section 6.5, “eDirectory Login Fails After Windows Upgrade to Windows 10 RS3,” on page 10 Section 6.6, “Loss of Client Configuration Settings After Upgrading to Windows 10 RS2,” onpage 11 Section 6.7, “Windows 7 and Windows Server 2008 R2 Displays the Verification Prompt Even ifTrusted Software Is Selected,” on page 11 Section 6.8, “The 8.3 File Name Support is Unavailable with the Lazy Close Feature,” onpage 11 Section 6.9, ““Login with Third-Party Credential Provider” Feature Not Supported WhenMicrosoft Windows Live ID is Used,” on page 11 Section 6.10, “Novell Products Not Supported with the Client for Open Enterprise Server,” onpage 12 Section 6.11, “Welcome Screen Issues,” on page 12 Section 6.12, “Authenticating to a OES Server Through a UNC Path,” on page 13 Section 6.13, “Using Ctrl Alt Del to Change Your Password,” on page 13 Section 6.14, “Mapped Drive Icon Doesn’t Update on Re-Authentication,” on page 13 Section 6.15, “LDAP Contextless Login Differences in the Client for Open Enterprise Server,” onpage 13 Section 6.16, “Login Profiles,” on page 14 Section 6.17, “Using the Force Grace Login Password Change Option,” on page 14 Section 6.18, “File Caching Settings Ignored,” on page 14 Section 6.19, “Exceeding Disk Quota Is Re
An option to use the NetIQ Advanced Authentication Credential Provider is also available in Client 2 SP4 (IR11), which was possible in the previous Client releases from Client 2 SP4 (IR6) to Client 2 SP4 (IR10) with Advanced Authentication. A new tab, Advanced Authentication is avail