Transcription
How to buildA simpleNorth American Style FluteBy: Donn ShandsINTRODUCTION & DISCLAIMERSIt often comes a time in a persons life when they hear music with a beautiful and pleasingsound and wish they were capable of reproducing that sound on their own and to maketheir own expression of music. For those totally without knowledge of music and theability to play any musical instrument, it will most likely appear to be a daunting wall oflearning to have to scale.While flute music has been in the world since the earliest of times, the music producedby the North American Style flute was not well known until late into the 20th century.With the advent of advanced electronics and recording capabilities, along with the suddensurge of New Age Music, the NAS Flute was a natural to be included in the cadre ofinstruments with soothing sounds and meditative potential. Many of the indigenousNative Americans with the musical knowledge of the flute passed on to them from theirelders, became great leaders in the movement and reawakening of the joys of the flute.Unlike the fipple flutes, and embrasure blown flutes, the North American Style flute istuned to the Pentonic scale and not the Diatonic scale. Being Pentonic scale, the usual 5notes being played will sound pleasing, and not discordant.The flute is also constructed with a mechanism that produces the sound without a greatdeal of effort by a player. Much can be written about the history and the uniqueness ofthe North American Style flute, and that is saved for future writings.Usually the first thing that comes to mind when a person wants to learn more about theNAS Flute, is they will inquire as to a source on where to purchase one.A music shop will probably try to get them to go ahead and purchase a Recorder flute,which would be a huge mistake.Then, the person would go on the internet and search about. Not being properlyinformed, they just might purchase a cheap knock off of what appears to be goodcraftsmanship and get a cheap, mass produced flute. Most often the knockoff was madein a foreign country and if even near to be in tune it would be a miracle.Trying to learn on an inferior flute is frustrating and very unproductive.The other thing that happens is that the person is daunted by the price of a well madeflute.What is left is a determined person that wants a flute and thinks they can make one ontheir own.Page 1
At that point, they have no clue that there are many more just like themselves that desireto own and play a flute. They have no idea that there is help available through internetforums and through Flute Circles in their local area.Usually, the first thing they will do is search on line on how to make a flute, and usuallywind up trying to construct a PVC flute. Usually the first attempts will be miserablefailures due to lack of crafting skills and lack of the proper tools for crafting. That alsoleads to great frustration.The more fortunate will be lucky and find help through a local flute circle and a memberthat can pass on the knowledge of crafting a playing flute. If a person has gone this far,and still determined to obtain a quality instrument, and still has the desire to learn to play,then they have passed the first mark on their flute journey.The set of chapters that have been provided in PDF form on this Beginner NAF FluteForum that follow this introduction are provided by myself and several dedicated makersand players of the North American Style flute.Each of us have gone through the hardships of the first steps of our personal FluteJourney.Much thought has gone into coming up with a simpler method to produce a playable flutethat was, made of wood, did not require the use of the more dangerous power tools in aworkshop, and when finished, taught the basic skills needed to build future, moreadvanced flutes.The simplicity of the construction lends itself to actually pre-cutting all the pieces neededfor assembly and being provided as a kit for individuals to assemble in work shop typeclasses under supervision of a qualified flute crafting instructor.The design of the flute in the project we are providing is that of a North American Styleflute. The design results in a square shaped flute with a square bore. The shape has noeffect on the playability or the sound. The design is not something that can be patented,as the concept is in the public domain. There might be individuals that will try to take theconcept of providing a kit to construct this type flute to make a buck and try to patent thekit idea as something of their own creation. I am all for any instructor, or dedicatedteacher of flute making, to being creative in making their own kits for their personalworkshops. I would believe the World of flute makers would frown on any one persontrying to corner the market on an idea that will provide for so many, a simple,inexpensive, safer, approach to making and playing their first flute.Page 2
DisclaimersI am not presenting this How To Manual as “The” only way to construct a flute. It ismerely a simple means to an end that will provide a playable instrument with some of thepitfalls and more dangerous aspects removed that are found in advanced power tool filledwood workshops. It basically avoids the use of PVC, which is a possible source of toxicdust. Every attempt is made to explain possible shop dangers, and how to avoid them.Myself, and all those associated with the How To Manual, will not be held liable for anyinjuries, accidents, or medical problems that may result from any attempt to construct anyportion of the project described.At no time is the project to be construed as an official project sanctioned by anindigenous North American full or partial blooded native Indian. All caution has beentaken as to call the flute being produced as a North American Style flute and not “NativeAmerican Style” flute.All caution has been made to show respect to the history and the culture of the peoples ofthe lands of the Americas where the designs of the flute evolved over centuries of timeto what it is today.My name is Donn Shands, I am of Scottish/Welch/English decent. I claim no other bloodlines. At no time do I represent myself as a blood line member of the American Indians.Knowing there will be questions to be answered, I am providing a source of contactbelow for as long as the links hold up.Donn ShandsSugar Land, TXtejasmed@chili-usa.comPage 3
How to buildA simpleNorth American Style FluteBy: Donn ShandsChapter One The basic items needed to have in your beginner flute workshop.Oh, the first thing you noticed was that the flute was square. Right, and it just sohappens that it plays in tune and is a High D. Some people still believe that bumble beescan’t fly and still can’t understand how 747s stay in the air, and all steel ships float.Well, as long as the length of the walls are straight and the bore is consistent for thelength of the flute, physics allow the flute to work as well as any round bore flute.So, why a square bore flute? Because it is probably the easiest flute to make out of woodwithout using a workshop full of tools. Most beginners of flute making will try toconstruct a North American style flute out of PVC for their first flute. Many a beginnerhas started his flute journey with PVC. Problem is, most of the beginner makers have noclue about the potential dangers of working with PVC. The finished flute will not killyou, but what is produced during the process of making the flute is what gets you.PVC saw dust and sanding powder can get into the lungs. Like black pepper that neverdissolves in your stomach and sticks to the lining, PVC dust gets into the lungs and doesnot dissolve. It stays there, and sometimes the chemical make up of the plastic cancreate a form of lung cancer. If you must use PVC, then take the precautions of using afilter mask and other measures to cut out any breathing of the byproducts of flute making.For a better idea, use wood to make the new flute.Don’t have a router? No problem.Don’t have a lathe? No problem.You will need some simple tools, and we will discuss each of them and somesuggestions as to how to obtain some that may not be readily available at the hardwarestore.You are probably wondering why I am going to all the trouble to walk you through thetools and where to find them. First, you will need them to complete the project. Second,these tools will be part of your starter workshop for crafting future North AmericanType flutes. Sometimes it seems a bit costly to do a start up for such a simple project,but you need what you need to do the job. If you don’t want to make the investment inthe future of a great hobby, and still want to play a flute, then just purchase a nice NAFfrom a reputable dealer. There are plenty to choose from, and they want the support.Pg 1
The parts and tools suggested to be available are as follows:Wood.Lowes and Home Depot have a couple of bins of specialized wood back in the lumberdepartment.There will be a bin of wood dowels, both round and square. Pick up a length of ½ inchsquare dowel. And for later use, buy a round dowel. Maybe ¼ in diameter, but smallerthan ½ in diameter.For the dowels try to obtain poplar if you can. Avoid oak if at all possible.In another area, will be a bin of cut slats of finished smooth cut wood.Usually the bin will be of poplar wood. Some stores have white and red oak, andfinished cut pine usually called craft wood, and some even have white aspen wood.For your first project, it is better to stay with the poplar wood.You might as well pick up about 4 pieces of 4 ft long poplar. The slats are finishedsmooth, and are about ¼ in thick and about 1 ½ inches wide. The label will say ¼ X 2 X4. The finished wood cut comes out to be 1 ½ inches wide.Find the slats that have no cracks in the length, have no holes. The color of poplar rangesfrom off set white, to a greenish tinge, to almost black. Some slats will have someinteresting patterns of all the colors mentioned. The more varied the colors of the grains,the more interesting the flute will be. The stains you might add later can enhance someof the patterns, or you can finish with a clear coat. For now, the main thing is getting anice piece of tight grain wood to work with.GlueMost makers of North American style flutes have settled on using the White GorillaWood Working Glue, the type that does not foam up. Tight Bond III glue is anotheroption. These glues will perform very well for wood projects. Usually, during glue up,the clean up is just water. They do not give off offensive fumes, and when dry, can besanded smooth. Within reason, they are water resistant after curing.#2 Pencil .sharpRuler .usually a nice metal one that is 18 inches.Ruler square .does not have to be a real expensive one. But fairly accurate.Clamps. For this project, it is better to use spring clamps. You can use C type clamps ifnecessary. Clamps that have rough faces will require some sort of cushion on theirface to prevent marring of the wood surface.This is a square flute being made, so it is not recommended to use rubber bands, Bicycleinner tube strips or bungie cords, or surgical tubing as a wrap clamp. The pressure willwarp the sides of the project. The wrap type clamps are used on future projects whenyou learn how to make branch type flutes.Small files. Diamond file sets are a good investment and will be a mainstay in your workshop.Pg 2
Sand paper. For practical purposes, you could get by with a sheet of 80 grit and a sheetof 120 grit. The black water proof paper is more durable.Small Exacto type knife set. You could get by with just one handle and a #11 blade.But it is better to make the investment as you go on a whole set.Knife .carving type. While the Exacto knife is the norm for most craft workers, theblades are usually too thin and brittle to use safely on certain carving projects.The thick and stiffer blade on a good whittling knife is recommended, one that has asturdy blade that ends in a point.Rasp .wood type. Most wood rasps are pure overkill on wood projects.If you can obtain one, the small fine Microplane rasp is the best tool for the project. Donot get the Stanley rasp it is overkill.Chisel You will need a ¼ inch wide flat blade chisel. See later notes on the chisel.Saw. Well, we can get really basic here. If you have absolutely no power saws, thenyou could get by with a simple hand coping saw. Buy some extra blades for backup.You could use an electric scroll saw. You could use an electric saber hand saw. Youcould use a band saw. For short cut offs, you can use a fine hack saw blade. I say no toany table saws for this project.Further, there is no need to endanger yourself with trying to use an electric planner, orrouter for any reason in this project.Sander. While I personally use a bench 4 inch wide table top belt sander, with a 6 in flatdisk sander, and also an up-right oscillating drum sander, you could get by with only therasp and the sand paper.Safety equipment Eye protection glasses. Leather apron. Leather gloves.Eventually you will need a dust mask, and possibly Nitryl gloves.Burning rods to make the finger holes. We will discuss that at a later time in the project.Burning rods make cleaner holes than drill bits and over all give you less problemsduring and after construction of a wooden flute.You may already have a bottle of propane along with a propane torch head in your toolcollection.Electric drill. Usually a common 3/8 in chuck electric drill will do. Personally, I have atable top drill press with a small drill press vice on the table plate.Drill bits. Brad points are nice, and a good set of Forester bits are great to have. A fewreally fine drill bits should be obtained, you will need them in the project.Dremel set. Best investment you will ever make. ½ inch sander drums with 120 grit areessential.Pg 3
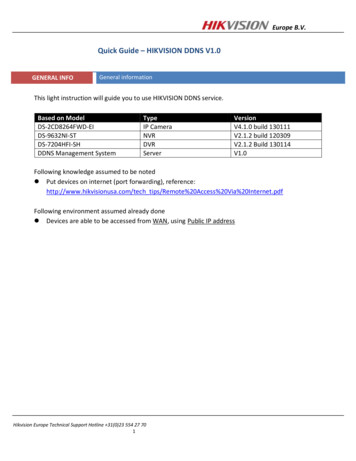
A bench vice. Usually every shop has one. I added some thick leather glued to the vicefaces to help keep from marring the surface of the wood project being held.No place for a vice? We are going to have to use something to hold the wood steadywhile cutting. If you have to, find two pieces of long 1 by 2 smooth straight boards, andclamp your piece of ¼” wood between them. Use your C clamps or even a couple ofVice grips if you have them.When you get down to it .this flute can be made without one power tool if necessary,and with the lowest common denominator of hand tools at your reach to use.Now, before we get into the project, lets discuss where some of the sources are whereyou can obtain the mentioned tools and material you will need.Wood Lowes and Home Depot. This is your first project, don’t attempt it withexpensive exotic woods.Glue Lowes and Home Depot. Maybe Walmart. The other local hardware stores andspecialty shops will zing you for another 20 % mark up.Pencil, Metal ruler, Square . Small desk calculatorNine out of ten of those reading this have a local Dollar Store.While you are there, pick up a pack of the water sandpaper in an assorted pack for just a buck.Clamps You can never have enough of them.Over a few years, I have collected quite a few of theplastic spring clamps of different sizes. Probably forproject, the 2 ½ inch jaw clamp is the best size.These clamps are available from Harbor Freight andPoppa Johns Tool box.http://www.pjtool.com/springclamps.aspxI think the 2 ½ in jaw is his 6 ½ long clampGet a box of 15 for less than 30 bucks at 2010 prices.These clamps have a nice articulating plastic face too,that does not mar the wood surface. Try to avoidthose metal flat spring clamps. They exert too muchpressure on a smaller area of contact.While you could get by withyour old Buck knife forwhittling, these customknives will be in your toolkit for life. Super strongcarbon steel that keeps anedge. The top knife is thebest to start with and giveyou the most use.Pg 4
KNIFE-2KN14/productinfo/993014/Wood Carver Supply is a nice place to start unless you have a Woodworkers orRockler’s in your neighborhood.You can almost start a war on the forum about which is the best cutting tools.I was introduced by the Fallen Branch group to the Flexicut tool line.Shown above is the flat blade, ¼ in chisel. The handle is called a power handle and canbe used with a whole assortment of different blades. The blades easily pull out andreplaced very securely in the handle. Later, when you learn to do gouging of flute boreblanks, you will purchase other blades with curved gouge tips to use in this handle.While most people are familiar with the common carpenters thick ¼ in chisel, this bladeis thinner and is far easier to use for flute making purposes and will be a constantcompanion on your work bench. Make the investment, you will thank yourself hundredsof times over.Exacto KnifeThe more economical sets can be bought as off brand types at Harbor Freight.You can find some Excel brand handles and blades at Hobby Lobby. Be careful, somebrands of blades are a lot thinner than others and break easily.Dremel When young, every kid’s dream was to own a Dremel kit.It is an investment that keeps on giving. Just down the road, you might have to replacethe electric brushes, and they are cheap at Lowes at the Dremel counter.The best investment is the unit with the flex shaft.Hang the unit over your work bench and attach it to a spring. Do not let the shaft hangdown so that it will touch the floor. You might drop it and break or bend a tool in thechuck.When you get established later down the road, go to the Master Carver site andinvestigate the Master Carver tool. Or check out the Fordom. Make sure you purchasea handle for those units that will take a ¼ in shank bit. But that is later.Diamond FilesProbably the best place to find sets of diamond files is Widget Supply.Their sets usually run less than 10 bucks.http://www.widgetsupply.com/page/WS/CTGY/ht Search for files or type in diamondfiles in the search box.Microplane rasphttp://us.microplane.com/8snap-inrasps.aspxPg 5
If you don’t want to buy a whole set of Microplane files, then just get the 8 in handleand the fine 8 in flat blade. Stay away from Stanley rasps they are too rough.Drill bits Browse Harbor Freight for economy drill bits. For your use, you willneed a small set of foresters, and a set of brad point bits. Harbor Freight also hasSafetystuff. packs of small fine drill bits. The finer drill bits will be a great helpsmall blisterlater on. The finer bits can be used in an adjustable chuck on your Dremel.Safety ProProtective glovesHarbor Freight has a great assortment of work gloves.Depending on your wallet, buy a good pair of comfortable gloves.You can obtain a pair of Kevlar gloves, and there are gloves that protect against knifecuts. Most of my shop work, I find a good pair of flexible pig skin work gloves is thebest protection and dexterity type. Stabbing yourself in the other hand with a knife orchisel can ruin your day. A sander will do a much faster job on bare skin than it will dogood on the piece wood you are working on. Sanding damage can be like 2nd and 3rddegree burns .not pleasant.Which brings to mind the leather R-LEATHERAPRON/productinfo/510009/One day you will thank me for suggesting this.It not only saves you a tongue lashing from your spouse about messingup your work pants with dust and glue and stains, it also helps tosave you from slipping and poking a chisel into your leg.If you can’t afford this apron, then a bit thicker apron which isa welders leather apron can be purchased from Harbor Freight forhalf the price. This one is a lot more comfortable and well worth it.A respirator mask to filter out dust is agood investment. Check out all therespirators on Amazon. Com and findone to suit you. Purchase an extra set offilters at the same time you purchase themask. At least with this mask you canwear your glasses.Remember, in the future, you will beworking with some woods that just mightbe real allergenic to you personally.If you don’t believe me, blow your noseafter a session in the shop after sanding.Or open up your shop vac and look at thefilter.For more information on respirators goto Chapter 1aBasic explanation of respirator use byEllie BarbarashPg 6
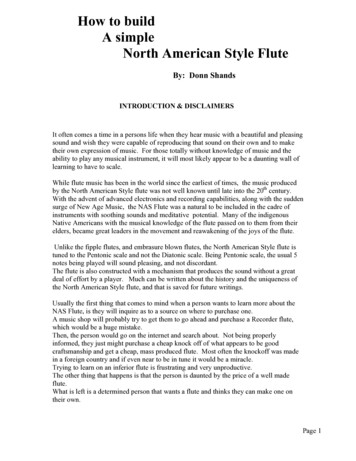
While a good ruler is essential, one of yourbest friends in the tool box is a good caliper.Not something you pick up at the dollar store,but for a reasonable price usually at HarborFreight.Note the one on the left is plastic. No frills, buteffective in a pinch.The two in the middle are composite. Onemeasures inches, mm, and fractions, while theother measures inches and mm.The third is metal and composite. When not onsale, it is usually in the 20 buck Americanrange, but sometimes gets down to the 12 buckAmerican when on sale.It measures in inches and mm. It has the addedfeature of being able to thumb screw down andset a measurement temporarily. The metal,under thumb wheel makes precision setting ofa measurement easy.The thing to understand about the threeelectronic units is that they measure indecimals when looking at inches and mm.Later, when you are using the flute makingprograms like Flutomat, measurements areinserted into the program in decimals. Thesecalipers save a lot of headache in trying toconvert inches to decimals. When flute makerson the forums are exchanging data, they willusually give each other required dimensions indecimal inches.Think of all the suggested items as the beginning basics of your flute making work shop.As mentioned, you could make the flute in this project without using one power tool if you had to.But, there are some tools that with a bit of ingenuity, if you cannot buy them, you can come upwith other solutions. However, I would not recommend the use of cruder tools to be used forcutting. The Flexicut chisel and knives should be the choice. Trying to use a cheap tool that willnot hold up to pressure and use and not hold an edge will only frustrate you and provide shoddyworkmanship.This was an introductory chapter, mainly to get you off to the right start on this project,and to provide you with the basic necessary items to get you into the project.As mentioned, you can really over spend and get distracted when shopping for workshopitems. Having the basic items on the bench, BEFORE you start, will help to suppressthe frustration of having to stop and go to the hardware store and pick up a missing item.Please go to Chapter 2Pg 7
How to buildA simpleNorth American Style FluteBy: Donn ShandsChapter 1.aSome simple language about respirators.By: Ellie BarbarashA respirator is better than a dust mask. It lets you breathe through a filter thatprotects your lungs and your nervous system from toxins in the air. A respiratoris only as good as the way it fits on your face. If you have any facial hair, likebig sideburns, a big mustache, or any kind of beard at all, a dust mask or arespirator is pretty ineffective, though it will keep the really big stuff out ofyour lungs at least. You can figure that for a poisonous gas or dust particle, thespace between your beard hairs is a big open tunnel to get through to yourmouth or nose, and some of the toxins will bypass the filter altogether and you'lljust breathe them in through gaps in the facepiece seal. It's better than nothing,but when you're dealing with a chemical or a solvent that can slowly kill you, it'sgood to know you have all the protection you can get.When you get a respirator, whether a disposable one or one of the silicone halffaced ones, pay attention to the kind of filter you are purchasing. For sandingand cutting, you want a particulate filter. HEPA is best. If you're working withany solvents or finishes at all, you'll want one with an organic vapor filter. Youcan get a dual filter that has both. Comfort is important, and so is keeping theinside of your respirator clean, and storing it in a sealed Ziploc bag in betweenuses.
How to buildA simpleNorth American Style FluteBy: Donn ShandsChapter Two:Let’s get started with the project.Lay out the first items you will need for the project.Rulers, sharp pencil, the ½ in square dowel and the flat lengths of 1 ½ inch by ¼ inchthick poplar wood.The first thing you do, is select a nice clear grained section of the slat and mark off 13inches. Your band saw will probably not be able to cross cut this piece. Use the copingsaw, or your table scroll saw, or in a pinch, use the shop vice, and carefully cut off theneeded piece with a hack saw blade. If you have a miter box saw, that is the better answer.Now, find an absolutely flat, hard, smooth surface to work on. The band saw table top isabout the most flat available. Turn the cut piece of slat on the edge and place it behindthe dowel as shown in the picture Use the square dowel as a ruler and mark a line the fulllength of the wood slat set on edge. The purpose here is to obtain, after the next wood cut,a piece of the wood slat that is exactly the same width as the square dowel.Cutting this long piece may present a problem to people that do not have a holding vicefor wood. It is simple on a band saw or a scroll saw. As mentioned before, you mightwant to pinch this board between two other boards and clamp down with c clamps andextra pieces of thin wood to protect the work surface. That should hold the piece to be cutsecurely enough to cut with a coping saw.Pg 1
Check the piece you just cut. It should have a smooth edge, and a rough edge. If youmeasure it to the square dowel, the entire length should be perfectly the same width asthe square dowel. (oops .did you cut on the wrong side of the line? )Take the cut piece and place it under the square dowel and place another piece of 13inch cut slat behind the two and on edge. IMPORTANT .make sure the smooth edgeof the slat is facing the bottom or on the table. Mark this with a pencil, then cut thispiece to size.Find another 13 inch piece of slat and repeat the cut, so now you have two sides for theflute.Use a saw and cut three or four short pieces of the square dowel. Make them about an inchand a half long. These are not a functional part of the flute, but provide accurate spacingwhile doing a glue up of the flute.First step is to place the spacer blocks on the table.Second step is to place the piece you have cut for theflute bottom, and put it on TOP of the spacer blocks.Remember, both of the edges should be as smooth aspossible as this should be the exact width of the squaredowel and when glued up, should show no opencracks along the seams.Make sure that the two side pieces have the SMOOTHside facing down, the Rough edges facing UP.This is the position you should be in when you haveapplied the glue in the next step. Failure to follow theseinstructions will give you problems with a proper seal ofthe top of the flute when that step comes.Pg 2
Now that you have things lined up, Have a paper towel, some water in a cup, and the whiteglue ready. Without any clamps on the project, and all in place, gently lift the part which willbe the bottom of the flute, up and away from the other pieces on the table.Put a bead of glue down each side of the edges of the wood that is to be the bottom of theflute. Use your finger and run it the length of each of the glue beads until the area is smooth.Run your finger down the sharp edges and remove any over flow excess. Clean up with papertowel and water. Gently place the bottom piece back in the groove on top of the spacerblocks, and press the two sides together to position it in place.Apply pressure downward on this piece to make it rest evenly on the spacer blocks under it.Apply the clamps only on the part where the spacer blocks are located. Note in the pictureabove that the spacer blocks and the smooth edges of the sides are all flush.For just the timebeing, remove thecenter clamp. Inspectthe position of thebottom slat. More thanlikely, you did notmake a precision cutof the two sides,usually, they will beslightly wider than youanticipated and theyleave a slight raisededge on both sides ofthe bottom slat.Perfectly OK, as thiswill be sanded smoothlater. But, the areawhere the top playingholes will go will haveeven seams.Note here, that when theclamps are applied, thatsome oozing of the glue isapparent. First check tomake sure all the crackshave glue in them the lengthof the seams, then wipe offexcess with wet towel.Apply the center clamp.Pg 3
Shown here is a flute glued up with more clamps applied. You can apply more clamps, butyou must use this type of flat surfaced plastic clamp. The main impact is actually pressingon the glue joint holding the bottom of the flute in place.Absolutely do not use rubber bands, surgical tubing, or elastic bands to bind this flute.Remember, you are making a square flute. Pay attention to the physics of the project.Bands would warp the shape of the flute sides.During the process of checking your glue up at this stage, it is a good idea to inspect thearea where the spacer blocks are seated. You do not want a lot of excess glue to get on thespacers as they will be glued to the inner surface of the flute, and will result in a lot of extrawork trying to remove them and all the clean up and smoothing later.It is time to give this stage of the project time to set up. Usually that will be better if youleft the project in a safe place out of direct sunlight, excess heat or excess cold.Proceed to Chapter 3Pg 4
How to buildA simpleNorth American Style FluteBy: Donn ShandsChapter 3: Measurements and crafting the sound mechanism, first steps.This chapter takes up after the glue has dried on the assembly of the bottom three pieces of theflute.The thing to do after removing the clamps, is to inspect the way the three pieces held together.All sides should be evenly spaced into a perfect square U. As a safety precaution, place a glove onyour holding hand and use the flat blade chisel to gently lift out the spacer blocks.
length of the flute, physics allow the flute to work as well as any round bore flute. So, why a square bore flute? Because it is probably the easiest flute to make out of wood without using a workshop full of tools. Most beginners of flute making will try to construct a North American style flute out of PV