Transcription
InstructionsInstructions for using AutoCAD Plant 3D 2018Process Plant Layout and Piping DesignSoftware versionAutoCAD Plant 3D 2018: K049.06 r2AutoCAD 2018: O.49.0.0V3.4Created By:Louis-Philippe RouillardDate:4/12/13Reviewed By:Steve SteynDate:28/7/14Reviewed By:Steve SteynDate:17/09/14Edited By:James T.Date:10/04/19
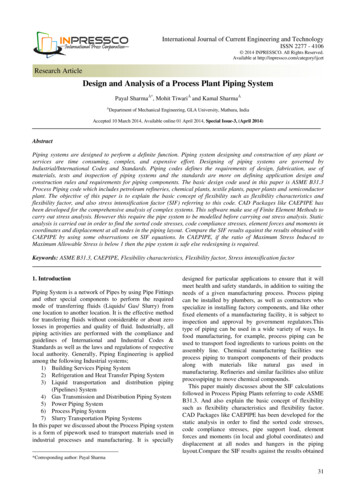
Process Plant Layout and Piping DesignInstructions for using AutoCAD Plant 3D 2018Preliminary Instructions to Setup the Exercise1. Obtain the necessary files If you are using AutoCAD from your PC, download the folder below from Moodle (Thename may be different depending on your course, but the template files are the same)o Practical AutoCADfiles Distillation Columno DME M10 AutoCADfiles Distillation Column If you are using AutoCAD from the remote labs, you will find that folder in the foldercalled AutoCAD which is located on the desktop.2. Obtaining the software You can download AutoCAD Plant 3D 2018 Free Student software (large file – 3GB ):o eatured The trial version:o ly, Logon to the Remote labs AutoCAD Plant 3D 2018 is installed on:Lab 12, Lab 13, Lab 14. Read the lab descriptions if you are unsure:https://lab.electromeet.com/LabListOpen AutoCAD Plant 3D 2018o The icon is located on the desktop 2. Upload the project file into AutoCAD Plant 3D 2018. Once AutoCAD is open, take a look to the left hand side of the window. Under Current project in the Project Manager Tab, expand the drop down menu. Click on Practical Distillation Column Files and go to step 3. If you can’t find Practical Distillation Column Files, click OpenAutoCAD Plant3D2018 SoftwareInstruction v3.4
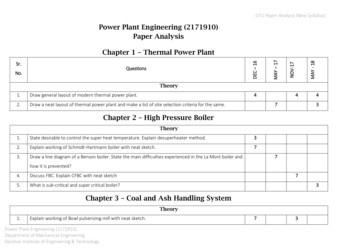
Process Plant Layout and Piping Design Search and open the folder Practical Distillation Column Files, located on the desktop.Open the document Project.xml3. Obtaining the drawing templates In Project Manager under the Project Tab expand P&ID DrawingsAutoCAD Plant3D2018 SoftwareInstruction v3.4
Process Plant Layout and Piping Design Three drawings will appear.As per the exercise, simply click on the drawing you wish to open:1. Distillation Plant2. Distillation Column3. Piping IsoAutoCAD Plant3D2018 SoftwareInstruction v3.4
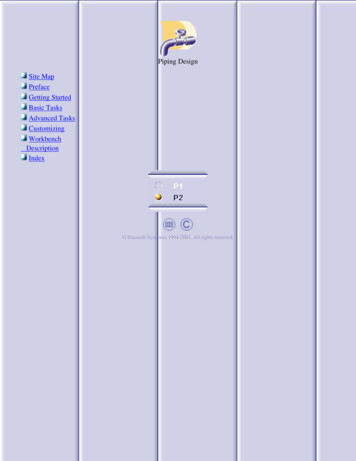
Process Plant Layout and Piping DesignHow to use Autodesk Autocad P&IdHow to setup the correct Tool Palettes Before you start drawing, make sure you have the correct Tool Palettes. Right click on Tool Palettes on the right hand side and select All Palettes. All the availablepallets will be available to you. To navigate through the different palettes, click on the relevant palette’s tab or at the bottomof the tabs where indicated to navigate through the list and select the appropriate palette.Some of the useful palettes to the exercise are the following: Draw EquipmentAutoCAD Plant3D2018 SoftwareInstruction v3.4
Process Plant Layout and Piping Design Hatches and FillsLinesInstrumentsNon engineeringValvesFittingsHow to draw a line or other basic shape? Open the Draw palette Select line (or other shape if desire), click where you want to place your line and click againAutoCAD Plant3D2018 SoftwareInstruction v3.4
Process Plant Layout and Piping Designto place the end point. Press enter to confirm.How to place equipment? Make sure you have the correct Tool Palettes (equipment or other) Select the desired equipment. To place it on your drawing, simply click at the desired position. You can adjust the size ofthe equipment by moving your mouse. Click and press enter to confirm. You can also adjust the scale by selecting the equipment, then right click and select Scale.Select a point and enter the scaling factor. To rotate or move the equipment, proceed in a similar way.How to shade? Make sure you have the Hatches and Fills Tool Palettes. Make sure that the boundary of the shading area is drawn first. Select the boundary then select the appropriate hatch or fill option.How to add annotations? On the top tool bar, select the letter A. Choose whether you want a text box or a leader. Click to place it on your drawing and enter the annotationHow to draw a pipe segment? Select the Line palette and choose you line. Simply click where you want to connect the pipe. A nozzle will appear automatically. Drag you’re the mouse to draw a straight section. To change direction, click where you want a change in direction drag your mouse until youreach the other equipment and click and press enter to confirm the path. If you want to stop a line without connecting it to equipment, click where you want to stopyour line and press enter. To reverse the flow direction of a pipe, right click on the line, under Schematic Line Editselect Reverse Flow.How to add a valve? In your Tool Palettes under the Valve tab on the right hand side, select the appropriate valve. To place the valve on your drawing, simply click at the desired position. To assign a tag number, right click on the valve and select Assign Tag Insert the tag numberand make sure that Place annotation after assigning tag is selected. Click Assign to confirm.How to insert instruments? In your Tool Palettes under the Instruments tab on the right hand side, select the appropriateinstrument under the General instrument section. Click to place the instrument. A window appears. Fill in the tagging information and under type select the instrument type.AutoCAD Plant3D2018 SoftwareInstruction v3.4
Process Plant Layout and Piping DesignMake sure that Place annotation after assigning tag is selected. Click Assign to confirm andchose the position of the tag.How to insert an Off Page Connector? In your Tool Palettes under the Non-engineering tab on the right hand side, select theappropriate Off Page Connector under the Off Page Connector and Tie-In Symbol section. Place the Off Page Connector like you did for the other drawing partsAutoCAD Plant3D2018 SoftwareInstruction v3.4
Process Plant Layout and Piping Design AutoCAD_Plant3D2018_SoftwareInstruction_v3.4 Instructions for using AutoCAD Plant 3D 2018 Preliminary Instructions to Setup the Exercise 1. Obtain the necessary files If you are using AutoCAD