Transcription
Piping DesignSite MapPrefaceGetting StartedBasic TasksAdvanced TasksCustomizingWorkbenchDescriptionIndex Dassault Systèmes 1994-2001. All rights reserved.
Site MapPiping DesignPrefaceUsing This GuideGetting StartedEntering the workbenchSet up correct working units and gridCreating a Line IDRouting a runFlipping elementsChanging the current axisBasic TasksManage piping linesRenaming a line IDDeleting a line IDImport a line IDModify properties of a line IDQuerying a line ID or itsmemberSelecting a line ID or itsmemberRouting runsRouting a run on an areaRouting from the end of aroutableBranching a runRouting a run at a slopeAuto-route betweenequipmentRoute a run within a pathwayRouting from an itemreservationDisplay information aboutroutablesModifying runsChanging a sectionChanging the angle of asegment
Moving nodesAlign adjacent segmentsConnect runsDisconnect runsMake segment parallel toreference planeMake segment parallel tocompass base planeMake segment parallel to ZaxisFit segment for partsassemblyPosition a segment relative toplaneCreate an offset connectionbetween segmentsCreate a closed loop runOpen a closed runAdjust extremeties of a runManipulating objectsAligning elementsDistributing elementsRotate resource usingdefinition dialog boxSnap resources togetherSnap and rotate a resourceUsing offset planesQuery/modify properties of an objectEdit properties of an objectFilter shown properties of anobjectRename an ObjectModifying a piping partRotate a piping partAdvanced TasksRouting tasksAligning a runRouting in 3D with thecompassRouting at an offset of a
routableRoute a run along a splineFix broken routablesBuilding piping partsChange the parameters of apartCreate piping part withspecified typeCreate graphicrepresentations for a partDefine properties for a partAssociate specifications to aconnectorConnectorsCreate connectorsUse the compass tomanipulate connectorModifying or deletingconnectorsCreating duplicate connectorsUsing the plane manipulatorCustomizingCreating object classes and attributesStarting the FeatureDictionary EditorCreate a new object classAdding properties to an objectclassDefining optionsFinding sample data onvarious platformsUser Dictionary settingsDefining directory pathsCreating reportsGenerating a reportCreating a toolbar shortcut fora macroCatalogsMaking a catalog accessibleCreating a catalog
Creating a specificationscatalogDefining queries for aspecification catalogResolving/modifying a queryStandards and design rulesCreating and modifyingstandardsModifying design rulesWorkbench DescriptionDesign Create ToolbarFabricate ToolbarBuild Create ToolbarPiping Line Mangement ToolbarDesign Modify ToolbarGeneral Environment ToolbarIndex
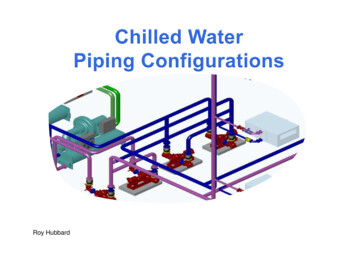
PrefaceThe CATIA Version 5 Piping Design product provides customers with a complete setof tools to create, modify, analyze and manage physical designs of piping systemsusing industry standard conventions, terminology, and practices. The tools are focusedon creating an intelligent piping layout that captures the design intent.Intelligent piping design allows users to create and validate their designs moreproductively and, in addition, reuse the captured intelligence for downstream designprocesses.The product supports the definition of piping configurations. This involves generallayout tools for intelligent placement of parts, and automatic placement of componentssuch as bends, elbows, tees, and reducers. A full set of routing and parts placementmethods allows users to choose the one that is right for a given situation. Specificationdriven design is available to ensure compliance with the project standard. Functiondriven design is used to ensure that the design intent is available for any modificationscenario.In addition, full capabilities are provided to quickly query design information, andgenerate appropriate report information. These design tools are provided via a highlyintuitive and productive interface that allows the user to create, modify, and managedesigns quickly.The product includes comprehensive and flexible setup functions that will provide arapid way to define project standards and catalogs that get the users into productionquickly. This product comes with a starter piping parts catalog based on the AmericanNational Standard Institute (ANSI).Together with other CATIA Version 5 products, the Piping Design product gives usersthe power to manage their piping systems from initial design to ship or plantoperations, in a completely flexible way.Using This Guide
Using This GuideThis book describes how to use the CATIA Version 5 Piping Designs product. Beforeyou read it, you should be familiar with basic CATIA Version 5 concepts such asdocument windows, standard tool bars, and view tool bars.To get the most out of this guide, you should start with the tutorial in the GettingStarted section.The remaining sections of the book describe in detail the procedures for using all of thefeatures of the Piping Designs product. The procedures are divided into basic,advanced, and customization sections.
Getting StartedThe following short tutorial provides an introduction to the CATIA Version 5 PipingDesign product, It is intended to give you a feel for the product's capabilities in a fewstep-by-step scenarios, which are listed below.Entering the workbenchSet up correct working units and gridCreating a Line IDRouting a runFlipping elementsChanging the current axisThese tasks can be completed in about 15 minutes.Certain functions will not work without setting up directory paths and options. Thesystem administrator should refer to the tasks under Defining options as well asplatform dependent sample data in Finding sample data on various platforms.
Entering the workbenchThis task shows you how to enter the Piping Design workbench.1. On the menu bar click Start, select Equipment & Systems and then Piping Design.2. The Piping Design workbench displays.Before using many tasks you will need to set your options correctly. Refer to the Customizing section.
Set Working UnitsThis task describes how to set working units.1.Select Tools - Options command.2.From the General menu, select Parameters and then click on theUnits tab.Select the Length Magnitude and set the units to Foot.Select the Area Magnitude and set the units to Square foot.Under Options, select the Equipments and Systems andclick on the General tab.Set the Grid Step field to be 1 ft. This sets the default gridstep for all the snapping capabilities provided with the PipingDesign product.Click the OK button to complete the customization of the workingunits.3.4.5.6.7.
Creating a line IDThis task describes how to create a piping line ID.You need to create a line ID before you can begin routing and placingcomponents and equipment. A line ID is a mechanism for identifying andorganizing piping segments and the components and equipment you place inthem. When you create a line ID you also assign characteristics; material, size,pressure attributes, heat tolerance and so on.The line ID displays in the specifications tree as an organizational element. Theroutes you create and the components you place under it, will appear in thespecifications tree and will also display as a 3D image. The Line ID will appear inthe specifications tree with the name you assigned it. Each run segment youroute will show as ArrRunX, X being a unique number assigned in sequence.Components and equipment will show as YYYFunction.X, YYY being acomponent name and X being a unique number, i.e. PumpFunction.1.1. The Create Line ID dialog box displays.Click the Line ID button2. Enter the name for your new piping line in the Line ID field.3. Click the Properties button to open the Properties dialogue box. Click thePiping tab and assign properties to the Line ID you are creating.You may enter all known characteristics for the new piping segment but at aminimum you must assign values for Nominal size and Pipe specificationproperties.4. Click Apply - you can create more line IDs if you want to. Click OK to end.
Routing a RunThis task describes how to create a piping run. In this case, a run represents theactual path of the piping segment through the plant, ship or structure.See Routing a run on an area for more information.1. The Routing dialog box is displayed.Click on the run button2. Click the Mode buttons to select the setting most suitable for the design;Point-To-Point, Orthogonal, Slope or Directional. This maytake some trial and error to establish your preference.3. Click the Section button to set the desired section shape to no section,rectangle or circle.4. Under Section Parameters select the SetPoint most suitable for the pipingrun.Section dimensions, Turn radius and Minimum length fields display the valuesgiven to the Line ID being used.The Display buttons allow you to select a display mode of Line/Curve,Solid, or Flat.5. Click OK.6. Click at 0,0,0 to start routing the piping run.7. Click at 0,3000mm,0 to create the first segment of the piping run.8. Click at 3000mm,3000mm,0 to create the second segment of the piping run.9. Double click at 3000mm,0,0 to complete the definition of the piping run.10. You have created a routing with one piping run. Each piping run you route willshow as ArrRun.X, X being a unique number. You can now createadditional runs using the steps described above, or you can go on to the taskof placing parts on the run.
Flipping ElementsThis task shows you how to flip a part that has been placed in your CATProductdrawing.1.Click the Flip Part Position icon.2. Select the part you want to flip.The part is flipped.
Changing the Current AxisThis task shows you how to change the current axis.When you activate an element, the current axis is reset to the axis of thatelement. Changing the current axis changes the reference point by whichelements are routed and placed.1.Click the Change Current Axis icon.2. Select the element you want to use as a reference.The axis for the selected element is displayed.
Basic TasksThe basic tasks for creating documents using the Piping Design product are explainedhere.Manage piping linesRouting runsModifying runsManipulating objectsQuery/modify properties of an objectModifying a piping part
Managing piping linesThe following section explains ways of managing piping lines.Renaming a line IDDeleting a line IDImport a line IDModify properties of a line IDQuerying a line ID or its memberSelecting a line ID or its member
Renaming a line IDThis task shows you how to rename a line ID.Only shared line IDs can be renamed.1. The Renaming Line IDs dialogClick on the Rename Line ID buttonbox displays, with a list of line IDs showing.2.3.4.If you want to search for other line IDs then scroll through the list or enter akeyword in the Filter String field.Select the line ID you want to rename. The Rename Line ID dialog boxdisplays.Enter the new name for the line ID and click OK.
5.Click OK again in the Renaming Line IDs box. The line ID will be renamed.
Deleting a line IDThis task shows you how to delete a line ID1. The Delete Line IDs dialog boxClick the Delete Line ID buttondisplays showing all the line IDs contained in your document.2. Select the line ID which you want to delete. (When you select a line ID allmembers that belong to it are highlighted.)3. Click Delete. If the line ID you selected has any members a message willdisplay alerting you that all members belonging to that line ID will be deleted.4. Click OK. The line ID and all its members will be deleted.
Only line IDs contained in your document will be deleted. The same line ID used inother documents will not be deleted unless you open those documents and followthe steps given above.
Import line IDsThis task shows how to import and/or update piping line IDs.The Import Line ID feature offers the user the utility of importing Line IDs from existing databases in other CADsoftware products. The Update feature allows you to update the properties of existing line IDs with propertiescontained in an XML import file.Installation of the Document Type Definition (DTD) and knowledge of XML are prerequisite to using this feature.The file format for the Line ID XML Import File resides in the DTD.The location of the DTD and sample XML file is platform dependent. In Windows NT the path for the DTD is.\intel a\code\dictionary\PlantShipLineIDImport.dtd.For the XML file, the path is.\intel pingLineIDImportsample.xml.The paths for the other platforms are identical with the exception of the platform identifier. Shown below are theplatforms with their respective identifiers.Windows: .\win a\AIX: ./aix a/HPUX: ./hpux a/IRIX: ./irix a/SOLARIS: ./solaris a/In all cases, copy the PlantShipLineIDImport.dtd and the PipingLineIDImportsample.xml file to a local directorywith 'write access'.In the following scenario both the sample XML file and the DTD have been copied to a user Temp directory.A portion of the sample XML file is shown below:
Be alert to any Line IDs you have created in CATIA as well as the Line IDs you will be importing. The propertiesof existing Line IDs in CATIA will be updated (replaced) with properties of Line IDs of the same name uponimport.Prior to running this feature you must set a path for your Line IDs. Go to Tools Options Equipment &Systems. Click on the Line Lists tab and set the path for your Line IDs.1. Click the Import Line ID button.2. The Line ID Import/Update dialog box opens. Click to open the file. This will cause the subroutine to runwhich will generate the Line IDs from the XML file. Note that under Files of type, only XML files may bedisplayed and opened.
3. When the routine is complete, the Results Summary will display.4. Click on View output file to view the Line ID Import/Update Report for the sample case below.
5. You can verify that the new line IDs have been imported by clicking on th
The CATIA Version 5 Piping Design product provides customers with a complete set of tools to create, modify, analyze and manage physical designs of piping systems using industry standard conventions, terminology, and practices. The tools are focused on creating an intelligent piping layout that captures the design intent. Intelligent piping design allows users to create and validate .