Transcription
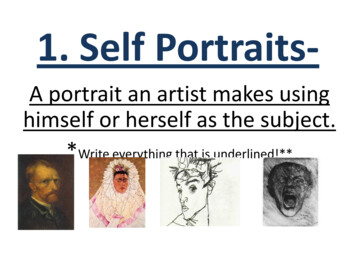
5LessonSelf-PortraitsPaul Klee:Expressionism, Cubism, SurrealismHow do artists create self-portraits?What kind of effects can art mediums create?LESSON OVERVIEW/OBJECTIVESStudents will work with various art supplies to create a self-portrait. Students will explore various artists’self-portraits to see possible ways to render a self-portrait. Additionally students will learn about Paul Klee whosehighly individual style was influenced by movements in art that included expressionism, cubism, and surrealism.KEY IDEAS THAT CONNECT TO VISUAL ARTS CORE CURRICULUM:Based on Utah State Visual Arts Core Curriculum Requirements (3rd Grade)Standard 1: The student will explore and refine the application of media, techniques, and artistic processes.Objective 1: Explore a variety of art materials while learning new techniques and processes.a. Practice using skills for beginning drawings.f. Establish more natural size relationships among objects in drawings.Objective 3: Handle art materials in a safe and responsible manner.a. Ventilate the room to avoid inhaling fumes from art materials.b. Dispose and/or recycle waste art materials properly.c. Clean and put back to order art making areas after projects.d. Respect other students’ artworks as well as one’s own.Standard 2 : The student will analyze, reflect on, and apply the structures of art.Objective 1: Analyze and reflect on works of art by their elements and principlesa. Determine how artists create dominance in their work; e.g., size, repetition, and contrast.b. Examine significant works of art and point out how the artists have created illusion or feeling of depth.Objective 2: Create works of art using the elements and principles.a. Identify dominant elements in significant works of art.b. Group some significant works of art by a common element or visual characteristic.c. Discover how an artist has thoughtfully used all of the space within an artwork.Standard 3:The student will choose and evaluate artistic subject matter, themes, symbols, ideas, meanings,and purposes.Objective 1: Explore possible content and purposes in significant works of arta. Explain possible meanings or interpretations of some significant works of art.b. Invent possible stories that may explain what is going on in these same works of art.Objective 2: Discuss, evaluate, and choose symbols, ideas, subject matter, meanings, and purposesfor their own artworks.a. Group significant works of art according to theme or subject matterkimballartcenter.orgLESSON 5 Self-Portraits Page 1
INSTRUCTIONAL OBJECTIVES:Students will: Understand that the elements of art are the building blocks for creating works of art. Learn about different ways to create a self-portrait. Learn the technique of creating a proportionally accurate rendering of a self-portrait and or face. Learn about the artist Paul Klee and his work. Learn about proportion, balance, symmetry and composition. Create a self protrait influenced by the work of Paul Klee.FOR THE TEACHERLooking and SeeingFirst show the students pictures of a variety of self-portraits. Have them discuss the different approaches,mediums used, composition, color, etc. Ask the students what the portraits say about the people portrayed. Whatinformation and clues did the portraits give them?Some things to notice when looking at the self portraits: Historical context of portraits. By the styles, can you tell when they were made?. Talk about colors and mediums used. How does that influence the way a viewer experiences the portrait? Observe what is unique about these paintings comparing and contrasting composition, color, texture etc.Next show the students the work of Paul Klee. You can introduce his work in the context of when and where helived and work. Highlight his use of color and squares as that will be important for the art lesson.Some things to notice when looking at his work: Look at use of color in the composition and discuss how that influences the experience of his work. Discuss elements such as harmony, balance, etc. Discuss emotions that the art evokes.VISUALSSelf-Portrait SamplesFrida Kahlo Self Portrait 1940This self portrait uses color, symbolsand elements around her face and inthe background to give the viewer moreinformation about herself in addition toher portrait.kimballartcenter.orgJoseph Wright of Derby Self-portrait(1765-1768)LESSON 5 Self-Portraits Page 2
Pieter ClaeszHokusaiVanitas with Violin and GlassBall, the artist is visible in thereflection, 1625.Early 19th Century, JapanPop Art TargetSelf-Portrait of Van Goghwith head bandaged, after he (debatedly)cut off part of his ear.Paul Gauguin 1889 National Gallery ofArt, Washington, D.C.kimballartcenter.orgLESSON 5 Self-Portraits Page 3
Contemporary Self-PortraitMadi Garlick Self-PortraitAnime StylePablo Picasso Self-Portraitkimballartcenter.orgLESSON 5 Self-Portraits Page 4
Paul Klee and Samples of his work“Art does not reproduce the visible;rather, it makes visible”Castle and SunSenecio - Oil on GauzeSinbad the SailorAncient Harmony (1925)kimballartcenter.orgWoman in Peasant DressLESSON 5 Self-Portraits Page 5
SUPPLIES Images and art samples of a variety of self-portraits. Images of the work of Paul Klee Color Wheel Chart - to remain in classroom or accessible for students Map of the United States - to remain in classroom or accessible for students Large drawing/painting paper (16” x 20” or 11” x 17” or 8.5” x 11”). One large sheet and several smallersheets of paper per student Sharpies Newspapers or some material to protect desks from sharpies!. Scissors Glue Writing paper and pens/pencils- bleeding art tissue paper, cut into small squares (craft stores)- 1 or 2 spray bottle(s)VOCABULARYSelf-Portrait: A self-portrait is a representation of an artist, drawn, painted, photographed, or sculpted by the artist.Although self-portraits have been made by artists since the earliest times, it is not until the Early Renaissance inthe mid-15th century that artists can be frequently identified depicting themselves as either the main subject, or asimportant characters in their work. With better and cheaper mirrors, and the advent of the panel portrait, many painters,sculptors and printmakers tried some form of self-portraiture. roportion: Proportion is the relationship of two or more elements in a design and how they compare with onePanother. Proportion is said to be harmonious when a correct or desirable relationship exists between the elements withrespect to size, color, quantity, degree, or setting. Good proportion adds harmony, symmetry, or balance among theparts of a design.Creating Proportion: Artists and designers use a variety of rules in creating and ensuring proportion, depending onthe subject or context. For instance, the human head is divided into six equal blocks: The forehead is in the upper twoblocks. The eyes fall just below the first horizontal line with the bottom of the nose just above the second horizontalline. The mouth is in the center of the lower two blocks. For figure drawing, the body is divided into lengths equal toseven and one half human heads - using the head of the subject.Graphic designers often use the “Rule of Thirds”. The page is divided into nine equal sized blocks by placing twovertical lines and two horizontal lines evenly spaced on the page. The key elements or points on the page areplaced at one or more of the four intersections of the lines with the most important in the top left intersection to takeadvantage of the natural “F” eye movement. Examples and a more detailed explanation can be viewed at: g-divine-proportion-to-web-design/Harmony: The effective use of proportion in design is often referred to as harmony, a relationship in which the variouselements of the composition appear as if they belong together in size and distribution.Symmetry: Symmetry indicates a mirror reflection in which one side of the image is identical to the other. If you cut theimage in half, one side is identical to the other.Balance: When elements are out of proportion, they tend to look awkward or unbalanced. Proportion is usually notnoticed until it is wrong. When the relative size of two elements being compared is out of balance, they are said to be“out of proportion”. If a person had a head larger than their entire body, we would say that they were out of proportion.kimballartcenter.orgLESSON 5 Self-Portraits Page 6
INSTRUCTIONAL PLANQuick Writing and/or discussionBefore beginning the lesson, show a variety of self-portrait examples both realistic and abstract (included in this lesson).Give them a few minutes to respond to the images. Encourage comparisons and contrasting statements as well asdescriptions of what they see. Use any of the following prompts: How do you think the artist made this self-portrait? What details do you notice about the portraits? If you were to write a title for each of the self portraits, what would be they be? What do these portraits tell you about the artists that made them?Introduction1) Introduce your students to concepts of creating self-portraits. Explain that they can look just like the artist creating itor it can be abstracted, made into anime, a cartoon, 3D etc. These ideas may be new to your students but you have thevisual art pieces to help explain the concepts. Introduce the artist Paul Klee (see below) and show images of his work(especially ones with the colored squares). Talk about how he was very interested in color theory - how colors relate toother colors around them. Ask kids to describe some of his paintings or share what they observed.2) Show how to draw a face in correct proportions. Have kids follow along with you as you draw on the board. They willdraw all their guide lines and portrait in pencil. Here is a guide. Be sure to use and explain words and concepts suchas balance, symmetry, harmony and proportion.Proportions of the FaceStart with acirle, then addthe chin.Erase thebottom of thecircle.Line ofSymmetryEye line is 1/2way up the face.Nose line is1/2 waybetweenthe chin andeye line.HairlineEye lids coverthe top ofthe iris.Mouth line is 1/2between the noseand chin.orslightly higher.Shirt curves aroundthe neck.Ears fitbetweenthe eyeand noselines.Hair is aboveand below thetop of the eckstartsunder theears.Look for the shape of the hair.Don’t draw every hair!LESSON 5 Self-Portraits Page 7
3). Once students have drawn in their guidelines and portrait, have them trace over ONLY their features and add detailsin sharpie. Make sure they’re not tracing their guide lines. They don’t really need to erase their pencil lines, becauseonce the paper gets wet, they will disappear. Emphasize to the students that all the details unique to them will be whatmakes their portrait look like them: freckles, how they part their hair, face shape, glasses, earrings, etc. It may be helpfulto draw in samples on the demonstration portrait.4.) Pass out tissue squares and have them lay them out and arrange how they want them, thinking about Paul Klee andhis experiments with color relationships. Talk about composition in this part of the project. Go around and spray eachpiece with water once kids have them all laid out. After a couple minutes, take off tissue paper and let dry. Enjoy thefinal self-portrait rendering!About the ArtistSynopsisPaul Klee - Educator, Painter (1879–1940). Paul Klee was a prolific Swiss and German artist best known for his largebody of work, influenced by cubism, expressionism and surrealism. He was a natural draftsman who experimented withand eventually deeply explored color theory. His works reflect his dry humor and his sometimes childlike perspective, hispersonal moods and beliefs, and also his musicality. Klee taught art in Germany until 1933, when the National Socialistsdeclared his work indecent. The Klee family fled to Switzerland, where Paul Klee died on June 29, 1940.More InformationKlee’s artistic breakthrough came in 1914, after a trip to Tunisia. Inspired by the light in Tunis, Klee began to delve intoabstract art. Returning to Munich, Klee painted his first pure abstract, In the Style of Kairouan, composed of coloredrectangles and circles.Klee’s work evolved during World War I, particularly following the deaths of his friends Auguste Macke and Franz Marc.Klee created several pen-and-ink lithographs, including Death for the Idea, in reaction to this loss. In 1916, he joined theGerman army, painting camouflage on airplanes and working as a clerk.By 1917, art critics began to classify Klee as one of the best young German artists. A three-year contract with dealerHans Goltz brought exposure as well as commercial success.Klee taught at the Bauhaus from 1921 to 1931, alongside his friend Kandinsky. In 1923, Kandinsky and Klee formed theBlue Four with two other artists, Alexej von Jawlensky and Lyonel Feininger, and toured the United States to lecture andexhibit work. Klee had his first exhibits in Paris around this time, finding favor with the French surrealists.Klee began teaching at Dusseldorf Academy in 1931. Two years later, he was fired under Nazi rule. The Klee familymoved to Switzerland in late 1933. Klee was at the peak of his creative output during this tumultuous period. Heproduced nearly 500 works in a single year and created Ad Parnassum, widely considered to be his masterpiece.Observe: Look, Discuss, and Reflect Ask students to look closely at one another’s self portraits. Talk about the elements of each portrait that are unique toeach person and help us identify each person. Looking at the tissue paper colors, name the colors you see and identify the ones you see the most. What comes tomind when you see those colors? What shapes do you see in the self portraits? Do the shapes look flat or dimensional? Talk about the balance, symmetry, proportion and composition of the portraits. Imagine what they would look like if theeyes were where the nose is and the mouth was off to the side.kimballartcenter.orgLESSON 5 Self-Portraits Page 8
Have students respond to one of the following prompts The best thing about this activity was . It was hard for me when I had to . Next I would like to experiment with .Lesson ExtensionsVisual Arts and Writing Ask students to choose another way to create a self portrait using ideas and techniques from some of the examplesshown in this lesson plan. Have students write a poem, lyric, or short piece based on something they created in this lesson.Supplemental Resources- Paul Klee - en wikipedia.org- 1964 The Diaries of Paul Klee 1898–1918 ed. Felix Klee Berkeley, University of California- Paul Klee at Tate Modern on YouTube, (3:38), The Art Fund (UK)- Self-Portrait - en wikipedia.org- National Portrait Gallery - Official web site“The Exploration of Self: What Artists Find When They Search in the Mirror” by Jeanne Ivy.“Creating Self-Portraits” - a method of self-examination.- UMBC, research related to The Self Portrait: A Modern View. (1987), Edward Lucie-Smith with Sean Kelly and otherbooksOne can also use the term “autoportrait” in the search engine of the Joconde database, which describes the works of 84French museums, including the Louvre:52 self-portraits from the National Galleries of Scotlandcatalogue of self portraits by the Royal Society of Portrait Painters 2007Other links :expressivemonkey.comgoogle - art lessons for kids inspired by paul kleekimballartcenter.orgLESSON 5 Self-Portraits Page 9
self-portraits to see possible ways to render a self-portrait. Additionally students will learn about Paul Klee whose . For figure drawing, the body is divided into lengths equal to seven