Transcription
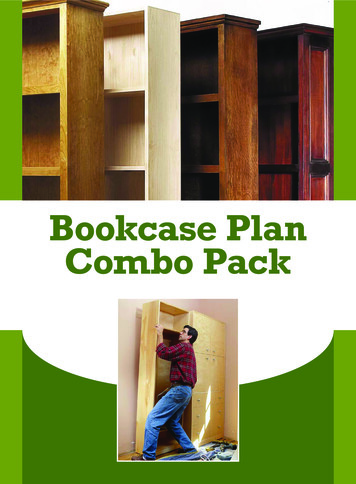
Bookcase PlanCombo Pack
Build BetterBookcasesWe show you how to make agreat bookcase in any style, with one basicbox design and one sheet of plywood.Everyone needs a bookcase, and if you’re abeginning woodworker, it’s a great project todevelop skills without breaking the bank. Ourstaff got together to design the ideal bookcase. Wewanted it to fit in the average home, look good and bemade to last. We also wanted to show that the samebasic construction could be dressed up in differentways to suit anyone’s sense of style. Our goal was toproduce a plan that would make good use of materials, and be relatively quick and easy to put togetherand finish. We held meetings, passed memos, e-mailsand sketches around the office and, in the end, madethe new guy (me) do all the work.Basic Bookcase ConstructionThe basic cabinet is built from one 4' by 8' sheetof 3 4"-thick hardwood plywood plus a few boardfeet of solid wood. This keeps the cost reasonable,but introduces some constraints on the size of thefinished bookcase. Our final design is 5' high anda little less than 21 2'-wide. It’s not quite as deep asmany bookcases, but it is a useful size for all but thelargest books. It does its job without taking overthe room, will hold a lot of books and the shelveswon’t sag. You can make the basic design any sizeyou want, but if you make it larger you won’t be ableto get all of the parts from one sheet of plywood. Ifyou make it wider, keep the shelves less than 36". Ifthe shelves are longer than that, they will likely sagwhen loaded with books.Using 3 4" plywood for the back as well as theother cabinet parts produces a box that is very strong.The edges of the plywood are all covered with solidwood. In three of the four designs this is a face frameapplied to the front of the box. The other design uses1 4"-thick hardwood as an edge band.I used biscuit joints to hold the case together andpocket screws to join the face frames. The assembledface frame is glued to the front of the cabinet. Thereis enough surface area for a good joint, without nailholes showing in the completed cabinet.Using plywood solves many problems you wouldhave if you made the bookcase from solid wood; thegrain and color of all the parts will be similar, youwon’t have to glue any parts together for width andseasonal wood movement won’t be an issue.by Robert W. LangComments or questions? Contact Bob at 513-531-2690 ext. 1327 orrobert.lang@fwpubs.com. Visit his web site at craftsmanplans.com.32POPULAR WOODWORKING June 2005
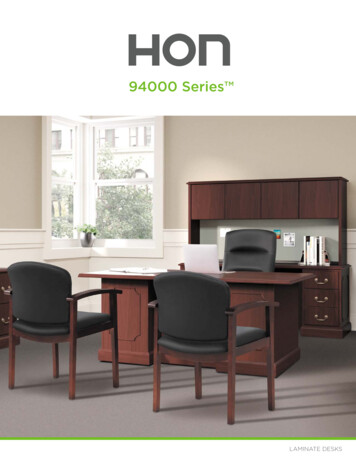
Photo by Al ParrishSHAKER: Made from cherry plywood with a solid cherry face frame.The profiles for the mouldings weretaken from typical details used inoriginal Shaker pieces.CONTEMPORARY: Made withouta face frame from maple plywoodwith 1 4"-thickthick solid maple gluedand nailed to the raw edges of theplywood.ARTS & CRAFTS: Quartersawnwhite oak plywood and solid woodwere used to construct the Arts& Crafts bookcase. The beveledmouldings were typical on built-inbookcases and other cabinets of theearly 20th century.FORMAL: The most complex bookcase is made from African mahoganyplywood, with genuine mahoganyface frame and mouldings.Additional mouldings are applied tothe side to form panels.popwood.com33
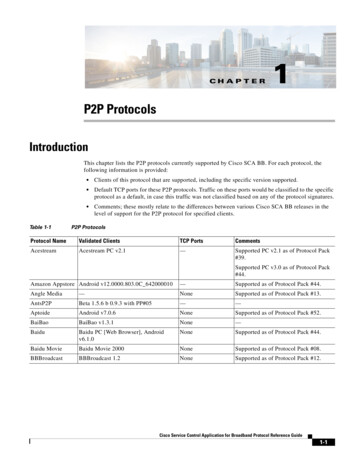
The Trouble with PlywoodPlywood however, does introducesome problems that you need tobe aware of. The veneer face isvery thin. You need to handle itcarefully to avoid scratching it,and when you sand you need tobe careful that you don’t sandthrough the veneer. Despite whatsome people might tell you, thefactory edges are not straight, andyou should never assume that thecorners of the sheet are square.The other problem with plywood is its thickness. It will bebetween 1 32" and 1 16" less than3 4", and the thickness can varythroughout the sheet. If you cutthe horizontal parts to the dimensions in the cutting list, your cabinet will finish slightly smaller inwidth. If you then cut the top andmake the face frame to the listedsize, they won’t quite fit. The firstthing you need to do is determine the actual thickness. Thendevelop a strategy for workingaround this discrepancy.I began by crosscutting theplywood at 60", as shown in thecutting diagram. This large piecewill yield the two long sides ofthe bookcase and the back. Thesmaller piece will provide thetop and bottom of the cabinet, aswell as the fi xed and adjustableshelves. There is a little extra roomto allow for squaring the ends ofthe finished parts and cuttingclean long edges. You can makethis crosscut on the table saw, butit’s easier to cut the full sheet witha circular saw and a straightedge.You could also make this first cutwith a jigsaw, and then clean upthe edge with a router. If you gothis route, clamp a straightedge tothe sheet, make sure it’s square andrun a flush trimming bit against itto clean up the cut.Make the first rip cut on thetable saw 1 4" wider than the finished part. Then move the fencein to trim the opposite edge. Keepthe best side up, and the freshlycut edges against the fence so thatyou have two clean edges on eachpart. After ripping, I crosscut theparts on a sliding compound mitersaw, using a stop to make sure thatpairs of parts were the exact samelength, which is important.The plywood I was using was1 32" thinner than 3 4", so I madethe parts that go between the sides1 16" longer than the listed length.One of the most important factsabout plywood is that it is almostalways thinner than the stateddimension. This (one of four types)3 4" plywood was 1 32" undersized.This allows the cabinet to finishat the correct width.Develop a StrategyLook at the exploded drawing atright to understand how the partsof the basic carcase go together.The back sits in a 3 4"-wide by 1 2"deep rabbet cut in the back edgesof the sides, the bottom and thetop. In the three versions with faceReference marksStory stickThe rabbet at the back edge of the cabinet sides,bottom and top is made with a stack dado set onthe table saw. The featherboard holds the plywood down flat to the surface of the saw.The story stick, made from a scrap of plywoodshows all of the cabinet parts at full size. Makeone and put away your tape measure. Use it to layout all of the parts quickly and accurately.A second story stick acts as a jig to locate the biscuit slots in the cabinet sides. Reference marks forthe slots line up with the centerline on the bottomof the machine.Speed squareWith the cabinet on its side, I can easily reach both the front and back edgesto keep them flush. Speed squares clamped to the side and shelves keep thecabinet square during this glue-up.34POPULAR WOODWORKING June 2005I let the glue dry overnight before attaching the cabinet top. Because the topis placed above the cabinet sides I had to use clamps in pairs to hold the topdown as shown here.
frames, the bottom and fixed shelfgo between the cabinet sides, andthe top sits on the upper edge ofthe sides. In the contemporarybookcase, one difference is thatthe top goes between the sides.The fixed middle shelf is 3 4"narrower than the cabinet bottom so its back edge is even withthe rabbet in the other parts. Thetop is 3 4" wider than the bottom,as the front edge covers the top ofthe face frame.Cut the parts from the sheetof plywood in stages. I cut onlythe two sides, the bottom andthe fixed shelf to final size beforeassembling the box. I then cut thetop to the right width, and cut itsrabbet in the back with the otherparts, but I left it long until afterthe basic box was assembled.If something went wrong withone of these parts, I could makethem into adjustable shelves, andreplace them with the parts fromthe remaining plywood. This isless efficient than cutting all theparts at once, but it’s insuranceagainst mistakes.I cut the rabbet with a stackdado set in the table saw, usinga featherboard to hold the stockdown (as shown at left). Plywoodis often bowed, and if it raises upwhile it is going across the dadostack, the rabbet won’t be a consistent depth. Making the rabbet1 2" deep gives room to attach theback with # 6 x 15 8" screws.stick, 31 4" wide by 103 8". Thiswas used to locate the slots for thebiscuits in the cabinet sides, andin the edges of the bottom pieceand the fixed shelf. I clamped thisto the bottom edge of the cabinetsides, placed the bottom of thebiscuit joiner against the marksand cut the slots.To set the height of the cutter for the slots in the ends of theWith all the joints ready, it’stempting to go ahead and glue thecabinet together. It is faster, andyou get a better finish if at thispoint you finish sand all of theinside surfaces, then assemble. Basic bookcase exploded view Making Layout SimpleWith the carcase parts cut andrabbeted, I took a 60"-long pieceof scrap plywood and made a storystick, showing at full scale thepositions of the plywood parts, aswell as the parts for the face frame.The most likely place to make amistake is in measuring, and thestory stick transfers the locationsto the finished parts without measuring (as shown at left).I also made a second storyshelves, I placed a shelf flat onthe bench, set the biscuit joinernext to it, and lowered the fenceuntil it was flush with the top surface of the shelf. This indexes themachine so the slots cut using theguide block line up with the slotscut using the machine’s fence. Cuttingdiagram popwood.com35
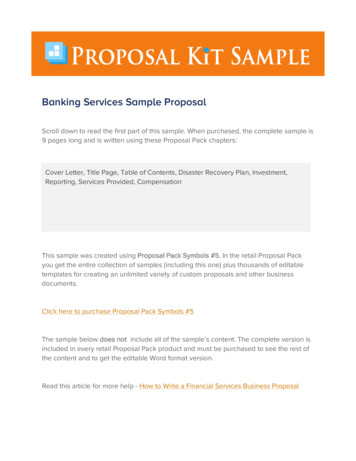
Arts & Crafts StyleThe Arts & Crafts bookcaseand the Shaker bookcaseare constructed the same way. Iassembled the cabinet with oneside across two sawhorses. Thislet me position clamps across bothsides of each joint. I clamped aspeed square on each of two opposite corners to keep the box squarewhile the glue dried.Before attaching the top, I stillneeded to cut it to its exact length.Instead of relying on the cuttinglist, I checked the outside dimension of the assembled box to becertain to get a good fit withoutthe undersized plywood throwing me off. I held the top in placeagainst the ends of the sides andmade a couple of marks for the bis-Before attaching the face frame,sand the front edges flush with a flatsanding block. I used a cloth-backedsanding belt glued to plywood.With the stiles clamped to the assembled box, I mark both thelength and the exact location of the rails directly. This eliminates errors due to measuring or using undersized plywood.It might take every clamp you own, plus a few borrowed from a neighbor, toattach the face frame. It’s worth the effort to get it lined up perfectly withoutleaving nail holes to be filled.36cuits. To clamp the top in position,I had to hook two clamps togetheras shown on page 34.I put together the basic boxwith the bottom and fixed shelfbetween the sides, and the topof the cabinet above the sides.Before working on the face frame,I made sure that all the edges onthe cabinet were flush by sanding them with a sanding block(shown below). It’s simply a pieceof plywood 3" wide with a pieceof a sanding belt glued to it. Byholding it flat on two adjacentsurfaces, any variations can bequickly removed so that the faceframe will sit flat.The face frame is assembledand glued to the front edge of thePOPULAR WOODWORKING June 2005plywood box. The outside edgesof the face frame are flush withthe outside faces of the plywoodwhen the cabinet is complete, butyou want to make the face frameso that it extends slightly beyondthe veneer. If you try to make itdead flush you are likely to end upwith the veneer proud of the solidwood frame at some point. If thishappens it’s almost impossible tocorrect without sanding throughthe thin veneer.Put Your Tape AwayInstead of measuring the parts forthe face frame, I put the assembledcabinet on its back, and clampedthe stiles to the front edges of theplywood, letting the long edgesThe face frame is put together with pocket screwsbefore being glued in place on the assembled cabinet box. Two clamps hold the stile on edge so that Ican see and reach both sides of the joint.It’s safer to trim the solid wood partsdown to the plywood parts. Theblock plane works quickly against anedge or against the veneer.A card scraper brings the solid woodeven with the plywood withoutraising a cloud of dust, or risking thedamage that a belt sander or random-orbit sander could cause.
ARTS & CRAFTS-STYLE BOOKCASEhang over the plywood about 1 32".Then I marked the length and thelocation of the rails directly fromthe plywood parts. Once the railsare the correct length, I used apocket-hole jig to drill holes in theends of each rail.After assembling the faceframe, it is glued down to theplywood. It takes a lot of clampsto get a nice tight glue line. Theface frame can be nailed down, butthat means filling all the holes.Where Solid Meets PlyAfter letting the glue on theface-frame-to-cabinet joint dryovernight, it was time to clean upwhere the plywood and solid woodmeet. Because the solid wood wasproud of the veneer, I could use ablock plane and scraper to bringthe surfaces flush.In the past I’ve used a randomorbit sander or belt sander for thistask, but I have found that usingthe plane and card scraper is faster,does a better job and there is alot less risk of going through theplywood’s thin face veneer.The trim around the front andsides of the plywood cabinet top ismitered at the corners, and gluedto the edges. If these trim piecesare bowed, I use a few biscuits tohelp keep the solid wood flushwith the plywood.I glued the solid-wood edgesto the two adjustable shelves, andthen bored the holes for the adjustable shelf pins using a jig I made,shown on page 38. You may needto trim the shelves to fit behind theface frame. I then sanded everything inside and out to #240 gritto prepare it for finishing.The crown and base mouldings for the Arts & Crafts cabinet are made with 30 bevel cuts.I made the cuts on the table sawand then removed the saw markswith my block plane.NO.ITEMDIMENSIONS (INCHES)TWL3 4" 2 Sides3 4" 1 Bottom3 4" 1 Fixed shelf3 4" 1 Top3 4" 1 Back 2 Adj. shelves 3 4"3 4" 2 Stiles3 4" 2 Rails 1 Bottom rail 3 4" 2 Shelf edges 3 4"3 4" 1 Top trim1 2" 1 Top trim3 4" 1 Base trim*Quartersawn white oak95 8"95 8"87 8"103 8"28"81 8"11 2"11 2"4"11 2"1"591 4"27"27"281 2"561 4"267 8"591 4"251 2"251 2"267 8"60"3 4"60"33 4" *QSWOQSWOQSWOQSWOQSWOQSWOQSWOQSWOQSWOQSWOQSWOQSWO Base moulding detail The Arts & Crafts finish consists of General Finishes’ Java gelstain, followed by amber shellac.After a coat of wax, I put the backin place, attaching it with #6 x15 8" screws. Crownmouldingdetail Plan section Profile Profile section Elevationpopwood.com37
Shaker Styletoward the router bit at the end ofthe cut and leave a snipe in the lastfew inches of the moulding.The cove moulding starts asa 3 4" x 3 4" piece of square stock.The 5 8" radius was milled on therouter table. The base mouldingis a 1 2"-radius bead with the cutter set to be flush with the face ofthe moulding at one end, leavinga 1 4" x 1 8" step at the top edge.Use a pair of featherboards to holdthe stock down to the router tableand tight to the fence while making the mouldings. Make one passto remove most of the waste, andthen reset the router to make afinal, light finishing pass.one end of each of the three pieces.This let me check the angle at thecorners. I held one end of the frontpiece against one of the short legs,and then marked the other end byrunning my pencil across the backof it, where it met the side of thecabinet. I usually make the cutjust a little long, check the anglewith the mating piece and thenmake the final cut.I used a shopmade jig to drillthe holes forthe pegs forthe adjustableshelves. 1 4"-20T-nuts act asbushings toguide a bradpoint drill bit.After drillingthe holes forthe T-nuts on 1"centers top-tobottom, I used atwist drill bit tobore out the softthreads in theT-nuts, leaving a1 4" diameter.Apply the TrimThe Shaker bookcase is assembled and trimmed in the sameway as the Arts & Crafts case. Theonly difference between the two isthe profile of the mouldings, thespecies of wood and the finish.All of these mouldings weremade on the router table. Thebullnose trim around the top ofthe cabinet can be made withtwo passes over a 3 8"-radius quarter-round bit, or one pass over abullnose cutter. Either way, leavea slight flat spot at the center ofthe radius. If you machine off theentire curve, the wood will movePutting the trim around the edgesof the top is the most exacting partof this project. I added an auxiliaryfence and table to my miter saw,as shown on page 40 and I thenmade a 45 cut in each directionso that I would have a referenceto exactly where the cut would bemade. I marked the cuts directlyfrom the assembled cabinet andlined up the marks to the kerf inthe auxiliary fence and table.After I made the mouldings onthe router table, I cut the piecesof trim a few inches longer thanneeded. I then made a 45 cut onSHAKER-STYLE BOOKCASENO. Crown moulding detail38The trim is glued to the cabinet,no nails are necessary. I trimmedthe top first, and then scraped thetop edge flush with the veneer.The Shaker cabinet is finishedwith Watco Danish oil. I wantedto add a bit of color to the wood soI mixed half medium walnut andhalf natural together, and appliedtwo coats of oil followed by onecoat of paste wax.Base moulding detailPOPULAR WOODWORKING June 2005 2111122212111ITEMDIMENSIONS (INCHES)TWLMATERIALCOMMENTSSidesBottomFixed shelfTopBackAdj. shelvesStilesRailsBottom railShelf edgesTop trimTop trimBase trim3 yCherry3 4"3 4"3 4"3 4"3 4"3 4"3 4"3 4"3 4"3 4"95 8"95 8"87 8"103 8"28"81 8"11 2"11 2"4"11 2"11 4"3 4"3 4"3 4"33 4"591 4"27"27"281 2"561 4"267 8"591 4"251 2"251 2"267 8"60"60"60"
Contemporary StyleThis bookcase is made without a face frame. It is lighterand simpler in appearance, andtakes less time to build and finish. Instead of a face frame, thevisible front edges of the plywoodare covered with 1 4"-thick stripsof solid wood.The plywood sides of this cabinet are cut to a finished length of59 3 4" and a piece of edge trim isput on the ends before the fronttrim is applied. The top piece inthis version is the same size as thebottom, and fits in between thesides. Because of this, the basiccabinet carcase should be assembled in one step.I clamped eachpart verticallyon the bench toattach the edgeswith glue and23-gauge pins.The edges arewider than theplywood is thick.Trim Now, Assemble Laterbit will dig in and ruin the edge.The router bit will also likely tearout a piece of the solid wood if thegrain direction isn’t consistent.Assemble the box after applying the edges. Below the bottomshelf is a 31 4"- high, 27"-wide(grain runs vertically) piece ofplywood to support the bottomshelf. The face of this kick boardpiece is set in 1 4" from the edgeof the cabinet sides. I finished thebookcase with Minwax PolycrylicSemigloss clear finish.The solid edges are applied andtrimmed before the cabinet boxis put together. I ripped the stripsto 3 8" and then took them downto 1 4" thick by making two passes through the planer. The solidmaple I used had been planed to1 32" over 3 4", so the strips wereabout 1 16" wider than the plywoodwas thick. This extra width makesit easy to attach the strips withoutworrying about lining up the edgeof the solid wood perfectly.I trimmed the solid wood downto the level of the plywood witha block plane followed by a cardscraper. You could use a routerwith a flush-trimming bit, but it’sawkward to try to balance the baseof the router on the edge of thepiece. If the router tilts at all, the CONTEMPORARY-STYLE BOOKCASEITEM 2 Sides 2 Top & bottom 1 Fixed shelf 2 Adj. shelves 1 Back 1 Kick board 1 Edge trim*Linear feet Before assembling the cabinet,trim the solidwood edgesflush to theplywood using ablock plane followed by a cardscraper. I sandedall the partsbefore assembly.NO.PlanDIMENSIONS (INCHES)TWL3 4"3 4"3 4"3 4"3 4"3 4"1 4"95 8" 593 4"95 8" 27"87 8" 27"81 8" 267 8"28" 561 4"27" 31 4"25 32" ple Section Elevationpopwood.com39
Formal StyleThe plywood case of the formal cabinet is assembled thesame way as the other two faceframe cabinets, but the top andthe face frame are both larger toaccommodate the paneled trim onthe outside of the bookcase. Theshelves are also deeper. Insteadof tucking behind the face frame,they sit 1 8" back from the front ofthe face frame.The edge of the face frame isflush with the inside edge of thecabinet side instead of the outside. This allows for the addition ofpieces of solid wood on the outsideof the cabinet to look like paneling. The top also overhangs theside of the cabinet 3 4" so that itis above the paneling. The jointbetween the two is covered by thecrown moulding.Make the face-frame stiles19 16" wide so that the edges ofthe face frame are proud of theveneer on both the inside of thecabinet, and the panel stiles onthe outside. If you need to trimor sand after everything is puttogether, it’s better to trim andsand these narrow edges.Applied PanelingWith the cabinet box assembled, and the face frame in place,I marked the locations of theAfter laying out the locations of the stiles and rails, I glued and clamped the solid-wood parts tothe plywood cabinet sides. An extra piece of wood is added at the bottom edge of the cabinet tosupport the short leg of the base moulding.applied stiles and rails on the faceof the plywood (shown below, left).The front stile fits behind the edgeof the face frame and is only 11 4"wide. The stile at the back edge is2" wide, equal to the width of thefront stile added to the thicknessof the face frame.The 2"-wide middle rail is centered vertically on the side of thecabinet. The top and bottom railsare made to leave 2" exposed fromthe edge of the crown and basemouldings. This makes the toprail 31 4" wide. I made the bottomrail the same width, and added apiece of 11 2"-wide material to thebottom edge of the cabinet side forBy holding the gun upside down, and pulling the triggerwith my little finger, I can nail the bead moulding fromthe side. The next layer of moulding will cover the holes.The solid woodstiles and rails,combined withthe bead, coveand crownmouldings area simple way toproduce a richpaneled lookto the finishedbookcase.Attaching a sacrificial base and fence to the miter saw lets me see preciselywhere the cut will be made by lining up my pencil marks with the saw kerfs.40POPULAR WOODWORKING June 2005
FORMAL-STYLE BOOKCASEattaching the base moulding.I used glue only to hold thesein place, clamping them downand letting the glue dry for anhour. Then I began applying thetrim to the inside edges. I markedthe lengths of the mitered piecesdirectly from the corners of thestiles and rails.Two-step MouldingThe bead moulding can be nailedfrom the side, because the covemoulding will cover the nail holes.I fit and placed all the bead moulding before beginning to fit thecove. I did nail the cove mouldingwith 23-gauge pins. These leavevery tiny holes that I filled witha bit of sanding dust mixed withclear lacquer.After all the panel mouldingwas on, I cut and fit the crown, andafter a final sanding stained thewood with Behlen’s “AmericanWalnut” NGR stain, followed bytwo coats of shellac. PWNO. ITEM 2111122212222221111DIMENSIONS (INCHES)TWL3 4"Sides3 4"Bottom3 4"Fixed shelf3 4"Top3 4"Back3 4"Adj. shelves3 4"FF stiles3 4"FF rails3 4"FF bottom rail3 4"Shelf edges3 4"Front cab stile3 4"Back cab stile3 4"Cab top rail3 4"Cab middle rail3 4"Cab bottom railCab bead moulding 1 2"Cab cove moulding 1 2"Crown moulding 3 4"3 4"Base moulding 95 8" 591 4"95 8" 27"87 8" 27"103 8" 30"28" 561 4"83 4" 267 8"19 16" 591 4"11 2" 27"4"27"11 2" 267 8"11 4" 591 4"2" 591 4"13 4" 63 8"2" 63 8"13 4" 63 8"11 16" 28LF1 2" 28LF2"60"33 4" 60" yMahoganyMahoganyMahogany Plan Plan section Crown moulding detail Base moulding detailProfile Profile section Elevationpopwood.com41
Wall1/2" x 11/2"rabbetin sides of cabinetSideBackShelfBack Rabbet DetailBUILT-INBASICSPlan viewSideWallMBevelShelfMaking a built-in is easyonce you understandscribing, fitting strips andFrench cleats. Here’s a solidlesson in all three.3/4"x 1" fitting stripglued to side of cabinetSimple fitting stripSideWallPlan view1"Shelfaking built-in furnitureisn’t tough. I’ve seenlots of first-time woodworkers build bookshelves thatfit in the nooks by their fireplace.But making built-ins that hugthe wall, sit level and are anchoredfirmly to the house requires a little more know-how.BackingstripLuckily, with a little planningand a few modifications to theplans of almost any cabinet, youcan make it a built-in. After trying different systems for makingbuilt-ins, this is the one that Iprefer. It’s simple, rock-solid andalmost foolproof.Cabinets in a Crooked HouseBiscuits press-fitinto slots (no glue)to hold fitting strip11/2"Complex fitting stripPlan view54POPULAR WOODWORKING February 2003If you’ve ever hung a cabinet orbuilt in a few shelves, you’ve prob-ably noticed that your rooms aren’tall square and your walls aren’tall plumb. This is usually theresult of your house settling. It’salso possible your framers or drywallers were sloppy.Either way, don’t build yourcabinets crooked to fit a catawumpus corner or sloping wall. Alwaysbuild your projects square and adda couple features to allow themto fit in an irregular space. Thereare two tricks to accommodatingout-of-whack walls: oversized backrabbets and fitting strips.Big Back RabbetsAll cabinets should have a backthat rests in rabbets in the sidesof the case. This ensure a tight fitbetween the back and sides. Withfreestanding furniture, if your backis 1 2"-thick, then the rabbets forthat back should be 1 2" wide. Thisis not so with built-ins.You need to cut a rabbet thatis significantly wider. How wide?I usually make it between 11 4"and 11 2", depending on how outof kilter the wall is.What this large rabbet does isit creates two long tongues on theback of your cabinet that canby Christopher SchwarzComments or questions? Contact Chris at 513-531-2690 ext. 1407 orchris.schwarz@fwpubs.com.
Photos by Al ParrishWEEKENDBOOKCASEYou can build the bookcase unit I’minstalling on the left using just onesheet of 3 4" plywood and one-halfsheet of 1 2" plywood.Best of all, you can build thisunit in a weekend. I know, I know –you’ve heard this story before(“Chippendale Highboy in aWeekend!”) but it’s true. I built thisbookcase in one day and finished itthe next. We’ve included plans anda cut list later on in the article thatshow you exactly how to do it.
be scribed to fit almost any wall.What’s scribing? This is whenyou cut the edge of the cabinetso it matches the shape of yourwall and fits tightly against it.Scribing isn’t difficult, and I’llshow you how I go about it later.Fitting Strips, Scribe Stiles“Fitting strips” and “scribe stiles”are two other weapons in your arsenal against the crooked wall.They are a lot like the large rabbets on the backside of your cabinet, except they help fit the sidesof your cabinet to a wall or to another adjacent cabinet.If you are building and installing a face frame cabinet, yourbest bet is incorporating a scribestile into your design. With thistechnique you make your faceframe stiles (the vertical piecesof the frame) wider so they extend out over the sides of the cabinet by 3 4". Cut a rabbet on thebackside of the stiles, which makesthem easier to scribe to fit, andyou then have a seamless wayof attaching your cabinets to wallsor to other cabinets.If you are building a cabinetwithout a face frame then youshould turn to the fitting strip.Fitting strips are attached to thecabinet sides and are cut to fitagainst a wall. Typically you cuta 45 angle on the backside of the3 4" x 1" fitting strip so when youscribe it there is a lot less material to cut away. There are a variety of different ways to attacha fitting strip to a case. Whatevermethod you use, avoid using metalfasteners because they could getin the way when you scribe andthen trim the fitting strip to size.If the case is small, you cansimply glue the fitting strip to theside of the case. If the case is large,you should come up with an alternate plan. It’s no fun turninga big case on its side, trimming alittle more and then setting itback up over and over again.One solution is to glue a backing board to the cabinet behindthe fitting strip that is a little narrow
the room, will hold a lot of books and the shelves won’t sag. You can make the basic design any size you want, but if you make it larger you won’t be able to get all of the parts from one sheet of plywood. If you make it wider, keep the shelves less than 36". If the shelves are longer than that, they