Transcription
Mobile Application Development LabLABORATORY MANUAL&RECORDB.TECH (R18)(III YEAR – II SEM)(2020-21)DEPARTMENT OFCOMPUTER SCIENCE AND ENGINEERINGMALLA REDDY COLLEGE OF ENGINEERING &TECHNOLOGY(Autonomous Institution – UGC, Govt. of India)Recognized under 2(f) and 12 (B) of UGC ACT 1956(Affiliated to JNTUH, Hyderabad, Approved by AICTE - Accredited by NBA & NAAC – ‘A’ Grade - ISO 9001:2015 Certified)Maisammaguda, Dhulapally (Post Via. Hakimpet), Secunderabad – 500100, Telangana State, India
DEPARTMENT OF COMPUTER SCIENCE AND ENGINEERINGVision To acknowledge quality education and instill high patterns of discipline making thestudents technologically superior and ethically strong which involves theimprovement in the quality of life in human race.Mission To achieve and impart holistic technical education using the best of infrastructure,outstanding technical and teaching expertise to establish the students intocompetent and confident engineers. Evolving the center of excellence through creative and innovative teaching learningpractices for promoting academic achievement to produce internationally acceptedcompetitive and world class professionals.
PROGRAMME EDUCATIONAL OBJECTIVES (PEOs)PEO1 – ANALYTICAL SKILLS1. To facilitate the graduates with the ability to visualize, gather information, articulate, analyze, solvecomplex problems, and make decisions. These are essential to address the challenges of complexand computation intensive problems increasing their productivity.PEO2 – TECHNICAL SKILLS2. To facilitate the graduates with the technical skills that prepare them for immediate employmentand pursue certification providing a deeper understanding of the technology in advanced areas ofcomputer science and related fields, thus encouraging to pursue higher education and researchbased on their interest.PEO3 – SOFT SKILLS3. To facilitate the graduates with the soft skills that include fulfilling the mission, setting goals,showing self-confidence by communicating effectively, having a positive attitude, get involved inteam-work, being a leader, managing their career and their life.PEO4 – PROFESSIONAL ETHICSTo facilitate the graduates with the knowledge of professional and ethical responsibilities bypaying attention to grooming, being conservative with style, following dress codes, safetycodes,and adapting themselves to technological advancements.
PROGRAM SPECIFIC OUTCOMES (PSOs)After the completion of the course, B. Tech Computer Science and Engineering, the graduates willhave the following Program Specific Outcomes:1. Fundamentals and critical knowledge of the Computer System:- Able to Understand the workingprinciples of the computer System and its components , Apply the knowledge to build, asses, andanalyze the software and hardware aspects of it .2. The comprehensive and Applicative knowledge of Software Development: Comprehensive skills ofProgramming Languages, Software process models, methodologies, and able to plan, develop,test, analyze, and manage the software and hardware intensive systems in heterogeneousplatforms individually or working in teams.3. Applications of Computing Domain & Research: Able to use the professional, managerial,interdisciplinary skill set, and domain specific tools in development processes, identify theresearch gaps, and provide innovative solutions to them.
PROGRAM OUTCOMES (POs)1.Engineering Graduates will be able to:Engineering knowledge: Apply the knowledge of mathematics, science, engineeringfundamentals, and an engineering specialization to the solution of complex engineeringproblems.Problem analysis: Identify, formulate, review research literature, and analyze complexengineering problems reaching substantiated conclusions using first principles ofmathematics, natural sciences, and engineering sciences.3. Design / development of solutions: Design solutions for complex engineering problems anddesign system components or processes that meet the specified needs with appropriateconsideration for the public health and safety, and the cultural, societal, and environmentalconsiderations.4. Conduct investigations of complex problems: Use research-based knowledge and researchmethods including design of experiments, analysis and interpretation of data, and synthesisof the information to provide valid conclusions.5. Modern tool usage: Create, select, and apply appropriate techniques, resources, and modernengineering and IT tools including prediction and modeling to complex engineering activitieswith an understanding of the limitations.6. The engineer and society: Apply reasoning informed by the contextual knowledge to assesssocietal, health, safety, legal and cultural issues and the consequent responsibilities relevantto the professional engineering practice.7. Environment and sustainability: Understand the impact of the professional engineeringsolutions in societal and environmental contexts, and demonstrate the knowledge of, andneed for sustainable development.8. Ethics: Apply ethical principles and commit to professional ethics and responsibilities andnorms of the engineering practice.9. Individual and team work: Function effectively as an individual, and as a member or leader indiverse teams, and in multidisciplinary settings.10. Communication: Communicate effectively on complex engineering activities with theengineering community and with society at large, such as, being able to comprehend andwrite effective reports and design documentation, make effective presentations, and give andreceive clear instructions.11. Project management and finance: Demonstrate knowledge and understanding of theengineering and management principles and apply these to one’s own work, as a memberand leader in a team, to manage projects and in multi disciplinary environments.12. Life- long learning: Recognize the need for, and have the preparation and ability toengagein independent and life-long learning in the broadest context of technological change.2.
MALLA REDDY COLLEGE OF ENGINEERING & TECHNOLOGYMaisammaguda, Dhulapally Post, Via Hakimpet, Secunderabad – 500100DEPARTMENT OF COMPUTER SCIENCE AND ENGINEERINGGENERAL LABORATORY INSTRUCTIONS1. Students are advised to come to the laboratory at least 5 minutes before (to the starting time),those who come after 5 minutes will not be allowed into the lab.2. Plan your task properly much before to the commencement, come prepared to the lab with thesynopsis / program / experiment details.3. Student should enter into the laboratory with:a. Laboratory observation notes with all the details (Problem statement, Aim, Algorithm, Procedure,Program, Expected Output, etc.,) filled in for the lab session.b. Laboratory Record updated up to the last session experiments and other utensils (if any) needed inthe lab.c. Proper Dress code and Identity card.4. Sign in the laboratory login register, write the TIME-IN, and occupy the computer system allotted toyou by the faculty.5. Execute your task in the laboratory, and record the results / output in the lab observation notebook, and get certified by the concerned faculty.6. All the students should be polite and cooperative with the laboratory staff, must maintain thediscipline and decency in the laboratory.7. Computer labs are established with sophisticated and high end branded systems, which should beutilized properly.8. Students / Faculty must keep their mobile phones in SWITCHED OFF mode during the labsessions.Misuse of the equipment, misbehaviors with the staff and systems etc., will attract severepunishment.9. Students must take the permission of the faculty in case of any urgency to go out ; if anybody foundloitering outside the lab / class without permission during working hours will be treated seriouslyand punished appropriately.10. Students should LOG OFF/ SHUT DOWN the computer system before he/she leaves the lab aftercompleting the task (experiment) in all aspects. He/she must ensure the system / seat is keptproperly.Head of the DepartmentPrincipal
INDEXS.NONameof the experimentPage.no1Installation of Android studio.12Development Of Hello World Application133456Create an application that takes the name from a textbox and shows hello message along with the nameentered in text box, when the user clicks the OKbuttonCreate a screen that has input boxes for User Name,Password, Address, Gender(radio buttons for maleand female), Age (numeric), Date of Birth (DatePicket), State (Spinner) and a Submit button. Onclicking the submit button, print all the data belowthe Submit Button (use any layout)Design an android application to create page usingIntent and one Button and pass the Values from oneActivity to second Activity182530Design an android application Send SMS using Intent40Create an android application using Fragments508Design an android application Using Radiobuttons569Design an android application for menu.6010Create a user registration application that stores theuser details in a database table.657
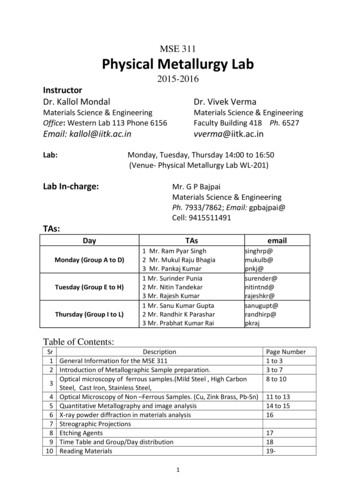
EXPERIMENT NO.1INSTALLING AND RUNNING APPLICATIONS ON ANDROID STUDIOStep 1 - System RequirementsThe required tools to develop Android applications are open source and can be downloaded fromthe Web. Following is the list of software's you will need before you start your Android applicationprogramming.Java JDK5 or later versionJava Runtime Environment (JRE) 6Android StudioStep 2 - Setup Android StudioAndroid Studio is the official IDE for android application development.It works based on IntelliJIDEA, You can download the latest version of android studio from Android Studio 2.2 Download, Ifyou are new to installing Android Studio on windows,you will find a file, which is namedas android-studio-bundle-143.3101438-windows.exe.So just download and run on windowsmachine according to android studio wizard guideline.If you are installing Android Studio on Mac or Linux, You can download the latest versionfrom Android Studio Mac Download,or Android Studio Linux Download, check the instructionsprovided along with the downloaded file for Mac OS and Linux. This tutorial will consider that youare going to setup your environment on Windows machine having Windows 8.1 operating system.InstallationSo let's launch Android Studio.exe,Make sure before launch Android Studio, Our Machine shouldrequired installed Java JDK. To install Java JDK,take a references of Android environment setupOnce you launched Android Studio, its time to mention JDK7 path or later version in androidstudio installer.
Below the image initiating JDK to android SDKNeed to check the components, which are required to create applications, below the image hasselected Android Studio, Android SDK, Android Virtual Machine and performance(Intel chip).
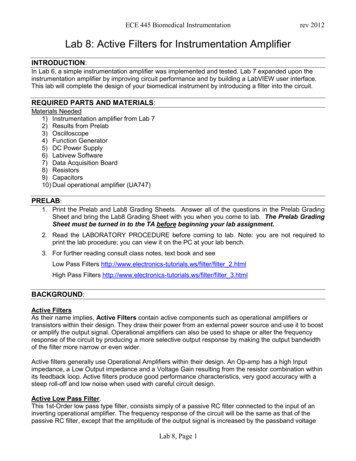
Need to specify the location of local machine path for Android studio and Android SDK, below theimage has taken default location of windows 8.1 x64 bit architecture.Need to specify the ram space for Android emulator by default it would take 512MB of localmachine RAM.
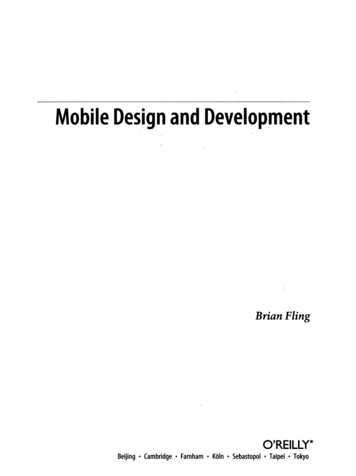
At final stage, it would extract SDK packages into our local machine, it would take a while time tofinish the task and would take 2626MB of Hard disk space.After done all above steps perfectly, you must get finish button and it gonna be open androidstudio project with Welcome to android studio message as shown below
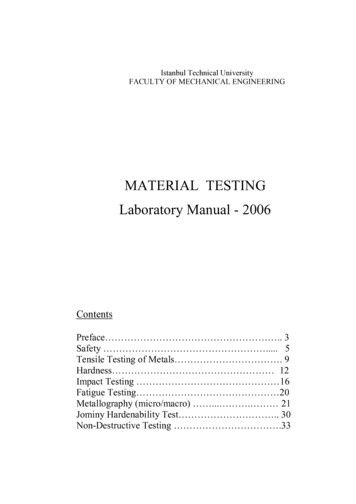
You can start your application development by calling start a new android studio project. in a newinstallation frame should ask Application name, package information and location of the project.After entered application name, it going to be called select the form factors your application runson, here need to specify Minimum SDK, in our tutorial, I have declared as API23: Android6.0(Mashmallow)
The next level of installation should contain selecting the activity to mobile, it specifies the defaultlayout for ApplicationsAt the final stage it going to be open development tool to write the application code.
Step 3 - Create Android Virtual DeviceTo test your Android applications, you will need a virtual Android device. So before we startwriting our code, let us create an Android virtual device. Launch Android AVD Manager ClickingAVD Manager icon as shown belowAfter Click on a virtual device icon, it going to be shown by default virtual devices which arepresent on your SDK, or else need to create a virtual device by clicking Create new Virtualdevice button
If your AVD is created successfully it means your environment is ready for Android applicationdevelopment. If you like, you can close this window using top-right cross button. Better you restart your machine and once you are done with this last step, you are ready to proceed for yourfirst Android example but before that we will see few more important concepts related to AndroidApplication Development.Exercise ProgramWrite the steps in installing Android Studio in Windows and Linux.
Record Notes
2. DEVELOPMENT OF HELLO WORLD APPLICATIONAIM: To design an android application to display Hello WorldFirst step is to create a simple Android Application using Android studio. When you click onAndroid studio icon, it will show screen as shown belowYou can start your application development by calling start a new android studio project. in a newinstallation frame should ask Application name, package information and location of the project.
Configure the Hello World Project DetailsWe'll finish creating the project by configuring some details about its name, location, and the APIversion itChange the name of the application. Change the default Project location to your preferreddirectory or just leave it as the default location.On the minimum API level, ensure that API 15: Android 4.0.3 IceCreamSandwich is set as theMinimum SDK. This ensures that your application runs on almost all devices.
The next level of installation should contain selecting the activity to mobile, it specifies the defaultlayout for Applications.
SOURCE CODE :The Main Activity FileThe main activity code is a Java file MainActivity.java. This is the actual application file whichultimately gets converted to a Dalvik executable and runs your applicationpackage com.example.helloworldapplication;import androidx.appcompat.app.AppCompatActivity;import android.os.Bundle;public class MainActivity extends AppCompatActivity {@Overrideprotected void onCreate(Bundle savedInstanceState) (R.layout.activity main);}}The Layout FileThe activity main.xml is a layout file available in res/layout directory, that is referenced by yourapplication when building its interface. You will modify this file very frequently to change thelayout of your application. For your "Hello World!" application, this file will have following contentrelated to default layout RelativeLayout xmlns:android tools "http://schemas.android.com/tools"android:layout width "match parent"android:layout height "match parent" TextViewandroid:layout width "wrap content"android:layout height "wrap content"android:layout centerHorizontal "true"android:layout centerVertical "true"android:padding "@dimen/padding medium"android:text "@string/hello world"tools:context ".MainActivity" / I )Running app on Phone:Connect your Phone to ComputerPlug in your device to your computer with a USB cable. If you're developing on Windows, you might needto install this universal ADB USB driver or find your specific USB driver for your device.Enable USB Debugging
The next step is to enable USB debugging so your phone can interact with your computer in a developer mode.The following steps are needed:1. (Windows Only) Install this ADB Driver2. Plug-in your Android Device to Computer via USB3. Open the "Settings" App on the Device4. Scroll down to bottom to find "About phone" item5. Scroll down to bottom to find "Build number" section6. Tap on "Build Number" 7 times in quick succession7. You should see the message "You are now a developer!"8. Go back to main "Settings" page9. Scroll down bottom to find "Developer options" item10. Turn on "USB Debugging" switch and hit "OK"11. Unplug and re-plug the device12. Dialog appears "Allow USB Debugging?"13. Check "Always allow from this computer" and then hit "OK"Running your AppNow, we can launch apps from Android Studio onto our device:1. Select one of your projects and click "Run" from the toolbar.2. In the "Choose Device" window that appears, select the "Choose a running device" radio button, select thedevice, and click OK.II) Running app on Emulator(AVD)To run the app from Android studio, open one of your project's activity files and click Run icon from the toolbar. Android studio installs the app on your AVD and starts it and if everything is fine with your set-up andapplication, it will display following Emulator window Once Gradle finishes building, Android Studio should installthe app on your connected device and start it.
Exercise Program:Design an android application to display Name, Class, College , Address etc of a student.
Record Notes
3. Create an application that takes the name from a text box and shows hello message along with the nameentered in text box, when the user clicks the OK button.Code for MainActivity.javapackage com.example.akshay.mrcet;import android.os.Bundle;import android.support.v7.app.AppCompatActivity;import android.view.View;import android.widget.Button;import android.widget.EditText;import android.widget.TextView;public class MainActivity extends AppCompatActivity {// These are the global variablesEditText editName, editPassword;TextView result;Button buttonSubmit, buttonReset;@Overrideprotected void onCreate(Bundle savedInstanceState) (R.layout.activity main);editName (EditText) findViewById(R.id.editName);editPassword (EditText) findViewById(R.id.editPassword);result (TextView) findViewById(R.id.tvResult);buttonSubmit (Button) findViewById(R.id.buttonSubmit);buttonReset (Button) findViewById(R.id.buttonReset);/*Submit Button*/buttonSubmit.setOnClickListener(new View.OnClickListener() {@Overridepublic void onClick(View v) {String name editName.getText().toString();String password Name:\t" name "\nPassword:\t" password );}});
/*Reset Button*/buttonReset.setOnClickListener(new View.OnClickListener() {@Overridepublic void onClick(View v) vity main.xml ?xml version "1.0" encoding "utf-8"? RelativeLayout xmlns:android app ls "http://schemas.android.com/tools"android:layout width "match parent"android:layout height "match parent"android:background "#FFFF8D"tools:context "com.example.akshay.mrcet.MainActivity" TextViewandroid:id "@ id/textView"android:layout width "wrap content"android:layout height "wrap content"android:layout alignParentLeft "true"android:layout alignParentStart "true"android:layout alignParentTop "true"android:text "NAME"android:textSize "20sp"android:layout margin "20dp" / TextViewandroid:id "@ id/textView2"android:layout width "wrap content"android:layout height "wrap content"android:textSize "20sp"android:text "PASSWORD"android:layout marginTop "38dp"android:layout below "@ id/textView"android:layout alignLeft "@ id/textView"android:layout alignStart "@ id/textView" /
EditTextandroid:id "@ id/editName"android:layout width "wrap content"android:layout height "wrap content"android:ems "10"android:inputType "textPersonName"android:hint "Enter Name"android:layout alignParentTop "true"android:layout alignParentRight "true"android:layout alignParentEnd "true"android:layout alignLeft "@ id/editPassword"android:layout alignStart "@ id/editPassword" / EditTextandroid:id "@ id/editPassword"android:layout width "wrap content"android:layout height "wrap content"android:ems "10"android:hint "Enter Password"android:inputType "textPassword"android:layout alignBottom "@ id/textView2"android:layout alignParentRight "true"android:layout alignParentEnd "true"android:layout marginRight "18dp"android:layout marginEnd "18dp" / Buttonandroid:id "@ id/buttonSubmit"android:layout width "wrap content"android:layout height "wrap content"android:layout alignParentLeft "true"android:layout alignParentStart "true"android:layout below "@ id/textView2"android:layout marginTop "20dp"android:text "SUBMIT" / Buttonandroid:id "@ id/buttonReset"android:layout width "wrap content"android:layout height "wrap content"android:text "RESET"android:layout alignBaseline "@ id/buttonSubmit"android:layout alignBottom "@ id/buttonSubmit"android:layout centerHorizontal "true" / TextViewandroid:id "@ id/tvResult"android:layout width "wrap content"
android:layout height "wrap content"android:layout alignParentBottom "true"android:layout alignParentLeft "true"android:layout alignParentStart "true"android:layout marginBottom "143dp"android:textSize "30sp" / /RelativeLayout Exercise Program:Design an android application to read Employee details from text boxes and display whenclicked on submit button.
Record Notes
4. Create a screen that has input boxes for User Name, Password, Address, Gender(radio buttons for maleand female), Age (numeric) and a Submit button. On clicking the submit button, print all the data below theSubmit Button (use any layout)Code for MainActivity.javapackage com.example.nkredy.mrcet;import android.os.Bundle;import android.support.v7.app.AppCompatActivity;import android.view.View;import android.widget.Button;import android.widget.EditText;import android.widget.TextView;public class MainActivity extends AppCompatActivity {// These are the global variablesEditText editName, editPassword,editAddress,editAge;TextView result;RadioGroup radioGenderGroup;ivate RadioButton radioGenderButton;Button buttonSubmit;@Overrideprotected void onCreate(Bundle savedInstanceState) (R.layout.activity main);editName (EditText) findViewById(R.id.editName);editPassword (EditText) findViewById(R.id.editPassword);editAddress (EditText) findViewById(R.id.editAddres);editAge (EditText) findViewById(R.id.editAge);radioSexGender (RadioGroup) findViewById(R.id.radioGender);result (TextView) findViewById(R.id.tvResult);buttonSubmit (Button) ClickListener(new View.OnClickListener() {@Overridepublic void onClick(View v) {String name editName.getText().toString();
String password editPassword.getText().toString();String address editAddress.getText().toString();int selectedId radioGenderGroup.getCheckedRadioButtonId();// find the radiobutton by returned idgen (RadioButton) findViewById(selectedId);result.setText("Name:\t" name "\nPassword:\t" password "\nAddredd:\t" address "\nAGE:\t" age "\nGender:\t" gen);}});}}activity main.xml ?xml version "1.0" encoding "utf-8"? RelativeLayout xmlns:android app ls "http://schemas.android.com/tools"android:layout width "match parent"android:layout height "match parent"android:background "#FFFF8D"tools:context "com.example.akshay.mrcet.MainActivity" TextViewandroid:id "@ id/textView"android:layout width "wrap content"android:layout height "wrap content"android:layout alignParentLeft "true"android:layout alignParentStart "true"android:layout alignParentTop "true"android:text "NAME"android:textSize "20sp"android:layout margin "20dp" / TextViewandroid:id "@ id/textView2"android:layout width "wrap content"android:layout height "wrap content"android:textSize "20sp"android:text "PASSWORD"android:layout marginTop "38dp"android:layout below "@ id/textView"
android:layout alignLeft "@ id/textView"android:layout alignStart "@ id/textView" / EditTextandroid:id "@ id/editName"android:layout width "wrap content"android:layout height "wrap content"android:ems "10"android:inputType "textPersonName"android:hint "Enter Name"android:layout alignParentTop "true"android:layout alignParentRight "true"android:layout alignParentEnd "true"android:layout alignLeft "@ id/editPassword"android:layout alignStart "@ id/editPassword" / EditTextandroid:id "@ id/editPassword"android:layout width "wrap content"android:layout height "wrap content"android:ems "10"android:hint "Enter Password"android:inputType "textPassword"android:layout alignBottom "@ id/textView2"android:layout alignParentRight "true"android:layout alignParentEnd "true"android:layout marginRight "18dp"android:layout marginEnd "18dp" / EditTextandroid:id "@ id/editAddress"android:layout width "wrap content"android:layout height "wrap content"android:layout marginRight "18dp"android:layout marginEnd "18dp" / EditTextandroid:id "@ id/editAge"android:layout width "wrap content"android:layout height "wrap content"android:layout marginRight "18dp"android:layout marginEnd "18dp" / RadioGroupandroid:id "@ id/radioGender"android:layout width "wrap content"android:layout height "wrap content" RadioButtonandroid:id "@ id/radioMale"android:layout width "wrap content"
android:layout height "wrap content"android:text "@string/radio male"android:checked "true" / RadioButtonandroid:id "@ id/radioFemale"android:layout width "wrap content"android:layout height "wrap content"android:text "@string/radio female" / /RadioGroup Buttonandroid:id "@ id/buttonSubmit"android:layout width "wrap content"android:layout height "wrap content"android:layout alignParentLeft "true"android:layout alignParentStart "true"android:layout below "@ id/textView2"android:layout marginTop "20dp"android:text "SUBMIT" / TextViewandroid:id "@ id/tvResult"android:layout width "wrap content"android:layout height "wrap content"android:layout alignParentBottom "true"android:layout alignParentLeft "true"android:layout alignParentStart "true"android:layout marginBottom "143dp"android:textSize "30sp" / /RelativeLayout Excersise program: Create a screen that has input boxes for User Name, Password, Address, Gender(radiobuttons for male and female), Age (numeric), Date of Birth (Date Picket), State (Spinner) and a Submitbutton. On clicking the submit button, print all the data below the Submit Button (use any layout)
Record Notes:
5.Design an android application to create page using Intent and one Button and pass the Values fromone Activity to second Activity.AIM: To design an android application to design a page using Intent and one Button and pass the Valuesfrom one Activity to second Activity.Main Activity Java Filepackage com.example.transferofdata;import android.os.Bundle;import android.app.Activity;import android.content.Intent;import android.view.Menu;import android.view.View;import android.view.View.OnClickListener;import android.widget.Button;import android.widget.EditText;public class MainActivity extends Activity{@Overrideprotected void onCreate(Bundle ate);setContentView(R.layout.activity main);final EditText et (EditText)findViewById(R.id.editText1);final EditText et1 (EditText)findViewById(R.id.editText2);Button send Listener(new OnClickListener(){@Overridepublic void onClick(View arg0){String s et.getText().toString();String s1 et1.getText().toString();Intent it new ("uname", s);
it.putExtra("pwd", s1);startActivity(it);}});}@Overridepublic boolean onCreateOptionsMenu(Menu menu){getMenuInflater().inflate(R.menu.main, menu);return true;}}SecondActivity.javapackage com.example.transferofdata;import android.os.Bundle;import android.app.Activity;import android.view.Menu;import android.widget.TextView;public class Second extends Activity{@Overrideprotected void onCreate(Bundle ate);setContentView(R.layout.activity second);TextView tv (TextView)findViewById(R.id.textView1);TextView tv1 Overridepublic boolean onCreateOptionsMenu(Menu menu){
getMenuInflater().inflate(R.menu.second, menu);return true;}}MainActivity.xml RelativeLayout xmlns:android tools "http://schemas.android.com/tools"android:layout width "match parent"android:layout height "match parent"android:paddingBottom "@dimen/activity vertical margin"android:paddingLeft "@dimen/activity horizontal margin"android:paddingRight "@dimen/activity horizontal margin"android:paddingTop "@dimen/activity vertical margin"tools:context ".MainActivity" Buttonandroid:id "@ id/button1"android:layout width "wrap content"android:layout height "wrap content"android:layout alignParentLeft "true"android:layout alignParentTop "true"android:layout marginLeft "78dp"android:layout marginTop "154dp"android:text "send" / EditTextandroid:id "@ id/editText1"android:layout width "wrap content"android:layout height "wrap content"android:layout alignParentTop "true"android:layout alignRight "@ id/button1"android:layout marginTop "18dp"android:ems "10" requestFocus / /EditText EditTextandroid:id "@ id/editText2"
android:layout width "wrap content"android:layout height "wrap content"android:layout alignRight "@ id/button1"android:layout below "@ id/editText1"android:layout marginTop "37dp"android:ems "10"android:inputType "textPassword" / /RelativeLayout SecondActivity.xml RelativeLayout xmlns:android tools "http://schemas.android.com/tools"android:layout width "match parent"android:layout height "match parent"android:paddingBottom "@dimen/activity vertical margin"android:padd
book, and get certified by the concerned faculty. 6. All the students should be polite and cooperative with the laboratory staff, must maintain the discipline and decency in the laboratory. 7. Computer labs are established with sophisticated and high e