Transcription
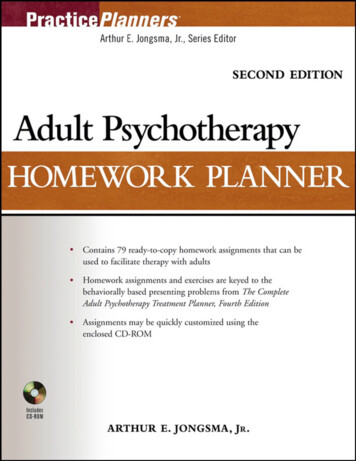
Collections Care Section: General ManualA. Basic / Minor Treatment1. Quick & Easy Tip-in GuideTime Requirements:This treatment should take no more than 15 minutes to complete.Purpose and Background:A tip-in is most often used to reattach a single loose page, such as an errata sheet, to an item that has atextblock in good condition (i.e. not brittle). It takes its name from the application of adhesive (PVA,PVA/methyl cellulose mix, or wheat starch paste) to only the “tip” of the detached leaf and its placementback “in” the volume.Considerations:How many pages can be tipped-in to a single volume? Typically, a section of up to 10 pages can be successfullytipped-in to one location in a volume. Examine the space and flexibility offered by the binding to determinewhether or not the item can accommodate more materials.Should the page be placed inside a pocket instead? If the loose material is thick, brittle, damaged, slippery, or folded,place the item(s) in a pocket and adhere it to the back cover.Procedures:1. Sandwich the page, reverse side up, between two pieces of scrap paper, leaving 1/8-inch visible along thebinding edge of the page. The top strip of scrap paper will protect the area that should not be glued.1/8/20151
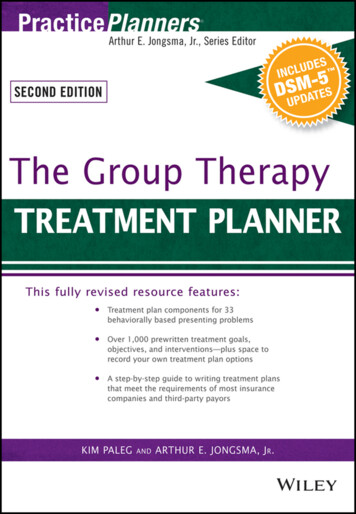
Collections Care Section: General Manual2. Using a roller or brush, apply a thin, even layer of PVA to the exposed 1/8-inch edge of the sheet.1/8/20152
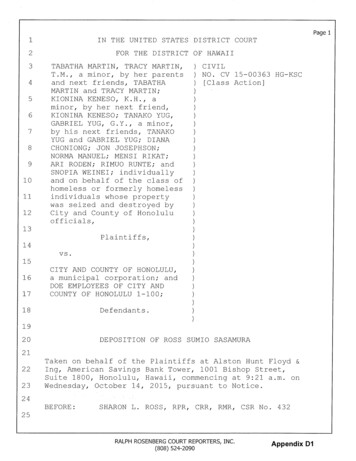
Collections Care Section: General Manual3. Carefully position the item to be inserted in place, setting it as far into the gutter as possible while ensuringthat the edges are even with the rest of the textblock.4. With the tipped-in sheet squarely in place, and starting in the middle of the page and working out to thetop and bottom, slide the tip of a bone folder along the front (unglued) side of the sheet to press it tight.1/8/20153
Collections Care Section: General Manual1/8/20154
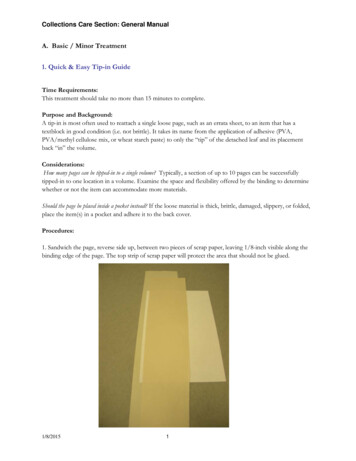
Collections Care Section: General Manual5. Place a sheet of waxed paper into the gutter between the insert and the page before it to protect thetextblock from excess adhesive. Close the book and allow a drying time of 30 minutes.2. Tip-InTime Requirements:This treatment should take no more than 15 minutes to complete.Purpose and Background:A tip-in is most often used to reattach a single loose page, such as an errata sheet, to a sewn or adhesivebound structure that has a textblock in good condition (i.e. not brittle). It takes its name from the applicationof adhesive (PVA) to only the “tip” of the detached leaf and its place back “in” the volume. This is the fastestand simplest of treatments performed in CCS.Considerations:Should the loose page be hinged in instead? A hinge-in provides greater ease of page opening, is more reversible,and is less likely to damage the adjacent pages than a tip. It is appropriate to hinge-in pages that havedetached from an item with an intact sewn structure and a textblock in fair to good condition. However careshould be taken to ensure that the enjoining page of the half folio is also not detached and loose. If this is thecase than both pages on either side of the signature will need to be tipped in as well.How many pages need to be reattached? Up to ten pages can be reattached to one location using the tip-in method;however, the area should always be examined first to ensure the binding has enough space and flexibility toaccommodate the extra material. If multiple pages have detached from an item with an adhesive binding1/8/20155
Collections Care Section: General Manualstructure, determine if the adhesive binding structure is apt to fail overall. If so, routing the item for librarybinding (double fan adhesive) is the most appropriate approach.Are the pages brittle? If so, do not attempt a repair that will cause further damage to the original. A tip-in repairmay be stronger than the page can handle, leading to potential cracks and deterioration later. Therefore,brittle pages should either be facsimiled or placed in a pocket adhered to the inside back cover of the book.Where should the loose page be placed? If the page is an errata sheet, it should be placed between the Title page andthe Table of Contents in a volume. All other pages should be reattached at their original location in thetextblock.Procedures:1. Trim irregular errata sheets square. Large errata sheets with a small amount of information can be trimmedto a smaller size for tipping in.2. Sandwich the item to be tipped in, reverse side up, between two pieces of scrap paper, leaving 1/8-inchvisible along the binding edge of the page. The top strip of scrap paper will protect the area that should notbe glued.1/8/20156
Collections Care Section: General Manual3. Using a roller or brush, apply a thin, even layer of PVA to the exposed 1/8-inch edge of the sheet.Note: PVA/methyl cellulose mix (50/50%) can be used for tip-ins to allow more time to place the itembefore it dries.4. Carefully position the inserted item in place, placing it as far into the gutter as possible while ensuring thatthe edges are even with the rest of the text block.Note: When 2-10 pages are to be tipped in, tip in one at a time. Each may be allowed to dry before the nextis added. Begin with the bottom page, if sequential pages are to be tipped in.5. With the tipped-in sheet squarely in place, starting in the middle of the page and working out to the topand bottom, slide the tip of a bone folder along the front (unglued) side of the sheet to press it tight. Checkfor excess glue and wipe away any that is present.6. Place a sheet of waxed paper into the gutter between the insert and the page before it to protect the textblock from excess adhesive. Close book and place a weight on the cover near the gutter to help ensure solidadhesion and prevent wrinkles from developing in the text block. Allow to dry for 30 minutes.1/8/20157
Collections Care Section: General Manual7. If necessary, trim the tipped in page to the same size as the textblock.Note: Those experienced at completing tip-ins can PVA two page edges at once, but must then work quicklyto secure them in place properly, one after the other, before they dry.Note: In situ tip-ins are made when a page is partially detached. The procedure is the same except that thePVA is applied to the text page following the page to be tipped in, and the partially detached page issmoothed down and becomes attached to this page.1/8/20158
Collections Care Section: General Manual3. Tip Together SectionsTime Requirements:This treatment should take no more than 15 minutes per item.Purpose and Background:In a traditional tip-in, only a single loose page, such as an errata sheet, is reattached to the textblock.Occasionally, however, one must tip-in a thin pamphlet or journal issue into a volume These pamphlets orissues have multiple pages that are tipped to each other and then into the volume.Considerations:Should the loose pages be hinged in instead? A hinge-in provides greater ease of page opening, is more reversible,and is less likely to damage the adjacent pages than a tip-in. It is appropriate to hinge-in pages that havedetached from an item with an intact sewn structure and a textblock in fair to good condition.How many pages need to be reattached? Up to ten pages can be reattached to one location when tipping togethersections; however, the area should always be examined first to ensure the binding has enough space andflexibility to accommodate the extra material. If the pages have detached from an item with an adhesivebinding structure, determine if the adhesive binding structure is apt to fail overall. If so, routing the item forlibrary binding (double fan adhesive) is the most appropriate approach.Are the pages brittle? If so, do not attempt a repair that will cause further damage to the original. A tip-in repairmay be stronger than the page can handle, leading to potential cracks and deterioration later down the line.Therefore, brittle pages should either be facsimiled or placed in a pocket adhered to the inside back cover ofthe book.Procedures:1. Sandwich the interior most folded sheet, reverse side up, between two pieces of scrap paper, leaving1/8-inch visible along the binding edge of the page. The top strip of scrap paper will protect the areathat should not be glued.2. Using a roller or brush, apply a thin, even layer of PVA to the exposed 1/8-inch edge of the sheet.3. Carefully position the folded sheet inside the adjacent folded sheet, setting it as far into the gutter aspossible while ensuring that the edges are even with the rest of the text block4. Repeat steps 2-4 to tip together the entire section.5. Carefully position the section in the bound volume, setting it as far into the gutter as possible whileensuring that the edges are even with the rest of the text block.6. With the tipped-in section squarely in place, and starting in the middle of the page and working outto the top and bottom, slide the tip of a bone folder along the front (unglued) side of the sheet topress it tight.1/8/20159
Collections Care Section: General Manual7. Place a sheet of waxed paper into the gutter between the insert and the page before it to protect thetext block from excess adhesive. Allow to dry for 30 minutes under weight.8. If necessary, trim the tipped in pages to the same size as the textblock.4. Hinge-inTime Requirements:This treatment should take no more than 15 minutes per item.Purpose and Background:The Hinge-in treatment is used to reattach a single loose page to an intact sewn structure that has a textblockin good condition (i.e. not brittle). It utilizes wheat starch paste and a strip of Japanese tissue to adhere thepage to the textblock; therefore, it is primarily used on older items (pre-1930) whose paper texture issympathetic to the tissue. The result is a “hinge” of Japanese tissue that keeps the page in place.Considerations:Should the loose page be tipped-in instead? If the book is more modern (post-1930), has an adhesive binding, orwould not be able to stand the moisture of the wheat starch paste, the page should be tipped into thetextblock instead. Tip-ins can also be used when reversibility, ease of opening, and/or potential damage to theadjacent pages are not primary concerns.How many pages need to be reattached? Up to ten pages can be hinged into the same spot in the textblock.Because Japanese tissue can add extra bulk to an item, the area should always be examined first to ensure thebinding has enough space and flexibility to accommodate the extra material. If multiple pages have detachedfrom an item, determine if the binding structure is apt to fail overall. If so, the book may need to be resewnbefore being placed in a new case.Are the pages brittle? If so, do not attempt a repair that will cause further damage to the original. A hinge-inrepair may be stronger than the page can handle, leading to potential cracks and deterioration later down theline. Therefore, brittle pages should either be facsimiled or placed in a pocket adhered to the inside backcover of the book.Procedures:1. If the binding edge of the page is ragged, trim it with a straight edge and scalpel/ knife.2.3.Place the page in the appropriate spot within the textblock, setting it as far into the gutter as possiblewhile ensuring that the edges are even with the rest of the text block.Using a straight edge and light duty book binder’s awl, needle tear strips of Japanese tissue between¼ and ½ inch wide. Tissue can also be torn by hand or by making water tears with a small brushor water pen.4. If the wheat starch paste is too thick to spread easily, thin it with a very small amount of water; then,using a clean blotter as a work surface to help absorb excess moisture, brush paste onto the1/8/201510
Collections Care Section: General ManualJapanese tissue. Take care with this step, as paste that is too watery can leave a tide line aroundthe hinge.1/8/201511
Collections Care Section: General Manual1.Place the pasted out tissue so it overlaps both the paper’s binding edge and the gutter of the book.Gently press with the fingers.2.Tuck a second piece of clean blotter into the gutter so it covers the mend. Close the book, weight it,and let dry.3.Examine the mend. The edges of the Japanese tissue should be completely adhered to the page andshould lie flat.4.If desired, repeat steps 3-7 on the other side of the page to create a stronger, more aestheticallypleasing hinge.5. Paper RepairTime Requirements:This treatment should take no more than 15 to 45 minutes to complete.Purpose and Background:Paper Repair treatments involve straightening folded page corners, mending tears, and filling losses in thetextblock. They are performed to restore the integrity of the textblock and prevent any tears from worsening.Depending on the type of paper and the extent of the damage, several different materials can be used: PVA,methyl cellulose, heat-set tissue, and Japanese tissue with wheat starch paste.Considerations:What kind of paper is involved, and where is the damage located? In instances where the tear is “scarfed” (i.e. one sideof the tear overlaps the other, rather than a cut or a clean tear), PVA or 3% methylcellulose can be applied tomend it. This should only be used on modern (post-1930) items that are not brittle or otherwise easilysubjected to cockling under moisture.Heat-set tissue is best used on modern, brittle, or clay-coated items. It should not be used on covers due tostrength considerations.Japanese tissue is best used on paper whose texture matches that of the tissue, such as older items (pre-1930);because of its strength, it can also be used on covers and hinge repairs. However, it should not be used onbrittle paper, clay coated papers, or other items that will not be able to stand the moisture of the wheat starchpaste.Losses can be mended with either Japanese tissue or heat-set tissue. For most repairs, heat-set tissue willsuffice, but it remains important to keep the quality of the paper in mind.Would a facsimile be a better choice? If the pages have endured heavy damage or large losses, especially if thoselosses extend into the text, creating a facsimile of the affected pages from another copy of the same itemwould be preferable. Pages that are too brittle to withstand treatment may also benefit from a facsimile, ratherthan risking further loss or damage by creating a mend that is stronger than the paper. Facsimiles can eitherbe tipped or hinged into the textblock or placed in a pocket attached to the items inside back cover.1/8/201512
Collections Care Section: General ManualWould replacement be a better choice? If extensive damage exists that is prevalent throughout the entire textblock,rendering large sections of the item unusable or unreadable, it may be better, as budget and bibliographicvalue permits, to mark it as a candidate for replacement and put in damaged workflow.Has the damage occurred on a fold-out or supplementary item? Fold-outs or supplementary items that require ten pagerepairs or fewer can be mended. If the item has more than ten tears, is brittle, these items can be placed in apocket.Procedures: Repair with PVA or Methylcellulose1. Use PVA on tears to the outer cover; use methylcellulose on tears to the inner pages.2.Apply a thin layer of adhesive to one side of the scarfed tear.3.Align the edges and press firmly, using a bone folder if desired. Applying heat sparingly with a tackingiron or heated spatula (with silicone release between) will help dry the adhesive; it can also help to limitcockling.Procedures: With Heat-Set Tissue1. Place a piece of silicone release paper under the tear to be mended.2.3.Set a tacking iron or heated spatula to 275-300 degrees.Using a straight edge and a scalpel/knife, cut strips of heat-set tissue between 1/8 and 1/4 inch wide.Heat-set tissue edges can also be needle torn for a slightly feathered edge1/8/201513
Collections Care Section: General Manual4.Identify the shiny adhesive side of the tissue. This side goes on the tear.5.Place the tissue on the tear, applying gentle pressure with the fingers to hold it in place.6.Place a piece of silicone release paper over the mend.7.Rub the tacking iron or heated spatula one or two times over the new mend.8.Examine the mend. Slightly flex the page to assure that there is good adhesion of the heat set tissue.The edges of the heat-set tissue should be completely adhered to the page.9.Trim excess tissue from page edges using a straight edge and scalpel/knife. Place a small self-healingsurface or light card under the repaired page while trimming. Small scissors can also be used totrim excess tissue from the page edge.1/8/201514
Collections Care Section: General ManualProcedures: With Japanese Tissue and Wheat Starch Paste1.Using a straight edge and light duty book binder’s awl, needle tear strips of Japanese tissue between 1/8and 1/4 inch wide. Tissue can also be torn by hand or by making water tears with a small brush or waterpen.2. If the wheat starch paste is too thick to spread easily, thin it with a very small amount of water; then,using a clean blotter as a work surface to help absorb excess moisture, brush paste onto the Japanesetissue. Take care with this step, as paste that is too watery can leave a tide line around the repair.If the repair extends into the text, inks should also be tested for solubility by placing a small drop ofwater on an inconspicuous part of the text, then blotting the area to see if ink feathers or offsets. If itdoes, consider using heat-set tissue instead. Rarely, heat-set tissue will change the color of a printingink and/or cause it to bleed.3. Place the pasted out tissue on the tear and gently press with the fingers.4. Place another piece of clean Remay next to wet mend, then blotter over the damp mend, weight it, andlet it dry for 20 – 30 minutes.1/8/201515
Collections Care Section: General Manual5. Examine the mend. The edges of the Japanese tissue should be completely adhered to the page andshould lie flat.6. Trim excess tissue from the page edges.Procedures: Mending LossesIf losses are large and involve text area, the item will be placed in the damage workflow in order to check to ifreplacement pages might be made available and they can then be substituted for the damaged page or pages.If text is not involved continue as below.1.Place a sheet of Mylar over the loss to protect the page.2.Fold a piece of Japanese or heat-set tissue in half.3.Place on top of the Mylar . If the loss is at the edge of the page, align the folded edge with thestraight edge of the loss.4.Using either a scalpel/ knife (heat-set) or book binder’s awl (Japanese tissue), trace the shape of theloss onto the tissue, leaving a border of 1/8 to 1/4 inch to allow it to adhere to the page. If the shapeof the loss is hard to see, place a darker paper behind it to make the shape more visible.1/8/201516
Collections Care Section: General ManualFor losses in the same area that extend over multiple pages, only leave the 1/8 to 1/4 inch border onone side of the shaped tissue; cut the other side to the exact shape of the loss. This will help preventthe introduction of extra bulk to the pages.5.Remove the Mylar . If the loss is at the edge of the page, fold the tissue around it; otherwise,separate the shaped pieces of tissue from one another.6.Paste down or adhere as indicated above.6. PocketsTime Requirements:This treatment should take no more than 15 minutes per item.Purpose and Background:Create pockets for loose materials that cannot be directly tipped into a book, such as loose pages, maps,charts, pamphlets, CDs, and items made of materials such as plastic that do not readily stick to paper. Pocketsare generally made from cut down archival folders, polyester L-Sleeves, or Tyvek 1/8/201517
Collections Care Section: General ManualConsiderations:1. Complete page repairs to materials that are to be enclosed in the pocket when appropriate, as well asrepairs to the textblock.2. CD pockets can be contained inside tip-in style pockets when the endsheets have information onthem that must not be obscured.3. The completed pocket must allow access to the item inside it. It must not be so large that items fallout, but it must be large enough to permit the item to be removed from and replaced in the pocketeasily without damage to the item.4. The preferred placement of pockets is in the lower right corner of the back cover of the book.However, when old material must be removed, damaging the pastedown or leaving residue, cover thedamage with the new CD pocket. If the disturbed area is larger than the pocket, cover the entire pageby gluing a sheet of plain paper over the entire pastedown.5. If an old pocket is on top of retainable information, including informative or decorative pastedowns,instead of removing the entire pocket, cut away the un-adhered material and tape the new pocket ontop of the old one.Procedures:L-Pocket: Open on the top and left (inside) edges.1. Measure and trim the top and inside edges of the pocket: Measure approximately 7mm from theinside and top edges of the item to be placed in the pocket. Seam side facing down, make pencilmarks on the pocket and trim at those marks. The cuts must be made on the top (flap end) of thepocket; and on the inside edge to prevent the items from easily falling out of the pocket. The insideedge is the edge on your left as you hold the pocket with the seam away from you.2. Make a peek-a-boo cut: Insert a small cutting mat inside the pocket. Make an equilateral triangle witha straight edge and the open corner of the pocket on the seamless, top layer of the pocket. Cut thetriangular corner from the pocket.1/8/201518
Collections Care Section: General ManualWraparound Pocket: Open on top edge only. Use for bulky items, items that are slick, or multiple items.1.Measure approximately 7mm from the edge of the item to be placed in the pocket on thetop (flap) end of the pocket, and trim.2.Measure approximately 18mm from the edge of the item to be placed in the pocket on theinside edge, and trim. The inside edge is the edge on your left as you hold the pocket withthe seam away from you.3.Make a cut approximately 12mm from the trimmed edge on the bottom layer (seam-side) ofthe pocket. This cut is made parallel to the sides of the pocket and extends the entire lengthof the pocket on its left edge. This cut leaves a “tab” extending from the front side of thepocket.4.Cut a 12mm triangle from the bottom left corner of the “tab” and wrap it around to theback of the envelope and adhere it to the back with double-sided tape, closing off the leftedge of the envelope. The removed triangle allows for greater ease in wrapping the tab.5.Make a peek-a-boo cut: Insert a small cutting mat inside the pocket. Make an equilateraltriangle with a straight edge and the open corner of the pocket on the seamless, top layer ofthe pocket. Cut the triangular corner from the pocket.CD Pocket: Use standard Tyvek envelope. Attach a pocket to the textblock for a CD thataccompanies a book and that is not already enclosed in a jewel case or secure pocket.III. Methods for attaching PocketsTape to Back Cover: Tape pockets to the back covers of books for loose items that will fit inside thecover and will not obscure information on the paste-down.1. Make sure the pocket will fit on the inside back pastedown. It should not overhang the book’s coverboard or extend into the hinge area of the textblock. When the book is closed, the pocket and itscontents should not prevent the book from closing completely.1/8/201519
Collections Care Section: General ManualThis image shows the book, the material that needs to be placed in a pocket and the supplies needed for theprocedure.2. Attach double-sided tape on the back side of the pocket around all four edges approximately 2mmfrom the pocket’s edges. Apply double sided tape diagonally across the pocket. The diagonal stripsof tape should be parallel to each other, and should be placed 20-40mm apart, depending on thesize of the pocket.3. Remove the paper backing from the double-sided tape and place the pocket on the inside backpastedown of the book. Secure the edges with a bone folder. If possible, attach the pocket along thelower and right edge of the pastedown. (Occasionally, the pocket will be too large to place this way andwill have to extend to the edge of the board.)1/8/201520
Collections Care Section: General ManualTip-in: Tip-in pockets for loose items that cannot be taped to back inside cover.1. Make sure the pocket will fit on the inside of the textblock. It should not overhang thebook’s cover boards. When the book is closed, the pocket and its contents should not preventthe book from closing completely.2. Turn the pocket over with the seam side facing you.3. Using two strips of waste paper as guides, paste out the “tab” on the seam side of the pocketusing the 50/50 PVA/methyl cellulose mix. To tip-in wraparound pockets, apply PVA to theright edge of the seam-side of the pocket, as with a regular tip-in.4. Tip the pocket into the textblock near the book’s back endsheet. Place the pocket as close tothe tail of the text block as possible. Secure the edges with a Teflon folder. Allow the adhesive atleast 20 minutes to dry.7. Tighten HingeTime Requirements:This treatment should take no more than 10 minutes to complete.Purpose and Background:This treatment is performed to prevent further damage to the hinge, and to prevent the textblock fromeventually separating from its case.Considerations:How loose is the textblock? If more than 3mm of the pastedown has been lifted away from the case, eitherrecase the book or send it to a bindery if applicable. If more than 3mm of the pastedown is torn, then recasethe book, or sent to the contracted commercial bindery.What tools are necessary to complete this treatment successfully? Cylindrical Plexiglas rods or knitting needles aregenerally used to apply PVA to the hinge area because they will fit into the space to be glued withoutdamaging it further.1/8/201521
Collections Care Section: General ManualProcedures:1.Place the book in a standing position.2.Dip a Plexiglas rod or knitting needle into a bottle of PVA and twist the rod against the opening ofthe container as you remove the rod to remove excess adhesive.3.Work the rod into the cavity where the textblock has moved away from the case (hinge) and twist therod to transfer the PVA into the gap. Re-adhere the book cover to the pastedown.4.Flip the book, re-coat the rod with PVA and insert the rod into the same cavity from the oppositeside so that both ends of the hinge are thoroughly coated with PVA. Use a bone folder and pressfrom the middle to the head and from the middle to the tail along the head to move excess adhesive.5.Use your fingers or a paper towel to remove any excess adhesive from the hinge area and placewaxed paper between the pastedown and flyleaf.6.Repeat Steps 2 through 5 for the opposite hinge, if necessary.1/8/201522
Collections Care Section: General Manual7.Place the book under weight between brass-edged boards and let dry for thirty minutes.Note: You can also tighten hinges by brushing PVA onto the Plexiglas rod or knitting needle. The adhesivecoated needle is then inserted into the hinge as the book lies flat on the work bench.8. Open LeavesTime Requirements:This treatment should take no more than 15-45 minutes per item, depending on the number of leaves to beopened.Purpose:Separating leaves where they remain attached allows pages to be turned freely.Considerations:The size and condition of the item will determine if opening leaves by hand -- as opposed to using a manualor automatic guillotine-- is the best option.1/8/201523
Collections Care Section: General ManualHow many leaves need to be opened? If only a few leaves require attention, opening by hand is practical andefficient.Are the pages brittle? Fragile paper is best dealt with by hand: a controlled, delicate technique will minimizedamage.Does the item have a hard case? The leaves of a hardbound book should only be opened by hand.Are the margins surrounding text too narrow to endure a loss? When opening leaves by hand, margins are notcompromised.Guillotines can save time, and they make clean and consistently precise cuts. Use a guillotine on paperbacksthat have strong paper, wide margins, and a large number of leaves that require opening.Procedures:1. Examine the item to determine where leaves need to be detached from each other (opened). Leavesmay be attached at the head, foot, or fore edge of a bound book.2. Place the item on a flat surface and open to the first set of leaves. Prop with a weight to hold inplace, if necessary.1/8/201524
Collections Care Section: General Manual3. Insert the tip of the scalpel blade or knife between two pages, where space allows.4. Angle the blade so that the tip does not scrape or snag the pages.5. Carefully slide the blade along the edge of the leaf until the pages are completely detached. Use thetext block for support, keeping the blade straight, steady and angled.1/8/201525
Collections Care Section: General Manual6. Turn the newly separated pages, checking for a complete range of movement.9. Bindery Preparation ITime Requirements:This treatment should take no more than 15 minutes per item.Purpose and Background:The Bindery Prep I workflow includes materials that will be sent to the contracted commercial bindery oncerepaired. These are typically sewn volumes that have loose pages or sections at the front or back that need tobe hinged on.The Bindery Prep I workflow may also include adhesive bindings that have loose pages at the front or backthat need to be tipped on.The goal is to retain the original leaf attachment method through the prep and library binding process.Considerations:1/8/201526
Collections Care Section: General Manual Why hinge instead of tip-i
Close the book and allow a drying time of 30 minutes. 2. Tip-In . Time Requirements: . (unglued) side of the sheet to press it tight. 1/8/2015 9 . Collections Care Section: General Manual . 7. P