Transcription
reading technique performanceTECHNIQUE 2By Irio O’FarrillInstructional Design: Maurice Verloop, Bass Program Chair, Musicians InstituteEdited by Joe BergaminiDigital book design and cover by Mike HoffLayout by Rick GrattonMusic engraving by Willie RoseMI Curriculum SeriesSeries Sponsor: Jon Clayden, Vice President of Academic AffairsCreative Director & Executive Editor: Donny Gruendler, Vice President of Instruction and Curricular DevelopmentManaging Editor: Joe BergaminiPublished for MI by WBH MusicWorks LLCExecutive Producers: Rob Wallis, Joe Bergamini, Mike HoffCopyright 2014 Musicians Institute, Inc.All Rights Reserved
BASS TECHNIQUE 2Unit 11. Thumb Plucking and Palm Muting2.Melodic Development3.Key CentersUnit 21.Slap Bass2.Melodic DevelopmentUnit 31.Slap Bass: Expanding Rhythms2.Melodic Development: Alternating Intervals3.Augmented Triads411131520252931Unit 41.Slap Bass: Rhythmic Sequencing2.The Natural Minor Scale3236Unit 51.Slap Bass Transposition2.Fretboard4143
Unit 61.Slap Bass: Neck-Hand Slapping2.Fretboard4851Unit 71.Slap Bass: Single-String Thumb and Pop2.Natural Minor Diatonic Triads3.Fretboard555963Unit 81.Slap Bass2.Diatonic Seventh Chords3.Chord Inversions666872Unit 91.Slap Bass: Mathematical Phrasing2.Diatonic Minor Seventh Chords3.The Melodic Minor Scale777983Unit 101.Slap Bass: Rhythmic Displacement2.The Harmonic Minor Scale3.Harmonizing The Melodic and Harmonic Minor ScalesAbout the Author848687923
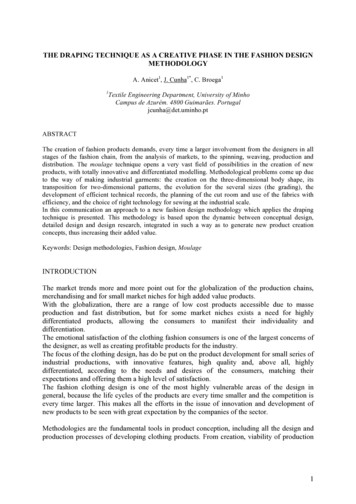
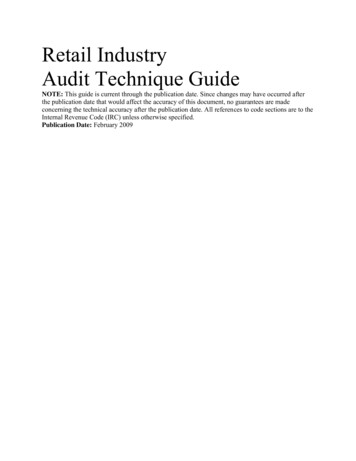
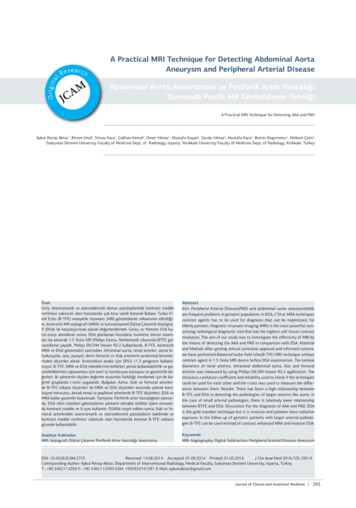
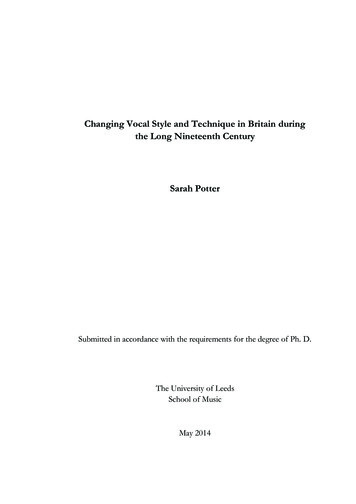
reading technique performanceChapter 1: Thumb Plucking and Palm MutingThumb plucking and palm muting is a technique used toemulate the sound of an upright bass on the bass guitar. Thebass guitar is a relatively new instrument compared to theupright bass that has been around for hundreds of years.When Leo Fender introduced the first bass guitar in 1951, allbass players played upright bass. The sound they were usedto hearing was the sound of the acoustic upright bass. Herenow was this new instrument that was much easier to carryaround, but didn’t quite have the same sound as the upright.In order to achieve the sound of an upright bass on this newEx. 1.1a: Guitar Village - Fender 1956 Precision bass in instrument, the bass guitar had a pickup and bridge cover.two-tone sunburst.Foam was stuffed under the bridge cover to deaden thestrings to make it sound more like an upright. The early Fenders also had a finger rest below the G string tomake it easier for the player to put their hand in the proper position for thumb plucking by laying their palmon the pickup cover. Today bassists do this by placing the palm of their hand across the strings by the bridgeand pluck with their thumb.This technique is useful in a variety of situations. Its roots go back to early blues and R&B players who stillwanted that thumpy upright sound. Latin players use this technique to emulate the sound of the AmpegBaby Bass (an electric upright bass used almost exclusively by Latin bands). The technique reduces sustainand deadens the sound of the instrument. It also adds some percussiveness to the sound, which is veryuseful in Latin music. The technique is also useful for creating a dub reggae sound. Anthony Jackson is oneof the modern masters of this technique. He not only uses the technique to emulate the sound of an upright,but also to add dynamics and change the mood of the music. His use of this technique is very fluid;he has developed the technique to where he can also alternate between his index finger and thumb foradded dexterity.To properly execute this technique, place the outer side of your plucking hand on top of the saddles of thebridge. Then bring your hand down so that the palm of your hand is covering the strings. Your hand will bealmost perpendicular to the strings. (Ex. 1.1b).Ex. 1.1b4 Bass Technique 2
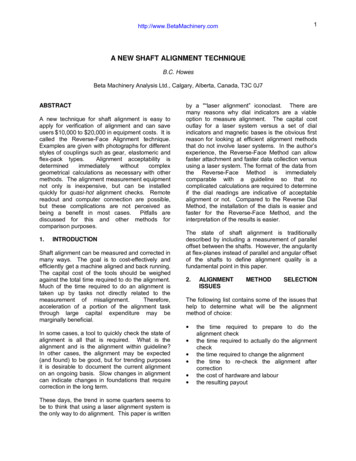
Unit 1 - Chapter 1Now, rest the fleshy part of your thumb on the string, and curl yourother fingers in slightly, allowing the tips of the fingers to rest on thestrings (Ex. 1.1c). You can use the other fingers of your hand to furthermute the strings that are not being played. This hand position is similarto the position for slap bass, which we will discuss in Unit 2.Ex. 1.1cIt is important to keep the outer part of your palm on the strings over the bridge saddles. If you move yourhand too far towards the pickups it will affect your intonation. Place enough pressure to keep the stringsmuted, but not so much as to totally deaden the tone and make your hand tense. Increasing and decreasingthe pressure can adjust the amount of muting. As you play across the strings from lowest to highest and backdown, allow your hand to float along with your thumb to access all of the strings.Practice the following exercises slowly on muted open strings. Pluck the strings using steady downwardstrokes with your thumb (T). Stay relaxed and concentrate on control, evenness of tone, and keeping asteady pulse. This technique will take some time and regular practice to develop enough dexterity to makeit useful. Take your time and don’t get frustrated.Ex. 1.1Ex. 1.2Ex. 1.3Ex. 1.45
Ex. 1.5Ex. 1.6Ex. 1.7Ex. 1.8Ex. 1.9Ex. 1.10Ex. 1.11Ex. 1.126 Bass Technique 2
Unit 1 - Chapter 1Now practice the same exercises, this time using open strings.Ex. 1.13Ex. 1.14Ex. 1.15Ex. 1.16Ex. 1.17Ex. 1.18Ex. 1.197
Ex. 1.20Ex. 1.21Ex. 1.22Ex. 1.23Ex. 1.248 Bass Technique 2
Unit 1 - Chapter 2The next exercises are examples of bass lines in different styles that work well with this technique. Play theexamples with your fingers first, and then use the thumb and palm mute technique to hear how thecharacter of each line changes. Playing each line with the proper feel will enhance the effect.Ex. 1.25a, Blues:Ex. 1.25b, R&B:Ex. 1.25c, Latin:Ex. 1.25d, Reggae:Ex. 1.25eA more advanced version of the thumb and palmmute technique adds the index finger to alternatewith the thumb (Ex. 1.25e). This can be very usefulfor playing cross-string patterns and faster passages.Play the following exercises by alternating betweendownstrokes with your thumb (T) and upstrokeswith your index finger (I).9
Practice these exercises with both muted and open tones, then go back and practice exercises 1.1 through1.24 using this technique.Ex. 1.26Ex. 1.27Here are some simple bass lines to play using alternating thumb and index finger.Ex. 1.28Ex. 1.29Ex. 1.3010 Bass Technique 2
Unit 1 - Chapter 2Chapter 2: Melodic DevelopmentIt is important for bass players to understand and develop melodic phrasing. While the role of bass playersis predominantly to provide a harmonic and rhythmic foundation and be supportive, there will be occasionswhere we can step to the forefront and provide a more melodic role. In addition, developing melodic ideasand phrasing will help you create more interesting bass lines and increase your fluency on the instrument.Melodic phrasing is taking a succession of notes and forming them to create a distinctive sequence, i.e. amelodic phrase. To that end, we begin developing melodic phrasing by practicing scales and varying themrhythmically.These first exercises utilize one- and two-octave E major scales, combining quarter-note and eighthnote rhythms.Ex. 1.31Ex. 1.32aEx. 1.32bThe next exercises, in the keys of A and F major, combine quarter-note and eighth-note rhythms along withties between certain notes. A tie is a curved linethat is placed either above or below two notes toconnect them rhythmically (i.e. the value/length of the note is extended through the second note). In theseexercises the ties add rhythmic displacement and syncopation to the phrases.Ex. 1.3311
1. Slap Bass: Neck-Hand Slapping 48 2. Fretboard 51 Unit 7 1. Slap Bass: Single-String Thumb and Pop 55 2. Natural Minor Diatonic Triads 59 3. Fretboard 63 Unit 8 1. Slap Bass 66 2. Diatonic Seventh Chords 68 3. Chord Inversions 72 Unit 9 1. Slap Bass: Mathematical Phrasing 77 2. Diatonic Minor Seventh Chords 79 3. The Melodic Minor Scale 83 Unit 10 1. Slap Bass: Rhythmic Displacement 84