Transcription
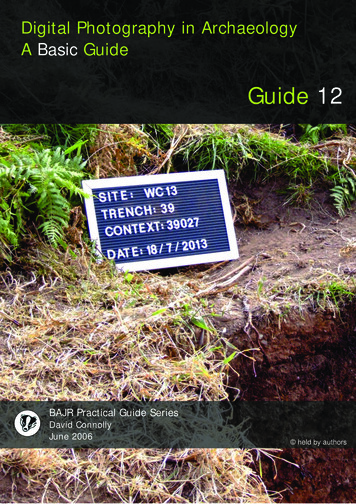
Digital Photography in ArchaeologyA Basic GuideGuide 12BAJR Practical Guide SeriesDavid ConnollyJune 2006 held by authors
BAJR Guide – Short Guide to Digital Photography in ArchaeologyIntroductionMany of us now use Digital Cameras in place of 35mm and are expected tobe able to use them, relying on the automatic setting to get the photograph weneed. However certain conditions require more than just point and click. Thisshort guide is to give a rough guide to 6 conditions where manual settings aremore appropriate and will help you understand more about how to takephotographs in general.The 6 settings we will discuss are:1.2.3.4.5.6.Landscape and “general shots”Keeping the feature in FocusIn the darkUsing FlashMaintain the colourClose-up finds shotsThis is not a comprehensive guide to site photography, but is intended toallow anyone to take decent photographs with the minimum of knowledge. Itshould also been seen as a starter for those who want to take it further, as likeanything, a grasp of the theory allows more comprehension of the ‘why’ and‘how’ that is never available in the age of automatic settings and softwarefixes.- BAJR Guide -2
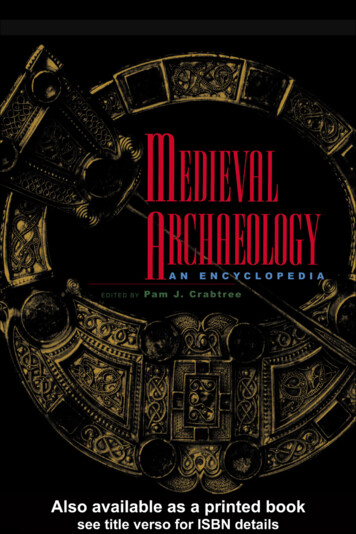
BAJR Guide – Short Guide to Digital Photography in Archaeology1 - Landscapes and General Shots.Often you are required to take general shots of either the site or trench or thesurrounding landscape. It sounds easy and an automatic setting should takecare of most situations. But many shots have subjects that are both near andfar from the camera – the trick is to have it all in focus. Too often either thebackground or foreground are slightly blurred. To sort this you will have toincrease your depth of field.To adjust depth of field you will have to be in Aperture Priority mode. This isset by turning the dial to A or in the case of Canon models AV.Now you can change the f-number, often by scrolling a dial or using up/downbuttons. You should be able to see the f-number change on the screen.A large f-number i.e f16 creates a large depth of field where subjects both1-This shot has both the foreground subject and the background in sharp focus- BAJR Guide -3
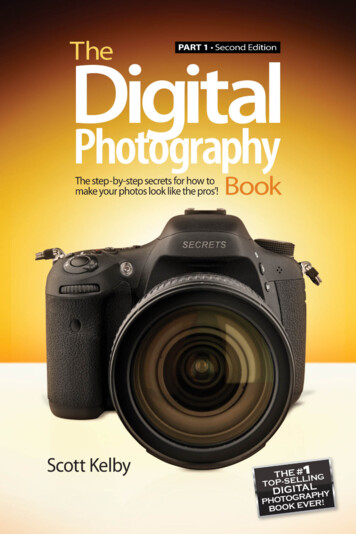
BAJR Guide – Short Guide to Digital Photography in Archaeologynear and far will be in focus. Choose thelargest available which will be anything over f8or even up to f16. (or f32 if your camera hassuch a setting)You can also get a wide depth of field byzooming out to the widest angle your cameracan go and then add to that a high f-numberwill ensure a maximum range in focus.NOTE :Large f-numbers close thehole in the lens, letting inLESS light.The cameramust then compensate bytaking a longer exposure,which can in turn increasethe risk of camera shake.The higher the f-number thesteadier you must hold thecamera. Tripods are cheaplight and useful in manysituations.2 - Keeping the feature in focus.How often do you take a photograph of a feature but end up with a shot thatmakes it difficult to work out what the centre of attention of the photograph issupposed to be? This is where we can steal a trick from portrait photography.The process is in essence the opposite ofTIP :the previous technique. You want to haveThe closer you go to the subject, the specific subject of your photograph tothe less Depth of Field you will be in clear focus while superfluousget and the further away, the background is out of focus to dramaticallymore Depth of Field will be highlight the subject.obtained.To adjust the depth of field you will once again set the camera dial to A or AV(Canon) Now you can change the f-number, often by scrolling a dial or usingup/down buttons. You should be able to see the f-number change on thescreen.Different cameras often have different available f-numbers, the rule is thesame. Small numbers i.e. f2.8 create a short depth of field where only themain subject is in focus. So to ensure the feature (whether that is a cut or anarchitectural element) is in sharp contrast to the background, choose an fnumber such as f2.8 – f5.6. If you have a ‘portrait mode’ you could also try tosee if it gives the results you need.You can also reduce the depth of field by zooming in on the feature (only everuse the optical zoom – do not use digital zoom!) and then standingbackwards (sounds daft zoom in and then step back. but the results areworth it) Or, move closer!- BAJR Guide -4
BAJR Guide – Short Guide to Digital Photography in Archaeology2 - The merkat-cross head is in focus and the background is slightly out of focus, whichhighlights the subject.- BAJR Guide -5
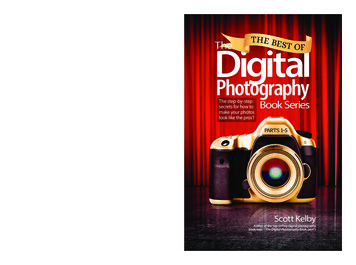
BAJR Guide – Short Guide to Digital Photography in ArchaeologyIn the dark.Poor light can often ruin most photographs, and you may find yourself insituations where poor light is your worst enemy. Either inside a building, atomb chamber, or even in a deep (and of course shored) trench. So how toachieve the best results? There are several professional ways to achieve it,but for this guide here is the simple solution.TIP :Digital cameras often autofocus onwhatever it is pointed at, so if the featureyou want to highlight is off centre there isa way to ensure that the focus remainson it. Centre on the feature and halfdepress the shutter button, and you willhear the camera focus.Now whileremaining half depressed, move andrecompose the shot, before finally fullydepressing the button and taking thephotograph.For best results, set your camerato Manual mode, which isnormally done by rotating the dialto M on the camera. Now you areable to alter and set the f-numberand the shutter speed.To let in the maximum amount oflight you should select thesmallest f-number available (f2.8– f5.6) and then choose a lowshutter speed. This setting willvery much depend on theconditions and you may have to take several pictures to achieve the desiredresult. (one of the beauties of Digital Photography)3 - This highlights the two problems of low lighting and light glare, with automaticsettings unable to cope with the situation.- BAJR Guide -6
BAJR Guide – Short Guide to Digital Photography in Archaeology.Try 2.5 seconds to start and thenstep up or down the shutterspeed to find the best –experiment and find what works,you can afford to take the photosand also you will soon know justthe right setting for the situationwithout thinking.TIP :If your camera has no fully manualmode, you can get a similar result by justswitching the flash off in Automaticmode. This will force the camera to alonger exposure than the 1/60th of asecond that is normal for flash shots.Remember you are looking for exposureover 1 second.Cameras indicate seconds by the ” symbol, so 4” is four seconds (you will seethe same usage in survey - 340 14’ 45” is 340 degrees 14 minutes and 45 seconds) .It is impossible to hold a camera still for this length of time so a tripod isessential, however you can make a stable platform out of many other items.A set of level legs or a bucket with a scarf or gloves used to balance thecamera will do just as well. Ensure you do not have the strap in the way andalso that none of the bucket or gloves get in the shot.Unless you are completely in the dark, and can light the scene with a handheld flash – turn OFF the flash. Cycle through your flash options until youhave a symbol that shows a lightning flash with a line through it – this ensuresthat the flash will not operate.If you are having difficulty in auto focusing you will have to set the camera toManual Focus. (you may have to read the instructions to see where to dothis, but often it is a switch between AF (Auto Focus) and MF (Manual Focus)and then set it to infinity ( I ) or measure the distance and set it to therelevant distance. (if your lens has manual settings marked on the barrel. A lotof modern lenses don’t have them which is a pain)To ensure you do not shake the camera when you press the shutter button,put it on self-timer, with cameras often having a short and long timer – whichcan also give you enough time to ‘escape’ from the shot as well. Or use aninfra-red remote control unit, if available- BAJR Guide -7
BAJR Guide – Short Guide to Digital Photography in ArchaeologyUsing flash.When to use flash and when not to can often confuse people. You have seenin the above examples the way to force settings by turning off the flash, butwhat about when you should use a flash?4 – A flash exposure of 1/60th illuminates the wall, but does not stop overexposurefrom the daylight.If you have a lot of brightness in the background (a very sunny day or backlitscene you can often end up with the camera influenced by the brightness inthe background and the foreground features are underexposed.To ensure the feature is also visible you must force the flash to operate (whichdoes sound strange if you are taking a photograph on a sunny day) To dothis (you may have to check your manual) but alter the setting so that thelightning icon is visible on the screen. The flash will now go off regardless ofthe conditions.TIP :A normal flash has a range of only a fewmetres, but will still add much neededlight to a foreground subject, even on asunny day.- BAJR Guide -8
BAJR Guide – Short Guide to Digital Photography in ArchaeologyNow that the flash will take care of the foreground it is time to optimise thebackground.During the day it should be possible for the auto mode toachieve the correct results, but you may still want to adjust the exposuresetting (see Maintaining the Colour) and the same is true if you arephotographing in a dark room with light coming in from windows or doors.This technique is useful to ensure that the lighting of your photograph isconsistent, and is known as Flash Fill.5 – A near perfect flash fill, both the wall and exterior are balanced for exposure. Thecamera was set on a tripod on a 1/250th second exposure (for the background) and aforced flash fill on the foreground) Note also the reuse of the technique seen insection 2 – where the foreground (the subject) is in focus, while the background isslightly out of focus! - Sorry about the car though sometimes you have to take your time andwait for the right moment. Even if it takes hours!- BAJR Guide -9
BAJR Guide – Short Guide to Digital Photography in ArchaeologyMaintain the colourPhotos can often end up looking washed out and the automatic mode willjudge the colours of a scene incorrectly thus over exposing it. What we will tryto do here is force the camera to underexpose.TIP :Whenever you change your settingsmanually, always remember to returnthem to default values. Turn flash backon, reset manual focus to automaticetc.If you forget to set the EV back to zero,all your photos will be either too dark orwashed out.Virtually every camera has the ability tounder or overexpose.This is calledexposure compensation and is indicatedby a square icon with a in the top cornerand a – in the lower corner. /-. Pressingthis button will normally bring up a scalerunning from -2 to 2 EV, and using eithera dial or buttons you can choose thesetting you want.A setting of -1 will halve the exposure (making it darker) a setting of 1 willdouble the exposure (making it brighter). Experiment on the same subject tosee the effect.This is one of the few techniques that can be replicated using photo softwareon your PC. Most washed out photographs can be ‘corrected’ by utilisingimage editing software to increase the contrast and the colour saturationwhilst reducing the brightness.6 – Washed out, sun blurred, foreground too dark – yes .that’s the automatic mode.- BAJR Guide -10
BAJR Guide – Short Guide to Digital Photography in Archaeology7 – Compensating for the sky is not going to help, neither is a flash fill for theforeground 8 – I would say that’s just about perfect. The colour is good, both the sky and thechurch are sharp and with the correct exposure, the foreground is pretty good too.Add a decent framing of the subject and it is clear, focused and properly exposed.- BAJR Guide -11
BAJR Guide – Short Guide to Digital Photography in ArchaeologyClose-up and finds shots.Most digital cameras can take amazing close-up shots and details, howeveryou must tell your camera what you are doing or it will end up with out offocus shots.To prepare your camera you must enable Macro mode (some cameras alsohave a super macro for incredible detail). This is normally achieved bymoving a dial or pressing a button with the icon of a flower (or a flower andmagnifying glass for super macro)Now all you have to do is get close to the subject a photograph it. Once againalthough not essential I would recommend a tripod and use a short self-timerto ensure no camera shake.Take at least two photographs, one with and one without acentimetre/millimeter and chroma scale. (see appendix)Keep thebackground neutral, such as beige or light blue and ensure an even light,whether this is achieved by using sunlight – or you can also use a daylightlamp (a SAD lamp is perfect), which provides a bright but even light.9 – Nice arrowhead, but useless photograph.- BAJR Guide -12
BAJR Guide – Short Guide to Digital Photography in Archaeology10 – Everything nice and sharp, a good scale – though the background could bebetter, though the neutral tone is good. You could cut yourself on this photo it is sosharp.- BAJR Guide -13
BAJR Guide – Short Guide to Digital Photography in ArchaeologyClose-up finds shots – A homemade solutionAs digital cameras can take amazing closeups why not enhance your shots with thishomemade diffuser set-up which costs onlya couple of quid and a ½ hour to make.The only thing you need is a half decentdigital -camera with a good macro ability.Now buy yourself a large funnel, (preferablywhite and semi-transparent) then after youhave measured the width of your lens cut offthespoutsothenarrowend of the funnel is a little larger than yourlens (see photo on right).Now cut the new funnel length (from the wide end) to that of your camera’smacro distance (it is critical you get this correct).WARNING :ensure that your lens does not foul thefunnel when you power up, You willseriously damage your camera Now you have a stable camera keeper complete with built in macrospacer, a built in light diffuser and a stand to keep your camera square to thesubject.This now gives us the ability to takephotographs using long exposures and sosmall f-stops (especially useful whentaking photographs of three-dimensionalartefacts).Always try to use daylight, avoiding flashwherever possible.If you have a badly worn coin try using anordinary hand torch (diffused), keeping itlow down to apply a low raking light acrossthe coin (this is best done in darkerconditions).Try using backgrounds that are marginally different (blues/greens) from thesubject, which will not confuse the camera’s auto exposure system. (If you arenot brave enough for fully manual)You can post process your image through a software program, to add a littlemore contrast/brightness where necessary.- BAJR Guide -14
BAJR Guide – Short Guide to Digital Photography in ArchaeologySummaryThis should now equip you with a basic knowledge to deal with varioussituations. But this is only the beginning and books and guides are availableto help you take it further if you want. One useful side of Digital Photographyis being able to see the results of your settings immediately. This can also betranslated into helping to take perfect 35mm photographs.Once you have achieved the photograph you want with the digital camera, it iseasy to then set your 35mm camera to the same settings that were successfulon the Digital Camera. The more you understand how different settingsaffect the final image, then you will be able to experiment and take betterpictures in general.Many people are put off by f stops, apertures, exposures and the like. Butonce you use them in different combinations you are well on the way, nolonger a happy snapper but a photographer.BooksConlon, V MCamera Techniques in ArchaeologyDorrell, P.'Photography in Archaeology and Conservation' (2nd edition,Cambridge University Press, 1994)Grey,TimColor Confidence: The Digital Photographer's Guide to ColorManagementHarp, ElmerPhotography in archaeological researchHowell, Carol L.APracticalGuidetoArchaeological(Archaeological Research Tools)Schlitz, M. 2005'Archaeological Photography' in The Focal Encyclopaedia ofPhotography, Fourth Edition, Elsevier Inc. MassachusettsPhotographySimmons, Harold C. Archaeological PhotographySitesAdvice on all digital imaging issues.http://www.tasi.ac.uk/index.htmlarchaeology and photography - Michael elShanks/943Dave Webb’s gallery of et.html- BAJR Guide -15
BAJR Guide – Short Guide to Digital Photography in ArchaeologyScalesPhoto Scales & Scene Marking .shtmlBAJR recommends Dave's Photographic Scales.Photographic scales for use in Archaeological Excavations, ArtefactRecording and Museum Display Work.The scales range in size from 500mm down to 10mm.A set of Round or Flat Red & White Scales marked off in100mm sections in the following sizes: 500mm, 400mm,300mm & 200mm.A set of Black & White 10mm width scales marked off inmillimetres in 12 different 25mm,20mm,15mm & 10mm.A set of Black & White 10mmwidth scales marked off in alternate 10mm black& white squares in the following sizes: 250mm,200mm,150mm,& 50mm.A set of Black & White 20mm width scales markedoff in sections of 50mmalternate 10mm black & white solid squares withalternate 50mm solid whitesections in the following sizes:250mm,200mm,150mm,100mm & 50mm.All the above Black & White scales are Silk Screen Printed and can beobtained in either 1mm or 3mm thickness.A set of Black & White North Directional Arrows consisting of2 sizes:40mm wide X 250mm length, & 20mm wide X 200mmlength.For all prices and any further information please ring 01903 718820 ore-mail; davecudmore@talktalk.netAnd mention BAJR- BAJR Guide -
BAJR Guide – Short Guide to Digital Photography in Archaeology - BAJR Guide - 4 near and far will be in focus. Choose the largest available which will be anything over f8 or even up to f16. (or f32 if your camera has such a setting) You can also get a wide depth