Transcription
forUPDATED ON 09/2020USAID SHOOTING GUIDE FOR PARTNERSPHOTO GUIDEUSAID PARTNERS
USAID SHOOTING GUIDE FOR PARTNERSGENERAL TIPS FOR CAPTURING VISUAL CONTENTPLAN AHEAD.Partners are encouraged to hire a professional photographer. Make sure to consult with USAIDDevelopment Outreach and Communications Specialists (DOCs) early about what they would likephotographed or filmed. Think about what visuals will help meet USAID’s communications objectives.Plan on visiting the site in the morning and in the afternoon to see how the sunlight enhances the photo.Arrive at a site a few minutes early to walk through where you might stand to take your photos and findunique vantage points (can you take a photo from a window on the second floor?).BRING CONSENT FORMS.Consent forms are usually provided by the mission or embassy and should be in the local language.This consent form can be used as a starting point but it needs to be translated and approved by therelevant mission/embassy.CRAFT STATEMENT OF WORK.It is important to capture photo credit details in the Statement of Work (SOW) with the hiredphotographer. The SOW should note if any photos are owned by USG (and therefore open for publicuse if on USG publications) and if not, the photographer would need to give permission for photos usedoutside of the project.GET CLOSER.Don’t be afraid to move nearer to your subjects when appropriate.GENERAL TIPS FOR CAPTURING VISUAL CONTENT2 18
USAID SHOOTING GUIDE FOR PARTNERSGENERAL TIPS FOR CAPTURING VISUAL CONTENTBE PATIENT.If you really like the way you’ve framed a photo, wait for the action to come to you (subject to walk intothe frame, etc.).TAKE MORE PHOTOS.The more photos you take, the more comfortable you’ll be behind the camera. Professionals don’t justtake lots of photos to take photos, they do this because they know that it takes a lot of good photos toget a great moment.KEEP YOUR CAMERA OUT AND KEEP THINKING ABOUT PHOTOS ATUNEXPECTED MOMENTS.Sometimes the best frames are captured when you least expect them to happen.CAPTURE ACTION SHOTS.Get photos of people doing something, rather than just standing around. Instead of getting a group shot,capture people greeting each other. Find a moment when people are interacting with each other andtheir environment.FUNDAMENTALS OF SHOOTINGThere are many elements to ensure that you get a good photo. When going out to a shoot, you mustremember the fundamentals to every photo: Exposure Focus Composition.GENERAL TIPS FOR CAPTURING VISUAL CONTENT3 18
USAID SHOOTING GUIDE FOR PARTNERSCAMERA EXPOSURE BASICSAPERTURE This is generally the first adjustment you can make to help achieve correct exposure. This is the eye of your camera. Aperture determines how much light is allowed to pass throughyour lens. A smaller f-stop number (f/1.4) will let more light in than a larger f-stop number (f/8). A small f-stop (1.4) more shallow depth of field vs larger f-stop wider depth of field. Depth of field (DOF) is the amount of focus room you have in front and behind your subject in ascene. So a smaller DOF would mean you have less room for your subject to move and still be infocus.SHUTTER SPEED How quickly your camera captures a scene. Your shutter speed will be determined by the speed of the action happening and how much lightyour camera needs. The longer your shutter stays open, the more light your camera lets in. 1/60 — Minimum shutter speed for handheld images As the numbers increase, (1/500) less light enters the camera and therefore you have a darker shot. Low shutter speeds (1/20 or 1/5 or over 1 second) can create motion blur of subjects movingthrough frame. Used to create artistic look or put focus on subject. A slow shutter speed would not be best for sports or fast moving action. A fast shutter speed,(1/2500) would not be best for helicopters in flight (catches the rotors still and seems awkward).CAMERA EXPOSURE BASICS4 18
USAID SHOOTING GUIDE FOR PARTNERSCAMERA EXPOSURE BASICSISO A measurement of how sensitive your camera sensor is to light. ISO 100-400 daytime photographs ISO 800-1600 evening or indoor photographs Higher apertures create more noise of grain in your image Usually a last option to change. Set it on an average setting around 600-800, adjust aperture andshutter speed. If those do not get the desired exposure, then change your ISO.CAMERA EXPOSURE BASICS5 18
USAID SHOOTING GUIDE FOR PARTNERSFOCUS AND COMPOSITIONFOCUS Manual Focus Preferred method to ensure you get the best focus. Tip: zoom in until you have a close up of someone’s eyes. Our brains subconsciously focus onpeople’s eyes, so they need to be sharp. Adjust until their eyes appear clear and sharp. Once theireyes are in focus, zoom back out to get your shot. Auto Focus Use when you think you cannot follow action fast enough and focus at the same time. The drawback of auto focus is that you are relying on the camera to make sure the focus is correct.COMPOSITION Know the rule of thirds. Science says that people like compositions that follow a grid that places asubject(s) at the intersection of these lines. Pay attention to your background. Move around (back orforward, lower or higher) to eliminate distracting elements like a pole in the middle of someone’s heador a glaring light, etc. Position the camera lens at the same level of the eye of the photo subject, or a bit lower.This means you often need to sit or kneel to get a good angle. Depth: Add interest to your image by layering elementsin ways that move a viewer through the frame.Foreground and background elements can be placed inways to add context and help someone understandwhat is going on.FOCUS AND COMPOSITION6 18
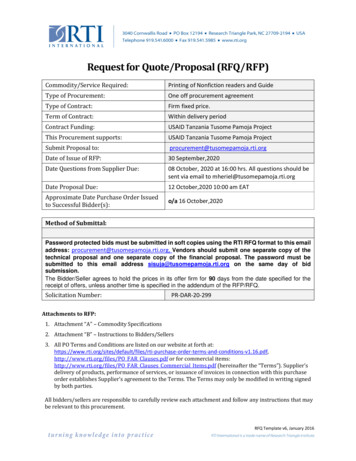
USAID SHOOTING GUIDE FOR PARTNERSVISUAL STORYTELLINGTelling a good visual story involves taking photos of people from a variety of anglesand in different locations, as well as capturing special moments that evoke emotion.If possible, avoid photographing events, conferences, and workshops, which are less visually interesting.Here’s our cheat sheet of the different shots you should capture on a shoot:1) WIDE ENVIRONMENTAL VIEW Wide view showing the entire scene to give context Could be shot with a drone, or from the top of a hill/mountain Helps answer the question ‘Where are we?’VISUAL STORYTELLING7 18
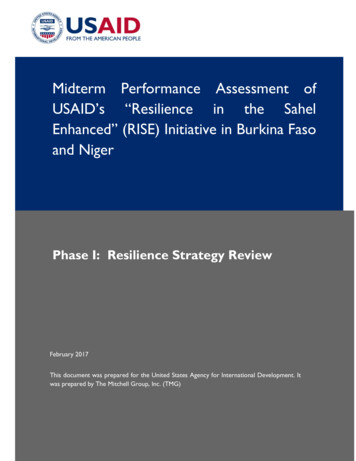
USAID SHOOTING GUIDE FOR PARTNERSVISUAL STORYTELLING2) MEDIUM PORTRAITS OF HERO Frame to focus on the expression of the hero (typically, the hero is a USAID beneficiary). Isolate a scene to help a viewer focus on a moment. Try different angles to capture different expressions of the hero.VISUAL STORYTELLING8 18
USAID SHOOTING GUIDE FOR PARTNERSVISUAL STORYTELLING3) FULL PORTRAITS OF SUBJECTS Both Portrait / Landscape orientation. Try moving slightly to the left or the right of the subject. Play with the light to see which is the best angle to shoot the photo. Consider including posed portrait of the whole family.VISUAL STORYTELLING9 18
USAID SHOOTING GUIDE FOR PARTNERSVISUAL STORYTELLING4) ENVIRONMENTAL PORTRAITS of OTHER CHARACTERS Capture what other people around the main subject are doingVISUAL STORYTELLING10 18
USAID SHOOTING GUIDE FOR PARTNERSVISUAL STORYTELLING5) CANDID MOMENTS Look for moments that show personality and emotion. If something makes you laugh, cry orrespond, it will probably resonate with someone else. Document it!VISUAL STORYTELLING11 18
USAID SHOOTING GUIDE FOR PARTNERSVISUAL STORYTELLING6) DETAIL SHOTS Capture what a person is doing with their hands (i.e., inspecting vanilla beans), often with shallowdepth of field.VISUAL STORYTELLING12 18
USAID SHOOTING GUIDE FOR PARTNERSVISUAL STORYTELLING7) ARTISTIC MOMENTS Look for shadows or reflections - in puddles of water, or mirrors - to form unique compositions.VISUAL STORYTELLING13 18
USAID SHOOTING GUIDE FOR PARTNERSVISUAL STORYTELLING8) ACTION PORTRAITS Photograph the person getting ready, eating with family, traveling to work, etc. Capture movement (e.g., subject sifting rice, cutting vanilla beans) Need higher shutter speed to ‘freeze’ motion without blurringVISUAL STORYTELLING14 18
USAID SHOOTING GUIDE FOR PARTNERSVISUAL STORYTELLING9) USAID BRANDING Look for scenes with USAID branding (preferably unstaged)VISUAL STORYTELLING15 18
USAID SHOOTING GUIDE FOR PARTNERSVISUAL STORYTELLING10) LIGHT Photograph from the angles that illuminate your subjects. Also try to schedule field visits during earlymorning to capture sunrise and late afternoon to capture sunset. Use sidelight if you can, for example, from an open door. Watch out for strong backlight. Move around to avoid it, and if necessary, force the flash. Use flash outdoors under trees/in shadows to give greater clarity to faces. Do not fire the flash against mirrors or windows. Change your angle in order to bounce the flash.VISUAL STORYTELLING16 18
USAID SHOOTING GUIDE FOR PARTNERSAFTER THE SHOOTIt’s important to get your photos from the field to Washington, D.C. as quickly as possible. This allows usto get images edited and incorporated into our online social media and communications channels. Even ifyou have a well-written narrative, a photo can pull a viewer into your story faster and make them curiousto learn more.TIPS: Transfer photos from your camera or phone every night. This provides peace of mindshould something happen later in the trip (camera stolen, card is ruined, etc.). Create a folder on Google Drive where you can easily upload and share photos. Include captions and photo credits, for every image, no matter how repetitive. With captions, our team can figure out who is in the scene, where you were, what was happeningand how the images fit into your story.AFTER THE SHOOT EMBED CAPTIONS AND PHOTO CREDITS IN METADATA: Right-click the photo, select View details, scroll to Add a description and then click on the pencil toEdit description, add the caption, press Enter Key to save. PHOTO CREDIT EXAMPLE Photo by Morgana Wingard for USAID [If USAID hired photographer] Photo by Bob Smith, USAID [If USAID employee] Photo by Jane Doe, CARE [If USAID partner] PHOTO CAPTION EXAMPLE GURADHERA, ETHIOPIA - FEBRUARY 8, 2014: Ethiopian pastoralist Dhaki Wako’s 7-year-oldson Liban drinks his daily breakfast milk straight from the cow as part of the family’s morningroutine. The USAID-supported resilience program connected Dhaki with a more reliablemarket to sell her milk in. This has increased her revenue and given the family financial securityin case of drought or market shock. Across the country’s disaster-prone drylands, USAID ishelping pastoralists mitigate and recover from environmental stresses.17 18
USAID SHOOTING GUIDE FOR PARTNERSFINAL SUGGESTIONS We are always looking to identify and share evocative and personal stories including examplesof individuals whose lives have been saved, greatly impacted, or individuals who are helping save liveswith USAID and/or with partner assistance. When sharing stories, it is always helpful toinclude the following: Provide stories that answer the five W’s: Who, What, When, Where and Why Succinctly describe the story with a headline Include a short paragraph that outlines the problem, USAID’s and partner response, and one to twofollow-up sentences that depict the real impact on people If available, include details that personalize the story, such as names, ages, quotes, locations, and photos Share links to supporting photos, write-ups or social media posts (when applicable) Provide an estimated start date of activity/action Include contact information for follow up questionsAFTER THE SHOOT18 18
USAID SHOOTING GUIDE FOR PARTNERS VISUAL STORYTELLING 7 18. VISUAL STORYTELLING 2) MEDIUM PORTRAITS OF HERO Frame to focus on the expression of the hero (typically,