Transcription
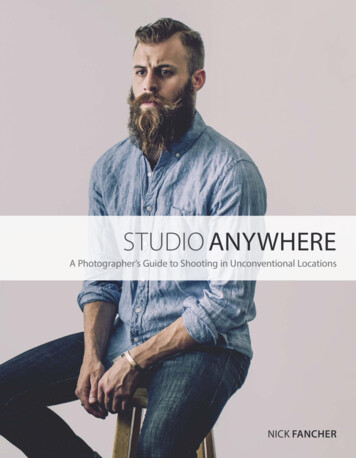
STUDIO ANYWHEREA Photographer’s Guide to Shooting in Unconventional LocationsNICK FANCHER
STUDIO ANYWHEREA Photographer’s Guide to Shooting in Unconventional LocationsNICK FANCHERPEACHPIT PRESS
STUDIO ANYWHERE: A PHOTOGRAPHER’S GUIDE TO SHOOTING IN UNCONVENTIONAL LOCATIONSNick FancherPEACHPIT PRESSwww.peachpit.comTo report errors, please send a note to errata@peachpit.comPeachpit Press is a division of Pearson Education.Copyright 2015 by Shutter-Think Photography, LLCAcquisitions Editor: Ted WaittProject Editor: Valerie WitteSenior Production Editor: Lisa BraziealDevelopment and Copy Editor: Linda LaflammeProofreader: Patricia J. PaneComposition: WolfsonDesignIndexer: James MinkinCover Image: Nick FancherCover Design: Aren StraigerInterior Design: Mimi HeftNOTICE OF RIGHTSAll rights reserved. No part of this book may be reproduced or transmitted in any form by any means, electronic,mechanical, photocopying, recording, or otherwise, without the prior written permission of the publisher. Forinformation on getting permission for reprints and excerpts, contact permissions@peachpit.com.NOTICE OF LIABILITYThe information in this book is distributed on an “As Is” basis, without warranty. While every precaution hasbeen taken in the preparation of the book, neither the author nor Peachpit shall have any liability to any personor entity with respect to any loss, damage, or injury caused or alleged to be caused directly or indirectly by theinstructions contained in this book or by the computer software and hardware products described in it.This book is intended for educational purposes only and is not intended to be, nor should it be construed as,legal advice. The law, particularly copyright law, is notoriously fact specific, and no book, including this one,can substitute for expert guidance from qualified legal counsel. To obtain guidance relevant to your particularcircumstances you should speak with a qualified, competent lawyer properly licensed in your jurisdiction.Consult your local bar association for guidance on finding such a lawyer in your area.The views and opinions expressed in this book are those of the author alone and are not purported to be thoseof any employer, client, or affiliated entity, past or present.TRADEMARKSMany of the designations used by manufacturers and sellers to distinguish their products are claimed astrademarks. Where those designations appear in this book, and Peachpit was aware of a trademark claim, thedesignations appear as requested by the owner of the trademark. All other product names and services identifiedthroughout this book are used in editorial fashion only and for the benefit of such companies with no intentionof infringement of the trademark. No such use, or the use of any trade name, is intended to convey endorsementor other affiliation with this book.ISBN-13: 978-0-134-08417-6ISBN-10: 0-134-08417-9987654321Printed and bound in the United States of America
This book is dedicated to anyone starting with nothing. Let no one tell you that you can’tcreate your own path or that you need to follow a certain formula to achieve success.Rules are constantly being broken, rewritten, and broken again. Enjoy your journey.ACKNOWLEDGMENTSI want to thank the team at Peachpit Press, who made this book a reality. Specifically,I’d like to thank Ted Waitt for giving me a chance and sticking with me as the ideaof Studio Anywhere evolved. Thank you to Valerie Witte, who seamlessly took overthe project from Ted. Thanks to Linda Laflamme, my patient and thorough editor; tothe fabulous production team of Lisa Brazieal, Mimi Heft, and WolfsonDesign, whoperfectly married the images, diagrams, and text to the page; and to Patricia J. Pane,my proofreader.A big thank you to Linda Ringler and Rick Kocks, my high school photographyteachers, who gave me total creative freedom and taught me more about photographyand alternative processes than any of my college professors. You truly are unsungheroes, and I will never forget the passion and knowledge that you instilled in myclassmates and me.I’d also like to thank my family and friends who are nothing if not supportive andencouraging. I am very fortunate.Finally, I’d like to thank my wife, Beth, for her faith in me and support over the years.You are a wonderful mother to Jack and Margot and wise beyond your years. You helpkeep me humbled without crushing my spirit.
CONTENTSIntroductionPART I THE LIVING ROOM STUDIO 1White Light, White Wallviii12Edit for Effect. 4Check Your Work. 7Lit Background. 9 2It’s the Mood That Makes It Good11Aesthetic Decisions. 12Finishing Touches in Post. 13Once More, With Feeling. 16 3Window Light20Subject Direction. 21Rugged Sophistication. 22 4Using Existing Environments25Aesthetic Decisions . 26Editing. 29Quiz 1: Deconstruct the Lighting. 35PART II THE BACKYARD STUDIO 5Head Shots3738Soft Light. 39Directional Light. 42iv STUDIO ANYWHERE: A PHOTOGRAPHER’S GUIDE TO SHOOTING IN UNCONVENTIONAL LOCATIONS
6When It’s Good to Be Shallow44Legendary Pink Dots. 44Alley Cat. 48 7In the Garage52Directional Light. 56 8Kiddie Pools. Who’d a Thunk It?57Blackout. 58Applying the Experiment. 61 9Shooting Product64Quiz 2: Deconstruct the Lighting. 69PART III THE BASEMENT STUDIO 10Soft Light7172On White. 73On Gray. 77 11Moody Light79The First Rule of Moody Lighting . 79Black on Black on Black. 84Are You Gellin’?. 88 12Creative Backdrops92No Paris? No Problem. 92Channeling the ’80s . 96Pegboard Pinlight.104 13Shooting Product106Lighting a Product with a Reflective Surface. 106Shooting a Product on a Reflective Surface. 111Re-creating Window Light. 115Quiz 3: Deconstruct the Lighting. 117CONTENTS v
PART IV THE OFFICE STUDIO 14Portraits on White119120Travel Light.120It’s the Wood That Makes It Good.124 15Environmental Portraits128Getting the Drop on Narrow Spaces.128Curtain Call. 133 16Shooting Product136Time to Reflect.138Put ’em on the Glass. 142Quiz 4: Deconstruct the Lighting. 145PART V THE PARK STUDIO 17Still Waters Don’t Need to Run Deep147148After the Rain.148Bridge Over Dappled Waters. 152 18Transform the Weather160Gettin’ Shifty with It.160Fake It ’Til You Make It.164 19Eclipse the Sun166A Gun at a Knife Fight. 166Quiz 5: Deconstruct the Lighting. 171vi STUDIO ANYWHERE: A PHOTOGRAPHER’S GUIDE TO SHOOTING IN UNCONVENTIONAL LOCATIONS
PART VI THE STREET STUDIO 20On the Beaten Path173174Dancer in the Dark. 175Homage to Street. 179 21Get on Up182Up on the Roof. 182Welcome to the Thunderdome. 186 22Concrete Jungle191Creating a Story. 191One Wall, Two Looks. 195 23Parking Garages202A GQ View.204Always the Sun. 206Quiz 6: Deconstruct the Lighting.210EpilogueWhat’s Next?211Testing New Waters. 211Edit Yourself. 213Building Your SEO. 217Quiz Answer Key. 226Index232CONTENTS vii
1 INTRODUCTIONWhat’s your definition of a photo studio? Is it having a white seamless backdropor a cyc wall? Maybe it’s anyplace where you have total control of all light. Perhapsit’s a place where you can create dynamic product shots. In a perfect world, whereevery day is a breezy 72 degrees with partial cloud coverage, we would all have a5,000-square-foot studio in New York or Los Angeles. We’d also have the entirecatalog of B&H in our equipment lockups. But that isn’t reality.Reality is that you have an outdated DSLR with two decent lenses (which took youseveral years to save up for), and you managed to sneak out of your office job an hourearly to shoot an underpaying client in a public park on a gray, 45-degree rainy day.Or maybe all you have at your disposal is an unfinished basement. Or a garage. Orthe empty conference room at your office day job. That’s the point of Studio Anywhere:to show you how to achieve the shot of your dreams while working in some of themost problematic scenarios imaginable.NO STUDIO? NO PROBLEMOver the years, I’ve slowly discovered that a traditional photo studio isn’t necessaryto get studio-like results. If you are shooting a portrait of someone, for example, youneed only a few feet of blank wall (especially if it’s a cropped shot, such as a headshot). Recently, I was in New York City on a shoot, and I decided to take an extraday to do a few test shoots with models. Because I didn’t know the city well, nordid I have a permit to shoot on the street or the budget to rent a studio, I thoughtit would be easiest to just meet the models at their homes, shooting both in theirapartments and around their buildings. I liked the element of unpredictability. WhenI punched the addresses into my GPS, I didn’t know whether I was walking into apenthouse suite with an amazing view of the city (it happened) or an unpolishedart living space, occupied by seven artists in Williamsburg (also happened). I knewthat I had the tools to overcome any lighting issues, however, so I welcomed thechallenge and was excited to see what kind of scenarios I’d encounter.viii STUDIO ANYWHERE: A PHOTOGRAPHER’S GUIDE TO SHOOTING IN UNCONVENTIONAL LOCATIONS
The shoot that started it all. I took this shot at one of my first shoots in New York City and realizedthat I was better off meeting my subject at his place rather than renting a studio.This book is a diary of sorts, of my experiences in working without the use of atraditional photography studio. Whether shooting a corporate portrait, a test shootwith a model, a promo shoot with a band, or a wedding, I always seem to be onlocation—even back when I had a studio. Staring at those rent bills each month,I came to realize the time I did spend in that expensive space was spent sitting infront of my computer, editing, or meeting with clients, which could just as easilybe done at coffee shops. So, I ditched the traditional studio. Now when I need toshoot a portrait on a blank backdrop or I need a place to shoot production shots,I get creative, as you’ll see in the chapters ahead.My goal in writing this book is not to teach you how to replicate one of my photos.My goal is to get you to think outside the box, or studio, in our case. This book is aplace where I share the techniques, tips, and shortcuts that I’ve learned along theway. Remember the end of The Last Crusade, when Indiana Jones tossed the fistful ofdirt across the invisible bridge to make it visible? This book is my fistful of dirt.Introduction ix
I see this book as a resource where photographers can glean technical info frombehind-the-scenes photos and lighting diagrams from my photo shoots. However,I don’t stop there. Because picture taking is only half of the process, I also lay outwhat my Lightroom and Photoshop workflow looks like. Finally, I let you in on theaesthetic decisions I made; directing a photo shoot is more than simply knowinghow to wield a camera or process a raw file. This book takes a holistic view of thephotographic process, starting at conceptualization through the execution andpost-production to completion.TAKE CONTROL: GEARWhether you are working with a harsh, sunny day, a gray rainy day, a small hallwaywith a white drop ceiling, or a large, dark room with a black ceiling, you must beable to overcome less-than-ideal scenarios. Once the shoot is over, you need toknow how to take the raw images and polish them, using editing software suchas Lightroom and Photoshop. This means that you need to have the right gear toaccomplish these things, and you need to know how to properly use it. Thankfully,there’s far less gear required to accomplish this than you may think.My perspective has always been one of using what you have. If you are just startingout, you have nothing or next to it. I bought my first DSLR at Best Buy, back in 2005:a Canon 20D with a kit 18–55 f/3.5–5.6 lens and a 1GB memory card. It’s a joke of asetup now, but I made it work. I used that setup exclusively for three years, untilI could afford to get a Sigma 70–200 and a 430EX strobe. I still couldn’t afford adecent wide-angle lens or even triggers for my flash (this was before the marketwas saturated with cheap wireless triggers). Still, I used what I had. Occasionally,I would book a gig where I needed better gear, so I would rent the additional gearfrom a fellow photographer, billing the client for the expense.I often receive an email from someone asking me to recommend what gear a beginnerphotographer should purchase. My response is always the same: It depends. What’syour budget? 500? Save up your money. If you manage to book a paying gig andneed gear for it, use your 500 to rent the gear for the shoot and bill the client forthe expenses. You need at least 1,000 to get a halfway decent startup rig, in myopinion. Buy a used, full-frame sensor DSLR, if possible, such as a Canon 5D MarkI, and buy a decent lens, like a Canon 85 1.8. Your next goal should be to purchasea decent wide-angle lens, such as a Canon 35 1.4L or a nice zoom lens, like a 24–70x STUDIO ANYWHERE: A PHOTOGRAPHER’S GUIDE TO SHOOTING IN UNCONVENTIONAL LOCATIONS
f/2.8L. After you have a decent body and a couple of reliable lenses, you can start toconsider purchasing a flash setup. That may be odd to hear, since I am a strobe guy,but honestly, you can accomplish quite a bit with a reflector and some sunlight.I don’t have a ton of gear, but I have all the tools that I need to get the job done.Like David against Goliath, I forgo larger weapons and opt instead to use somethingsimpler with which I am familiar and accurate. Almost every piece of gear I owncan fit in my Pelican 1510 case, which at 22x14x9 inches can fit into most airplaneoverhead compartments (Figures I.1 and I.2).Figure I.1 My gear. It may not look like much, but I’ve got it where it counts.ABCEFGHDIPQTKJRMOLSNA Powerex AA batteries and backup batteriesH Butterfly clips for stylingB Backup battery and chargerI 1/8 to 1/4 sync adaptorP Rocket Blaster air blowerC Backup camera (Canon Rebel XS)J Sync cords and flash standsQ Polarizing filterD Memory cards (86GB)K LumoPro LP180sR Honl gridE Canon 70–200 F/4L ISL PocketWizard Plus X TransceiversS Tripod mountF SustenanceM Canon 35 F/1.4LT Variable ND filtersG Gel kitN Card readerO Canon 5DII
Figure I.2 Almost all of my gear fits in my Pelican 1510 case.As you can see, I have two good lenses: one wideprime and one long zoom. I have a full-frame,DSLR camera body and a cheaper backupDSLR. For lighting, I have three LumoPro LP180strobes, which are durable, manual flashes (noTip Although I prefer Powerexrechargeable batteries, I also keep abackup stash of disposable batteriesin my case. Better to have them andnot need them than the alternative.E-TTL). I also have two neutral-density filters(one for each lens size), a colored gel pack, a strobe grid, a polarizing filter, an airblower to remove sensor dust, and a ton of AA batteries. Besides what you see inthe case, I also have a couple 15-foot light stands, an umbrella, a 5-in-1 reflector,and a tripod that I rarely use.Whether you’re a seasoned pro or just beginning, as a photographer, one of yourmain priorities should be to get past the novelty of your gear. Whether you don’tknow how to properly use your gear or you are more focused on getting the imagetechnically immaculate, you will likely miss out on the whole purpose of the shoot:to connect with your subject and capture their essence as you perceive it.To illustrate my point, consider Figures I.3 and I.4, which feature the same subjectphotographed with two different camera bodies. For Figure I.3, I used my semi-probody: a Canon 5DII. I shot Figure I.4 with a Canon Rebel XSi (which currently goesfor just under 200 on eBay) that I keep in my case as an “Oh, shit” body. The 5D hasa full-frame sensor and 21 megapixels; it’s an all-around badass piece of equipment.Weighing in at just over 10 megapixels, the Rebel is a starter camera with a croppedsensor. If I were to pull that out of my case at a commercial shoot, the art directorxii STUDIO ANYWHERE: A PHOTOGRAPHER’S GUIDE TO SHOOTING IN UNCONVENTIONAL LOCATIONS
would laugh at me. When used to capture good light at a low ISO, and in combinationwith a decent lens, however, the camera bodies provide comparable results. Evenwhen viewing the images at 100%, it’s hard to tell the difference between the twofiles, other than the 5D’s larger file size.Figure I.3 Shot with a Canon 5DII. Take a closelook at it, and then compare this image toFigure I.4, which was shot with the Rebel XSi.Figure I.4 Shot with a Canon Rebel XSi.Although the XSi is a far inferior camera bodyto the 5DII, you’ll have a hard time telling theresults apart when you use a good lens ingood light.Introduction xiii
DECONSTRUCT THE LIGHTINGWhen it comes to lighting, a small flash is typically more than sufficient to get thejob done well. The lighting diagrams included in this book will let you in on howI light a variety of situations with nothing more than small flashes. Unfortunately,a lighting diagram or behind-the-scenes photo won’t be available for most imagesthat you come across. For this reason, knowing how to properly deconstruct thelighting in an image, sometimes referred to as reverse engineering, is an invaluableskill. If you know how to read the quality of light in a photograph, you’ll be ableto tell quite a bit about how it was created, such as how many lights were used,whether the light source was soft or hard, and whether it was large or small.Some photos can be rather easy to deconstruct, especially when you can discernthe light modifier in the catchlight (the specular highlights) in a subject’s eyes or onthe shiny surface of a product. The task gets trickier if multiple light sources areinvolved or if the subject is in a scene with mixed lighting—not to mention photosthat are composites, which open a whole other can of pixels. But pay attention to afew of these constants: Height and direction of the light source Hardness or presence of any shadows Number of apparent light sourcesOnce you’ve sharpened your skills at reading light, you’ll be able to glance at a photoand know, for example, that it was lit with an umbrella overhead and a reflectorunderneath, or with two softboxes sandwiched together in front of the subject.Then, if you or your client wants similar results to a photo you see, you have a headstart on ideas, knowing at least where to begin with the lighting.Consider Figure I.5. This is a one-light portrait with a hard light source: just a barebulb strobe on a light stand. The flash head is zoomed out to 24mm, which allowsfor a wider, more even light spread. Note the tiny catchlight, the hard quality tothe light, and the defined shadows on the subject’s face. The similar shadows onthe background mean that the subject is also close to the background, as well. InFigure I.6, the distance of light to subject and from the subject to the backgroundas well as strobe output level are all the same, but the zoom is now set to 70mm.As you can see, the spread is not as wide, leaving the center of the flash hotter, orbrighter, than the edges of the light. This technique of zooming the flash head in canbe useful if you are shooting a subject outside or in a setting without a backdrop,xiv STUDIO ANYWHERE: A PHOTOGRAPHER’S GUIDE TO SHOOTING IN UNCONVENTIONAL LOCATIONS
where light falloff is not apparent. In other words, it allows you to get the mostout of your flash, because it’s focused into the area where your subject is standing,rather than off into no-man’s land.Figure I.5 The subject is standing in front of awhite background, while the light source is abare-bulb flash, zoomed out to 24mm. Note thetiny catchlight, the hard shadows below his jaw,and how defined and close his shadow is to him.Figure I.6 The subject is standing in front of a whitebackground, while the light source is a bare-bulbflash, zoomed in to 70mm. There are still hardshadows on the subject, and his shadow is stillclose and defined. The light spread is starting to falloff in the corners of the image, however, leaving aslight hotspot in the middle of the frame.
Figure I.7 shows the flash zoomed to 105mm, while Figure I.8 zooms to 105mmwith a grid added. The quality of light is still hard, but with the focus all the way tothe middle, so there is almost no light spread, and the center of the light is now twoto three stops brighter. Again, this is helpful to keep in mind when you are outside,trying to overpower the sun and your flash needs all the juice it can get. Not tomention, if your subject is outside and not against a backdrop, using a wide flashzoom is just a waste of power. Instead, focus the zoom in and just worry aboutproperly lighting the subject.Figure I.7 The subject is standing in frontof a white background, while the lightsource is a bare-bulb flash, zoomed in to105mm. The light falloff in this image ismuch more apparent.xvi STUDIO ANYWHERE: A PHOTOGRAPHER’S GUIDE TO SHOOTING IN UNCONVENTIONAL LOCATIONS
Figure I.8 The subject is standing infront of a white background, while thelight source is a flash zoomed in to105mm with an added grid. The lightis now almost like a spotlight.Introduction xvii
When it comes to softening your light source, you have several options. Figure I.9 waslit with a strobe zoomed to 24mm, just like in Figure I.5, but with a white umbrellaadded to the light. When deconstructing the photo, look for a circular shape in thesubject’s eyes (the umbrella) and also note the quality of any present shadows. Whenthe light is diffused by an umbrella or another modifier, the shadows will appearsofter, with the edges feathered rather than defined. Figure I.10 was lit the same asFigure I.9, except that the subject’s shadow is no longer visible in the background,which means that he’s no longer standing right in front of the backdrop.Figure I.9 The subject is standing in front of a whitebackground, while the light source is a flash zoomedout to 24mm with an added umbrella. The catchlightis a bit larger, and the shadows are much softer.Figure I.10 The subject is 3 feet away from a whitebackground, while the light source is a flash zoomedout to 24mm with an added umbrella. His shadow isno longer visible because of the increased distancebetween him and the backdrop.
If the catchlight is a square or a narrow rectangle (Figure I.11), you can deducethat the light source was a softbox or a strip light, respectively. Add a second lighton the other side of the subject, leaving a small gap between them, and you havea lighting effect similar to the one Martin Schoeller has made famous, as seen inFigure I.12.Figure I.11 The subject is 3 feet away from a whitebackground, while the light source is a flash zoomedout to 24mm and bounced into a 40x60-inch whiteboard to create a large light bank. The catchlight is abit larger and is shaped like a square.Figure I.12 This setup is similar to the one that MartinSchoeller made famous: two softboxes placed in frontof the subject, about 2 feet apart. It’s a soft, flatteringlight that leaves a cool catchlight in the subject’s eyes.Introduction xix
Sometimes there may be two catchlights, one brighter than the other, as is the casein Figure I.13. The brighter catchlight is the light, and the less vivid shape is just areflector. If you move the subject several feet off of a white background, the mainlight won’t spill onto it as much, turning the white to a medium gray tone, as seenin Figure I.14. Also, note the addition of the hair light in the shot, which helps toseparate the subject from the darker background. If I aim the second (hair) light atthe background, powering up the output so that it’s higher than my main light, I nowhave a pure white background, as seen in Figure I.15.Of course, all this deconstructive advice is not to say that you can only achievecertain results by replicating the lighting or techniques that another photographerused, or by replicating what you see in the pages of Studio Anywhere. Rather, onceyou understand how light works and how to manipulate the light that’s available toyou (be it natural or manufactured), it’s your prerogative to use that information infresh and creative ways. Just remember to always check the directional and qualityof the light, and especially the eyes, because the eyes don’t lie. Only Photoshop does.Figure I.13 The subject is 3 feet away from a whitebackground, while the main light is zoomed out to24mm and shot into an umbrella, with a fill reflectorbelow the subject’s chin. There are now two catchlights:one circular and bright, and one wider and less vivid.xx STUDIO ANYWHERE: A PHOTOGRAPHER’S GUIDE TO SHOOTING IN UNCONVENTIONAL LOCATIONS
Figure I.14 While similar to the previous setup inFigure I.13, this has an added hair light, which separatesthe subject from darker backgrounds.Figure I.15 Here you see a large main light and anilluminated, white background.Introduction xxi
KIDDIE POOLS. 8WHO’D A THUNK IT?Ohio is not an island. We don’t have access to exotic beaches. Hell, a good numberof Ohioans probably don’t even know what the word exotic means. So when Iwant to construct a dreamy water scene for a portrait here, I need to get creative(Figure 8.1).For creativity, I can think of no better source of inspiration than the fashion industry.Although I hardly consider myself a fashion photographer, I regularly study thephotography in fashion magazines, which contain some of the best lighting andstorytelling techniques. I have always found it useful to look at those who are doingbetter work than me, so that I may glean from their work and apply it to my own.A word of warning, however: Studying photographers further along than you canalso be discouraging. When you topple from the heights of inspiration down theslippery slo
viii studio anywhere: a photographer’s guide to shooting in unconventional locations This book is a diary of sorts, of my experiences in working without the