Transcription
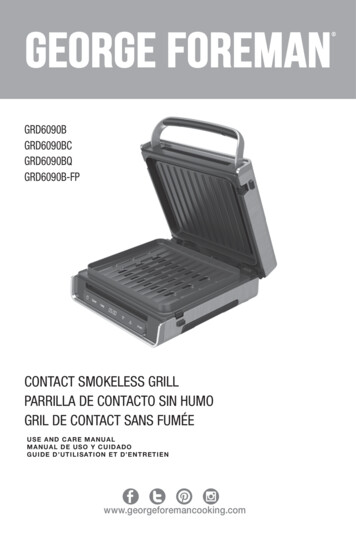
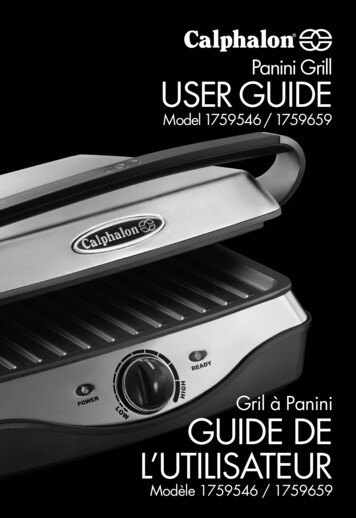
Panini GrillUSERGUIDEModel 1759546 / 1759659Gril à PaniniGUIDE DEL’UTILISATEURModèle 1759546 / 1759659
Thank you for choosing a Calphalon Panini Grill. All Calphalonkitchen electrics are engineered to deliver premium heatingperformance.The Calphalon OPTI-HEAT System is made up of two parts:premium materials and optimal heat delivery, which worktogether to offer even heating and create beautiful results.We know you are excited to start grilling, and we promiseto enhance your culinary experience every step of the way.So whether you’re a novice in the kitchen, or an experiencedgourmet, the tips and recipes in this guide will help you createdelicious panini and other grilled culinary creations.Table of ContentsImportant SafeguardsParts and FeaturesAssembling Your Panini GrillOperating Your Panini GrillCleaning and CareFrequently Asked QuestionsWarranty/Customer 9101114Table des matièresMise en garde importantesPièces et CaractéristiquesAssemblage de votre gril à paniniUtilisation de votre gril à paniniNettoyage et entretienFoire aux questionsGarantie/Service à 2022242527282933
What You Need To Know AboutSafety InstructionsWarning and Important Safeguards appearing in this guide arenot meant to cover all possible conditions and situations thatmay occur. Common sense, caution and care must be exercisedwhen maintaining or operating your panini grill.Recognize Safety Symbols, Words and LabelsWARNINGWarning – Hazards or unsafe practices which COULD resultin severe personal injury or death.CAUTIONCaution – Hazards or unsafe practices which COULD result inminor personal injury.IMPORTANTThe first time you use your Calphalon Panini Grill you maynotice that a slight odor may be emitted and/or smoking mayoccur. This is caused by the Panini Grill burning off residualoils left over from the manufacturing process; this is commonfor any type of indoor grill. We recommend you run the grill onthe "HIGH" setting with the cover closed for approximately 10minutes, until the odor and/or smoking dissipates, after whichthe Panini Grill may be used normally.1
IMPORTANT SAFEGUARDSWARNINGWhen using electrical appliances, basic safety precautions shouldalways be followed including the d all instructions.Do not touch hot surfaces. Use handles or knobs.Always remove the plug from the wall outlet before cleaningor removing the internal drip tray.Always allow the grill plates to cool completely beforecleaning the grill plates or removing the internal drip tray.To protect against electrical shock do not immerse cord, plugs,or panini grill base in water or other liquid.Close supervision is necessary when any appliance is usedby or near children.Unplug from outlet when not in use and before cleaning.Allow to cool completely before assembling or removing parts.Before storing the unit, allow it to cool completely beforeattempting to remove the removable internal drip tray,attempting to clean the unit or store the unit. The powersupply cord should be disconnected before storing the unit.Do not operate any appliance with a damaged cord or plugor after the appliance malfunctions or has been damagedin any manner. Return appliance to the nearest authorizedservice facility for examination, repair or adjustment.The use of accessory attachments not recommended byCalphalon may cause injuries.Do not use outdoors.The power cord must be fully unwound from the cord wrapwhen in use.Do not let cord hang over edge of table or counter, or touchhot surfaces.Do not place on or near a hot gas, electric, or inductionburner, or in a heated oven.Do not operate the panini grill on any surface that may beaffected by heat. Use a heat-resistant mat on these surfaces.
16. Extreme caution must be used when moving an appliancecontaining hot oil or other hot liquids.17. To disconnect, remove plug from wall outlet.18. This product is designed for household use only. Do not useappliance for other than intended purpose.19. This appliance generates heat and may create steam duringuse. Take precautions to prevent burns, fires or other personalinjury or property damage.20. Do not place anything on top of or underneath this productwhile it is operating or when it is being stored.21. Do not leave your panini grill unattended during use.22. Be sure to leave adequate space around the panini grill forair circulation and keep it away from flammable fabrics andsurfaces.23. When placing food on or removing food from the grill,prevent the grill from accidentally closing by holding thehandle for the upper grill plate with an oven mitt or pot holder.24. The panini grill is not intended for use with the top housingopen.Avoid electrical shockThis appliance is equipped with a 3-prong grounding plug foryour protection against shock hazard and it should be pluggeddirectly into a properly grounded receptacle. Do not cut orremove the grounding receptacle. Do not cut or remove thegrounding prong from this plug. If the plug fails to fit into anexisting outlet, contact a qualified electrician to update the outlet.Short Cord InstructionsA short power cord is to be provided to reduce the risk resultingfrom becoming entangled in or tripping over a longer cord.Extension cords are available and may be used if care isexercised in their use. If an extension cord is used, the markedelectrical rating of the extension cord should be at least as greatas the electrical rating of the appliance. If the appliance is of thegrounded type, the extension cord should be a grounding 3-wirecord. The extension cord should be arranged so that it will notdrape over the countertop or tabletop where it can be pulled onby children or tripped over unintentionally.SAVE THESE INSTRUCTIONS.3
Parts & Features1. Power "On" Light2. Variable Temperature Control Knob3. Green "Ready" Light4. High Performance Bronze Nonstick Grill Plates5. Adjustable Grill Height Selector & Lock6. Removable Internal Drip Tray7. Cord Storage (under the unit)56473142
OPTI-HEAT SystemOptimal Heat Delivery:The precision placement of the grill’s heating element, alongwith the internal sensor, help maintain even heat across thecooking surface.Premium Materials:Your grill’s high performance bronze nonstick finish is backedwith our exclusive 5-year limited warranty, and it offers flawlessrelease as well as easy clean-up. The grill plates are made fromdie cast aluminum.Sleek, Contoured Design – The contoured shape of yourpanini grill complements contemporary kitchen designs, and thesleek stainless steel housing coordinates with other Calphaloncountertop appliances.Large Grill Capacity – Cook for one or for a crowd withthe large grill capacity. Sized to fit 2 large panini, 4 burgersor chicken breasts, the grill is ready for action year round.And, since the grill cooks food from both sides at the sametime, it grills quickly and efficiently. Choose from a variety oftemperatures to toast your favorite panini or sear a juicy burger.Adjustable Grill Height – Adjust the grill for variousthicknesses of food. Slide the height selector into the desiredposition, so you can accommodate everything from delicategrilled cheese sandwiches to thick burgers or chicken breasts.Grill Plates – Clean easily by wiping with a damp spongeor cloth.5
Removable Internal Drip-tray – As the grill sears theoutside of meats and poultry, excess fat drains away into thehandy, hidden drip tray. After your panini grill cools, simplyslide the tray out and dispose of the drippings after each use.The drip tray can be placed in the top rack of the dishwasherfor easy clean-up.Upright Storage – Save space in the kitchen with theconvenient upright storage of the panini grill. Just empty andclean the drip tray, close the grill, move the adjustable heightselector into the locked position, and tuck the grill awaystanding upright for space-saving convenience.Assembling Your Panini Grill1. Carefully remove all the pieces of the panini grill from thepackaging and place on counter near a suitable electricaloutlet. (See page 3 for information regarding electricalrequirements.) Remove all packaging materials, includingany stickers or tags, from the grill before the first use.2. Before the first use, open the grill by moving the adjustableheight selector to the unlocked position. Wipe the grillplates with a clean, damp cloth and dry thoroughly. Washthe internal drip tray in warm, soapy water. Rinse and drythoroughly.3. Insert internal drip tray.4. Plug power cord into a 3-prong electrical outlet andcontinue with steps for “Operating Your Panini Grill”.6
Operating Your Panini GrillATTENTIONTo Turn ON: Plug the power cord into a suitable outlet.The "Power" light will illuminate.To Turn OFF: Simply unplug the power cord. There is no "Off"setting while the unit is plugged into an outlet.Setting The ControlsStep 1: Select the heat setting. Turn the control knobclockwise to the desired heat setting. Consider the followinggeneral tips for selecting a heat setting:LOW – Use this setting to keep grilled foodswarm until serving.MEDIUM – Choose this setting for toastingbreads or sandwiches such as grilled cheeseand other Panini-style sandwiches.HIGH – Use this setting for searing the outsideof meats, such as burgers, chicken and steaks,when you want the outside brown, while theinside stays juicy.Step 2: Preheat the grill. Set the temperature knob to thedesired temperature. When the panini grill has reached thespecified temperature, the green "Ready" light will illuminate.Note: To maintain consistent temperature, the heating elementand green “Ready” light will cycle on and off.7
Step 3: Carefully open the grill using the handle and a potholder or oven mitt, avoiding contact with the hot grill plates.For a crisp texture and golden color, use a light coating of oliveoil, or other vegetable oil on panini or other foods. DO NOTuse aerosol nonstick cooking sprays on the panini grill. Thesesprays can build-up on the grills and become difficult to remove.Place the food on the preheated lower grill plate. Carefully closethe grill, sandwiching the food in between the hot grill plates.See the Grilling Guide on page 9 for suggested grilling times.Step 4: When the food is done, lift the handle and carefullyremove it from the grill using a heat-resistant, non-metal utensilsuch as a nylon, silicone or wooden utensil. Check the internaltemperature of meats and poultry to make sure they are at thedesired level of doneness. Unplug the cord from the outlet whenfinished cooking. Allow to cool before cleaning the grill plates.Step 5: To store, close the grill, move the adjustable grillheight selector into the locked position, and tuck the grill awaystanding upright for space-saving convenience.Using the Adjustable Grill Height SelectorWARNINGTHE ADJUSTABLE GRILL HEIGHT SELECTOR MAY BE HOT WHILETHE PANINI GRILL IS IN USE. USE CARE WHEN ADJUSTING IT.Your Calphalon Panini Grill includes an adjustable heightfeature that lets you control how much pressure is placed ondelicate foods like panini and grilled cheese sandwiches. Itprovides a stop for the upper housing which limits how far it willclose. And, it allows you to set the grill to heat your food fromthe bottom only, if desired.81. Preheat the grill with the top housing fully closed.2. Open the grill and place your food on the lower grill plate.3. Set the adjustable height to the desired height andcarefully close the grill, lowering the top housing until itrests on the slider.
4. If you need to adjust the height, open the grill, reset theslider, and carefully close the grill again.Grilling GuideFoodCooking TimeTemperaturePanini, sandwichesor focaccia5 to 7 minutesMEDIUMGround meat patties5 to 6 minutesHIGHChickenBoneless breast half5 to 8 minutesHIGHPork chops5 to 7 minutesHIGHLamb chops3 to 4 minutesHIGHFish filets3 to 4 minutesHIGHShrimp / Scallops2 to 3 minutesHIGHBeef steaksThinThick2 to 3 minutes5 to 7 minutesHIGHHIGHNote: Cooking times will vary depending on the size and thickness ofthe food. Adjust cooking times, as needed, to make sure foodsare thoroughly cooked.Cleaning and CareALWAYS ALLOW THE GRILL PLATES TO COOL FULLY BEFORECLEANING THE GRILL PLATES. DO NOT CLEAN THE GRILLPLATES WHILE THE UNIT IS IN USE.1. Metal utensils may damage the nonstick coating. Use onlynon-metal, temperature resistant utensils, such as nylon,silicone or wood.2. When you are done using the panini grill carefully unplug it.3. Allow the panini grill to cool thoroughly and then removethe internal drip tray.9
4. Discard drippings from the drip tray. For everyday cleanup of the drip tray and grill plates, use warm, sudsy waterand a dish cloth or sponge. For grease build-up on the grillplate nonstick surface, clean with a non-abrasive spongeor cleaning pad and a liquid dishwashing detergent toremove any food residue. Rinse and dry thoroughly. Youmay also wash the internal drip tray in the top rack of yourdishwasher.5. Wipe the panini grill base with a clean, damp cloth.DO NOT use abrasive cleaners or scouring pads, as theymay scratch the nonstick surface of the panini grill.DO NOT immerse the panini grill base in water.6. Insert the removable internal drip tray.7. Close the grill, move the height selector into the lockedposition, and tuck the grill away standing upright forspace-saving convenience.Frequently Asked QuestionsMy panini grill is not getting hot; what am I doingwrong? Be sure the power cord is plugged into a suitableoutlet. See page 3 for electrical requirements. Then, check tomake sure the heat setting knob is set.My burger patties are only getting grill marks onone side. Why? Check the adjustable grill height selectorlever on your grill. If it is set too high, it may not sandwich yourburger patties snugly enough to form grill marks on both sides.See page 8 for complete instructions on using the AdjustableGrill Height Selector.When I grill frozen chicken breasts, they are brownon the outside and still pink inside. How can I makesure they are safely cooked? Be sure to thaw meats andpoultry completely before grilling. This will ensure that they arecooked evenly throughout.10
Is it okay to grill a thick-cut pork chop alongside athinner pork chop? It is best to cook meat of the samethickness at the same time. So, either cook one chop and thenthe other. (Your panini grill cooks so quickly it won’t take long.)Or, butterfly the thicker cut so it lays flatter and can cook evenlynext to the thinner chop.Warranty/Customer ServiceWarrantyPlease take a few moments to register your product, it willgreatly expedite any warranty inquiries you may have.Also, with your help, we can continue to develop new productsand services that make your culinary experience even better.Please visit calphalon.com for complete details.Limited One Year and Five Year WarrantyCalphalon will repair or replace any panini grill founddefective in material or workmanship within one year ofthe original purchase. In addition, Calphalon will repair orreplace any panini grill if the nonstick grill plates are founddefective in material or workmanship within five years oforiginal purchase. This warranty applies when the grill isput to normal household use and is operated and caredfor according to these instructions. Minor imperfections,surface markings as a result of shipping, and slight colorvariation in the grill plate nonstick coating are normal.This excludes damage from misuse or abuse, such asimproper cleaning, use of metal utensils, neglect, accident,alteration, fire, theft, or use in a commercial establishment.This warranty excludes all incidental or consequentialdamages, except in those states that do not allow theexclusion or limitation of these damages. This warrantygives you specific legal rights, and you may also haveother rights which vary from state to state.11
If You Have a Warranty ClaimIf you believe you have a defective product, please callCalphalon Consumer Relations at 1-800-809-PANS(7267) or send the product via pre-paid freight, with aletter explaining the defect, to:Calphalon Consumer Relations315 Matzinger Road - Bldg. CToledo, OH 43612All items must be shipped freight pre-paid. Please usea package delivery service able to track and/or insureyour return items – we recommend UPS or FedEx ground service. All appliances confirmed as defective(as described) will be replaced, free of charge, with anidentical item or, if the item is no longer available, witha comparable product. Warranty replacements will beprocessed within 10 -15 business days after receipt.Please call Calphalon Consumer Relations at1-800-809-PANS (7267) if you have additional questions.Customer ServiceWe at Calphalon want to hear from you. If you have aquestion, comment, or a recommendation that will help us helpyou, please contact us via our website, phone, fax or mailingaddress.Website:calphalon.comToll-Free Phone: 1-800-809-PANS (7267)(Business Hours: 8:00am – 5:00pm EST, comFax:419-666-2859Write To Us:Consumer Calphalon RelationsP.O. Box 583Toledo, OH 43697(Please, DO NOT send returns to this address.)
Tips for Grilling Perfect Panini1. Use good quality bread, sliced somewhat thicker than youmight slice it for a cold sandwich.2. Use any combination of ingredients for the filling butdon’t make the sandwich overly complex. Three to fouringredients is ideal for letting individual flavors shinethrough.3. Try to select one ingredient that will help bind thesandwich together. Cheese is a good choice because as itmelts, it gets sticky. Garlic mayonnaise, olive tapenade, oreven barbecue sauce can achieve a similar effect.4. Do not overstuff the panini or the exterior will cook beforethe interior has a chance to.5. Once assembled, brush both sides of the sandwich lightlywith olive oil.6. Preheat your Calphalon Panini Grill on "MEDIUM" until the"Ready" light comes on.7. When the grill is hot, brush it lightly with olive oil. Placethe sandwich in the Panini grill and close the cover. Grillfor 3 to 5 minutes or until golden brown.Great Panini combinations:Grilled chicken, gruyère, tomato and fresh basilGrilled eggplant, fresh mozzarella and olive tapenadeFeta cheese, spinach, pine nuts and roasted garlicSmoked salmon, vegetable cream cheese and fresh dillSliced beef, cheddar cheese, corn relish and barbecue sauceProsciutto, Fontina or mozzarella, tomato and fresh basil13
RecipesProsciutto & Fontina Panini with ArugulaIngredients for each Panini2 slices good quality, European-style bread, about ½-inch thick2-4 slices Fontina or Swiss cheese, medium thickness2-3 slices of very thin prosciutto (or enough to cover eachslice of bread)Small bunch of arugula or spinach, washed and dried1 tablespoon olive oilPreheat the Calphalon Panini Grill on the "MEDIUM" setting.While the grill is preheating, assemble the panini.Place the Fontina or Swiss cheese on the bread, being sureto cover the surface, followed by a few leaves of arugula orspinach. Next, add a layer of prosciutto and another layer ofcheese followed by the remaining slice of bread. Brush eachside of bread with a light coating of olive oil.When the Panini Grill "Ready" light is illuminated, place thepanini on the grill, lower the top grill and toast for about 3-5minutes (check the panini after 2 minutes for doneness,continue to toast if necessary) Remove with a nylon spatulaand serve warm.14
Boneless Lemon Garlic Pork ChopsIngredients4 boneless pork loin chops about a ½-inch thick1 shallot, finely minced1 tablespoon Dijon mustard1 tablespoon cider vinegar2 cloves fresh garlic, finely mincedZest of 1 large lemonJuice of 1 large lemon1 tablespoon coarsely ground black pepper1 tablespoon olive oilPlace all the ingredients except the olive oil into a plasticstorage bag to marinate. Marinate the pork in the refrigeratorfor at least 4 hours or overnight. Remove from the refrigeratorat least one hour prior to cooking. Remove chops and discardmarinade.Preheat the Calphalon Panini Grill on the "HIGH" setting untilthe "Ready" light comes on. Brush both sides of the grill with theolive oil and place the chops on the grill. Grill the chops for 5-7minutes or until done.Serves 415
Notes:16
Notes:17
Gril à PaniniGUIDE DEL’UTILISATEURModèle 1759546 / 1759659Merci d’avoir choisi un gril à panini Calphalon. Tous lesappareils de cuisine électriques Calphalon sont conçus pour uneperformance de cuisson supérieure.Table des matièresMise en garde importantesPièces et CaractéristiquesAssemblage de votre gril à paniniUtilisation de votre gril à paniniNettoyage et entretienFoire aux questionsGarantie/Service à ge2022242527282933
Le Système OPTI-HEAT de Calphalon est composé de deuxparties: des matières de première qualité et une diffusion optimalede la chaleur, qui se combinent pour offrir une cuisson uniforme etdonner d’excellents résultats.Nous savons que vous avez hâte d’essayer votre gril, et nousvous promettons d’enrichir votre expérience culinaire à chaqueétape. Alors, que vous soyez novice dans la cuisine ou gourmetchevronné, les conseils et recettes de ce guide vous aideront àélaborer de délicieux paninis et autres créations culinaires grillées.Ce qu’il vous faut savoirDirectives de sécuritéLes avertissements et mises en garde importantes qui apparaissentdans ce guide ne prétendent pas couvrir toutes les conditions etsituations possibles pouvant se présenter. Il faut faire preuve debon sens, être attentif et prendre des précautions pour entretenir oufaire fonctionner votre gril à panini.Reconnaître les symboles, énoncéset étiquettes de sécuritéAvertissementAvertissement – Dangers ou pratiques dangereuses quiPOURRAIENT entraîner des blessures personnelles graves ou la mort.AttentionAttention – Dangers ou pratiques dangereuses qui POURRAIENTentraîner des blessures personnelles mineures.ImportantLa première fois que vous utiliserez votre gril à panini Calphalon,une faible odeur ou de la fumée pourrait s’en dégager. Ceci estcausé par le fait que le grill Panini brûle les huiles résiduellesprovenant du processus de fabrication; c’est commun à tousles types de grils intérieurs. Nous vous recommandons de fairefonctionner le gril à réglage « HIGH » avec le couvercle fermé,pendant environ 10 minutes, jusqu’à ce que l’odeur ou la fumée sedissipe. Après cela, le gril Panini pourra être utilisé normalement.19
MISE EN GARDE IMPORTANTESAvertissement20Lorsqu’on utilise des appareils électriques, il faut toujours suivre desprécautions de sécurité de base, notamment:1. Lire toutes les instructions.2. Ne pas toucher les surfaces chaudes. Utiliser les poignées ou lesboutons.3. Toujours retirer la fiche de la prise murale avant de nettoyer oud’enlever le plateau à graisse interne.4. Toujours laisser refroidir complètement les plaques de gril avant denettoyer les plaques de gril ou d’enlever le plateau à graisse interne.5. Ne pas immerger les cordons, fiches ou la base du gril à paninidans l’eau ou d’autres liquides pour se protéger des déchargesélectriques.6. Une surveillance attentive est nécessaire lorsqu’un appareilélectrique est utilisé par des enfants ou à proximité d’enfants.7. Débrancher l’appareil de la prise murale lorsqu’il n’est pas utiliséet avant de le nettoyer. Le laisser refroidir complètement a-vantd’assembler ou de retirer des pièces.8. Laisser refroidir complètement l’unité avant de la ranger et de tenterd’enlever le plateau à graisse interne ou de nettoyer l’unité. Lecordon d’alimentation doit être débranché avant de ranger l’unité.9. Ne pas faire fonctionner un appareil électrique dont le cordon oula fiche sont endommagés, ou après un mauvais fonctionnementde l’appareil ou après qu’il ait été endommagé de quelque façonque ce soit. Pour faire examiner, réparer ou régler l’appareil, lerapporter au centre de réparation autorisé le plus proche.10. L’utilisation d’accessoires non recommandés par Calphalon peutcauser des blessures.11. Ne pas utiliser l’appareil à l’extérieur.12. Le cordon d’alimentation doit être totalement déroulé et sorti del’enrouleur avant de l’utiliser.13. Ne pas laisser le cordon pendre du bord d’une table ou d’uncomptoir, ni toucher des surfaces chaudes.14. Ne pas placer l’appareil sur un brûleur à gaz, électrique ou àinduction chaud, ni à proximité, ni dans un four chaud.15. Ne pas faire fonctionner le gril à panini sur une surface pouvantêtre affectée par la chaleur. Sur de telles surfaces, utiliser un tapisrésistant à la chaleur.
16. Faire extrêmement attention en déplaçant un appareil contenantde l’huile chaude ou tout autre liquide chaud.17. Pour débrancher l’appareil, retirer la fiche de la prise murale.18. Ce produit est conçu pour une utilisation ménagère seulement. Nepas utiliser l’appareil à d’autres fins que celle prévue.19. Cet appareil génère de la chaleur et peut créer de la vapeurpendant son utilisation. Prendre des précautions pour éviter desbrûlures, le feu ou d’autres blessures personnelles ou dommages àla propriété.20. Ne rien placer au-dessus ou au-dessous de ce produit lorsqu’il esten fonction ou qu’il est rangé.21. Ne pas laisser votre gril à panini sans surveillance pendant sonfonctionnement.22. Veiller à laisser suffisamment d’espace autour du gril à paninipour la circulation de l’air et l’éloigner des tissus et surfacesinflammables.23. Pour placer des aliments sur le gril, ou les retirer, éviter que le grilse ferme accidentellement en tenant la poignée de la plaque degril supérieur avec des gants isolants ou une manique.24. Le couvercle du gril à panini ne doit pas rester ouvert pendantl’utilisation.Éviter les décharges électriquesCet appareil est muni d’une fiche à trois broches, avec mise à la terre,pour vous protéger des risques de décharge électrique et elle doitêtre branchée directement dans une prise mise à la terre appropriée.Ne pas couper ni enlever la mise à la terre de cette fiche. Si la fichen’entre toujours pas dans la prise, contacter un électricien qualifiépour mettre une prise aux normes.Mode d’emploi du cordon courtUn cordon d’alimentation court est fourni pour réduire le risque, avecun cordon plus long, de s’enchevêtrer ou de trébucher. Des rallongessont disponibles et peuvent être utilisées, mais avec précaution. Lescaractéristiques électriques de la rallonge doivent être au moins égalesà celles de l’appareil. Si l’appareil a une mise à la terre, la rallongedevrait être un cordon à trois fils avec mise à la terre. La rallonge doitêtre placée de façon à ne pas pendre d’un comptoir ou d’une table oùelle pourrait être tirée par des enfants ou risquer de faire trébucher.CONSERVER CES INSTRUCTIONS.21
Pièces et Caractéristiques1. Témoin d'alimentation sur « Marche »2. Bouton de contrôle de variation de la température3. Témoin de couleur verte « Prêt »4. Plaques du grill antiadhésif bronze hautes performances5. Sélecteur et verrouillage de la hauteur réglable du grill6. Plateau interne de trop-plein démontable7. Rangement du cordon (sous l'unité)564731222
Système OPTI-HEATDiffusion optimale de la chaleur:L’emplacement de précision de l’élément chauffant du gril, ajoutéau détecteur interne, aident à maintenir une chaleur homogène surl’ensemble de la surface de cuisson.Matériaux supérieurs:La haute performance du revêtement antiadhésif bronze de votregril est appuyée de notre garantie limitée exclusive de 5 ans,et il offre un excellent écoulement de la graisse de même qu’unnettoyage facile. Les plaques du gril sont en aluminium moulé souspression.Conception mince, profilée – La forme profilée de votre grilà panini s’harmonise au design contemporain des cuisines, etson boîtier mince en acier inoxydable s’harmonise aux autresappareils électriques de comptoir de Calphalon.Grande capacité de gril – Cuisinez pour une seule personneou pour une foule grâce à la grande capacité de gril. Assezgrand pour 2 gros panini, 4 hamburgers ou poitrines de poulet,le gril est toujours prêt à l’action, toute l’année. Et comme ilcuit les aliments des deux côtés à la fois, il grille rapidement etefficacement. Choisissez diverses températures pour toaster vospanini favoris ou saisir un hamburger juteux.Hauteur de gril réglable – Réglez le gril pour diversesépaisseurs de nourriture. Faites glisser le sélecteur de hauteur dansla position désirée, de façon à convenir à diverses cuissons, desandwichs au fromage grillés délicats jusqu’aux hamburgers épaisou aux poitrines de poulet.Plaques de gril – Nettoyez-les facilement en les essuyant avecune éponge ou un chiffon mouillé.23
Plateau à graisse interne amovible – Comme le gril saisitl’extérieur des viandes et volailles, l’excès de graisse s’écoule dansle plateau à graisse pratique, dissimulé. Lorsque le gril à paninisera refroidi, faites simplement glisser le plateau pour le sortiret jetez la graisse après chaque utilisation. Le plateau à graissepeut être placé dans le panier supérieur du lave-vaisselle pour unnettoyage facile.Rangement vertical – Gagnez de la place dans la cuisinegrâce au rangement vertical pratique du gril à panini. Videz etnettoyez le plateau à graisse, fermez le gril, mettez le sélecteurde hauteur réglable en position verrouillée et rangez le gril à laverticale, gagnant ainsi de la place.Assemblage de votre gril à panini1. Enlevez avec soin toutes les pièces du gril à panini del’emballage et placez-le sur le comptoir, près d’une priseélectrique qui convienne. (Voir la page 21 pour plus derenseignements concernant les exigences électriques.) Retireztout le matériel d’emballage du gril, incluant les autocollantsou les étiquettes, avant la première utilisation.2. Avant la première utilisation, ouvrez le grill en déplaçantle sélecteur de réglage de la hauteur sur la position nonverrouillée. Avant de l’utiliser pour la première fois, essuyezles plaques du gril avec un chiffon propre, mou
use aerosol nonstick cooking sprays on the panini grill. These sprays can build-up on the grills and become difficult to remove. Place the food on the preheated lower grill plate. Carefully close the grill, sandwiching the food in between the hot grill plates. See the Grilling