Transcription
WORLDE BLUE WHALE MIDI CONTROLLERUSER’S MANUALHANGZHOU WORLDE MUSIC ELECTRONIC CO.LTDHANGZHOU BLUE WHALE MUSIC TECHNOLOGY CO.,LTD
HANGZHOU BLUE WHALE MUSIC TECHNOLOGY CO.,LTDWEBSITE: WWW.WORLDE.COM.CNHANGZHOU WORLDE MUSIC ELECTRONIC CO., LTDEMAIL:SALES@WORLDE.COM.CNTEL:86 571 88730848ContentsIntroduction . 3What’s in the Box? . 3Blue Whale Keyboard overview . 3Section 1: Getting Started . 31.1 Blue Whale Keyboards Overview . 31.1.1 Top Panel Overview . 31.1.2 Side Panel Overview . 41.2 Setup . 41.2.1 Minimum System Requirements . 41.3 Using The Blue Whale with Your Software . 51.4 MIDI Connections . 51.5 Power Supply . 5Section 2:Basic MIDI Control from Your Blue Whale . 52.1 Function Keys/Multi-functional keyboard . 52.2 The Keyboard . 62.2.1 Velocity Curve . 62.2.2 OCTAVE . 62.2.3 TRANSPOSE. 62.3 CHANNEL. 72.4 CHANGING VOICE AND VOICE BANK . 72.4.1 PROGRAM . 72.4.2 BANK L/M . 72.5 MIDI Controller Messages . 72.5.1 Programming the Controls on MIDI Controller . 82.5.2 ASSIGNABLE DIAL . 82.5.3 PITCH BEND AND MODULATION TOUCH STRIPS . 82.5.4 ASSIGNABLE PEDAL . 82.5.5 PAD SETTING . 8Section 3. Advanced Settings . 93.1 How to make good use of the keyboard . 93.1.1 DUAL . 93.1.2 SPLIT . 93.2 Other controls . 93.2.1 MUTE. 93.2.2 CONTROL ASSIGN . 103.2.3 GM . 103.2.4 GS. 103.2.5 XG. 103.2.6 Reset . 103.2.7 SNAP SHOT . 103.2.8 PEDAL POLARITY . 103.2.9 SHIFT BUTTON GROUPS(1-8/9-16) . 103.3 Pad Control . 103.3.1 Pressure Control . 103.3.2 Pad Curve . 113.3.3 Pads Note setting . 113.3.4 Select the Backlit RGB Colour for the 8 Pads . 113.4 MMC(MIDI MACHINE CONTROL) . 12Section 4: Usage Examples . 124.1 Recording Your Performance on A Sequencer . 12Section 5: MIDI Information Specification . 125.1 Program & Bank Changes Explained . 12Section 6: Troubleshooting . 13Section 7: Technical Info . 14Section 8: Appendices . 14Appendix A ——MIDI IMPLEMENTATION CHART . 14Appendix B – Useful MIDI Data Tables . 15Appendix C - General MIDI Controller Numbers (MIDI CC's). 17Appendix D – Assignable Controller Numbers to Linear Controllers . 17Appendix E-Assignable Controller Numbers to Non-Linear Controllers . 18Appendix F – Assignable Controller Numbers to Rotary Encoders . 18Appendix G – Assignable Controller Numbers to Pressure Pads. 18Appendix H - Factory Presets . 19Appendix I - Hexadecimal Conversion Chart . 192
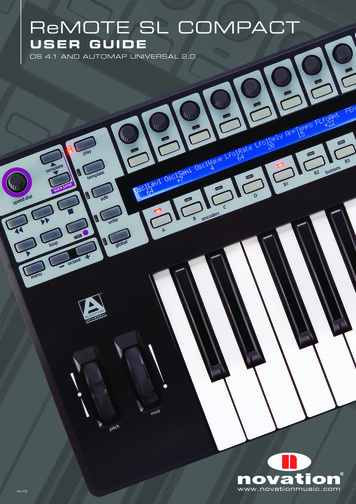
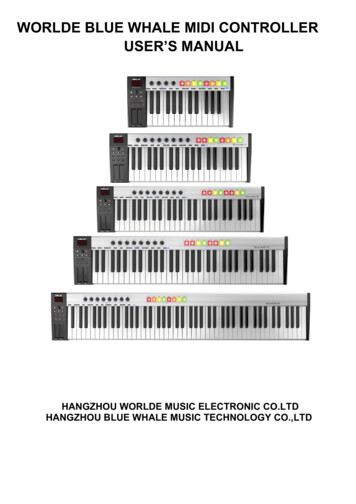
HANGZHOU BLUE WHALE MUSIC TECHNOLOGY CO.,LTDWEBSITE: WWW.WORLDE.COM.CNHANGZHOU WORLDE MUSIC ELECTRONIC CO., LTDEMAIL:SALES@WORLDE.COM.CNTEL:86 571 88730848IntroductionThank you for purchasing the WORLDE BLUE WHALE 25/37/49/61/88 USB MIDI controller. BLUE WHALE 25/37/49/61/88 is a greatcontroller for the studio and live stage. To help you get the most out of your new instrument, please read this manual carefully.Your BLUE WHALE 25/37/49/61/88 MIDI controller will not make any sound unless it is connected to a computer or other externalMIDI gear. This is because the BLUE WHALE 25/37/49/61/88 sends MIDI data when you play it and does not produce sound on itsown. Instead, it is used to control a virtual instrument on your computer or a MIDI sound module to generate sounds.To use the functions of this product, you’ll need to adjust the settings in the application you’re using. Adjust these as described in theowner’s manual for your application.BLUE WHALE 25/37/49/61/88 integrates perfectly with DAWs (such as Ableton Live, Bitwig and so on) for both production andperformance.What’s in the Box?Blue Whale keyboardUSB cableUser manualBlue Whale Keyboard overviewHere is a rundown of some of the great features the Blue Whale keyboards have to offer: 8 high quality velocity & pressure sensitive performance trigger pads with RGB backlit. 2 x Assignable Pedal Interfaces (PEDAL A:switch pedal, default as sustain pedal, PEDAL B:continuous pedal, default asexpression pedal ), which can be assigned as 130 controllers. 8x Assignable Dials (4 dials for Blue Whale 25). Each dial can establish an independent channel and can be assigned as130 controllers. 2 x Assignable Pitch Bend and Modulation Touch Strips, which can be assigned as 130 controllers. 5 Buttons for MMC. 1x Value Dial(Enter button :Push to enter). 6 Function buttons - providing functions like PROGRAM, CHANNEL, OCTAVE, TRANSPOSE, CONTROL, ASSIGN 1xMIDI OUT. USB interface, adaptable to USB 2.0(FULL SPEED). Power supplied by USB and DC 5 V. The ability to upgrade via USB(Please visit www.worlde.com.cn) Compatible with Windows XP/Vista/Windows7/8/10 and Mac OSX. Drive free and hot-plug supported.Section 1: Getting Started1.1 Blue Whale Keyboards Overview1.1.1 Top Panel Overview3
HANGZHOU BLUE WHALE MUSIC TECHNOLOGY CO.,LTDWEBSITE: WWW.WORLDE.COM.CNHANGZHOU WORLDE MUSIC ELECTRONIC CO., LTDEMAIL:SALES@WORLDE.COM.CNTEL:86 571 887308481.1.2 Side Panel Overview1.1.3 Control DefinitionsThe controls are referred by name throughout this manual.1:LED DISPLAY2: Encoders3:Transport buttons4:Keyboard5:Trigger Pads(with RGB backlit, refer to 3.3.4 formore info)6:Function buttons7:Value Dial(Enter button: Push to enter)8:Modulation/Pitch Bend Touch Strips9:Multi-functional Keyboard10:DC power socket11:USB 2.0 port12:Pedal A (default as sustain pedal)13:Pedal B( default as expression pedal)14:MIDI OUT port1.2 SetupIf you intend to connect your Blue Whale keyboard to a computer, please read sections 1.2 and 1.3 first. If you only intendto use your Blue Whale keyboard to control a sound module or synthesizer using the external MIDI OUT, you should skipto section 1.4.1.2.1 Minimum System RequirementsIf you are using your Blue Whale with a computer, the following minimum system requirements apply:WindowsMac OSi3 1.2GHz or higherMacintosh i3*1.2GHz/P4*1.2GHz or higher(CPU requirement may be higher for laptops)(CPU requirement may be higher for laptops)1G RAMOS X 10.3.9 with 1G RAM,Direct X 9.0b or higherOS X 10.4.2 or greater with 1G RAMWindows XP (SP2) or higher*G3/G4 accelerator cards are not supported.(Windows 98, Me, NT or 2000 not supported)WORLDE suggests you also check the minimum system requirements for your software, as they may be greaterthan the above.USB hubs are not supported. WORLDE suggests that you connect directly to one of your computer’s built in USB ports.4
HANGZHOU BLUE WHALE MUSIC TECHNOLOGY CO.,LTDWEBSITE: WWW.WORLDE.COM.CNHANGZHOU WORLDE MUSIC ELECTRONIC CO., LTDEMAIL:SALES@WORLDE.COM.CNTEL:86 571 887308481.3 Using The Blue Whale with Your SoftwareWhen installed, the Blue Whale appears as a simple MIDI device with one input port and one output port. You shouldselect the listed Blue Whale input port as the MIDI input device in your software. Once this is set, your software should beable to receive notes and controller data from the Blue Whale.If you have connected external MIDI gear like a drum machine or another keyboard to your Blue Whale’s MIDI IN port,this gear can be interfaced to the computer by selecting the listed Blue Whale input port. This way, your Blue Whale isacting as a MIDI to USB interface.The port names are defined as USB MIDI CONTROLLER when connecting to USB port.It will appear as a single USB MIDI CONTROLLER in the Device Manager.1.4 MIDI ConnectionsThe MIDI Out port accepts a standard 5-pin DIN-type MIDI plug (available from most professional audio retailers).The MIDI Out port can be used to connect the Blue Whale to a hardware sequencer, an external synthesiser or soundmodule, for example.1.5 Power SupplyIf you are using your Blue Whale with a computer via its USB port, there is no need for an external power supply. YourBlue Whale will draw its power from the computer.However, if you are intending to use your Blue Whale without connecting to a computer’s USB port, then you will need touse an external power supply. No power supply is included in the box. Please select one that meets the followingrequirements: 5V DC 250mA -300mA Centre positive(AC power adaptor pin diameter:5.5mm*2.1mm)Section 2:Basic MIDI Control from Your Blue WhaleYour Blue Whale controller will not make any sound unless it is connected to a computer or other external MIDI gear.This is because the Blue Whale sends MIDI data when you play it and does not produce sound on its own. Instead, it isused to control a virtual instrument on your computer or a MIDI sound module to generate sounds.This is a good place to introduce you to the way we approach the differences between the Blue Whale 88 and 61/49/37and the Blue Whale 25. The appearance and functionality of the Blue Whale 88/61/49 and 37 are the same, it’s just thesize of the keyboard that is different, so when we give instructions for these models, these four are always groupedtogether. The Blue Whale 25 looks different, and a few its functions are accessed in a different way, so for this model wewill always give you a separate set of instructions.2.1 Function Keys/Multi-functional keyboard5
HANGZHOU BLUE WHALE MUSIC TECHNOLOGY CO.,LTDWEBSITE: WWW.WORLDE.COM.CNHANGZHOU WORLDE MUSIC ELECTRONIC CO., LTDEMAIL:SALES@WORLDE.COM.CNTEL:86 571 887308482.2 The KeyboardWhen you play the keyboard, MIDI note messages are sent. These messages are read by your computer software orexternal MIDI gear and used to generate sound accordingly.2.2.1 Velocity CurveEvery time you press a key, a MIDI note message is sent with a velocity value between 0 and the maximum; this valuespecifies how hard you pressed the key. Since different people have different playing styles, your Blue Whale offers 6different velocity curves as shown below. The default is the first one. You should experiment with the different velocitycurves to seek the curve that best suits your playing style.To change the velocity curve:Press EDIT button to enter keyboard multi-function mode. Press Velocity Curve button to start the selection function ofvelocity curve. When this button is valid, the LED displays the Number of current velocity curve. It can be adjusted byValue Dial. The initial value is 1, adjusting scale is 01 06. Press Enter button to confirm. It will be saved and displayedfor the current velocity curve after resetting.The operation steps and LED displays the following:(1) Press EDIT button to enter keyboard multi-function mode.(2) Press the “VEL CURVE” button to start the selection function of velocity curve and the LED displays the number ofcurrent velocity curve.(3) Rotate the Value Dial to adjust the keyboard velocity curve. The initial value is 1, adjusting scale is 01 06.(4) Press the Enter button to confirm and the LED will display Number of current velocity curve. It will be saved anddisplayed for the current velocity curve after resetting.2.2.2 OCTAVEPress the Octave button to adjust the octave function. This function allows the keyboard to change the Pitch up/down byoctave. When this button is activated, the LED displays the value of current transposition. Press the Enter button toconfirm. It can be adjusted by Value Dial. The initial value is 0, adjusting scale is -4 5. It will be saved and displayed forthe current transposition after resetting. The operation steps and LED displays the following:(1) Press the “Octave” button and the LED displays the value of current transposition.(2) Rotate the Value Dial to adjust the keyboard octave. The initial value is 0, adjusting scale is -4 5.(3) Press Enter button to confirm and the LED will display the value of current transposition. It will be saved and displayedfor the current OCTAVE after resetting.2.2.3 TRANSPOSEPress the Transpose (X’POSE) button to adjust the Transpose function. Transpose adjusting function allows thekeyboard to change the Pitch up/down by semi-tone. When this button is valid, the LED displays the value of currenttranspose. Press Enter button to confirm. It can be adjusted by Value Dial. The initial value is 00, adjusting scale is6
HANGZHOU BLUE WHALE MUSIC TECHNOLOGY CO.,LTDWEBSITE: WWW.WORLDE.COM.CNHANGZHOU WORLDE MUSIC ELECTRONIC CO., LTDEMAIL:SALES@WORLDE.COM.CNTEL:86 571 88730848-12 12. It will be saved and displayed for the current transpose after resetting. The operation steps and LED displays thefollowing:(1) Press the “X’pose” button and the LED displays the value of current transposition.(2) Rotate the Value Dial to adjust the keyboard transpose. The initial value is 00, adjusting scale is -12 12.(3) Press Enter button to confirm and the LED will display the value of current transposition. It will be saved and displayedfor the current transposition after resetting.2.3 CHANNELPress the Channel selection function button to adjust the current MIDI channel. When this button is valid, the LEDdisplays the current channel number. The channel can be selected and confirmed by Value Dial. The initial setting is 1,adjusting scale is 01 16. It will be saved and displayed for the current channel after resetting. The operation steps andLED displays the following:(1) Press the “Channel” button and the LED displays the current channel number.(2) Rotate the Value Dial to adjust the keyboard channel. The initial setting is 01, adjusting scale is 01 16.(3) Press Enter button to confirm and the LED will display “Done”. It will be saved and displayed for the current channelafter resetting.2.4 CHANGING VOICE AND VOICE BANK2.4.1 PROGRAMPress Program button to adjust the voice of current channel. When this button is valid, the LED displays the current voicenumber. The voice can be adjusted and confirmed by Value Dial.The initial setting is 00, adjusting scale is 00 127. It will be saved and displayed for the current voice after resetting. Theoperation steps and LED displays the following:(1) Press the “Program” button and the LED displays the current voice number.(2) Rotate the Value Dial to adjust the keyboard program. The initial setting is 00, adjusting scale is 00 127.(3) Press Enter button to confirm and the LED will display “Done”. It will be saved and displayed for the current voicenumber after resetting.2.4.2 BANK L/MPress EDIT button to enter keyboard multi-function mode. Press Bank L/M button to adjust the voice bank of currentchannel. When these buttons are valid, the LED displays the current voice bank number. The voice can be adjusted orselected by Value Dial. The initial setting is 00, adjusting scale is 00 127. It will be saved and displayed for the currentvoice number after resetting. The operation steps and LED displays the following:(1) Press EDIT button to enter keyboard multi-function mode.(2) Press the “Bank L/M” button and the LED displays the current voice bank number.(3) Rotate the Value Dial to adjust the keyboard Bank L/M voice. The initial setting is 00, adjusting scale is 00 127.(4) Press Enter button to confirm and the LED will display “Done”. It will be saved and displayed for the current voicenumber after resetting.2.5 MIDI Controller MessagesThere are 135 MIDI controller messages that are used for controlling the MIDI-adjustable parameters in your software oron your external MIDI gear(0 to127 is the standard MIDI control parameter,128 to 134 is the special MIDI controlparameter). Examples of these controllable parameters include volume, pan, expression, reverb, chorus and portamento.Each of the controls on your Blue Whale keyboard is able to send any of the 128 standard MIDI controller messages tocontrol such parameters. Please note that in order for these effects to work, the MIDI device you are sending to must beable to receive these messages. A full list of these control messages is given in Appendix C.For example, you may want to set the Knob1 to control the channel volume. This is done by assigning controller 7 to theKnob1.Examples of other popular effects are listed in the table below. (Please consult Appendix C for the full list.)7
HANGZHOU BLUE WHALE MUSIC TECHNOLOGY CO.,LTDWEBSITE: WWW.WORLDE.COM.CNHANGZHOU WORLDE MUSIC ELECTRONIC CO., n1Volume7Pan10Expression11Reverb depth91Chorus depth93TEL:86 571 88730848There are many different types of virtual instruments available and most of these respond to MIDI controller messages,allowing you to control a variety of parameters from your Blue Whale keyboard. Please review the manual that came withyour software or external gear to see what these controller numbers are.2.5.1 Programming the Controls on MIDI ControllerWhen programming a physical controller on your Blue Whale, the controller that was last used will be the first oneselected for programming. To select a different physical controller for programming, the method is: Move the physicalcontroller you wish to program and press the assignable button.When in assign, the LED displays “CH0”.2.5.2 ASSIGNABLE DIALThere’re 8 dials(4 for Blue whale 25) that can be assigned channel and controller number. independently. First press the“Assign” button. Then operate the dial for selection, and the LED shows the controller number.Input the No. with Value Dial when the dial is selected. The numbers are the controllers. You also need to use the ‘Enter’button to confirm the data. For example: if you want to assign R1 to volume control 7, operation steps are shown asbelow:(1) Press CTRL ASSIGN button and the LED displays “CH0”.(2) Rotate R1 dial.(3) Input and confirm the number with the “Value” dial. The numbers are the controllers (The controller value will bedisplayed when you exit Assign mode).(4) Press the “Enter” button to confirm and the LED will display “Done”. It will be saved and displayed for the current valueafter resetting.2.5.3 PITCH BEND AND MODULATION TOUCH STRIPSIf you touch the Pitch bend strip at its centre and move your finger forward or backward, it will alter the pitch of the playedsound.Similarly, moving your finger along the Modulation strip alters the modulation amount of the played sound.2.5.4 ASSIGNABLE PEDAL2 pedal interfaces that can be assigned controller No. independently. First press the ”assign” button. Then operate thepedal to select it, and the LED shows the controller number and the controller value. Input the No. with Value Dial whenthe pedal is selected. You need to use enter to
BLUE WHALE 25/37/49/61/88 integrates perfectly with DAWs (such as Ableton Live, Bitwig and so on) for both production and performance. What’s in the Box? Blue Whale keyboard USB cable User manual Blue Whale Keyboard overview Here is a rundown of some of t