Transcription
Paper ID #22132Integrating CAD and CAM for Design-build ProjectsDr. Joseph Rudy Ottway, Murray State UniversityDr. Rudy Ottway is an assistant professor in the Institute of Engineering at Murray State University inMurray, KY. He teaches SOLIDWORKS, AutoCAD, and engineering drawing in the Engineering Graphics and Design program. Prior to academia, he worked as a CAD Analyst with Science ApplicationsInternational Corporation in Huntsville, AL. He completed a B.S. in Engineering Graphics and Designand a M.S. in Management of Technology from Murray State University, and a Ph.D. in TechnologyManagement with a specialization in Manufacturing Systems from Indiana State University. His researchinterests include computer-aided design (CAD), computer-aided manufacturing (CAM), additive manufacturing, product design and development, and experiential learning.c American Society for Engineering Education, 2018
Integrating CAD and CAM for Design-Build ProjectsAbstractThis evidence-based practice presentation discusses design and build projects within anundergraduate, Engineering Graphics and Design program. Students are presented with aproblem statement and parameters and asked to design a solution. Students utilize computeraided design (CAD) and computer-aided manufacturing (CAM) software during the design andmanufacturing process. Teams of two or three students sketch ideas, create 2D geometry inAutoCAD or 3D models/assemblies in SOLIDWORKS, participate in a pre-manufacturingdesign review, manufacture components using a 3D printer, CNC router or mill, and/or laser,assemble components, and provide a post-manufacturing design review. This presentationprovides information regarding CAD and CAM tools, project workflow, and projectobservations, challenges and lessons learned. It is the intent of this presentation to provideresources for engineering and engineering technology educators to engage students in designprojects that produce physical prototypes or design artifacts.IntroductionA primary goal of many engineering educators is to teach students relevant knowledgeand applicable skills that prepare students for a career in engineering or engineering technology.Jonassen, Strobel, and Lee [1] describe this preparation and transition as workplace transfer. ThePedagogy for Employability Group [2] suggests, when hiring graduates, employers seek thefollowing attributes: ingness to learnindependent working/autonomyworking in a teamability to manage othersability to work under pressuregood oral communicationcommunication in writing for varied purposes/audiencesnumeracyattention to detailtime managementassumption of responsibility and for making decisionsplanning, coordinating and organizing abilityIn order to receive accreditation from the Accreditation Board for Engineering andTechnology (ABET), an engineering or engineering technology program “must havedocumented student outcomes that prepare graduates to attain the program educational objectives[3].” Highlighted below are several outcomes provided by ABET [3] for accrediting engineering
technology programs. Interestingly, and not surprisingly, these student outcomes are similar tothe attributes specified as desirable by employers. an ability to select and apply the knowledge, techniques, skills, and modern tools of thediscipline to broadly-defined engineering technology activitiesan ability to select and apply a knowledge of mathematics, science, engineering, andtechnology to engineering technology problems that require the application of principlesand applied procedures or methodologiesan ability to design systems, components, or processes for broadly-defined engineeringtechnology problems appropriate to program educational objectivesan ability to function effectively as a member or leader on a technical teaman ability to identify, analyze, and solve broadly-defined engineering technologyproblemsan ability to apply written, oral, and graphical communication in both technical and nontechnical environments; and an ability to identify and use appropriate technical literatureParticipating in design-build projects engages students in problem solving activities in anacademic setting that mimic those of an industrial setting. Jonassen [4] suggests that learnersneed complex, ill-structured problem solving experiences. Design projects inherently contain illstructured problem solving activities that produce a variety of solutions [4], [5]. A problem musthave 1) an unknown entity in some situation, and 2) solving for the unknown must have somesocial, cultural, or intellectual value [4]. Problem solving requires the student to create a mentalmodel of the problem statement or problem space, and progress into an activity-basedmanipulation of the problem [4]. Design projects provide an enjoyable and unique opportunityto learn in new ways and transfer knowledge [6]. Students that complete design projects learnand practice the skills sought by employers. Students gain first-hand experience in both hard andsoft skills, while solving problems and creating physical artifacts.Experiential learning techniques serve as the foundation for design projects. Twotechniques that fall under the umbrella of experiential learning are problem-based learning andproject-based learning [7]. Problem-based learning involves students working through complexor ill-structured problems by deciding what knowledge they need to apply to create a solution[1], [7]. Project-based learning involves some of the same aspects as problem-based learning, butwill typically result in the creation of a physical design artifact that provides a problem solution.Problem-based learning is often open-ended engineering design projects that include learningsignificant design elements such as problem identification and formulation, design conceptgeneration, and project management [7]. Jonassen et al. [1] assert “more classroom experiencesand all PBL programs should engage students in resolving the complexities and ambiguities orworkplace problems more consistently throughout the curriculum (p.147).” McClellan and Hyle[8] support this by adding, “the goal of higher education should be to facilitate learning throughexperiences.”
Design ProjectsAutomaton ProjectAn automaton is a mechanical device utilizing mechanisms to create repeatedmovements. One Merriam Webster [9] definition describes automaton as, “a machine or controlmechanism designed to follow automatically a predetermined sequence of operations or respondto encoded instructions.” Wood [10] defines automaton as a “machine that contains within itselfthe power of motion.” Mechanisms used in automatons can include gears, springs, cams, pulleys,and linkages. When combined in creative ways, these mechanisms can create whimsical andmesmerizing movements. Designers have been creating automatons for generations. Some earlyand well know automatons include the Digesting Duck (1739), the Flute Player (1738), and theTambourine Player (1739) by Jacques de Vaucanson and The Writer (1774), The Draughtsman(1774), and a Musical Lady (1776) by Pierre Jaquet-Droz [10].Engaging students in manufacturing an automaton provides a unique opportunity to mixcreativity with design. Students gain design experience, develop CAD skills, apply design formanufacturing and assembly (DFMA) principles, utilize manufacturing processes, considermaterials, and learn to work with others. Consequently, these are essential qualities thatemployers seek when hiring designers and engineers.The automaton project was implemented in a sophomore-level, parametric modeling andrendering CAD course in the fall semester of 2017. The lecture and lab course met three days aweek and each class period was 110 minutes. Students utilized SOLIDWORKS as their primaryCAD software for the course. Students had access to an Epilog Mini 18 laser engraver/cutter, anAXIOM AR4 CNC router, and various 3D printers including a Stratasys uPrint, Afinia H800,and FormLabs Form 1 . Students completed the automaton project in four weeks. Students weregrouped into teams of three by random assignment. At least two approaches for the creation ofstudent teams can be used. One approach is to use the randomly assigned method and anotherapproach is the strategically assigned method. Random assignment is often used because of itsconvenience [1]. The opposite approach to randomly assigning teams is to strategically assignspecific students to specific teams based on their individual skills. In this case, the instructorcreates teams based on his or her internal assessment and will include a combination of thestudents’ hard and soft skills. It is important to keep the number of students in a team to two orthree as having too many students in a group leads to members that do not contribute [11].Students were given a problem statement or objective. The stated objective of the automatonproject was to design and manufacture a functioning automaton. Prior to meeting with their team,students were given time individually to conduct preliminary research, brainstorm ideas, andcreate sketches of potential automatons. Afterward they met with their peers and discussed ideasas a team. The team generated one idea with which to move forward for design and manufacture.As a team, students assign the various tasks needed to transition from ideas and sketches into a3D SOLIDWORKS model. Students were given three class periods to complete the preliminarydesign.
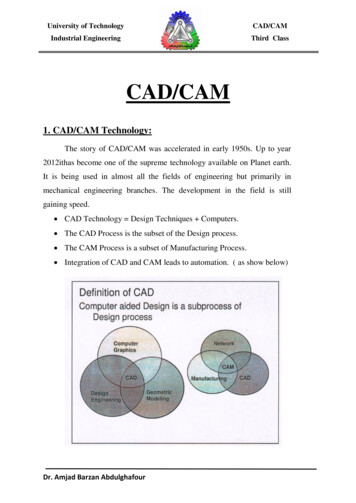
Figure 1. Screenshot showing CAD model of airplane automaton in SOLIDWORKSAfter the three class periods, students participated in a preliminary design reviewadministered as an oral presentation to the instructor and the class. The preliminary designreview is a brief overview of the design and should address the project objective, materials beingconsidered, manufacturing processes to be used, time of manufacturing and assembly, andestimated cost of materials. The preliminary design review presentation can include acombination of sketches, CAD screenshots or renderings, engineering drawings, photos orvideos, or any media that clearly communicates design and manufacturing of the automatonproject. The preliminary design review allows development of written and oral communicationskills as well as peer evaluation. The preliminary design review also serves as anotheropportunity for the instructor to provide valuable input related to successful design andmanufacturing [11]. It is recommended that the instructor ask guiding questions that leadstudents to the discovery of changes which facilitate the production of a functioning automaton.During the questions and comments period of the preliminary design review, typically at the end,students are encouraged to take notes related to changes that need to be made to the design.Students are given two additional class periods to make changes to their design and prepare for afinal design review.
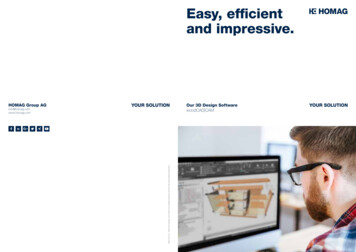
Figure 2. Physical model of airplane automatonThe final design review is similar to the preliminary design review, but should present arefined design that is ready for manufacturing. It is important to note, and an invaluable part ofthe process, that the final design may not be perfect. Students then progress to manufacturing andutilize laser engraving/cutting, 3D printing, and CNC operations, or a combination of thesemanufacturing processes, to produce their design. Students were given three class periods tocomplete manufacturing, assembly, and testing. At this point in the project students were allowedand encouraged to make simple modifications to their design based on data and feedback fromthe physical prototypes. Students were required to give a final presentation describing the entiredesign and manufacturing process.
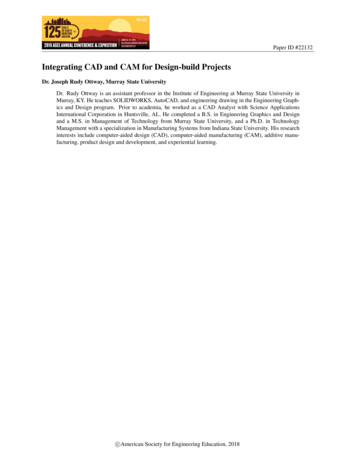
Figure 3. Completed automaton projectsAfter completing the automaton project students were asked to provide reflectionstatements on aspects that were enjoyable, unenjoyable, and what they would do differently.Below are a few samples of student feedback.1. What aspects did you find enjoyable?“I liked that challenge of designing something that had a specific function and seeing it all theway through production.”“The design process and the freedom in this assignment.”“I found the complications that we had to face enjoyable.”2. What aspects did you find unenjoyable?“I had to redo my assembly twice which was annoying but it was my fault.”“The time crunch at the beginning of the project. It worked out though.”“It would be more enjoyable if we had another week.”3. What would you do differently?“Try to incorporate more mechanical movements into the design.”“Have a more defined process, maybe a basic model to base things off of.”“I would have finished my design sooner and ordered parts sooner.”
Additionally, based on participation in the automaton project, students were asked to rankthe increase of their skillset. The 10 point Likert scale ranged from ‘0 – Did not increase’ to ‘10– Significantly increased’. Table 1 below highlights the student rankings.Table 1.Student rankings of skills after automaton projectStatementRank the amount that participation increased your SOLIDWORKS skills.Rank the amount that participation increased your knowledge of design formanufacturing.Rank the amount that participation increased your ability to effectively workon a team.Note. n 15 students. Rankings are based on a 10 point Likert scaleRanking7.478.206.60In addition to the automaton project this course engaged students in a variety of reverseengineering activities where students disassembled mechanical products, measured items withscales and calipers, and created 3D parts, assemblies, and 2D engineering drawings usingSOLIDWORKS. Students typically participate in at least one other design/build project. Basedon an IASystem course evaluation the overall summative rating for this course has a median of4.9 out of 5.0 (n 13) and a challenge and engagement index of 5.1 out of 7.0 (n 13). Theoverall summative rating “represents the combined responses of students to the four globalsummative items and is presented to provide an overall index of the class’s quality.” Thechallenge and engagement index “combines students responses to several IASystem itemsrelating to how academically challenging students found the course to be and how engaged theywere.” When asked to rank the amount you learned in this course a median score of 4.8 out of5.0 was calculated (n 12). When asked to rank the relevance and usefulness of course content amedian score of 4.9 out of 5.0 was calculated (n 13).Table 2. below provides a brief summary of the timeline associated with the automaton project.Table 2.Project activities and allotted timeActivityResearch, idea generation, individual sketches, team discussionsPreliminary design creation (SOLIDWORKS)Preliminary design review (oral presentation)Final design creation (SOLIDWORKS)Final design review (oral presentation)Manufacturing, assembly, testing, design changes, andremanufacturing (3D printing, CNC router, laser cutting)Final presentation (oral presentation)Note. Class period length is 110 minutesClass periods allotted1312131
3D Printed Desktop Catapult ProjectOver the last decade classrooms have drastically increased the use of 3D printing becauseof its ability to assist in teaching design and engineering concepts [12], [6]. Other educators haveeven implemented catapult or trebuchet projects in their classrooms [13], [14]. 3D printing offersan inexpensive and easy way for students to produce a physical prototype of their digital CADmodel. Physical artifacts or prototypes are invaluable to connection of CAD skills and the abilityto design successful products.The objective of the 3D printed desktop project was to design a small, desktop catapult tolaunch a marble. The catapult project was implemented in a freshman-level, CAD coursefocusing on the use of SOLIDWORKS in the spring semesters of 2016 and 2017. The lectureand lab course met three days a week and each class period was 110 minutes. Students worked inteams of two. Students used two, 3” X .125” rubber bands as the energy source for launching themarble. The instructor informed students at the beginning of the project that final designs wouldbe 3D printed using material extrusion technology. Material extrusion can also be known asFused Deposition Modeling (FDM), a proprietary Stratasys term, or Fused Filament Fabrication(FFF), a term often used in the RepRap community. Consequently, students were encouraged toconsider design methods for 3D printing, including build envelope size, material use, printingtime, feature details, part orientation, and assembly. An initial design parameter required studentsto fit all catapult parts within a single build or print job, with a maximum size envelope of 6” X6” X 6”. Students used SOLIDWORKS computer-aided design (CAD) software to design theircatapults. Students were required to create ideation sketches, design 3D SOLIDWORKS partsand create an assembly, produce a 2D SOLIDWORKS assembly drawing with balloons and abill of materials, render a photorealistic image in SOLIDWORKS PhotoView 360, and animatethe assembly and disassembly of the catapult.Figure 4. Screenshot showing CAD model of catapult in SOLIDWORKS
After all catapults had been 3D printed, students assembled the catapults and preparedthem for launching marbles. On average, most teams launched marbles between 25 and 35 feet.However, one team launched a marble an average of 72 feet! Students were asked to rank theiroverall satisfaction and any perceived increase in their skillset. Table 3 reveals a high ranking,8.50 out of 10, for overall satisfaction with the catapult project.Table 3.Student rankings of skills after catapult projectStatementRank your overall satisfaction with the catapult project.Rank the amount that participation improved your SOLIDWORKS skills.Rank the amount that participation improved your design skills.Rank the amount that participation increased your team work skills.Ranking8.507.588.587.83Note. n 12 students. Rankings are based on a 10 point Likert scaleFigure 5. Physical prototype of 3D printed desktop catapultThe 3D printed desktop catapults offer the opportunity for students to engage in a fun,tangible, and competitive project that builds CAD and design skills, increases knowledge ofdesign for manufacturability and assembly methods, and promotes teamwork. Challengesassociated with 3D printing desktop catapults include time and material for 3D printing. It iscritical for the instructor to work closely with students to challenge design decisions and provide
feedback concerning manufacturability, assembly, and catapult performance. To assist inlearning project management, it is recommended to create a timeline that highlights criticalmilestones.After completing the catapult project students were asked to provide reflection statementsregarding aspects that were easy, difficult, and what they learned about design. Below are a fewsample student comments.1. What was the easiest part of the catapult design project?“Giving the design review presentation was one of the easier parts of the project.”“Coming up with a design that was different from the others.”“Working with my teammate.”2. What was the most difficult part of the catapult design project?“Carrying out the design properly and getting everything to fit.”“Figuring out the tolerance for the holes, for the parts to assembly correctly.”“Making things fit in the build plate.”3. What did you learn about design during this project?“I learned a lot about how things fit together in real life (it’s a lot different thanSOLIDWORKS).”“A knowledge of the materials being used is important.”“I need to think more about the size of parts.”This freshman level course teaches students the fundamentals of SOLIDWORKS parts,assemblies, and drawings. Students learn SOLIDWORKS by modeling a number of basic 3Dparts ranging in geometric complexity from simple to intermediate, creating 2D engineeringdrawings based on ASME standards, and constructing several 3D assemblies. The parts andassembly assignments are taken from the Technical Graphics Communications – 4th Edition byBertoline, Wiebe, Harman, and Ross and The Beginner’s Guide to SOLIDWORKS: Level 1 byAlejandro Reyes.Based on an IASystem course evaluation the overall summative rating for these courseshas a median of 4.8 out of 5.0 (n 22) in 2016 and 4.8 out of 5.0 (n 12) in 2017. The challengeand engagement index was 5.4 out of 7.0 (n 22) in 2016 and 5.3 out of 7.0 (n 12) in 2017.When asked to rank the amount you learned in this course a median score of 4.8 out of 5.0 wascalculated (n 21) in 2016 and 4.8 out of 5.0 (n 12) in 2017. When asked to rank the relevanceand usefulness of course content a median score of 4.8 out of 5.0 was calculated (n 21) in 2016and 4.9 out of 5.0 (n 12) in 2017.
Figure 6. 3D printed desktop catapults
CNC Cube ProjectThe objective of the computer-numeric control (CNC) cube project was to create acustom design to be etched or cut using a CNC machine. The CNC cube project wasimplemented in a sophomore-level, CAD course focusing on the use of SOLIDWORKS in thefall semester of 2016. The lecture and lab course met three days a week and each class periodwas 110 minutes. Students worked individually to create their design. Each student was given acube of 6061 aluminum measuring 1.25” X 1.25” X 1.25”. Students were informed that the CNCcube would be cut using a 1/16” square end mill using a Tormach PCNC 770 CNC mill. Studentsused SOLIDWORKS CAD software to design geometry to be removed from at least one face ofthe cube.Figure 7. Screenshot showing CAD model of CNC cube in SOLIDWORKSStudents could choose to cut up to four faces of the aluminum cube. After geometry ofthe material to be removed was complete, students were required to generate the proper toolpathsusing an add-in to SOLIDWORKS named HSM Premium.
Figure 8. Screenshot showing HSM Premium CNC toolpaths in SOLIDWORKSHSM Premium is computer-aided manufacturing (CAM) software produced byAutodesk. HSM Premium CAM software is an add-in to Inventor or SOLIDWORKS and is usedto simulate CNC toolpath operations and export the appropriate machine’s G-code. G-code isplain text language that instructs the CNC controller to perform desired motion and cutting tocomplete the cutting operations [15]. The green geometry shown in Figure 8 represents thealuminum cube and the blue circular and vertical lines represent the path of the cutting tool.Prior to using the Tormach CNC mill, students are required to meet with the instructor to reviewthe toolpath simulation and closely inspect parameters such as spindle revolutions per minute(RPM), cutting speed and depth, travel speed, clearances, and manufacturing time. Figure 9shows a completed CNC cube. It should be noted that the plunge rate was incorrectly specified inHSM resulting in a broken end mill and the student decided not to complete the hole pattern onthe cube’s perimeter. Some students decided to drill a small hole in the top, glue in braided steelwire, and attach an alligator clip to create a picture or note holder.
Figure 9. Completed CNC cube projectIn addition to the CNC cube project this course engaged students in a variety of reverseengineering activities where students disassembled mechanical products, measured items withscales and calipers, and created 3D parts, assemblies, and 2D engineering drawings usingSOLIDWORKS. Students participated in a variety of assignments and design-build projectsduring the course of the semester. Based on an IASystem course evaluation the overallsummative rating for this course has a median of 4.8 out of 5.0 (n 25) and a challenge andengagement index of 5.3 out of 7.0 (n 13). When asked to rank the amount you learned in thiscourse a median score of 4.7 out of 5.0 was calculated (n 25). When asked to rank the relevanceand usefulness of course content a median score of 4.8 out of 5.0 was calculated (n 25).ConclusionImplementing and engaging students in design-build projects is an invaluable opportunityfor students to increase skills in CAD, design for manufacturing and assembly, application ofmanufacturing processes and materials, and teamwork. Students understand design and applyknowledge transfer when digital CAD files are converted into tangible, physical products. Thefeedback and data students receive from inspecting manufactured geometries and relationships ofproduced features drastically impacts the amount they learn. Reduced pricing and vastavailability of various CAD, CAM, and prototyping equipment provides educators opportunitiesto implement design projects in the classroom. Available online are a myriad of resourcescontaining project ideas for STEM projects at all age levels. Educators can develop andimplement their own design projects, seek ideas or design problems from peers, family, orfriends, or work with local industries to develop design projects.The author recommends allowing plenty of time to complete design projects. It isimportant not to rush, but instead allow time for students create, design, manufacture, assemble,reflect, redesign and remanufacture as necessary. A key component related to engaging studentsin design-build projects is allowing creativity, minimal guidance, and the opportunity for failure.
In most cases, students do not get the design and manufactured components perfect andfunctioning on their first attempt. Student reflection and discussion of the successes and failuresof the project are the key to learning. A final written or oral presentation is recommended thusgiving students a final opportunity to process what they have learned during the design-buildprocess. Appendix A offers a rubric for assessing design reviews.
References[1] D. Jonassen, J. Strobel, and C.B. Lee. “Everyday Problem Solving in Engineering: Lessonsfor Engineering Educators,” Journal of Engineering Education, 95: 139–151.doi:10.1002/j.2168-9830.2006.tb00885.x. 2006.[2] The Pedagogy for Employability Group, “Learning & Employability: Series One,” York,United Kingdom, The Higher Education Academy, 2006. [E-book] b/pedagogy-employability[3] Accreditation Board for Engineering and Technology (ABET), “Criteria for AccreditingEngineering Technology Programs,” 2018. [Online] ingtechnology-programs-2018-2019/#outcomes[4] D.H. Jonassen, “Toward a Design Theory of Problem Solving,” ETR&D, vol. 48, no. 4, pp.63-85, 2000. [Online] Available: https://doi.org/10.1007/BF02300500[5] O. Lawanto, “Students' metacognition during an engineering design project” Perf.Improvement Qrtly, vol. 23, no. 2, pp. 117–136, doi:10.1002/piq.20084, 2010.[6] K. Sutton, M.E. Grubbs, and J. Ernst, “Designing under Constraints: Cell Phone Case DesignChallenge,” Technology And Engineering Teacher, vol. 74, no. 2, pp. s12-17, 2014.[7] N. Furman and J. Sibthorp, “Leveraging Experiential Learning Techniques for Transfer,”New Directions for Adult and Continuing Education, pp. 17–26, doi:10.1002/ace.20041, 2013.[8] R. McClellan and A.E. Hyle, “Experiential Learning: Dissolving Classroom and ResearchBorders,” Journal of Experiential Education, vol. 35, no. 1, pp. 238-252, 2012.[9] Merriam Webster, “Automaton definition,” 2018. [Online] Available: n[10] G. Wood, Edison’s Eve: A Magical History of the Quest for Mechanical Life. New YorkCity, NY: Anchor Books, 2003.11] S.S. Moor and B.D. Drake, “Addressing Common Problems in Engineering Design Projects:A Project Management Approach,” Journal of Engineering Education, 90. . 10.1002/j.21689830.2001.tb00618.x.,2001[12] R. L. Martin, N.S. Bowden, and C. Merrill, “3D Printing in Technology and EngineeringEducation,” Technology and Engineering Teacher, vol. 73, no. 8, pp. 30-35, 2014.[13] D.R. Herber, A.P. Deshmukh, M.E. Mitchell, and J.T. Allison, “Project-Based Curriculumfor Teaching Analytical Design to Freshman Engineering Students via ReconfigurableTrebuchets,” Education Sciences, vol. 6, no. 7, 2016.
[14] B. N. Roszelle, “ Implementation of 3D Printing Design Project in First Year MechanicalEngineering Course to Aid in Understanding of Engineering Design Process,” 7th First YearEngineering Experience Conference, Roanoke, VA, USA, August 3-5, 2015. 7.pdf[15] E. Ford, “ Get to Know Your CNC Code: How to Read G-Code, October 24, 2016. [Online}Available: nc-how-to-read-g-code/
Appendix A: Rubric for assessing design reviewsCategoryDesign objectiveIdeation/BrainstormingDesign forManufacturability andAssemblyManufacturing ProcessesMaterials0 – Not achieved4 - AchievedPoor0Does not discussobjective, does notunderstand designobjectiveDoes not includepreliminary ideas orsolutions, presents fewor non-applicablesolutions to solvedesign problemDoes not describe partgeometry andassemblies, providesminimal description oftypes of fit and featurerelationships, givesweak rationale fordesign choicesDoes not provideinformation aboutmanufacturingprocesses, providesminimalunderstanding ofprocess selectionMaterial list is notgiven, does not discussselection, vendors, orpricing1234ExceptionalClearly states andunderstands theproject objectivePresents numerous,applicable solutionsto solve designproblemProvides detaileddescriptions of partgeometry andassemblies, discussestypes of fits andfeature relationships,provides rational fordesign choicesUnderstandsmanufacturingprocesses, selectsappropriatemanufacturingprocesses. Providesrational for processselection, providesaccuratemanufacturingtimeframeDevelops detailed billof materials, selectsappropriate materials,provides ana
Integrating CAD and CAM for Design-build Projects Dr. Joseph Rudy Ottway, Murray State University Dr. Rudy Ottway is an assistant professor in the Institute of Engineering at Murray State University in Murray, KY. He teaches SOLIDWORKS, AutoCAD, and engineering