Transcription
Lightning LinkThe parts for the Lightning Link can be made from tool steel, machined with great precision, hardened andtempered with loving care, the polished to a high gloss that your mother would be proud of. On the otherhand, using only a couple of pieces of power hacksaw blade to make the parts from, a dremel tool, handdrill and one or two files to do the work, you can cut out the Lightning Link in about an hour.The first description will make a link that you could most likely pass on to your great grandkids. Thesecond may not last that long, but I know of one made from mild steel, that has never been hardened ortempered. It's been used to fire over 5,000 rounds, and still going strong. All that ever goes wrong with it isthe part of the bolt carrier hits gets peened over after about five or six hundred rounds. When that happens,the woman that owns it drops it out of the gun, puts it on the rear bumper of her jeep and beats it back inshape with a rock. She’s then back in business for a few hundred more rounds.The only complaint I've ever heard about the Lightning Link is it converts the firearm to full auto only. Ican't see that's a problem. No one says you have to hold the trigger down until the magazine's empty. I'vefound with a little practice it's easy to fire two shot bursts using the Link.Also keep in mind; that it takes only about ten seconds to install the Lightning Link in a standard unalteredAR-15, and only about six seconds to remove it. Going from semi-auto to full and back to semi is only amatter of seconds.How it worksIn normal semi-auto operation the hammer is cocked by a rearward movement of the bolt carrier, as thecarrier moves forward, the hammer is caught and held in the cocked position by the sear located on theforward part of the trigger catching in the sear notch, on the hammer. If you hold the trigger after a shot'sfired the sear will not catch in the hammer's sear notch when the hammer cocks because the sear isdepressed below the arc of the hammer notch.What happens is because the trigger is being held back; the disconnector hook is tipped forward and inposition to catch the hammer, stopping it from following the bolt carrier forward. When the trigger isreleased, it allows the hammer to slip from under the disconnector hook and be caught by the trigger sear inthe hammer sear notch. Making it necessary to pull the trigger for each shot.
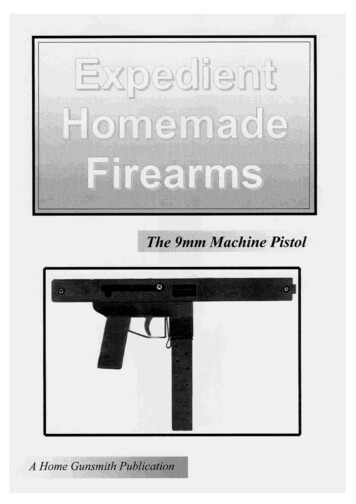
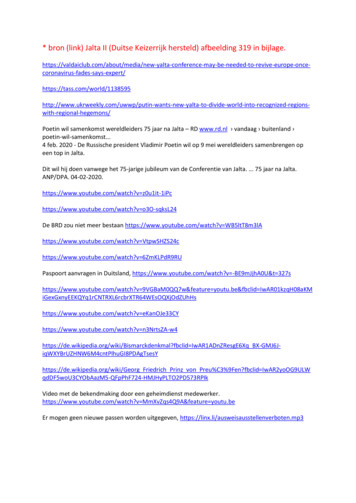
As long as the trigger is held back, the sear is held below the arc of the hammer notch. The only thingholding the hammer in the cocked position is the disconnector.The Lightning Link accomplishes full-auto fire by pulling the disconnector to the rear forcing it to releasethe hammer.The assembled link lays flat in the lower receiver, with the opening at the front fitting over the hook of thedisconnector, and the upright resting between the upper receiver take-down pin post, and the bolt carrier.In operation the takedown pin post acts as a fulcrum point. When the bolt carrier strikes the top of the linksupright the lower end is rocked to the rear, moving the body of the link backward about 1/16 inch, releasingthe hammer from under the disconnector hook. As long as the trigger is held back the rearward movementof the bolt carrier will cock the hammer under the disconnector hook. The forward movement of the carrierwill strike the upright of the link just as the bolt locks in battery, releasing the hammer, and firing theweapon. When the trigger is released, the sear will stop the hammer in the cocked position negating theoperation of the disconnector and the Lightning Link.ConstructionThe drawings show the shape and give the dimensions for a Lightning Link that fits in the Colt AR-15. Ifit's to fit in an after market lower receiver it may be necessary to change the outside dimensions. Eitherway, all that's really important is that it fits inside the receiver and can move back and forth about 1/16inch.When building the Lightning Link without a milling machine I find the simplest way is to cut the longpiece to the length and width. Next center punch and drill a 1/8 inch hole at each corner of the large oblong
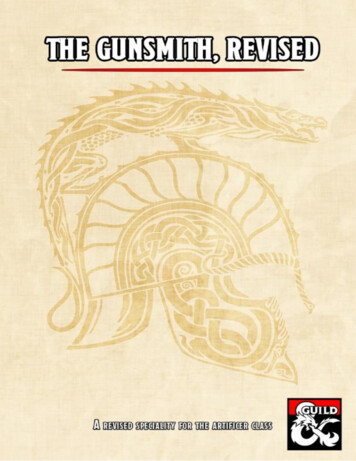
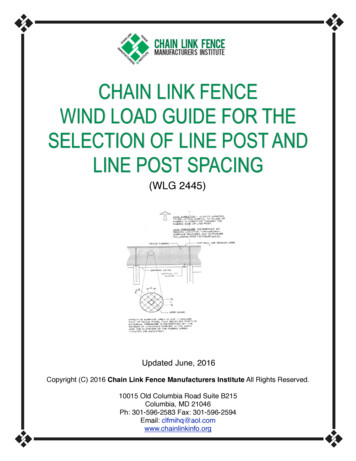
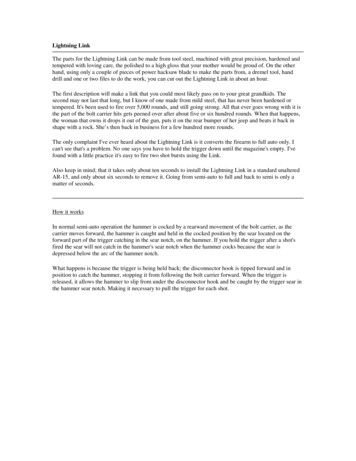
hole at one end. With a dremel tool and banded cutoff wheel cut out the material between the four holesyou drilled.Next center punch and drill a 1/8-inch hole so you can cut out the .130 wide tail that extends out of theoblong you have already cut. NOTE. Do not square off the end of the .130 cut at this time.Center punch and drill a 1/32-inch hole at each end of the .043 slot at the other end of the part. Cut the slotout with the dremel too and bonded cutoff wheel. Square the ends and finish the slot using a needle file.Clean up the oblong hole and .130 wide cut with a small file. NOTE. Now’s the time to square the end ofthe .130 cut. CAREFUL. Don’t get carried away. The distance between the front {squared end} of the.130 cut and the rear face of the .043 slot cannot be any more that 2.120.File or grind the outside edges to shape until it fits into the lower receiver without touching the innerreceiver walls.To check the link for fit and function, drop it over the hook on the disconnector, refer to drawings [A] and[B]. Hold the trigger back and cock the hammer. It will be caught by the disconnector hook. Now place ascribe or anything that will fit into the slot at the rear of the link and pull it toward the back of the receiver,the hammer should fall. If it did, keep holding the trigger, recock the hammer and do it all again. As long asyou hold the trigger back, the link will release the hammer. When you release the trigger, the link can nolonger release the hammer from the cocked position.If the link would not move back far enough to pull the disconnector hook off the hammer, find out what'sstopping it and correct the problem.
Cut the upright part to length and file or grind it to shape. File a slight bevel at the to rear of the upright.
AssemblyRefer to the first drawing. Install the parts in the lower receiver. See drawing [A]. Tip the weapon so thelinks upright rests against the rear of the receiver. Close the upper until the take-down pin post is farenough into the lower receiver, that when you tip the firearms muzzle down the links upright can restagainst the post. Continue closing the weapon until it's completely closed. NOTE. This first time you mayhave trouble getting the link upright to slide in place between the rear of the takedown pin post and the boltcarrier. All I can tell you is wiggle and jiggle things until it goes into place. It will fit in place much easierafter its shaped by the bolt carrier.After the takedown pin is in place, hold the trigger back and operate the bolt carrier about five times. Thebolt carrier hitting it forms the bend in the top of the links upright at this time. See drawing [D]. Be sure tolet the bolt slam with full force each time. Now's the time to find out if everything's working right. Cock theweapon, point it in a safe direction and pull the trigger. You should hear the hammer fall. Keep holding thetrigger, cock the weapon, and release the trigger. Pull the trigger, nothing should happen, the LightningLink will have released the hammer when the bolt carrier closed.Test FireLoad two rounds in the magazine. The first will fire when you pull the trigger, the second will fireautomatically. Check the brass for any problems. If all's well, load five rounds and fire. If all goes well,load her up and let her rip.
the woman that owns it drops it out of the gun, puts it on the rear bumper of her jeep and beats it back in shape with a rock. She’s then back in business for a few hundred more rounds. The only complaint I've ever heard about the Lightning Link is it converts the firearm to full auto only. I can't see that's a problem. No one says you have to hold the trigger down until the magazine's empty. I've