Transcription
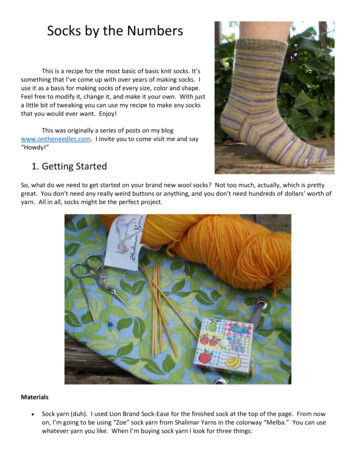
Socks by the NumbersThis is a recipe for the most basic of basic knit socks. It’ssomething that I’ve come up with over years of making socks. Iuse it as a basis for making socks of every size, color and shape.Feel free to modify it, change it, and make it your own. With justa little bit of tweaking you can use my recipe to make any socksthat you would ever want. Enjoy!This was originally a series of posts on my blogwww.ontheneedles.com. I invite you to come visit me and say“Howdy!”1. Getting StartedSo, what do we need to get started on your brand new wool socks? Not too much, actually, which is prettygreat. You don’t need any really weird buttons or anything, and you don’t need hundreds of dollars’ worth ofyarn. All in all, socks might be the perfect project.Materials Sock yarn (duh). I used Lion Brand Sock-Ease for the finished sock at the top of the page. From nowon, I’m going to be using “Zoe” sock yarn from Shalimar Yarns in the colorway “Melba.” You can usewhatever yarn you like. When I’m buying sock yarn I look for three things:
1. It has to be machine washable. I am not a crazy person and am not going to hand wash mysocks. That’s super dumb. If I’m making wool socks (which are my favorite), I use yarn madefrom Superwash Wool (which is machine-washable). Yarns that have a small percentage ofnylon or polyester mixed with the Superwash Wool are also good, since the synthetic fibers addstrength to your socks.2. I need 100 grams of yarn (about 450 or so yards) to make a pair of adult-sized socks. Mostsock yarn comes in 100 gram skeins, but sometimes it comes in 50 gram skeins, in which caseyou’ll need to buy two.3. It has to say “Sock” on it, or it has to recommend using size US 1-3 needles on it. If you useyarn that’s too thick, you’ll end up with socks that are too big to fit in your shoes. You could dothis, and use them as slippers, but if you actually want socks to wear on a regular basis, getthinner yarn. A set of 5 Size 2 knitting needles. I like short (5-inch long) wooden or bamboo ones, but it’s a matter ofpersonal preference.A tape measure. If yours has fruit on it, that’s ideal. If not, that is acceptable, too.A stitch marker (optional).Scissors and a tapestry needle for finishing up.So, go and collect your materials, and I’ll wait here.2. Getting Your Sock NumberAre you ready to get started?! I know I am!But, before we really start knitting, we need to get your SOCK NUMBER. It’s super important, and getting anaccurate number will ensure that your socks fit properly. All you need to do is make a swatch, measure yourfoot and do a tiiiiny bit of math. Then we can get down to the business of making your socks!OK, so first, make a stockinet stitch swatch with your yarn and needles that you’ll be using. You can look atthis post if you need a refresher. Come back when you know the gauge (in stitches per inch) for yourswatch. I’ll wait.Cool! What’s your gauge? Mine is 7 stitches per inch. You should write this down somewhere so you don’tforget. Muy importante.The next step is to measure your foot (or the foot of the person for whom the socks are intended). Measurethe circumference of the widest part of the ball of the foot. I like socks to be a little snug, so I can wear themin sneakers, so I try to keep the tape measure tight when I measure my feet.
I am wearing a sock in this picture. You should not wear socks when you measure your feet. (My feet aredisgusting-- I roller-skate a lot, so my feet are covered in bruises, blisters and callouses. But, I like it whenpeople read the things I write, so I decided to hide my feet for your viewing pleasure. You’re welcome.)Hey, look! I have feet that are about 9 inches around. (I wear size US 12 shoes, for reference. So if you havelittle delicate lady-feet, you haven’t measured wrong.)If you’re making socks as a gift for someone else whose feet you don’t have access to, here’s a pretty goodreference for foot sizes.Now it’s time for a little bit of math. I promise it’s not scary.Get your gauge (mine is 7 sts/in) and your foot measurement (mine is 9 in), and multiply them together:7 x 9 63Then round this number to the nearest multiple of 4. If you want a sock that fits snugly, round down. If youwant a sock that’s a smidge looser, round up. I like my socks snug, so I’ll round down to 60.That’s it! That’s your Sock Number. My Sock Number is 60. What’s yours?3. Starting at the TopARE! YOU! READY!I am. And apparently overexcited. Or possibly over-caffeinated. Which often goes hand-in-hand. Withoutfurther ado, let’s get started.
So, these are “top-down” socks, meaning that we cast on at the cuff, and work down to the toe. (Somepatterns are worked “toe-up,” but it’s really just a personal preference if you like top-down socks or toe-upsocks.)Since these are top-down socks, you’ll cast on your Sock Number of stitches (I hope you wrote it downsomewhere). I cast on 60 stitches, because that was my sock number.Divide your stitches evenly among four ofyour needles (15 stitches on each needles,in my case).Then, working in the round, knit the leg ofyour sock.For my basic basic socks, I like to do 1 inchof k1p1 ribbing, then stockinet stitch(knitting all rows, since we’re working thissock in the round) until the leg measuresabout 6 inches. BUT, you can do anythingyou like. Think about the sock leg as acanvas for you to play on. The rest of thesock is pretty standard, but you can add allsorts of fun stuff to the leg, if you like.Think about how you want your socks to look. Do you want them to have ribbing? Stripes? Lace? Colorwork? Do you want them to be tall? Short?Take a look through pattern books and at pictures of socks and find something you like. As long as the patternyou choose (ribbing, lace, color work, etc.) uses a number of stitches that divides nicely into your SockNumber, you are free to do whatever you like. Keep on knitting until your finish your leg.4. Getting FlappyHow’s your sock looking? Pretty tubular? Now, you could just make a big, long tube and close it up at one endand say “Hey, It’s a sock!” But I think foot-shaped socks are much better than tube-shaped socks. They aremore comfortable, and more interesting to knit.
Here’s what you should have so far (I’ve numbered the needles for ease of discussion later):Needles 1 and 4 are the back of the leg/heel/sole of the foot. Needles 2 and 3 are the shin and the top of thefoot. The end of the row is between needles 1 and 4.Set aside your fifth needle for now (don’t lose it, we’ll need it later). Using needle 4, place a marker, and knitacross needle 1. You’ll have half your stitches on one needle, which you’ll work back and forth to create yourheel flap. It will look like this (except with a stitch marker in the middle of your needle I forgot to put it onmine):
Using just this needle (the combined 1 & 4 needle), make the heel flap, following these rules: Work the heel flap back and forth, not in the round. Do not knit any of the stitches on needles 2or 3.Since we’re doing stockinet stitch back and forth, make sure to knit one row and purl one row.Every time you start a new row, slip the first stitch. This makes a nice edge that will make iteasier for us to pick up stitches later on.Your heel flap is done when you’ve worked rows equal to half your Sock Number. (My socknumber is 60, so I’ll work 30 rows for my heel flap).When you’re done, work back to the beginning of the round (in the middle of the row/where you put thestitch marker). It should look like this:5. The Turn of the HeelSo, I don’t know about you, but my heel isn’t square-shaped, so we probably shouldn’t make our socks squareshaped, too. To do this we’re going to “Turn the Heel.” I got completely confused the first time I did this, soI’m going to do my best to help you through. We can do it together! Solidarity!Anyway, “turning the heel” involves making short rows across the heel flap and throwing in some decreases aswe go, to make the heel well heel-shaped. The goal is to end up with a little round, cup-shapedheel. “Short rows” are rows that are knit only partway across. This lets you start building up 3-D structures,instead of just flat pieces. Some people use short rows for things like puffy sleeves or fitted bust lines onsweaters, or faces on teddy bears etc.OK, so get out your sock and follow along. You’ll be starting from the marker at the back of the sock.
First, do this: Knit 2, K2tog (left leaning decrease), knit 1, wrap and turn. (This video is a good tutorial for wrapand turn. Ignore the part where she talks about hiding your wraps, though. That’s more for sleeves or otherthings. That doesn’t matter so much with heels.)Your first row should look like this:Turn the work and Purl to the marker. Then, Purl 2, P2tog, Purl 1, wrap and turn.It should look like this:
Turn the work back to the knit side. See where there is a gap from where you wrap and turned? Knit until onestitch before the gap. Knit the two stitches on either side of the gap together. Knit 1, wrap and turn.See how the k2tog closes up the gap so nicely? (I haven’t done the last k1 or the wrap and turn yet):
Then, do the same thing on the purl side. Purl until one stitch before the gap. Purl the two stitches on eitherside together. Purl 1, wrap and turn.Keep on repeating these two rows: Knit to 1 before the gap, k2tog, k1, w&tPurl to 1 before the gap, p2tog, k1, w&tYou’ll work more and more stitches each time you work a row.When you get to a point where you can’t do another full repeat of the pattern, stop when you’re back at themarker, on the knit side. Your heel should look like this:We’re getting there! Your sock is looking sockier and sockier! (sockier [sok-EE-er]: adj. more like a sock)6. Pick-up ArtistThe next step is to do the set-up row for the foot part of the sock. It’s a little fiddly, but not toodifficult. Much like the rest of making socks. And knitting in general.
So, after turning the heel, your sock should look like this (I’ve numbered the needles again, for yourreference):
Knit to the end of needle 1Then, still using needle 1, pick up and knit stitches equal to one quarter of your Sock Number from the side ofyour heel flap. My Sock Number is 60, so I will pick up 15 stitches. If you were careful with slipping the firststitch of each of your heel flap rows, you should actually have the proper number of spaces in which to pick upstitches. (It’s hard to explain, but once you try it, it will make sense.)Picking up stitches is just like knitting, only you don’t need live stitches to start with.Insert your needle where you want the stitch to go.
Wrap the yarn around your needle, just like you do when you knit.And pull the stitch through.
If you haven’t tried picking up stitches before, this is a pretty good video tutorial.When you get to the last picked-up stitch, pick up both the usual slipped stitch as well as the stitch below, andthen knit it as normal. This will prevent your sock from having a little hole on the side. If you skip this step, it’snot a big deal, but it makes a nicer finished product.It’s a little fiddly, but it really makes the finished sock look better:Knit needles 2 and 3 normally:
Then, using your fifth needle, and continuing in the same direction around your sock, pick up and knit stitcheson the remaining side of the flap. Remember to pick up 1/4 of your Sock Number of stitches (just like withneedle 1). If you want to do the fancy-pants no-holes pick-up, like on needle 1, do it at the beginning of thisneedle.Then, using the same needle, knit the stitches from needle 4 as normal.So, what you should end up with is:Needles 1 and 4: A whole lot of stitches (both should have the same number).Needles 2 and 3: Both of these should have stitches equal to a quarter of your Sock Number.
If you fold your sock in half, it should look kind of like this (quite sock-like, I think):7. GussetThe next step is the sock gusset. I always feel like “gusset” is a vaguely dirty word. I don’t know whythough. I guess I’m just being weird.Anyway, the sock gusset is the part of the foot right next to the heel. To make the gusset, you’ll decrease twostitches every other row, until you’re back down to your Sock Number of stitches. It’s super easy, and kind offun watching your little decreases line up nicely.
So, remember how your needles were numbered? Starting at the back of the heel/bottom of the foot, andworking your way around in the knitting direction like this:So, needles 1 and 4 are the bottom of the foot, and needles 2 and 3 are the top of the foot.See how there are approximately a billion stitches on needles 1 and 4? And see how there are only stitchesequal to 1/4 of your Sock Number on needles 2 and 3? We are going to decrease stitches on needles 1 and 4until they also only have 1/4 of your Sock Number. Does that make sense? (I can’t actually see your response,but I’m going to assume you are nodding or at least giving me a blank look.)OK, so here’s what we’re going to do: Row 1: Knit to two stitches before the end of needle 1. Knit these two stitches together (k2tog). Knitneedles 2 and 3 with no decreases. On needle 4, slip, slip knit (ssk), then knit to the end of therow. You will have decreased 2 stitches on this row. If you need a reminder about the differencebetween k2tog and ssk, try this video.Row 2: Knit even (no decreases).
Repeat Rows 1 and 2 until all of your needles have the same number of stitches. See how the decreases lineup nicely, and make cool triangle-y shapes on both sides of your sock? That’s your gusset.8. This Step is the InstepThis step is stupid easy. We’re going to make this “instep” of the sock. The folks that write books aboutknitting call this the instep. But I think it should more accurately be called the “foot-part.” Basically, it’s thepart of the sock between the gusset and the toe decreases. And it’s really simple to do.You knit. That’s all. No fancy decreases or increases, no picking up stitches, no dropping stitches, no shortrows, no ribbing (unless you really want to for decorative reasons) or anything else. Just knit a tube until yoursock is 1 1/2 inches shorter than you want your finished sock to be.How long do you want your sock to be? As long as your foot (see, I told you this step was easy). Measure yourfoot from the back of your heel to the tip of your big toe (or whatever toe is longest). Subtract 1 1/2inches. Knit your instep until the sock measures that length from the back of the heel to the needles. Forexample, my bare foot is 10 1/2 inches long. So, I knit my instep until the sock measured 9 inches long fromneedles to the back of the heel when laid out flat. In my opinion, it’s better to err on the side of making yoursock a smidge too big. No one wants socks that are too small.
See? I realize I forgot to include a ruler in this photo, so you’ll have to take my word on the length of my sock.If you don’t have a ruler hanging around, just keep trying on your sock until only 1 1/2 inches of toe poke outthe end. If you’re knitting socks for someone whose feet you don’t have access to, this website has somegood sizing charts.9. TootsiesWe’re so close, I can taste it! Only a few more rows until you get to be done! (And then you get to makeanother one unless you’re an amputee. In which case I’m jealous that you don’t have to make two socks,but I’m also sorry for your loss.)So, there are a bunch of ways to do toes, just like there are a bunch of ways to do heels. You’re welcome touse whatever method you like, but here’s what I do. It’s easy, and gives me a nice result.Starting at the between needles 4 and 1, work the toe in the round by repeating the following two rows:Row 1: Needle 1: knit to 2 stitches before the end of the needle. K2tog (right leaning decrease). Needle 2: ssk (left leaning decrease), then knit to the end of the needle. Needle 3: knit to 2 stitches before the end of the needle, k2tog. Needle 4: ssk, then knit to end of needle.Row 2: Knit evenly (no decreases).Repeat these two rows until you only have 5 stitches on each needle, finishing with Row 1. You will have 20stitches total.
(Note: if you’re using this recipe to make tiny kids’ socks or doll socks, you’ll want to keep decreasing untilthere are 2 or 3 stitches left on each needle.)Here’s what your toe should look like. See how the decreases end up lining up nicely?10.Closing TimeWe’re in the final stretch! All we have left is to close up the toe and weave in the ends. Then you’ll have abeautiful new sock!OK, when you finished decreasing for your toe, you had stopped with your active yarn at the bottom of thesole (between needles 4 and 1).Knit needle 1, so that your active yarn is coming from the side of the foot (by where your big toe/pinky toewould sit if you put on the sock).
You’re now officially done with knitting the sock! Yay! No more knitting. Just grafting the toe closed.To set up for grafting (also called the Kitchener Stitch), combine the stitches on needle 1 with the stitches onneedle 4. Combine the stitches on needle 2 with the stitches on needle 3. Cut your yarn, leaving a couple feetof tail, and get out your tapestry needle. Your toe should look like this:Now, using the Kitchener Stitch, graft these stitches together. I’m not even going to try to explain it in print.Try looking at YouTube videos for help. This is a great video tutorial, if you haven’t done it before.When you’re done, your toe should look like this:
See how the knitting flows nicely from the top of the foot to the bottom of the foot? Very pretty.Now, all that’s left is to weave in your ends, and your sock is done!Congratulations! You’ve now completed your first sock!
11.Second Sock SyndromeIt’s one of the most feared maladies in the fiberarts community. It strikes suddenly and withoutconsideration for age, experience, or the generalhealth of the knitter. It’s sent many a project bagto the back of the closet. It’s the cause of half ofAmerica’s cold feet. It’s the one, the only:Second Sock SyndromeDun dun dunnn! It’s the silent killer (or rather, thecause of people getting bored with their socksand not making the second one of the pair).Don’t fall prey to Second Sock Syndrome. Knityour second sock, and make sure your feet getthe love that they truly deserve.I made sure to follow the exact same pattern thatI used to make my first sock, so that they matchperfectly. Count your rows in the leg and instep,so that one sock doesn’t end up longer or shorterthan the other one.12.Sock Block RockOnce you’ve finished your second sock, you could just say “Hey! I’ve got some socks. Yay!”OR, you could guild the lily and go one more step and block the suckers. Your socks will fit just fine withoutblocking them, so if I’m just making socks for myself, I won’t do it. But, if I’m making the socks as a gift, I’llblock them. Blocking just makes the toes andheels lay nicely and fixes all those littleweirdnesses that happen during knitting.Here’s what you need:1 pair of socks (blocking works best with woolor other natural fibers).A clean bowl (or a clean sink) filled withbathwater-warm water.A couple clean towelsSock blockers (optional)
Drop your socks into the bowl of water, and let them soak for about 20 minutes. They need to be completelysaturated. Don’t scrub or squeeze them or anything, just lay them nicely in the bowl of water. If you messwith them too much, they’ll start to felt, which is not great. You can poke them a bit until they go underwater,if you feel it’s necessary.After your socks are thoroughly saturated, take them out of the bowl and squeeze them gently to get rid of agood portion of the water. They should still be wet, but not drippy.Then, lay out the towel (or towels) and arrange your socks nicely on top. Roll the whole mess into a damptowel-and-sock burrito. Squeeze it as much as you can, to get out most of the water. (I know, first I tell you toget them wet, then I tell you to dry them out I can’t make up my mind. I’m terrible.)
Now you have two options. The easiest way to block socks is to use sock blockers (duh). Sock blockers aresock-shaped forms that you put your wet socks on to dry after you’re done knitting them. You can find themat your local knitting store, or you can buy them here, among other places. Basically, you put the damp sockson the sock blockers, and let them hang to dry. (My socks are a skotch too big for my blockers, so I useclothespins to keep them on the blockers.) If you don’t own blockers, not to worry. You can get out anotherclean, dry towel and lay your socks out nicely on the towel and leave them out to dry.Now, your beautiful socks are completely, totally and 100% DONE! How exciting. And, just in time forsummer (because nothing says summer, like wool socks).Questions? Comments? Mistakes? Just want to say Hi? Contact me through my blog: www.ontheneedles.com, or viaemail: knittingontheneedles@gmail.com 2013 Allison Griffith
Take a look through pattern books and at pictures of socks and find something you like. As long as the pattern you choose (ribbing, lace, color work, etc.) uses a number of stitches that divides nicely into your Sock Number, you are free to do whatever you like. Keep on knitting until yo