Transcription
USER MANUALModel: SB2020n-G6MVIZIO 20" 2.0 Channel Sound Bar with BluetoothPlease read this guide before using the product.
IMPORTANT SAFETY INSTRUCTIONSYour Unit is designed and manufactured to operate within defined design limits, and misuse may result in electric shock or fire. To prevent your Unit from being damaged, thefollowing rules should be observed for its installation, use, and maintenance. Please read the following safety instructions before operating your Unit. Keep these instructions in asafe place for future reference. Read these instructions. Keep these instructions. Heed all warnings. Follow all instructions. Do not use this apparatus near water. Clean only with a dry cloth. Do not block any ventilation openings. Install in accordance with the manufacturer’s instructions. Do not install near any heat sources such as radiators, heat registers, stoves, or other apparatus (including amplifiers) that produce heat. Do not defeat the safety purpose of the polarized or grounding-type plug. A polarized plug has two blades with one wider than the other. A grounding type plug has twoblades and a third grounding prong. The wide blade or the third prong are provided for your safety. If the provided plug does not fit into your outlet, consult an electrician forreplacement of the obsolete outlet. Protect the power cord from being walked on or pinched, particularly at plugs, convenience receptacles, and the point where they exit from the apparatus. Only use attachments/accessories specified by the manufacturer. Use only with the cart, stand, tripod, bracket, or table specified by the manufacturer, or sold with the apparatus. When a cart is used, use caution when moving thecart/apparatus combination to avoid injury from tip-over. Unplug this apparatus during lightning storms or when unused for long periods of time. Refer all servicing to qualified service personnel. Servicing is required when the apparatus has been damaged in any way, such as when the power supply cord or plug isdamaged, liquid has been spilled or objects have fallen into the apparatus, the apparatus has been exposed to rain or moisture, does not operate normally, or has been dropped. To reduce the risk of electric shock or component damage, switch off the power before connecting other components to your Unit. Unplug the power cord before cleaning your Unit. A damp cloth is sufficient for cleaning. Do not use a liquid or a spray cleaner on your Unit. Do not use abrasive cleaners. Always use the accessories recommended by the manufacturer to insure compatibility. When moving your Unit from an area of low temperature to an area of high temperature, condensation may form in the housing. Wait before turning on your Unit to avoidcausing fire, electric shock, or component damage. Slots and openings in the back and bottom of the cabinet are provided for ventilation. To ensure reliable operation of your Unit and to protect it from overheating, be sure theseopenings are not blocked or covered. Do not place your Unit in a bookcase or cabinet unless proper ventilation is provided. Never push any object into the slots and openings on your Unit enclosure. Do not place any objects on the top of your Unit. Doing so could short circuit parts causing a fire orelectric shock. Never spill liquids on your Unit. WARNING: Exposure to loud sounds can damage your hearing causing hearing loss and tinnitus (ringing or buzzing in the ears). With continued exposure to loud noises, ears maybecome accustomed to the sound level, which may result in permanent damage to hearing without any noticeable discomfort. When connected to a power outlet, power is always flowing into your Unit. To totally disconnect power, unplug the power cord. Do not overload power strips and extension cords. Overloading can result in fire or electric shock.English - ii
The wall socket should be located near your Unit and be easily accessible Keep your Unit away from moisture. Do not expose your Unit to rain or moisture. If water penetrates into your Unit, unplug the power cord and contact your dealer. Continuoususe in this case may result in fire or electric shock. Do not use your Unit if any abnormality occurs. If any smoke or odor becomes apparent, unplug the power cord and contact your dealer immediately. Do not try to repair yourunit yourself. Avoid using dropped or damaged appliances. If your Unit is dropped and the housing is damaged, the internal components may function abnormally. Unplug the power cordimmediately and contact your dealer for repair. Continued use of your Unit may cause fire or electric shock. Do not install your Unit in an area with heavy dust or high humidity. Operating your Unit in environments with heavy dust or high humidity may cause fire or electric shock. Ensure that the power cord and any other cables are unplugged before moving your Unit. When unplugging your Unit, hold the power plug, not the cord. Pulling on the power cord may damage the wires inside the cord and cause fire or electric shock. When your Unitwill not be used for an extended period of time, unplug the power cord. To reduce risk of electric shock, do not touch the connector with wet hands. Insert the remote control batteries in accordance with instructions. Incorrect polarity may cause the battery to leak which can damage the remote control or injure the operator. See the important note and rating located on the back of the unit. WARNING - This equipment is not waterproof. To prevent a fire or shock hazard, do not place any container filled with liquid near the equipment (such as a vase or flower pot) orexpose it to dripping, splashing, rain, or moisture. CAUTION - Danger of explosion or fire if batteries are mistreated. Replace only with the same or specified type. Do not leave the batteries exposed to direct sunlight for a long period of time with doors and windows closed. Do not disassemble the batteries or dispose of it in fire. Where the MAINS plug or appliance coupler is used as the disconnect device, the disconnect device shall remain readily operable No naked flame sources,such as lighted candles,should be placed on the apparatus. The ventilation should not be impeded by covering the ventilation openings with items, such as newspapers, table-cloths, curtains, etc.; The equipment shall be used at maximum 35 degree C ambient temperature.WARNING: To reduce the risk of fire or electric shock, do not expose this apparatus to rain or moisture.CAUTIONRISK OF ELECTRICSHOCK DO NOT OPENThe lighting flash with arrowhead symbolwithin an equilateral triangle is intendedto alert the user to the presence of notisolated dangerous voltage within theproduct that may be sufficient magnitudeto constitute a risk of shock to persons.The exclamation point within an equilateraltriangle is intended to alert the user tothe presence of important operating andservicing instructions in the literatureaccompanying the appliance.Warning: This equipment is a Class II ordouble insulated electrical appliance. It hasbeen designed in such a way that it doesnot require a safety connection to electricalearth.English - iii
TABLE OF CONTENTSPackage Contents .5Controls & Connections .6First-Time Setup.8Using the Remote .11LED Indicator.13Programming the Sound Bar .17Using Button Combinations .18Bluetooth Pairing.19Using Bluetooth mode .20Advanced Setup .21Help & Troubleshooting.24Limited Warranty .25Specifications .28Legal & Compliance .29English - iv
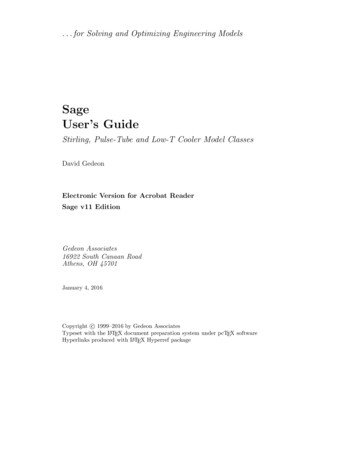
PACKAGE CONTENTSSound BarStereo RCA to3.5mm Audio Cablewith AdapterRemote Controlwith 2x AAA BatteriesDigital OpticalCablePower CableUser ManualEnglish - 5
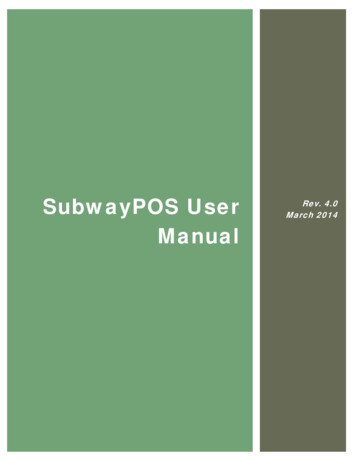
CONTROLS & CONNECTIONSBack of Sound BarPower PortSub OutSubwoofer OutUSB*USB InOPTICALDigital Optical Audio InEnglish - 6AUXAnalog Audio In(Stereo 3.5mm)* Supports .WAV and .MP3 file format playback only.
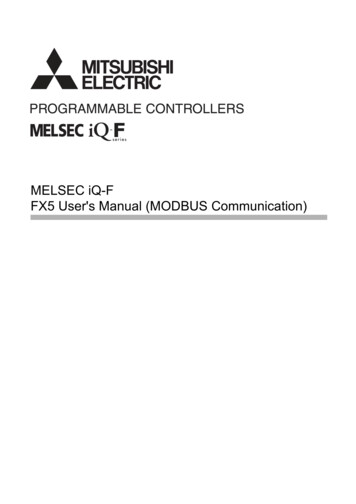
Top of Sound BarrPowerPress to turn soundbar on or off.InputPress to change theaudio source.Bluetooth InputHold to pair.VolumeIncrease or decrease theloudness of the audio.(See ‘Bluetooth Audio Pairing’ formore information.)English - 7
FIRST-TIME SETUPBack of Sound Bar1 CHOOSE ONE CABLE*AND CONNECTIT TO YOUR TVDIGITAL OPTICALCABLE†BETTER* Not all TVs have the audio outputs shownabove. To connect the sound bar directlyto your other devices (Blu-ray player,game system, etc.) see your device’s usermanual.† When using the digital input, if there is noaudio:(A) try setting the TV output to PCM-or(B) connect directly to your Blu-ray/othersource; some TVs do not pass throughdigital audio.English - 83.5MM TORCA CABLEORGOODOptional: Use the includedRCA adapter to connect toyour TV if needed.
2Connect the power cable to the sound bar AC IN as shown.Plug the power cable into an electrical outlet.English - 9
34TopRemove the battery cover by gentlysliding it away from the remote.TopInsert the included batteries and gentlyslide the battery cover back into place.When needed, VIZIO recommends replacing the batteries that camewith this remote with two, new Duracell ‘AAA’ alkaline batteries.5InputTurn on your TV and sound bar. The sound bar will automaticallybegin searching for an active input.*The LED indicator on the front of the sound bar will begin cyclingthrough inputs until an audio source is detected.**Tip: Pressing the INPUT button will stopthe auto detect function.PowerYou can press the INPUT button to switch between audio sources.For example, if you connected your TV to AUX , set the sound barto AUX .*Occurs only during first-time set up.**Auto detect function only occurs once when the sound bar is first powered on. To enable this feature again, youmust do a Factory Reset (see the Using Button Combinations section for more information) or press and hold theINPUT button for 3 seconds.English - 10
USING THE REMOTEPowerPress to turn on or off.Input*Press to change the input sourceDisplayDisplays sound bar settingsMenuPress to access the menusettings.Enter/Play/PausePress to select an option, play or pause.Long press will announce the current audio input.PreviousPress to return to previous track.(Changes audio settings in Menu)Up/DownPress to cycle through settingsand optionsMutePress to mute/unmute.NextPress to skip to the next track.(Changes audio settings in Menu)Volume /Press to increase anddecrease volume.Long press for 5 seconds will disable the power LED.*Press INPUT then Previous to select previous input.Press INPUT then Next to select Bluetooth input.English - 11
For the best surround sound experience, position the sound as shown.The sound bar should be close to ear level (approx. 2-3 feet off the floor).Sound bar is centeredbelow the TV.(If your TV permits it, youcan also slide the sound barunderneath the TV.)English - 12
LED INDICATORPress the Menu button and use the Up/Down Arrow buttonson the remote to access the different functions and acousticsettings of the sound bar. Each function and setting willbe displayed on the remote control’s LCD display. The LEDIndicators will behave differently with each function.FunctionLED/Speaker BehaviorThe LED will blink a different colorfor each input:Green: AUXAmber: OpticalBlue: BluetoothMagenta: USBInputBluetoothPairingThe LED will blink blue whensearching and turn solid once adevice is paired successfully.BT PairDTS TruVolumeOn/OffTruVolOnLED Indicator is located here.DescriptionPress the INPUT button on the remote to cycle through the available inputs: Analog Audio In - AUX Stereo 3.5mm Digital Optical Audio In - Optical Bluetooth USB In - USBPress and hold the INPUT button on the sound bar to enable the auto inputdetect function.Press the MENU button and hit the Enter button on BT Pair. The sound bar willannounce that is it "searching." It will be discoverable for 15 minutes. You cannow search for the sound bar (VIZIO SB2020) using your Bluetooth device. Thesound bar will power down if no device is found.Note: Set your Bluetooth device into pairing mode prior to the sound bar.Press the Next/Previous button to enable/disable TruVolume.A high tone double beep indicatesOn, while a low tone double beepindicates Off.When enabled (On), TruVolume provides a consistent and comfortable volumelevel for a more enjoyable listening experience.English - 13
FunctionEqualizer ModeEQLED BehaviorA high tone double beep indicatesMovie mode, while a low tone doublebeep indicates Music mode.Treble LevelTrebleHigh tone double beep: Max levelDescriptionPress the Next/Previous button to toggle between two preset equalizersettings: Movie or Music.Note: Movie mode is on by defaultPress the Next/Previous button to increase/decrease the treble level.Medium tone single beep: Mid levelLow tone double beep: Minimum levelBass LevelsBassVirtual X ModeVRT:XEnglish - 14High tone double beep: Max levelMedium tone single beep: Mid levelLow tone double beep: Minimum levelA high tone double beep indicatesOn, while a low tone double beepindicates Off.Press the Next/Previous button to increase/decrease the bass level.Decreasing the BASS level to the lowest setting will reduce BASS andSubwoofer levels on the bar. This is best for watching TV late at night in aquiet environment.Press the Next/Previous button to enable/disable Virtual X. When enabled(On), all inputs will produce a virtual sound technology that simulatesthe effect of having overhead sound. When disabled (Off), all sources willplayback in stereo.
FunctionEco Power On/OffEcoPwrSpeaker TestSpkr TestLED BehaviorA high tone double beep indicatesOn, while a low tone double beepindicates Off.—DescriptionPress the Next/Previous button to enable/disable Eco Power Mode. Whenenabled (On), the sound bar will go into standby after a period of inactivity.The sound bar will automatically turn off when no audio signal is detected.Off disables this feature.Press the Play/Pause button to activate the speaker test function. A voicewill begin calling out each speaker: left, right, and subwoofer-white noise (ifan optional subwoofer is connected). If any of these are missing, check theconnection and run the speaker test function again.Press the Next/Previous buttons to reset either Audio or All settings. Pressthe Play button to select.ResetResetAllNight Mode On/OffNightMuteLED will flash 3 timesonce settings are reset.A high tone double beep indicatesOn, while a low tone double beepindicates Off.When muted, the LED indicator willslowly pulse.Audio - Only audio settings, such as bass and treble levels, will be reset.All - All paired Bluetooth devices will be unpaired and settings will be lost.All programmed IR remotes will also be removed. See the Reset to FactoryDefault Settings section for more information.Press the Next/Previous button to enable/disable Night Mode. Whenenabled (On), the bass level will be lowered on the sound bar. If an externalsubwoofer is connected, bass level will also be lowered.Note: Night mode will be turned Off the next time the sound baris turned On.Press the Mute button to mute/unmute the sound bar.English - 15
FunctionLED BehaviorPower LEDPwrLEDTV RemoteVZtv RmtEnglish - 16A high tone double beep indicatesOn, while a low tone double beepindicates Off.A high tone double beep indicatesOn, while a low tone double beepindicates Off.DescriptionTurns the Power Indicator LED light off and on while in use. Press the Next/Previous buttons to toggle between On and Off.Press the Next/Previous button to enable/disable VIZIO TV Remotes. Whenenabled (On), you can use a VIZIO TV remote control to turn on the SoundBar (using the TV Volume Up button) and control volume.
PROGRAMMING THE SOUND BARYou can program the sound bar to accept TV remote IR commands. Press the Menu button on the remote, thenuse the up/down buttons to navigate to Learn. Use the next/previous buttons to toggle through Learn Vol -,Learn Vol , and Learn Mute.FunctionLearn Volume DownLearnVol-Learn Volume UpLearnVol Learn MuteLearnMuteLED BehaviorDescriptionThe LED indicator will flash yellow whenlearning and will turn solid once it hassuccessfully recognized the TV remote.Press the Play button on the remote to put the sound bar intolearning mode. While the sound bar is in learning mode, press theVolume Down button on the TV remote control while pointing theremote at the sound bar.The LED indicator will flash amber whenlearning and will turn solid once it hassuccessfully recognized the TV remote.Press the Play button on the remote to put the sound bar intolearning mode. While the sound bar is in learning mode, press theVolume Up button on the TV remote control while pointing theremote at the sound bar.The LED indicator will flash white whenlearning and will turn solid once it hassuccessfully recognized the TV remote.Turn off your TV speakers whenprogramming your sound bar.Press the Play button on the remote to put the sound bar intolearning mode. While the sound bar is in learning mode, press theMute button on the TV remote control while pointing the remote atthe sound bar.Point both the sound bar and TVremotes towards the front of thesound bar when programming.English - 17
USING BUTTON COMBINATIONSButtons are located here.There are 3 functions that are triggered by 3 different button combinations on the sound bar.FunctionFactoryResetLED BehaviorLED will flash 3 times.VIZIO TVRemoteControlEco PowerModeEnglish - 18A high tone double beep indicatesOn, while a low tone double beepindicates Off.A high tone double beep indicatesOn, while a low tone double beepindicates Off.DescriptionReset the sound bar to the factory default settings. Toperform a Factory Reset, Press and Hold the Bluetooth(Volume Down (—) buttons for 5 seconds.) andNote: This will erase all settings and preferences that you have set.Enable/disable the use of a VIZIO TV remote control to poweron and adjust the volume of the sound bar. To enable/disablethis function, Press and Hold the Power () and Volume Up ( )buttons for 5 seconds.Note: This function is enabled by default.When the Eco Power setting is enabled, the sound bar willautomatically power down after a period of inactivity. Whendisabled, the sound bar will remain powered on until you turnit off. To enable/disable this function, Press and Hold the) and Volume Down (—) buttons for 5 seconds.Power (Note: Eco Power Mode setting is enabled by default.
BLUETOOTH PAIRINGTo pair the sound bar with a Bluetooth device:1.Press and hold the Bluetooth buttonon the sound bar forfive (5) seconds or select the BT Pair option from the displayremote menu. When the sound bar is in Bluetooth PairingMode, the LED Indicator on the front display panel will turn blueand start blinking.Once the device is paired, the LED Indicator will stop blinking.2.3.You can now search for the sound bar (VIZIO SB2020) usingyour Bluetooth device. For more information, refer to the userdocumentation that came with the device.Top of Sound BarPlay audio from your Bluetooth device. Volume can becontrolled on your source device and the sound bar.XBluetoothDeviceEnglish - 19
USING BLUETOOTH MODEYour sound bar supports music streaming from smartphones, tablets, and computers with Bluetooth capability.Device compatibility will vary, see your device’s documentation for more information. Once you have paired your source device to the sound bar, as long as you stay within range of the sound bar,your device should remain paired. If the input is changed, the Bluetooth device will disconnect. If the source is changed back to Bluetooth, any paired Bluetooth device will reconnect automatically.Your sound bar is not equipped with a microphone,so it cannot operate as a hands-free device for asmartphone.Maximizing SignalA Bluetooth signal has a range of up to 30 feet. Keep in mind that Bluetooth is a compressed audio format, sostreamed music may lose some integrity when compared to a wired connection.Try the following if your sound quality is less than optimal: If you hear any break-up or disconnect while streaming music from your device, move the source devicecloser to the sound bar. Be sure that there are no solid obstructions in the line-of-sight between the sound bar and the sourcedevice. Other wireless devices can affect Bluetooth range, including wireless security cameras, wireless videobaby monitors, cordless phones, and microwave ovens. Turning off or moving these devices may improveBluetooth range.Reduce the volume levels on your device and on thesound bar before pressing Play. High volume levelscan damage your hearing.English - 20
ADVANCED SETUPBack of Sound BarDIGITALOPTICAL CABLEUSB Thumb Drive*3.5MM TORCA CABLEOptional: Use the included RCAadapter to connect if needed.Tablet/MP3 Player/LaptopNetwork Media PlayerGame Console*Supports .WAV and.MP3 fileformat playback only.English - 21
Take a moment to register your productVIZIO.COM/PRODUCT-REGISTRATIONWhy register?Customized SupportGet assistance quickly with your information on hand.News and OffersTake advantage of the latest news and special offers from VIZIO.Safety and SatisfactionStay up-to-date with important product updates and notifications.English - 22
Award-Winning Customer Care At Your Convenience.NEED HELP?Go to: support.vizio.comFind help with: New product setup Connecting your devices Technical problems Product updates and moreLive chatsupport availableYou can also contact our support team at:Phone: (877) 698-4946Text Message: (205) 301-3729Note: This number accepts SMS/MMS messages only. No voice calls are accepted.Message and data rates may apply. (U.S. only).Se habla Español Nous parlons FrançaisEnglish - 23
HELP & TROUBLESHOOTINGThere is no power.There is no sound.I hear buzzing or humming.The remote isn’t working.English - 24 Press the POWER button on the remote control or on the top of your sound bar. Ensure the power cord is securely connected. Plug a different device into the electrical outlet to verify that the outlet is working correctly. Increase the volume. Press Volume Up on the remote control or on the top of your sound bar. Press MUTE on the remote to ensure the sound bar is not muted. Press INPUT on the remote or on the top of your sound bar to select a different input source. When using the optical input, if there is no audio: (A) Try setting the TV output to PCM or(B) Connect directly to your Blu-ray/other source, some TVs do not pass through digital audio. On the optical input, the input LEDs will flash rapidly and vocally announce "Format Not Supported"if an unsupported format is present. Set the source to output PCM. Your TV may be set to variable audio output. Confirm that the audio output setting is set to FIXEDor STANDARD, not VARIABLE. Consult your TV’s user manual for more detailed information. If using Bluetooth, ensure that the volume on your source device is turned up and that the deviceis not muted. Ensure all cables and wires are securely connected. Connect a different source device (TV, Blu-ray player, etc) to see if the buzzing persists. If it doesnot, the problem may be with the original device. Connect your device to a different input on the sound bar. Replace the remote batteries with new ones. Point the remote directly at the center of the Sound Bar when pressing a button. If using a Bluetooth connection, some of the buttons on the remote may not be supported by thestreaming application. (e.g., Pandora doesn’t support the Back button.)
LIMITED WARRANTYUnited States and CanadaBY USING YOUR VIZIO PRODUCT YOU AGREE TO BE BOUND BY ALL THE TERMS OF THIS WARRANTY. BEFORE USING YOUR VIZIO PRODUCT, PLEASE READ THIS WARRANTYCAREFULLY. IF YOU DO NOT AGREE TO THE TERMS OF THIS WARRANTY, DO NOT USE THE VIZIO PRODUCT AND, WITHIN THIRTY (30) DAYS OF THE DATE OF PURCHASE, RETURNIT FOR A REFUND TO THE AUTHORIZED RETAILER WHERE YOU PURCHASED IT.This warranty contains a binding arbitration agreement and a class action waiver for United States residents. If you live in the United States, the binding arbitrationagreement and class action waiver affect your rights under this warranty. Please read the text under the section titled “Binding Arbitration Agreement; ClassAction Waiver (U.S. Residents Only)” carefully.How Long This Warranty LastsFor non-commercial use, VIZIO warrants the product on the terms set forth below for one (1) year from the date of original purchase. For commercial use, VIZIO warrants thisproduct on the terms set forth below for ninety (90) days from the date of original purchase.What This Warranty CoversVIZIO warrants the product against defects in materials and workmanship when the product is used normally in accordance with VIZIO’s user guides and manuals.Except where restricted by law, this warranty applies only to the original purchaser of a new product. The purchase must have been made from an authorized retailer in theUnited States (including Puerto Rico) or Canada. The product must also be located in the country where it was purchased at the time of warranty service.Zero Bright Pixel Defect Guarantee (Displays Only)Your product may qualify for a warranty against “zero bright pixel” defects for the duration of the warranty on select new product purchases. To determine if this guaranteeapplies to your product, refer to the model’s product information page at www.vizio.com, look for the “zero bright pixel” guarantee on the box, or contact VIZIO TechnicalSupport at the email address or telephone number below.How to Get ServiceBefore obtaining warranty service, you may visit www.vizio.com for additional help and troubleshooting. To obtain warranty service, contact VIZIO Technical Support via email atTechSupport@VIZIO.com or via phone at 877 MY VIZIO (877-698-4946).Your Obligations Before ServiceYou must obtain pre-authorization before sending your product to a VIZIO service center. You may be required to supply a purchase receipt (or copy) to show that the productis within the warranty period.When you return a product to a VIZIO service center, you must ship the product in its original packaging or in packaging that affords an equal degree of protection. VIZIOTechnical Support will provide instructions for packing and shipping the product to the VIZIO service center.ALL USER DATA AND DOWNLOADED APPLICATIONS STORED ON A PRODUCT WILL BE DELETED IN THE COURSE OF SOME IN-HOME AND ALL SHIP-IN WARRANTY SERVICE.If this occurs, your product will be restored to its original state. You will be responsible for restoring all applicable user data and downloaded applications. Recovery andreinstallation of user data and downloaded applications is not covered under this warranty. In order to protect your personal information, VIZIO recommends that you alwaysclear all personal information from the product before it is serviced, regardless of the servicer.VIZIO’s ResponsibilitiesIf VIZIO determines that a product is covered by this warranty, VIZIO will (at its option) repair or replace it, or refund the purchase price to you. There will be no charge for partsor labor during the warranty period. Replacement parts may be new or recertified at VIZIO’s option and sole discretion. Replacement parts and VIZIO’s labor are warranted forthe remaining portion of the original warranty or for ninety (90) days from warranty service, whichever is longer.English - 25
Types of ServiceDisplays that are 30 inches or larger will usually be repaired in-home. If in-home repair is not available, VIZIO will provide other service options. Displays that are 40 inches orlarger may be eligible for in-home replacement if in-home repair is not available.Both in-home repair and in-home replacement require complete and easy access to the product and neither includes de-installation or re-installation of the product. In-homerepair and in-home replacement are subject to availability.All other VIZIO products must be sent to a VIZIO service center to obtain warranty service. VIZIO is not responsible for transportation costs to the service center, but VIZIO willcover return shipping to the customer.What This Warranty Does Not CoverThis warranty does not cover: (a) cosmetic damage; (b) normal wear and tear; (c) improper operation; (d) improper voltage supply or power surges; (e) signal issues; (f) damagefrom shipping; (g) acts of God; (h) customer misuse, modifications or adjustments; (i) installation, set-up, or repairs attempted by anyone other than by
Refer all servicing to qualified service personnel. Servicing is required when the apparatus has been damaged in any way, such as when the power supply cord or plug is damaged, liquid has been spilled or objects have fallen into the apparatus, the apparatus has been exposed to rain or