Transcription
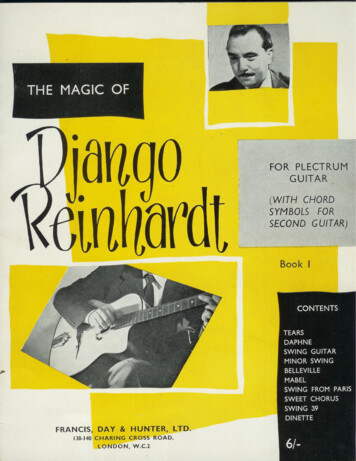
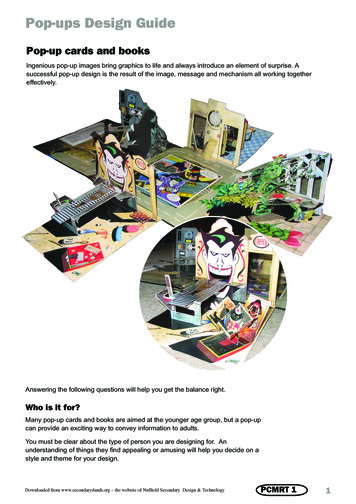
Pop-ups Design GuidePop-up cards and booksIngenious pop-up images bring graphics to life and always introduce an element of surprise. Asuccessful pop-up design is the result of the image, message and mechanism all working togethereffectively.Answering the following questions will help you get the balance right.Who is it for?Many pop-up cards and books are aimed at the younger age group, but a pop-upcan provide an exciting way to convey information to adults.You must be clear about the type of person you are designing for. Anunderstanding of things they find appealing or amusing will help you decide on astyle and theme for your design.Downloaded from www.secondarydandt.org – the website of Nuffield Secondary Design & TechnologyPCMRT 1
Pop-ups Design GuideWhat will it look like?Certain images have become clichédand over-used. For example, anobvious idea for a Christmas cardwould feature a robin or Christmastree. To help you devise an imaginativeand original pop-up, it is importantto research the theme and usebrainstorming exercises to discover aricher source of images.Give careful thought too the style ofdecoration of your design and theeffect that you want to create. A pop-upstorybook could use bright colours andan amusing cartoon style to encouragea child to learn to read, whereas a getwell card for an elderly person wouldrequire a more gentle, cheerful style.Remember that too much decorationmay distract from the three-dimensionalimage. A pop-up can look impressiveleft quite plain.You will need to consider the appearance of themessage or text. The style of the lettering andthe layout of the words should be attractive, butalso suit the image of the pop-up design.How will it work?Pop-ups use a variety of differentmechanisms. Some are very complicated,but even the most basic can have a lot ofvisual impact. It is useful to study popup books and cards and analyse howthey are constructed. You can adapt amechanism for your own design. You willfind instructions for pop-up mechanismsopposite.Downloaded from www.secondarydandt.org – the website of Nuffield Secondary Design & TechnologyPCMRT 1
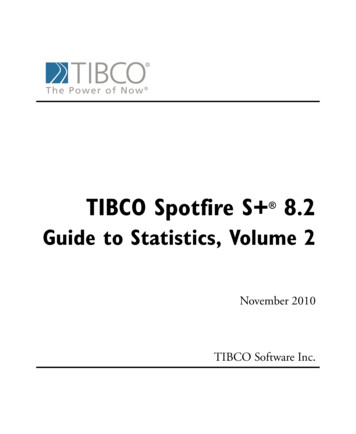
Pop-ups Design GuideCard mechanicsHere you will find techniques to help you makecard and paper mechanisms for pop-ups. Youcan adapt these examples to create imaginativedesigns of your own.MaterialsPapers and card can be bought in a wide range ofcolours, textures, thicknesses and weights. This briefguide will help you decide on a suitable thickness ofmaterial. You will find more detailed information inthe Paper and Card Chooser Chart.The backing sheet on which the pop-up is builtshould be strong enough to open without buckling.For pop-ups that involve a lot of stresses andstrains, use a rigid, heavy weight of card, such asmounting board. For the pop-up design, you canuse thick paper, such as cartridge paper, or thincard. Card that is too thick will be too bulky to foldflat and thin paper will not keep its shape whenthe page is opened.DecorationTake care when using water-based paints tocolour your design. Too much moisture will wrinklethe surface of paper and cause thin card to warp.You can achieve effective results with markers,pencil crayon and pastels, or use a colourphotocopy of your original artwork.Scoring and foldingScoring makes it easier to produce a neat fold. Using a metal ruler as a guide, run the tip ofa scalpel along the line of the fold. Only the surface of the card should be cut (do not cut toodeeply or the card will break). The card is then folded away from the score line so that it canopen slightly along the cut. You will find that the card bends and folds accurately. Rememberthat paper and card will fold more smoothly with the direction of the grain.1A pop-up design with scoring lines(- - - - -) and cutting lines ( )2Just fold and the castle ‘pops up’3Adding extra detail. Can you explainwhy the tower can’t be included in theoriginal piece?Remember – when using asharp knife or scalpel withpaper or card take great care!Downloaded from www.secondarydandt.org – the website of Nuffield Secondary Design & TechnologyPCMRT 1
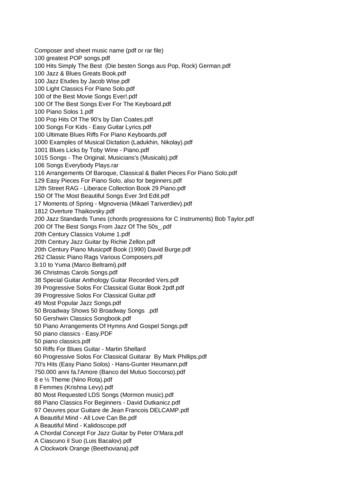
Pop-ups Design GuidePop-up mechanismsThe pop-up boxThe V foldThis design is based on the V-fold mechanism.The hollow box shape can be modified to create allsorts of objects.This is a simple but versatile mechanism. The popup images are attached to the page by means ofV-shaped flaps or an inverted V shape, dependingon the effect that you wish to create.1Apply glue to the undersides of the tabs andattach them to the backing sheet so that thepoint of the V touches the central fold line.2If the angle of the V is 90 degrees, the pop-upwill stand vertically when the card is open. Ifthe angle of the V is less than 90 degrees, itwill lean backwards, but if it is more than 90degrees, it will lean forwards.1Scale up the diagram to the required size.Cut it out and score along the fold lines.2Apply glue to the end tap and fold to join thesides of the box. Making a square ‘tube’.3Apply glue to the lid tabs. These will lookneater if they are attached to the inside of thebox – but will have more strength if they areglued to the outside. You will have to decidewhich is more suitable for your design.4Fold back the base tabs inwards and gluethese to the backing sheet using the V-foldtechnique.Downloaded from www.secondarydandt.org – the website of Nuffield Secondary Design & TechnologyPCMRT 1
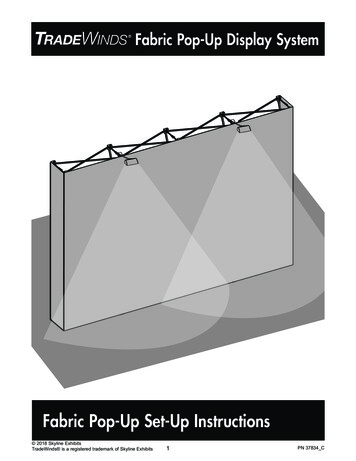
Pop-ups Design GuideLayered mechanismsFloating layersThis mechanism is based on parallelograms andinvolves accurate measuring, but, again, is quitesimple to make.This mechanismuses a . Thelayers are positionedto support a design thatspans the page, increasing theimpression of depth.The single layer1Cut a strip of card, allowing for glue tabs andfold as shown checking that the pop-up will notprotrude outside the card when it is closed.2Find the correct position by holding the stripin place with paper-clips. All parts should beparallel to one page or the other. Mark theposition for gluing with a pencil.3Glue taps in place. The pop-up design can beglued onto the moving layer.Multiply layersIncised mechanismsUsing this mechanism, you can create quitecomplicated designs from one piece of card withno gluing.1Mark in pencil the central fold line on thebacking sheet.2Draw the layer mechanisms at 90 degrees tothe central fold.3Position as shown in the diagram. Rub out thepencil central fold line on the layer.4Measure AB (the distance between the shortend and the central fold).5Mark the same distance at the other end. Thisline will be formed into a fold on the finishedmechanism.1Cut two or three strips of card of differentlengths. The length will depend on the size ofyour card. Allow for glue tabs.2Hold in position with paper-clips. Check that the6 Now cut and fold your drawing to create alayers are parallel and that the pop-up will notlayer mechanism from one sheet of card.show when the card is closed. Mark the correctpositions with a pencil.This technique can be used to produce a multiplelayer effect or to create the whole pop-up design.Glue the tabs in position. Glue the pop-updesigns onto the individual layer mechanisms.3Downloaded from www.secondarydandt.org – the website of Nuffield Secondary Design & TechnologyPCMRT 1
Pop-ups Design GuideMechanisms that produce movementThe sliding mechanismThe rotary mechanismLinear movement can be produced using a slidingmechanism.This mechanism will give a circular or rotatingmovement.1Cut a slot in the card backing sheet, in thedirection of the required movement.1Cut a 10 mm hole in the backing card at thecentre of the circular movement.2Fold two small pieces of card in half and passthese through the slot – as shown.23Cut a strip of stiff card as pull tab. The lengthwill depend on the size of your card.Use another piece of card and cut a 30 mmdiameter circle. This can be cut to act asgluing tabs. Mark out and cut as shown in thediagram.4Glue this to the back of the two smaller pieces.3Stick the centre circle of the tabs to the imagethat is required to move.5Near the edge of the card, attach a guide forthe pull tab.46The image that is required to move can now beglued to the front of the two small pieces of card.Now cut a circle of card that is large enough toprotrude beyond the backing card. Push the tabsthrough the hole and glue them to the centre ofthe disc. This will provide a wheel to turn theimage on the front of the card.Downloaded from www.secondarydandt.org – the website of Nuffield Secondary Design & TechnologyPCMRT 1
Pop-ups Design Guide Card mechanics Here you will find techniques to help you make card and paper mechanisms for pop-ups. You can adapt these examples to create imaginative designs of your own. Materials Papers and card can be bought in a wide range of colours, textures, thicknesses and weights. This brief guide will help you decide on a suitable thickness of material. You will find more .