Transcription
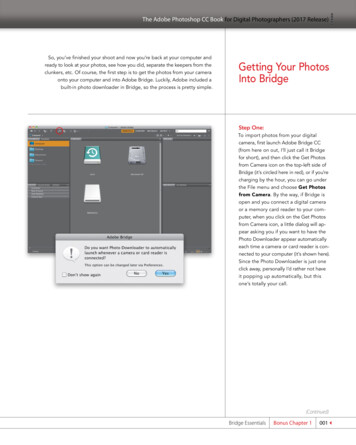
The Adobe Photoshop CC Book for Digital Photographers (2017 Release)So, you’ve finished your shoot and now you’re back at your computer andready to look at your photos, see how you did, separate the keepers from theclunkers, etc. Of course, the first step is to get the photos from your cameraonto your computer and into Adobe Bridge. Luckily, Adobe included abuilt-in photo downloader in Bridge, so the process is pretty simple.Getting Your PhotosInto BridgeStep One:To import photos from your digitalcamera, first launch Adobe Bridge CC(from here on out, I’ll just call it Bridgefor short), and then click the Get Photosfrom Camera icon on the top-left side ofBridge (it’s circled here in red), or if you’recharging by the hour, you can go underthe File menu and choose Get Photosfrom Camera. By the way, if Bridge isopen and you connect a digital cameraor a memory card reader to your computer, when you click on the Get Photosfrom Camera icon, a little dialog will appear asking you if you want to have thePhoto Down loader appear automaticallyeach time a camera or card reader is connected to your computer (it’s shown here).Since the Photo Downloader is just oneclick away, personally I’d rather not haveit popping up automatically, but thisone’s totally your call.(Continued)Bridge EssentialsBonus Chapter 1001
The Adobe Photoshop CC Book for Digital Photographers (2017 Release)Step Two:SCOTT KELBYClicking Yes in that dialog or clickingon the Get Photos from Camera icononce your preference is set brings upBridge’s Photo Downloader. Before youdo anything else, I recommend clickingon the Advanced Dialog button in thebottom-left corner (as shown here).While this does make some ad vancedoptions available, more importantly,it shows you previews of the photosyou’re about to import.Here’s what the Advanced dialog lookslike, with the thumbnail previews on theleft and options on the right. By default,it’s set to import every photo it finds onyour memory card. If you see a photoyou don’t want imported, just turn offthe checkbox under the thumbnail (onlychecked photos will be imported). If youwant just a few photos imported, it’squicker if you start by clicking the Un Check All button first (below the leftside of the thumbnail preview area) touncheck all the photos. Then select thephotos you do want to import by pressing-and-holding the Command (PC: Ctrl)key and clicking on them (as you do, eachthumbnail is highlighted), then turn onthe checkbox for any one of these photos, and all your selected photos becomechecked (and will be imported).002Bonus Chapter 1Bridge EssentialsSCOTT KELBYStep Three:
The Adobe Photoshop CC Book for Digital Photographers (2017 Release)Step Four:Once you’ve chosen which photos youwant imported, you’ll need to choosewhere these photos will be saved to onyour computer. By default, it saves themin your Pictures folder. If you want themsaved to a different location, then clickthe Choose (PC: Browse) button (seenhere, where I’ve zoomed in on the SaveOptions section of the Photo Down loader). This brings up a dialog whereyou can choose the location where you’dlike your imported photos stored. Prettystandard stuff—you’ve chosen whichphotos you want to import, and whereyou want to save them on your computer once they’re copied from yourmemory card.Step Five:I recommend letting the Photo Down loader create a separate folder for yourimported photos, inside your Picturesfolder. If not, it’ll just toss them looseinto your main folder, which makes staying organized a nightmare. By default,it puts your photos in a folder namedwith the date you took them. Personally,I think it’s more useful to name the folders by topic or subject (that way, youdon’t have to remember the date). Forexample, these photos are from a Na tion al Hockey League shoot, so from theCreate Sub folder(s) pop-up menu, I’dchoose Custom Name and then typein the name I’d like for the folder justbelow it, as shown here, where my custom name is “Tampa Bay Lightning.”When I’m searching on my computer,that name means more to me than justseeing a folder named “20120401.”(Continued)Bridge EssentialsBonus Chapter 1003
The Adobe Photoshop CC Book for Digital Photographers (2017 Release)Step Six:Also by default, your photos will keepthe same non-descriptive, just-aboutuseless names your camera gave themwhen they were taken. So, I recommendhaving the Photo Downloader renameyour photos as they’re imported with adescriptive name, which will make yourlife much easier down the road when youneed to find these photos again fast. Todo this, click on the Rename Files popup menu, and a list pops up with a widerange of auto-naming choices (seen here).So, just choose which naming conventionyou’d like from the options that include acustom name, including the ones followedby the date the photos were taken, fromthis list.Step Seven:If you’ve chosen any of the naming conventions that have a custom name in itfrom the Rename Files pop-up menu, thename field is highlighted beneath it. Typein your custom name (in this case, I chose“TB Lightning”) and then in the field tothe right of it, choose the number whereyou’d like the sequential auto-numberingto start (it automatically uses a four-digitnumber). An example of your renamingappears directly under the name field(as seen here). There’s also a checkboxthat lets you embed the original filenameinto your renamed file, just in case forsome reason you need it one day (by theway, so far I’ve never needed to know aphoto’s original camera-given name, buthey—ya never know).004Bonus Chapter 1Bridge Essentials
The Adobe Photoshop CC Book for Digital Photographers (2017 Release)Step Eight:In the Advanced Options section,there’s a checkbox that automaticallyopens Bridge (if it’s not already open)once your photos are imported. I knowwhat you’re thinking: “That’s an advancedoption?” (Don’t get me started.) Anyway,directly under that you have the abilityto convert your imported photos intoAdobe’s DNG format, which is a universal archival format designed primarily forRAW files. For more on the advantagesof DNG, jump over to Chapter 2 in thebook, but in the meantime, here’s my ruleof thumb for converting to DNG: If it’s aRAW file, I turn on the Convert To DNGcheckbox. If it’s a JPEG or TIFF file, there’snot really any advantage to converting toDNG, so I don’t. Simple enough. Again,to learn more about DNG and why youmight want to convert your RAW photosto DNG, jump over to Chapter 2.Step Nine:There are two more options in theAdvanced Options section: one Irecommend you avoid, and one that isabsolutely critical. First, the bad one:there’s a checkbox called Delete OriginalFiles. This one erases the photos on yourmemory card right after they’re copiedto your computer. So, what if the imagesyou just copied to your computer arecorrupt or otherwise messed up? (Hey—it happens.) You can’t try to re-importthem or rescue them from the memorycard because (that’s right) you just hadBridge erase them. My golden rule is:don’t erase anything unless you have atleast two back ups first, and you’ve spotchecked at least two or three randomphotos from those to make sure they’reokay. Otherwise, you’re really taking yourchances. Okay, so that’s the bad checkbox (leave Delete Original Files turnedoff). Now, for the good one.(Continued)Bridge EssentialsBonus Chapter 1005
The Adobe Photoshop CC Book for Digital Photographers (2017 Release)Step 10:To make certain you have a secondback up copy, turn on the Save CopiesTo checkbox to automatically back upyour imported photos to a different harddrive (click the Choose [PC: Browse] button to choose the external hard drive,network, etc., where you want a copy ofthe photos you’re importing backed upto). This is so incredibly important because at this point, if your computer’shard drive crashes, all your photos aregone. For good. But by turning this feature on, you’ll have a second backup seton a totally separate hard drive (and yes,it has to be on a totally separate harddrive—backing up to a different folderon your same computer doesn’t help,because if your computer’s hard drivecrashes, you lose the originals and thebackup at the same time).Step 11:The next section down is the Apply Meta data section. This is where you’re ableto embed your name and copyright information into each file automatically, asit’s imported. Simply click in the Creatorfield and type in your name. Then clickin the Copyright field, type in your copyright info (as shown here), and you’re set.Now, you can have more information embedded upon import than this, but firstyou’d have to create a metadata template(which would appear in the Tem plate toUse pop-up menu at the top of this section). I show you how to create your ownin Bonus Chapter 2, so for now, just usethe Basic Metadata template and enteryour name and copyright info.006Bonus Chapter 1Bridge Essentials
The Adobe Photoshop CC Book for Digital Photographers (2017 Release)Step 12:So that’s a look at how I set up thePhoto Downloader to import photos.Now all you have to do is click the GetMedia button (in the bottom right-handcorner of the Photo Downloader), and adownload status dialog appears (shownhere), showing you which files are beingimported, how far along you are, etc.Step 13:SCOTT KELBYOnce your files are imported, they’re displayed in Bridge as thumbnails (as shownhere), and now you can begin sorting,ranking, and doing all the other coolstuff we’re going to learn in the rest ofthis chapter and in Bonus Chapter 2.Bridge EssentialsBonus Chapter 1007
The Adobe Photoshop CC Book for Digital Photographers (2017 Release)Here’s a BetterWay to ViewYour ImagesOnce you import your photos, they appear in Bridge, but they appearin the default layout. This layout does a good job of giving you access toall of Bridge’s different panels and features, but I think it’s a pretty lamesetup for actually using Bridge. So, here we’re going to look at how toset up Bridge for a much better way to view and work with your photos.Step One:SCOTT KELBYAlthough we call it “importing,” yourphotos aren’t actually in Bridge—they’rein a folder on your computer, and you’relooking at what’s inside that folder usingBridge. Your photos show up as thumbnails in the Content panel, which bydefault appears in the center of Bridge(as shown here). You have control overhow quickly your thumbnails appear inBridge based on how high quality youwant your thumbnails to be.Step Two:You make your “speed” choice from anOptions pop-up menu in the Path Barat the top of the window (shown here).Prefer Embedded (Faster) lets your thumb nails load the fastest by using the samesmall preview you see on the back ofyour digital camera. High Quality OnDemand (which is the one I use myself)loads low-res thumbnails first, but onceyou click on a thumbnail, it then rendersa higher-quality thumbnail. I don’t recom mend Always High Quality (which hasBridge individually render a high-respreview of each photo) simply becauseit’s so much slower. Gener ate 100% Pre views is pain fully slow because it rendersthe full-screen preview even if you neveruse it. Again, my recommendation: HighQuality On Demand for initial quick loading, and then higher quality when youclick on a thumbnail.008Bonus Chapter 1Bridge Essentials
The Adobe Photoshop CC Book for Digital Photographers (2017 Release)Step Three:By the way, if you’re going to choosePrefer Embedded (Faster), you don’thave to dig through that pop-up menu—just click the little Browse icon to theimmediate left of the Options icon. Now,once your thumbnails appear in the Con tent panel, you can resize them using theThumbnail Size slider at the bottom rightof Bridge (as shown here). Dragging tothe right makes the thumbnails larger,and you can pretty much imagine whathappens when you drag to the left.TIP: One-Click SizingIf you want to jump to the next larger(or smaller) size thumbnail, just clickon the little rectangular icon on the farright (or left)Step Four:If you look back at the Bridge capturein Step Three, you’ll see a problem—see how the two photos at the very bottom of the center Content panel are cutoff? If that drives you as crazy as it doesme, you can turn on an option that makessure that never happens. You see, there’sa little feature in Bridge CC that I personally love (it’s the little things, right?) calledGrid Lock, and you turn this option on byclicking on the little Lock Thumbnail Gridicon in the bottom-right corner of Bridge’swindow (shown circled here in red). By theway, there are a few other icons there, aswell: the next icon over switches you backto regular Thumb nails view; the secondicon from the right displays a Details viewof your photos, which is a small thumbnail followed by lines of embedded infoabout your photo; and the icon on thefar right gives you a List view, which is asimple list of your images like you mightsee when viewing a folder of images onyour computer.(Continued)Bridge EssentialsBonus Chapter 1009
The Adobe Photoshop CC Book for Digital Photographers (2017 Release)Step Five:Once my photos appear in Bridge, thefirst thing I generally want to do is geta closer look at them. When you clickon a thumbnail, a preview of that photoappears in the Preview panel at the topof the right side Panels area (as seenhere). The problem is the preview isn’tmuch bigger than the thumb nail (infact, if you’ve dragged the ThumbnailSize slider to the right, it’s not even asbig!). So, when I’m starting to look atmy images, the first thing I do is makemy preview larger—that way I can seemy photos at a large enough size thatI can actually make a reasonable decision about which ones are “keepers”and which ones aren’t. What we needis a much bigger Preview panel, anda much smaller Content panel.Step Six:A step in the right direction is tochoose one of Adobe’s built-in workspaces. These are just different layoutsfor Bridge’s panels that focus on different tasks. Some of these built-in workspaces appear right on the ApplicationBar at the top of the window, so they’reone click away (like Essentials, Film strip,etc.). To get to the workspace we need,called Preview, click-and-hold on the littledown-facing triangle to the right of theworkspaces in the Application Bar andchoose Preview from the pop-up menu(as shown here). This changes Bridge’slayout to what you see here, with a really big Pre v iew panel on the right, theContent panel (with your thumb nails) really skinny in the center, and the left sidePanels area still there on the left. This isbetter, but I’m not loving it. There’s stilltoo much clutter for just viewing your images (we need distractions out of the way,so we can focus on the photos).010Bonus Chapter 1Bridge Essentials
The Adobe Photoshop CC Book for Digital Photographers (2017 Release)Step Seven:To put the focus on our photos, we needto hide the left side Panels area. Go backand look at the capture in Step Six, andyou’ll see a thin divider bar that separates the left side Panels area from theContent panel in the center. Just doubleclick directly anywhere on that dividerbar, and the left side Panels area tucksout of sight, leaving just the Contentpanel thumbnails on the left, and a reallyhuge Preview panel. Now, I recommendshrinking the size of the Content panelon the left, so you just have one verticalrow of thumbnails. You do that by clicking-and-dragging the thin divider barbetween the Content and Preview panels to the left to squash the Contentpanel’s size a bit (as shown here).Step Eight:This is the exact Bridge layout I usewhen looking at my imported photos,and if you like this layout, you can save itas your own (so it’s only one click away).You do that by going under the Windowmenu, under Workspace, and choosingNew Workspace. A dialog will appearasking you to name your workspace andwhen you click OK, your workspace willnow not only appear in the Workspacesubmenu, it will also appear as the firstworkspace in the Application Bar’s listof workspaces.TIP: Panel TricksTo collapse any panel, just double-clickon its tab. To expand it, double-click onits tab again. However, if there’s a panelyou find you don’t use, you can hide itfrom view—just go under the Windowmenu and choose the name of the panelyou want to hide. To make a hidden panelvisible again, do the same thing.(Continued)Bridge EssentialsBonus Chapter 1011
The Adobe Photoshop CC Book for Digital Photographers (2017 Release)Step Nine:Now that your Preview panel is nice andlarge, you can really put it to work. If youpress-and-hold the Command (PC: Ctrl)key, and click on more than one thumbnail in the Content panel, it displays themin the Preview panel (as shown here).To remove one of the photos from thePre view panel, Command-click on itsthumbnail in the Content panel to de select it (if you look at the capture inStep 10, you’ll see where I’ve deselectedthe top photo, leaving just two selected,and they automatically zoom up to fill inthe space and give you an even bettersize for making a comparison).Step 10:The Preview panel has another nicefeature: a built-in Loupe for zooming intight (perfect for zooming in on an eyein a portrait to check sharpness). Here’show it works: Move your cursor overa photo, and your cursor changes intoa magnifying glass. When you click, aLoupe magnifier (shown here) appearswith a 100% view of the area your cursor is over. To reposition the Loupe,click-and-drag it where you want. Tozoom in to a tighter 200% view, pressthe (plus sign) key on your keyboard(the view magnification amount appearsto the right of the photo’s name). Pressthe key again to zoom to 400%, andonce again for the maximum view of800%. To zoom back out, press the –(minus sign) key. To remove the Loupe,click the little X in its corner.012Bonus Chapter 1Bridge Essentials
The Adobe Photoshop CC Book for Digital Photographers (2017 Release)Step 11:One of my favorite features in Bridge isthe ability to instantly see any thumbnailfull screen—just click on it in the Contentpanel, then press the Spacebar on yourkeyboard, and it appears full screen (likeyou see here). As handy as this is, thereis another full-screen view mode youmay like better—Review mode.Step 12:To see all the images in your currentfolder in Review mode, deselect them all,then press Command-B (PC: Ctrl-B). Ifyou have more than four images in yourfolder, it puts your images full screen in acool carousel-like rotation (as seen here).This mode is great for two big reasons:The first is it makes a really nice on screenslide show presentation. You can use theLeft and Right Arrow keys on your keyboard to move through the photos orthe arrow buttons in the lower-left cornerof the screen (as a photo comes to thefront, it becomes larger and brighter).If you want to open the image in front inCamera Raw, press R. To open all your images in Camera Raw, press Option-R (PC:Alt-R). To leave Re view mode, press theEsc key. If you forget any of these shortcuts, just press H.TIP: One-Click Collection fromReview ModeWhen you’re in full-screen Review modeand you’ve whittled things down to justyour keepers, you don’t need to leaveReview mode and navigate to the Collec tions panel to create a collection—justclick the New Collection button in thebottom-right corner of the screen andwhatever’s left in Review mode is automatically added to this new collection.(Continued)Bridge EssentialsBonus Chapter 1013
The Adobe Photoshop CC Book for Digital Photographers (2017 Release)Step 13:The second reason to use Review modeis to help you narrow things down to justyour best photos from a shoot. Here’show: Let’s say you have five or six similar photos, or photos of a similar subject(in this case, two hockey players fighting),and you want to find the single best oneout of those. Start by Command-clicking(PC: Ctrl-clicking) on just those photos (inthe Content panel) to select them, andthen press Command-B (PC: Ctrl-B) toenter Review mode. As you move throughthe photos (using the Left and RightArrow keys on your keyboard), and yousee one come to front that’s not going tomake the cut, just press the Down Arrowkey on your keyboard (or click the DownArrow button onscreen) and that photois removed from contention. Keep doingthis until you’ve narrowed things downto just the final image. Once you fallbelow five images, you no longer getthe carousel view. Instead, it looks morelike regular Preview mode—it’s just fullscreen (as seen here).Step 14:In Review mode, you can still use theLoupe for zooming in—just move yourcursor over any photo and click to bringup the Loupe for that photo. You canalso have multiple Loupes—one foreach open image (shown here).TIP: Moving and Zooming inthe LoupeWith some Loupes in place, Commandclick (PC: Ctrl-click) and drag within anyone of them and they’ll all move together,which is handy for inspect ing similar pho tos. Also, if you press Command– (plussign; PC: Ctrl– ) to zoom in, all theLoupes zoom in together.014Bonus Chapter 1Bridge Essentials
The Adobe Photoshop CC Book for Digital Photographers (2017 Release)Step 15:Okay, this isn’t really a step, but I’ve got afew cool tips about viewing your photosand working with Bridge’s panels, andI figured this is a perfect place for them:TIP: Grouping PanelsYou can group panels you want togeth erby clicking on a panel’s tab, and dragging-and-dropping it onto another panel.This creates a “nested” panel, where youcan now click on a tab to reveal that panel.That way, if you need a lot of panels visible for the way you work, at least youcan nest them together. In the exampleshown here, I clicked-and-dragged thetabs of the panels normally in the rightside Panels area and dropped them onthe top of the left side Panels area to nestthem there (notice the five tabs across thetop of the left side Panels area).TIP: Quick Navigation Using thePath BarThe Path Bar shows you visually thefolder hierarchy (the file path) of whatyou’re seeing in Bridge, but beyond that,each level of that path is clickable. So, ifyou want to jump back two folders, justclick on the folder. This can be a hugetime saver when navigating from folderto folder.TIP: Hide the Path BarIf you really want the ultimate in clean layouts for viewing your photos, you can hidethe Path Bar across the top of Bridge’swindow—go under the Window menuand choose Path Bar, and it’s hidden (inthe image here, the Path Bar is hidden,leaving just that one slim bar acrossthe top).TIP: Hiding Panels AreasPressing the Tab key hides both sidePanels areas, so whatever’s in the centerpanel goes full screen.Bridge EssentialsBonus Chapter 1015
The Adobe Photoshop CC Book for Digital Photographers (2017 Release)Sorting andArrangingYour PhotosAh, finally we get to the fun part—sorting your photos. We generally havethe same goal here: quickly finding out which are the best shots from yourshoot (the keepers), marking them as your best shots, and then puttingthem one click away, so we can view them as slide shows, post them onthe web, send them to a client for proofing, or prepare them for printing.Here we’re going to look at how to do just that, in the most efficientway possible, by taking advantage of some of the features in Bridge.When you view your images in Bridge,by default, they’re sorted manually byfile name, so it’s pretty likely that the firstphoto you shot will appear in the upperleft corner of the Content panel. I sayit’s “pretty likely” because there are exceptions (if you did multiple shoots ondifferent cameras, or shot on differentmemory cards, etc.), but most likely they’llappear first one shot first. If you wantto change how they are sorted, clickand-hold on the words Sort by Filenamenear the right side of the Path Bar, and apop-up menu of options will appear (asseen here).SCOTT KELBYStep One:Let’s start by quickly rating our photosto separate the keepers from the restof the bunch. First, I switch to a viewmode that’s better for decision making,so choose either the workspace we created earlier (seen here) or Full ScreenPreview (select any photo and then pressthe Spacebar. You don’t have to selectthem all first—just click on any one, hit theSpacebar, then use the Left and RightArrow keys on your keyboard to movethrough the full-screen images). If yougo with the workspace we created earlier, you still use the same Left and RightArrow keys on your keyboard to movethrough your images.016Bonus Chapter 1Bridge EssentialsSCOTT KELBYStep Two:
The Adobe Photoshop CC Book for Digital Photographers (2017 Release)Step Three:Probably the most popular method forsorting your images is to rate them usingBridge’s 1- to 5-star rating system (with 5being your best images). That being said,I’m going to try to convince you to try arating system that is faster and more efficient. When you see a photo that is reallybad (way out of focus, the flash didn’t fire,the subject’s eyes are closed, etc.), pressOption-Delete (PC: Alt-Delete) to markthat photo as a Reject. When you do this,the word Reject appears in red below thelarge image in the Preview panel, andbelow the thumbnail, as well (they’re bothcircled here in red). It doesn’t delete them;it just marks ‘em as Rejects. Note: You canchoose to have Bridge automatically hideany photos you mark as Rejects by goingunder the View menu and choosingShow Reject Files (as shown here).SCOTT KELBYStep Four:When you see a “keeper” (a shot you maywant to print, or show to the client, etc.),then you’ll press Command-5 (PC: Ctrl-5)to mark that photo as a 5-star image, andthis star rating will appear below the selected photo in the Preview panel and thethumbnail, as well (they’re shown circledhere in red). So that’s the drill—movethrough your photos and when you seea real keeper, press Command-5, andwhen you see a totally messed up photo,press Option-Delete (PC: Alt-Delete) tomark it as a Reject. For all the rest of thephotos, you do absolutely nothing. So,why not use the entire star rating system?Because it takes way, way too long (I’llexplain why on the next page).(Continued)Bridge EssentialsBonus Chapter 1017
The Adobe Photoshop CC Book for Digital Photographers (2017 Release)Here’s why I don’t recommend usingthe entire star rating system: What areyou going to do with your 2-star images?They’re not bad enough to delete, so wekeep ‘em, right? What about your 3-starones? The client won’t see these either,but we keep ‘em. What about your 4-starphotos (the ones that weren’t quite goodenough to be five stars)? We keep them,too. See where I’m going? Why wasteyour valuable time deciding if a photo isa 2- or a 3- or a 4-star, if all we’re goingto do is keep ‘em anyway? The only shotswe really care about are the ones we wantoff our computer (they’re messed up andjust wasting disk space), and our bestshots from that shoot. So, once you’vegone through and ranked them, let’s getrid of the dogs. Click-and-hold on theFilter Items by Rating icon on the rightside of the Path Bar (it’s the star) andchoose Show Rejected Items Only (asshown here) to see just the Rejects.SCOTT KELBYStep Five:Now press Command-A (PC: Ctrl-A)to select all of them, and then pressCommand-Delete (PC: Ctrl-Delete) tomove these all to your Trash (PC: RecycleBin). Next, go under the Filter Items byRating pop-up menu again, but this timechoose Show 5 Stars (as shown here) tofilter things down so just your keepers—your 5-star images—are visible in Bridge.018Bonus Chapter 1Bridge EssentialsSCOTT KELBYStep Six:
The Adobe Photoshop CC Book for Digital Photographers (2017 Release)Step Seven:At this point, we want to set things upso that in the future these 5-star photosare just one click away at any time, andwe do that using collections. Here’s howit works: Our first step is to click on theword Essentials up in the Application Bar,then press Command-A (PC: Ctrl-A) toselect all your 5-star photos. Now click onthe Collections panel’s tab (in the middleof the left side Panels area) to make theCollections panel visible. Click on theNew Collection icon at the bottom of thispanel (it’s circled here in red) and a dialogwill appear asking if you want to includethe selected photos in this new collection(you do, so click the Yes button).TIP: Removing RatingsTo remove a photo’s star rating, just clickon the photo, then press Command-0(zero; PC: Ctrl-0).Step Eight:When you click the Yes button, Bridgecreates a new collection in the Collectionspanel. The collection is untitled, but thename field is already highlighted, so allyou have to do is type in a name for yourcollection (as I did here), and press theReturn (PC: Enter) key on your keyboardto lock in your new name. Now these“best of that shoot” photos will always bejust one click away—go to the Collectionspanel, click on the collection, and just theshoot’s 5-star photos appear. Also, if youwanted to view this collection larger, youcould either make the thumbnails bigger(using the Thumbnail Size slider at thebottom of the window), or just switch toyour viewing workspace (the one we created earlier) and you’ll see the imagesreally large in the Preview panel.(Continued)Bridge EssentialsBonus Chapter 1019
The Adobe Photoshop CC Book for Digital Photographers (2017 Release)Step Nine:Now, you can take things a step further ifyou like. For example, if you show theseshots to your client, and they choose threeof these 5-star photos to have print ed, youcan then use color labels to mark those asyour “Client Selects.” Just Command-click(PC: Ctrl-click) on the photos they choseto select them, then press Command-6(PC: Ctrl-6) which adds a color banneraround the star rating (as seen here, whereyou can see Red labels on three of theimages). If I do this, I generally create another collection called “Client Selects” byclicking on the Filter Items by Rating icon(the star on the right side of the Path Bar)and choosing Show Labeled Items Onlyfrom the pop-up menu, which displays justthose red-labeled photos. Then I selectthem all (Command-A [PC: Ctrl-A]), c
SCOTT KELBY Step 12: So that’s a look at how I set up the Photo Downloader to import photos. Now all you have to do is click the Get Media button (in the bottom right-hand corner of the Photo Downloader), and a download status dialog appears (shown here), showing you which files