Transcription
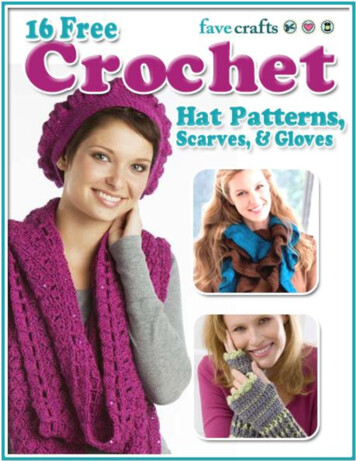
16 Free Crochet Hat Patterns, Scarves, and Gloves16 Free Crochet Hat Patterns, Scarves, and GlovesCopyright 2012 by Prime Publishing LLCAll rights reserved. No part of this book may be reproduced or transmitted in any form or by any means,electronic or mechanical, including photocopying, recording, or by any information storage or retrievalsystem, without written permission from the publisher, except in the case of brief quotations embodiedin critical articles and reviews.Trademarks are property of their respective holders. When used, trademarks are for the benefit of thetrademark owner only.Published by Prime Publishing LLC, 3400 Dundee Road, Northbrook, IL 60062 – www.primecp.comFree Craft ProjectsFree Crochet ProjectsFree Knitting ProjectsFree Holiday Craft ProjectsFree Sewing ProjectsFree Quilt ProjectsFree Jewelry ProjectsFree Christmas CraftsFree Crochet Afghan PatternsFind great craft projects at FaveCrafts.2
16 Free Crochet Hat Patterns, Scarves, and GlovesLetter from the EditorsHello, Readers!With winter in full swing, it’s time to start crocheting some warm winter hats, scarves, and gloves! Thesepatterns are quick and easy, and they make great gifts too. Everyone can use a little extra warmth intheir lives, especially when there’s a chill in the air. Refresh your winter wardrobe by creating somestylish cold weather accessories using one of these great free patterns.You can find more craft projects, great activities for kids and decorating ideas at www.FaveCrafts.com.Our eBooks, like all of our craft projects, are absolutely FREE. Please feel free to share with family andfriends and ask them to sign up at our website for free newsletters from FaveCrafts.com.We hope you enjoy reading and creating!Sincerely,The Editors of FaveCraftsFind great craft projects at FaveCrafts.3
16 Free Crochet Hat Patterns, Scarves, and Gloves16 Free Crochet Hat Patterns, Scarves, and Gloves eBookTable of ContentsScarves . 5Hats .18Crimson Ridge Cowl . 5Blooming Spring Hat . 18Cute Bowtie Neckwarmer . 7Easy to Crochet Petite Brimmed Cap . 20Cupcake Scarf . 9Beginner Crochet Cap . 23Double the Fun Potato Chip Scarf . 11Grey Slouchie Beanie . 24Gloves and Mittens. 12Three Colored Cloche . 26Easy Crochet Mittens . 12Crochet Sets.28Lacy Wrist Warmers . 14La Poetique Scarf and Beret Set . 28Striped Fingerless Gloves . 16Crochet Scarf and Hat Roving Set . 31Beginner Crochet Hat and Scarf Set . 32Shimmering Lacy Bobble Scarf and Wristlets. 34Find great craft projects at FaveCrafts.4
16 Free Crochet Hat Patterns, Scarves, and GlovesScarvesDifficulty Level: Advanced BeginnerCrimson Ridge CowlYou will need to have basic crochet skills.This project uses a slightly advanced stitch,simple shaping and edging.By: Salihan CraftsWhen the rest of the world slowly puts awaytheir winter woolies, it's time for those downunder to start crocheting for the upcomingchill. The Crimson Ridge Cowl is an easyproject you can whip up quickly for thoseunpredictable autumn days.Finished Measurements:22" (56cm) circumference around the widestpart and narrows to 19" (49cm) 9.5" (24cm)tallGauge: 10 stitches 4" (10cm) in singlecrochet through back loopMaterials:Approximately 107 yards (98m) ofLion Brand Wool-ease Chunky or anybulky/12ply yarnUS M/N (9mm) crochet hookEmbroidery needleFind great craft projects at FaveCrafts.5
16 Free Crochet Hat Patterns, Scarves, and GlovesStitch Explanation:This pattern is written using Americancrochet abbreviationsch(s) chain(s)rnd(s) round(s)st(s) stitch(es)sc single crochetsctbl single crochet through back loop onlysc2tog tbl single crochet 2 stitches togetherthrough back loops onlyRnd 3: Ch 1, *1 sctbl to next 6 sts, sc2togtbl*, repeat ** to end of rnd, slip st into theturning ch (42 sts)Repeat round 1 until cowl measures 9"(23cm)Rope edging rnd: Working from LEFT toRIGHT (opposite direction), ch 1, sc intoeach st, slip st into the turning ch.Ch 1 and fasten off.Weave in loose ends using the embroideringneedle.Instructions:Chain 53 sts. Slip st into the first chain to joinin the round.Rnd 1: Ch 1, 1 sctbl into each st, slip st intothe turning ch (52 sts)Repeat round 1 until cowl measures 3"(7.5cm)Rnd 2: Ch 1, *1 sctbl to next 11 sts, sc2togtbl*, repeat ** to end of rnd, slip st into theturning ch (48 sts)Repeat round 1 until cowl measures 6"(15cm)Find great craft projects at FaveCrafts.6
16 Free Crochet Hat Patterns, Scarves, and GlovesCute Bowtie NeckwarmerBy: Darla J. Fanton for Red Heart YarnThis is such a cute pattern you will lovewearing around. Who says bowties are justfor men? This is an intermediate crochetpattern that uses a double-ended crochethook.Gauge: 19 sts 4”; 24 rows 4” in doublehook pattern.Check your Gauge: Use any size hook toobtain the gauge.Notes:The ends and center sections of the scarf areworked in the double-ended hook technique.The pick-up action and work-off action arelisted as two separate rows.The Keyhole sections are worked in TunisianCrochet where the pick-up and work-offactions comprise one row. A row is completewhen you have one stitch remaining on thehook.When working in horizontal stitches, inserthook under top loop only.Special Abbreviations:Horiz horizontalVert verticalTKS Tunisian Knit Stitch – Insert hookfrom front to back between vertical strands ofsame st, yo and draw through keeping loopon hook.Materials:RED HEART “Soft Yarn : 1 balleach 9440 Lt GreyHeather A, 9520 Seafoam B.Crochet Hooks: 6.5mm [US K-10½] –10” double-ended crochet hook; 6.5mm [US K-10½] standard hook (usedfor edging only).Two stitch holders (at least 4” length),tapestry needle.Neck Warmer:With A, ch 3.Row 1: Working in bump on wrong side ofch, pick up loop in 2nd ch from hook andremaining ch; slide loops to opposite end ofhook and turn – 3 loops on hook.Row 2: Place slip knot of B on left end ofhook; draw slip knot through first loop, [yo,draw through 2 loops] twice; 1 loop of Bremains. DO NOT TURN.Row 3: Pick up loop in first horiz st, pick uploop under next vert bar, pick up loop in nexthoriz st, pick up loop under final vert bar;slide loops to opposite end of hook and turn –5 loops.Find great craft projects at FaveCrafts.7
16 Free Crochet Hat Patterns, Scarves, and GlovesRow 4: Pick up A, yo, draw through 1 loop; *yo, draw through 2 loops; repeat from *across until 1 loop of A remains. DO NOTTURN.Row 5: Pick up loop in first horiz st, pick uploop under next vert bar, pick up loop in eachhoriz st until 2 vert bars remain, pick up loopunder next vert bar, pick up loop under finalhoriz st, skip final vert bar; slide loops toopposite end of hook and turn – 7 loops.Rows 6-19: Repeat Rows 4-5, alternating tworows of A and two rows of B – 21 sts at endof Row 19.Row 20: Repeat Row 4.Row 21: Pick up a loop in each horiz st; slideloops to opposite end of hook and turn – 21loops.Row 22: Repeat 4 with B.Row 23-30: Repeat Rows 21-22, alternatingtwo rows of A and two rows of B.Divide for KeyholeRow 31: * Pick up loop in next horiz st,transfer loop to stitch holder, pick up loop innext horiz st holding it on hook; repeat from* keeping st holder to the back of work. DONOT TURN – 11 B sts on hook, 10 B sts onholderRow 32: Working only sts on hook, yo, drawthrough one loop, * yo, draw through 2loops; repeat from * across; drop B, ch 1 withA.Row 33: TKS in each st across – 11 sts.Row 33 Return: Yo, draw through 1 loop;*yo, draw through 2 loops; repeat from *across until 1 loop remains;DO NOT TURN.Rows 34-40 Return: Repeat Row 33 and Row33 Return.Row 41: TKS in each st across, transfer loopsto 2nd stitch holder.Work 2nd half of 1st keyhole: Turn work,place loops from 1st st holder on hookmaking sure B yarn is to the left.Repeat Rows 32 – 41 on 10 sts with B.Rejoin sts: Holding work so st holder with 11sts is closest to you, replace loops on hookbeginning with 1st st at right edge of frontholder and alternating 1 st from each holder.21 sts on hook, one strand of yarn at eachedge of work.Row 42: Repeat Row 4 with A, drop A, ch 1with B.Rows 43-146: Repeat Rows 21-22,alternating two rows ofA and two rows of B.Divide for Keyhole:Row 147: Repeat Row 31.Rows 148-157: Repeat Rows 32-41.Work 2nd half of 2nd keyhole as for firstthrough Rejoining Sts.Row 158: Repeat Row 42.Rows 159-168: Repeat Rows 21-22alternating two rows of A and two rows of B.Row 169: Skip 1st horiz st, pick up loop ineach horiz st until 2 remain; skip next horizst, pick up loop in final horiz st; slide loops toopposite end of hook and turn – 19 loops.Row 170: Repeat Row 4.Rows 171-184: Repeat rows 169-170; notingtwo fewer loops on hook each pick-up row –5 loops at end of Row 183.Row 185: Skip first horiz st, slip st in nexthoriz st, skip next horiz st, slip st in finalhoriz st; transfer final loop of A to standardhook for edging. Fasten off B.Edging: Ch 1, turn so predominantly A sideis facing; working in ends of rows, sc evenlyaround working through top thickness only ofkeyhole section, join with slip st in beginningsc. Fasten off. Weave in yarn ends.Abbreviations: A, B color A, B; ch chain; mm millimeters; st(s) stitch(es); yo yarn over; * or ** repeat whateverfollows the * or ** as indicated; [ ] workdirections in brackets the number of timesspecified.Find great craft projects at FaveCrafts.8
16 Free Crochet Hat Patterns, Scarves, and GlovesCupcake ScarfFinished Size: One size fits mostBy: Jennifer CirkaGauge: Not importantCupcakes are trendy right now, so embellisha crochet scarf with some yummy-lookingcupcakes with this free crochet scarf pattern.“Cake” Pattern – make 21. With brown, ch 162. Row 1: (RS) hdc in third ch fromhook, hdc in next 3 chs, sc inremaining chs. Ch1, turn. (4hdc, 10sc)3. Row 2: working in BLO, sc in each stacross. Ch1, turn. (14sc)4. Row 3-15: repeat row 2.5. Row 16: working in BLO, sc in first10 sts. Hdc in last 4 sts. Finish off andweave in ends. (10sc, 4hdc)“Icing” Pattern – make 21. Row 1: With icing color and RSfacing, attach yarn with a sc to thewidest egde – right corner. Evenlyspace 17 more sc along edge. Ch3,turn. (18sc)Materials:Any worsted weight yarn (I usedmostly “I Love This Yarn”, 100%acrylic)Small amount of brown for cupcake“cake”Small amount of pink and purple for“icing”Small amount of red for “cherry”Approximately 200 yards of mainscarf color (I used baby blue)G-6 / 4 mm crochet2. Row 2: sc in each sc across, ch3, turn.(18sc)3. Row 3: sc in each sc across andturning ch. Ch3, turn. (20sc)4. Row 4: sk first 2sc, sc in next st andeach st across until 2 sts remain. Ch2,sl st in turning ch. (16sc)5. Row 5: sk ch sp. Sc in first sc andeach sc across. Ch3, turn. (16sc)Find great craft projects at FaveCrafts.9
16 Free Crochet Hat Patterns, Scarves, and Gloves6. Row 6: sk first 2 sts, sc in next sc andeach st across. Ch3, turn. (14sc)7. Row 7-9: repeat row 6. (8sc)AssemblyAttach cherry to top of icing and attachcompleted cupcakes to the bottom of thescarf or wherever desired.8. Row 10: sk first 2 sts, hdc in next 4sts, ch2. sl st in turning ch. Finish offand weave in ends.“Cherry” Pattern – make 21. Round 1: With red, 6sc in magic ring,do not join. (6sc)2. Round 2: 2sc in each sc around.(12sc)3. Round 3: ch1, 2hdc in each sc around.Finish off and weave in ends. (24hdc)Scarf Pattern(Note: Hat pattern not available)1. With MC, ch 302. Row 1: 2dc in 3rd ch from hook. *sk2 sts, (sc, 2dc) in next st. Repeat from* across. Sc in last ch. Ch2, turn.3. Row 2: 2dc in first sc. *sk 2 dc, (sc,2dc) in nest sc. Repeat from * across,ending with sc in turning chain. Ch2,turn.4. Repeat row 2 until desired length isachieved.5. Final row: ch1, sc in each dc and scacross. Finish off and weave in ends.Find great craft projects at FaveCrafts.10
16 Free Crochet Hat Patterns, Scarves, and GlovesDouble the Fun Potato Chip ScarfBy: Tracie Barrett for Red Heart YarnGet twice as much fun from your fashionscarf pattern in this Double the Fun PotatoChip Scarf from Red Heart Yarn. Easycrocheted scarf patterns can look quiteimpressive! Mix and match colors to create ascarf for every outfit.Instructions:GAUGE: 12 sts 4”; 8 rows 4”. CHECKYOUR GAUGE. Use any size hook to obtainthe gauge given.1. With A, ch 146 (174) loosely.2. Row 1: Dc in 4th ch from hook andeach st across. Turn 144 (172) dc.3. Row 2 (Right Side): Ch 3 (counts asdc here and throughout), dc in each stacross. Turn.4. Row 3: Ch 3, dc in same st, 2 dc ineach st across. Turn. 288 (344) dc.5. Row 4: Repeat row 2.6. Row 5: Ch 3, dc in next st, 2 dc innext st, * dc in next st, 2 dc in next st;Repeat from * across. Turn. 432 (516)dc.7. Row 6: Repeat row 2.8. Row 7: Ch 3, dc in next 2 sts, 2 dc innext st, * dc in next 2 sts, 2 dc in nextst. Turn. 576 (688) dc.9. Row 8: Repeat row 2. Fasten off.10. With Right Side facing, join B toopposite side of foundation chain.11. Row 1: Ch 3, dc in each ch across.Turn.Materials:RED HEART “Super Soft ” (1skein each 9344 Chocolate A and9518 Teal B)Crochet Hook: 6.0mm [US J-10]Yarn needle12. Rows 2-8: Repeat rows 2-8 fromprevious side. Fasten off.13. Weave in all ends.Find great craft projects at FaveCrafts.11
16 Free Crochet Hat Patterns, Scarves, and GlovesGloves and MittensMaterials:Easy Crochet MittensChunky worst weight yarnSize I crochet hookBy: Julie Huston from Treasures Made FromYarnEvery girl needs a pair of cozy mittens for thewinter season. Before the temperature startsto plummet, make yourself a pair of theseEasy Crochet Mittens. Made with bulkyyarn, these simple mitts can be crocheted upin hardly any time at all!Instructions:Starting at cuff: chain 11Row 1: sc in second chain from hook, sc inthe remaining stitches, ch1 turn (10 sc)Row 2: sc in back loops of each sc across,ch1, turnRepeat row 2 until 20 rows are completed.Turn woek to the side and work incontinuous rounds.Row 1: work 20 sc along side of the cuffmark the first and the last stitchRow 2: 2 sc in the first stitch, sc until the laststitch, 2 sc in the last stitch (22 sc) again,mark the first and the last stitch.Repeat row 2 until you have 30 sc.Setting up for the thumb:sc in the next 4 sc, sc in the next sc and markthis stitch. sc in the next 21 sc, skip the next 8sc, sc in the marked sc. (22 sc)Marked stitch is first sc in each row.Row 1: sc in each of the 22 sc around.repeat row 1 for 10 rows, or about 1 1/2inches below desired length.Find great craft projects at FaveCrafts.12
16 Free Crochet Hat Patterns, Scarves, and GlovesDecrease for top of mitten:Row 1: sc 2tog, sc in the next 4, sc 2tog, *scin the next 5, sc 2 tog* repeat aroundRow 2: sc aroundRow 3: *sc in next 4, sc 2 tog* aroundRow 4: sc aroundRow 5: *sc in the next 3, sc 2 tog* aroundRow 6: *sc in the next 2, sc 2 tog* aroundfinish off.Thumb:sc in the first unworked sc (mark this stitch)and in the remaining 7 sc, 2 sc in the side ofthe mitten (10 sc)do two more rounds of scdecrease for thumb:Row 1: sc in the next 3 sc, sc 2tog, repeatone more timeRow 2: sc aroundRow 3: sc in the next 2 sc, sc 2 tog, repeatone more time, finish off.Sew in ends, and sew up side seam for cuff.Of course, make the other mitten.Find great craft projects at FaveCrafts.13
16 Free Crochet Hat Patterns, Scarves, and GlovesLacy Wrist WarmersMaterials:By: Nazanin S. Fard for Red Heart YarnKeep your hands toasty and your fingers freeto work with this wrist warmers crochetpattern or fingerless mittens crochet pattern.These stylish wrist warmers would make agreat gift or a quick crochet project.Yarn: RED HEART “EcoWays ”: 1 Ball each 2316 Storm Aand 1615 Lichen B.Crochet Hook: 6mm [US J-10].Yarn needle.Gauge: 14 sts 4” in dc.Directions are for size Small/Medium;changes for size Medium/Large are inparentheses.Size:Hand Circumference: 7½ (8½)”.Length: 10”.Special Abbreviations:fpdc (front post double crochet): yarn over,insert hook from front to back to front aroundthe post of indicated stitch and draw yarnthrough, [yarn over and draw through 2 loopson hook] twice.bpdc (back post double crochet): yarn over,insert hook from back to front to back aroundthe post of indicated stitch and draw yarnthrough, [yarn over and draw through 2 loopson hook] twice.To Change Color: Work the joining slip stwith next color to be used.Note: Do not cut yarn when changing colorbut drop to the wrong side of the work andpick up again as needed.Find great craft projects at FaveCrafts.14
16 Free Crochet Hat Patterns, Scarves, and GlovesInstructions: (Make 2)With A ch 26 (30) loosely; join with a slip stin first ch to form a ring making sure that thech is not twisted.Rnd 1: Ch 3 (counts as dc), dc in next ch andin each ch around; join with a slip st in top ofch-3 – 26 (30) sts.Rnd 2: Ch 3, fpdc around next st, * bpdcaround next st, fpdc around next st; repeatfrom * around; join with a slip st in top of ch3.Rnd 3: With B repeat Rnd 2.Rnds 4 and 5: With A repeat Rnd 2.Rnds 6-11: Repeat Rnds 3-5.Rnd 12: Repeat Rnd 3.Rnds 13 and 14: With A ch 3, dc in next stand in each st around; join.Rnd 15: With B ch 1, sc in each st around;join with a slip st in first sc.Rnds 16 and 17: Repeat Rnds 13 and 14.Rnd 18 (Thumb Opening): With B ch 1, sc insame st as joining, ch 4, skip next 4 dc, sc ineach dc around; join.Rnd 19: With A ch 3, 4 dc in ch-4-space, dcin each sc around; join.Rnd 20: Repeat Rnd 13. Cut A.Rnd 21: With B ch 1, sc in same st as joining,* skip next dc, 5 dc in next dc, skip next dc**, sc in next dc; repeat from * around, endat **; join. Fasten off.Find great craft projects at FaveCrafts.15
16 Free Crochet Hat Patterns, Scarves, and GlovesStriped Fingerless GlovesBy: Berta GilholmWith this free crochet pattern, you can keepyour hands warm while still being able to useyour fingers. With instructions from BertaGilholm, you can create two equally colorfulversions of a classic pattern.Materials:Any Worsted Weight self patterning#4 yarn. I used Red Heart SuperSaver, Multi Color Acrylic, wwmedium, 5 oz., 141 gCrochet Hook size US I 9 /5.50mmYarn NeedleStitches: Ch – Chain, Slst – Slip Stitch, Sc –Single Crochet, Scdc – Single CrochetDecreaseNote: Do not count Ch1 at beginning of eachround as a stitch on rows.This pattern is for a medium glove, If yourequire a smaller or larger glove do one of thefollowing:1. Change the hook 1 size down forsmall or 1 size up for large.2. Subtract 2 sc’s plus 2 rows for smallersize or Add 2 sc’s plus 2 rows forlarger size.Instructions:Cuff Instructions:With I hook, Ch 13,Row 1: Sc in second Ch from hook and ineach Ch across, ch 1, turn (12 sc)Row 2: Working in back loops only Sc ineach Sc across, ch 1, turn (12 sc)Row 3 – 18: Repeat row 2, at end of last rowline up row 18 against first chain row to sewseam for cuff as follows: Ch 1, slst througheach sc/ch row across, Ch 1 (12 slst)Find great craft projects at FaveCrafts.16
16 Free Crochet Hat Patterns, Scarves, and GlovesGlove Instructions:Rnd 1: Working on ends of Cuff, Sc aroundcuff 22 times, join with slst to first sc, ch 1(22 sc)Rnd 2: Sc in each sc around, join with slst tofirst sc, ch 1 (22 sc)Rnd 3 – 7: Repeat round 2, (22 sc)Row 8: Sc in next 9 Sc, Sc 2 times in nextSc, Repeat * one more time, join with slst tofirst sc, ch 1 (24 sc)Rnd 9: Sc in each sc around, join with slst tofirst sc, ch 1 (24 sc)Row 10: Sc in next 12 Sc, Sc 2 times in nextSc, Sc in next 11 sc, join with slst to first sc,ch 1 (25 sc)Rnd 11: Sc in each sc around, join with slstto first sc, ch 1 (25 sc)Thumb Area: Join yarn in any thumb holestitchRnd 1: Sc 13 times around thumb hole area,join with slst to first sc, ch 1 (13 sc)Rnd 2: Sc in next 4 sc, dcsc over next 2 sc,repeat one more time, sc in last sc, join withslst to first sc, ch 1 (11 sc)Rnd 3: Sc in next 11 sc around, join with slstto first sc, ch 1 (11 sc)Rnd 4: Slst in each sc around. fasten off atend of last round.Weave in ends.Thumb Hole:Rnd 12: Slst in first 2 sc, Ch 1, Sc in next 21sc, ch 1, turn (21 sc)Rnd 13: Sc in each sc around, ch 1, turn (21sc)Rnd 14: Sc in each sc around, ch 1, join withslst to first sc, ch 1 (22 sc) (thumb hole made)Rnd 15: Sc in each sc around and in ch 1 sp,join with slst to first sc, ch 1 (22 sc)Rnd 16 - 20: Sc in each sc around, join withslst to first sc, ch 1 (22 sc) fasten off at end oflast round. Weave in ends.Find great craft projects at FaveCrafts.17
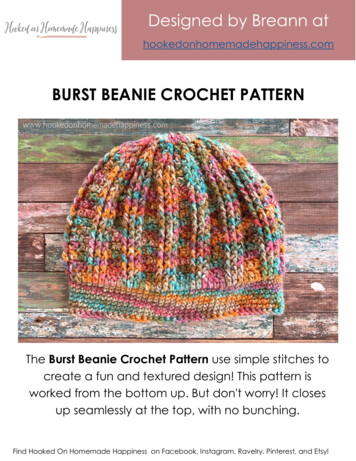
16 Free Crochet Hat Patterns, Scarves, and GlovesHatsMaterials:Blooming Spring HatBy: Lindsay Obermeyer for SerendipityProjects that have crochet and knittingtogether can blossom into beautiful things,like this Blooming Spring Hat. Who doesn'tlove colorful spring hats? With flowers andleaves topping this beanie, you'll be in thespirit of spring in no time!1 Skein Manos (or other worstedweight yarn) in color #70Assorted bits of pink, red and greenyarn from previous projects1 16” #9 Circular needle1 Set of #9 double points (you coulddo the whole project on doublepoints)1 G crochet hook (or size to matchassorted bits of pink and red)1 Set of straight knitting needles insize to work the green leaves1 Tapestry needleStitch markersScissorsInstructions:Gauge:4 stitches to the inch6 rows to the inchOn #9 needle using ManosDirections for Hat:1. Cast on 80 stitches and join circle.2. Add a stitch marker to markbeginning and end of round.3. Work in Garter Stitch for first inch.Remember that Garter in the round is- *K a round, purl a round* repeatfrom * to * for one inch.4. Switch to Stockinette Stitch andcontinue for 4 more inches. In theround, this means you are justknitting.Find great craft projects at FaveCrafts.18
16 Free Crochet Hat Patterns, Scarves, and Gloves5. On final round of the body, placestitch markers every 10 sts.6. Decrease round is worked as a K2togafter every stitch marker.Directions for Leaves (you will be workingthe leaves in Garter Stitch):1. Cast on 1 stitch. Leave a long tail.2. Work an increase – 2 stitches.7. Knit the next round. You willcontinue working a decrease roundand then knitting a round until youhave only 8 stitches left. At somepoint, around 40 stitches, you willwant to switch to double pointedneedles as the crown of the hat is toosmall to continue working on acircular needle.8. With 8 stitches left, cut a long tail andpull it through the remaining stitches.Pull firmly and weave in all tails.4. Work an increase in the end stitches –6 stitches.5. Knit for 3 rows.6. Work an SSK (slip, slip, knit) on theright side and a K2tog on the left – 4stitches.7. Work an SSK (slip, slip, knit) on theright side and a K2tog on the left – 2stitches.Directions for Flowers:1. Chain 21 stitches. Leave a long tail.2. Turn, skip 2 sts.3. Double crochet 3 times in the nextstitch.4. Continue working a DC 3 times ineach stitch. The piece will begin toform a corkscrew.5. When only 5 stitches remain, work aDC in the next stitch and the rest in ahalf double crochet. Bind off.6. Leave a long tail.3. Work an increase in both stitches – 4stitches.8. K2tog. Cut tail and pull through finalstitch. Work in this tail, but leave theother.Finishing:1. Open up the first corkscrew / flower.Use one of the tails and stitch thecorkscrew into a spiral / rosetteformation onto the crown of the hat.Bring tail to back of work (hat crown)and tie to first tail. Work in ends.2. Continue until all “flowers” areattached.3. Sew on leaves where needed visually.Work in tails.Find great craft projects at FaveCrafts.19
16 Free Crochet Hat Patterns, Scarves, and GlovesEasy to Crochet Petite Brimmed CapMaterials:Red Heart Super Saver (Art.E300) solid color 7 oz (198 g), 364 yd(333 m); multi color and print 5 oz(141 g), 244 yd (223 m),flecks 5oz(141g), 260 yds (238 m) skeins): 1skein 313 AranCrochet hook, 5mm [US H-8]Heavy-weight interfacing or plasticfor brimStitch markersYarn needleBy: Sharon Mann for Red Heart YarnThis Easy to Crochet Petite Brimmed Capfrom Red Heart Yarn is a great addition toyour trendy winter hats collection. A pieceof stiffening helps the brim stay stiff andkeep its shape. Best of all, it's so easy tocrochet! Hats like this are great winterstaples.Instructions:Gauge: 16 dc 4”; 9 rows 4”. CHECKYOUR GAUGE. Use any size hook to obtainthe gauge.Special Abbreviation: Fpdc Front postdouble crochetCap:1. Ch 4, slip st in first st to form ring.2. Round 1: Ch 3 (counts as dc here andthroughout), work 7 dc in ring, slip stto top of beginning ch to join, placemarker for beginning of round – 8 sts.3. Round 2: Ch 3, 2 dc in same space, 3dc in each st around, slip st in top ofbeginning ch – 24 sts.4. Round 3: Ch 3, [(dc and Fpdc) in nextst, dc in next 2 sts] 7 times, (dc andFpdc) in next st, dc in last st, slip st intop of beginning ch – 32 sts; 8 Fpdc.Find great craft projects at FaveCrafts.20
16 Free Crochet Hat Patterns, Scarves, and Gloves5. Round 4: Ch 4 (counts as dc and ch 1here and throughout), skip next st,[(dc and Fpdc) in next st, ch 1, skipnext st, dc in next st, ch 1, skip nextst] 7 times, (dc and Fpdc) in next st,ch 1, skip next st, slip st in top ofbeginning ch – 40 sts.6. Round 5: Ch 3, dc in ch-1 space, dc innext st, *(dc and Fpdc) in next st, [dcin ch-1 space, dc in next st] twice;repeat from * 6 more times, (dc andFpdc) in next st, dc in ch-1 space st,slip st in top of beginning ch – 48 sts.7. Round 6: Ch 4, skip next st, dc in nextst, *ch 1, skip next st, (dc and Fpdc)in next st, [ch 1, skip next st, dc innext st] twice; repeat from * 6 moretimes, ch 1, skip next st, (dc andFpdc) in next st, ch 1, skip next st,slip st in top of beginning ch – 56 sts.8. Round 7: Ch 3, *[dc in ch-1 space, dcin next st] twice, (dc and Fpdc) innext st, dc in next ch-1 space, dc innext st; repeat from * 6 more times,[dc in ch-1 space, dc in next st] twice,(dc and Fpdc) in next st, dc in nextch-1 space, slip st in top of beginningch – 64 sts.9. Round 8: Ch 4, skip next st, *[dc innext st, ch 1, skip next st] twice, (dcand Fpdc) in next st, ch 1, skip nextst, dc in next st, ch 1; repeat from * 6more times, [dc in next st, ch 1, skipnext st]10. twice, (dc and Fpdc) in next st, ch 1,skip next st, slip st in top of beginningch – 72 sts.11. Round 9: Ch 3, *[dc in ch-1 space, dcin next st] 3 times, Fpdc in next Fpdc,dc in next ch-1 space, dc in next st;repeat from * 6 more times, [dc in ch1 space, dc in next st] twice, Fpdc innext Fpdc, dc in next ch-1 space, slipst in top of beginning ch – 72 sts.12. Round 10: Ch 4, skip next st, *[dc innext st, ch 1, skip next st] 3 times,Fpdc in next Fpdc, ch 1, skip next st,dc in next st, ch 1; repeat from * 6more times, [dc in next st, ch 1, skipnext st] 3 times, Fpdc in next Fpdc, ch1, skip next st, slip st in top ofbeginning ch – 72 sts.13. Rounds 11-15: Repeat Rounds 9-10,end with Round 9.14. Round 16: Slip st in each st around.15. Fasten off.Brim:Top Side1. Mark 22 sts on front of Cap on Round16 for Brim.2. Row 1: With right side facing, joinyarn in first marked st, working infront loops only, sc in each next 22sts.3. Row 2: Ch 1, turn, sc in each stacross, sc in back loops in next 4 stson Cap – 26 sts.4. Row 3: Ch 1, turn, sc in each stacross, sc in front loops in next 4 stson Cap – 30 sts.5. Row 4: Ch 1, turn, sc in each stacross, sc in back loop in next st onCap – 31 sts.Find great craft projects at FaveCrafts.21
16 Free Crochet Hat Patterns, Scarves, and Gloves6. Row 5: Ch 1, turn, sc in each stacross, sc in front loop in next st onCap – 32 sts.4. Row 4: Ch 1, turn, sc in each stacross, sc in front loop in next st onCap – 31 sts.7. Row 6: Ch 1, turn, sc in each stacross, sc in back loop in next st onCap – 33 sts.5. Row 5: Ch 1, turn, sc in each stacross, sc in back loop in next st onCap – 32 sts.8. Row 7: Ch 1, turn, sc in each stacross, sc in front loop in next st onCap – 34 sts.6. Row 6: Ch 1, turn, sc in each stacross, sc in front loop in next st onCap – 33 sts.9. Fasten off.7. Row 7: Ch 1, turn, sc in each stacross, sc in back loop in next st onCap – 34 sts.Bottom Side:8. Fasten off.1. Row 1: With wrong side facing, joinyarn on wrong side of Row 1 of Brim,sc in back loops of first 22 sts.2. Row 2: Ch 1, turn, sc in each stacross, sc in front loops in next 4 stson Cap – 26 sts.Finishing: Using Brim as a template, cut apiece of interfacing or plastic to samedimensions. Slip piece in between layers ofBrim and sew Brim closed. Weave in ends.3. Row 3: Ch 1, turn, sc in each stacross, sc in back loops in next 4 stson Cap – 30 sts.Find great craft projects at FaveCrafts.22
16 Free Crochet Hat Patterns, Scarves, and GlovesBeginner Crochet CapHat:Chain 4, join with slip stitch to form ring.By: Edie Eckman for Red Heart YarnUse a free crochet pattern from Red Heart tomake a beginner crochet cap. Worsted weightyarn is used for a nice soft touch. Thecamouflage colors are great.Round 1: Chain 3 (counts as double crochetthroughout), work, 11 double crochet intoring, slip stitch to first double crochet to join– 12 double crochet.Round 2: Chain 3, double crochet in same st,2 double crochet in each double crochetaround, slip stitch to first double crochet tojoin – 24 double crochet.Round 3: Chain 3, 2 double crochet in nextdouble crochet, *double crochet in nextdouble crochet, 2 double crochet in nextdouble crochet; repeat from *, slip stitch tofirst double crochet to join – 36 doublecrochet.Round 4: Chain 3, double crochet in next dc,2 double crochet in next double crochet,*double crochet in next 2 double crochet, 2double crochet in next double crochet; repeatfrom *, slip stitch to first double crochet tojoin – 48 double crochet.R
16 Free Crochet Hat Patterns, Scarves, and Gloves Find great craft projects at FaveCrafts. 3 Letter from the Editors Hello, Readers! With winter in full swing, it’s time to start crocheting some warm winter hats, scarves, and gloves! These patterns are quick and easy, and they make g