Transcription
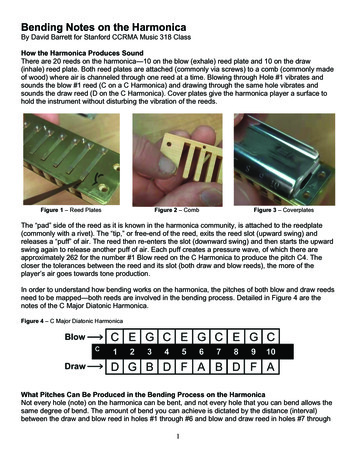
Bending Notes on the HarmonicaBy David Barrett for Stanford CCRMA Music 318 ClassHow the Harmonica Produces SoundThere are 20 reeds on the harmonica—10 on the blow (exhale) reed plate and 10 on the draw(inhale) reed plate. Both reed plates are attached (commonly via screws) to a comb (commonly madeof wood) where air is channeled through one reed at a time. Blowing through Hole #1 vibrates andsounds the blow #1 reed (C on a C Harmonica) and drawing through the same hole vibrates andsounds the draw reed (D on the C Harmonica). Cover plates give the harmonica player a surface tohold the instrument without disturbing the vibration of the reeds.Figure 1 – Reed PlatesFigure 2 – CombFigure 3 – CoverplatesThe “pad” side of the reed as it is known in the harmonica community, is attached to the reedplate(commonly with a rivet). The “tip,” or free-end of the reed, exits the reed slot (upward swing) andreleases a “puff” of air. The reed then re-enters the slot (downward swing) and then starts the upwardswing again to release another puff of air. Each puff creates a pressure wave, of which there areapproximately 262 for the number #1 Blow reed on the C Harmonica to produce the pitch C4. Thecloser the tolerances between the reed and its slot (both draw and blow reeds), the more of theplayer’s air goes towards tone production.In order to understand how bending works on the harmonica, the pitches of both blow and draw reedsneed to be mapped—both reeds are involved in the bending process. Detailed in Figure 4 are thenotes of the C Major Diatonic Harmonica.Figure 4 – C Major Diatonic HarmonicaWhat Pitches Can Be Produced in the Bending Process on the HarmonicaNot every hole (note) on the harmonica can be bent, and not every hole that you can bend allows thesame degree of bend. The amount of bend you can achieve is dictated by the distance (interval)between the draw and blow reed in holes #1 through #6 and blow and draw reed in holes #7 through1!
#10. Figure 5 shows the chromatic scale. The chromatic scale lists every note available in ourwestern European diatonic music system.Figure 5 – Chromatic ScaleMusicians tend to like to use the visual reference of the piano for this same information.Figure 6 – Piano Keyboard1 draw is the note D and the 1 blow is the note C on the harmonica. When performing a 1 draw bend,the player can lower the pitch of the draw reed (D) very close to, but not equal to, the blow reed(about an eighth of a tone away from C). Players learn to control their bending process to stop atnotes within our chromatic system. Referencing the chromatic scale above, this gives us the note Das our target for this 1 draw bend. When using these bends for “bluesy” affect, it’s commonly okay tobend further than the notated pitch if it’s used as an outside tone (not of the chord, nor the scale ofthe chord—a tone outside of the key that builds bluesy tension—a note that will resolve to a scale orchord tone, and ultimately to the root note of the home chord).Continuing this process with the 2 draw, the player can bend down to whatever is between the G ofthe 2 draw and E of the 2 blow. This gives produces the notes G and F. This process is used up tothe 6 draw.At the seventh hole of the harmonica the blows are higher than the draws. This means that a playernow bends the blow notes. The same rule applies here whatever pitches are between the higherpitched reed (blow in this case) and lower pitched reed (draw reed in this case) are what can be bent.Figure 7 below shows all the bends available on the C Major Diatonic Harmonica with the bendingprocess stated so far. Each slash (‘) represents a half step bend: 3 3 draw (B), 3’ 3 draw half stepbend (B , 3” 3 draw whole step bend (A) and 3’’’ 3 draw minor third bend (A ).2!
Figure 7 – C Major Diatonic Harmonica with Standard BendingDetailed in Figure 8 are the notes of the C Major Diatonic Harmonica using Standard Bending to produce the CMajor Scale on the Music Staff.Figure 8 – C Major Diatonic Scale with Standard BendingBending Process using MRIFigure 9A and 9B shows the harmonica in the mouth, with a normal tongue block embouchure usedfor the production of good tone.Figure 9AFigure 9B3!
To produce a bend, the first step is for the harmonica player is to hump their tongue to the roof of themouth. This is demonstrated in Figure 10.Figure 10The placement of the tongue is very similar to the spoken E, as demonstrated in Figure 11, but withthe tongue a bit higher in the mouth. I commonly uses “KEE” to help students achieve the properlocation in the mouth.4!
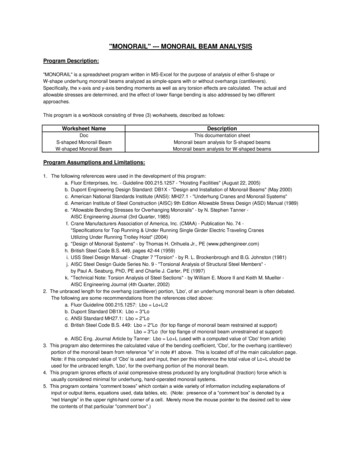
Figure 11Just humping the tongue is not enough for the bend to occur, the tongue must be humped in a placewhere the volume in front of the hump of the tongue to the face of the harmonica is tuned to the pitchof the draw reed (in our case, the note B on the C Harmonica). The player then moves theconstriction point further back in the mouth to enlarge the chamber and sound the lower pitch. Figures12A and 12B demonstrates in light blue this volume. I commonly uses “SH” as an approximation ofthe location for a slight bend.5!
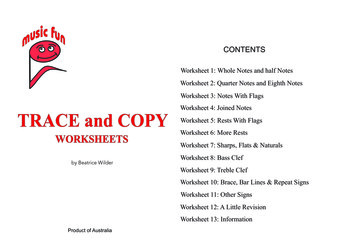
Figure 12AFigure 12BTo deepen the bend, the player again moves the constriction point further back in the mouth and canalso drop the jaw if they wish to make volume larger (though dropping the jaw is generallydiscouraged unless the player is bending on a very low-tuned harmonica). Figures 13A and 13Bdemonstrates this lowered pitch—note the larger chamber in light blue. I commonly use “KEE” as anapproximation of this bend location.Figure 13AFigure 13BHole 3 draw on the harmonica can bend even further. Figures 14A and 14B demonstrate this. Icommonly use “KOO” as an approximation of this bend location.6!
Figure 14AFigure 14BBending for Bluesy AffectFigure 8 detailed how bending can be used to fill in the missing notes of the “natural” scale of theharmonica—the C Major Scale for the C Major Harmonica for example. The notes F and A wererecovered in the lower octave a B for the upper octave. This is helpful for both recovering notes of thescale and chord.Bending is also used to create bluesy sounds, such as the half steps between the scale, slurring andemphasizing notes found between those half steps (commonly known as quartertones). Let’s first talkabout the ordering of note choice for song writing and improvising, from most consonant to mostdissonant.Chord Tones are the notes of the chord and match the most and should be played most often. Theseare called Non-Active Tones due to the fact that they match—thus they don’t grab much attention.We also have Scale Tones, which are not of the chord, but of the scale of the chord, and addinterested by introducing new notes without straying too far from the chord structure and tonal centerof the song. These notes are called Active Tones because they actively seek to resolve to a ChordTone and ultimately to the root note of the song (G in our case). Chord Tones (Non-Active Tones)and Scale Tones (Active Tones) comprise the most common notes used in melodicdevelopment (soloing).Our last type of tone is the Outside Tone. The Outside Tone (OT) is not of the chord and not of thescale of the chord—it’s essentially outside of the key. These notes are very dissonant, which meansthey’re very bluesy. These Outside Tones add the spice that makes the music exciting—but too muchof it can make the music overly dissonant—so moderation is important.7!
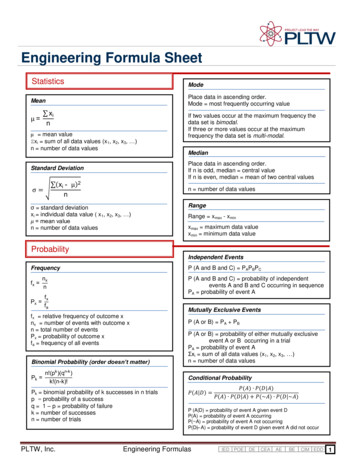
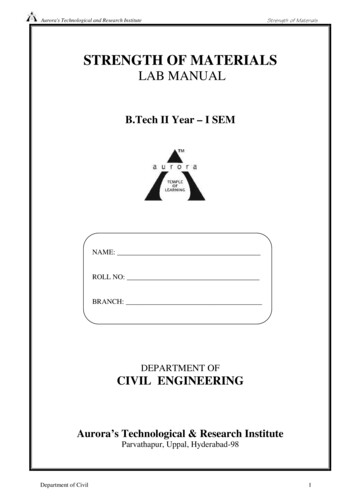
7Figure 15 – Illustrated below are all of the tones (a full chromatic scale) available from root note of a G Chord.Simply stated, Chord Tones should be played the most, since they match the notes that the rest ofthe band are playing. Scale Tones, since they are within the key you’re playing in, also sound good,but are used to support the Chord Tones, in the form of Passing Tones, Neighbor Tones and otherdevices. Outside Tones are outside of the key, and are very exciting, but should be used sparinglydue to them being very dissonant.Figure 16With the technique of bending, a very bluesy-sounding scale, called the Blues Scale, is possible.Here are the three most common “positions,” or keys, played on the C Harmonica with theircorresponding blues scales.Figure 17 – Blues ScalesstC Blues Scale (1 Position)8!
G Blues Scale (2ndPosition)rdD Blues Scale (3 Position)Bending CombinationsPlayers employ cool approached to bending, including moving beyond single-note bending to exploretextural options. I’ll perform the following examples for you in class:1)2)3)4)Dip Quick bend note to releaseCut Quick natural note to bendTwo-Note Texture Bending Adjacent holesSplit Bending Holes played on both the left and right side of the mouth, separated by the use ofthe tongue in the center5) More Let’s Do ItGrab your C Harmonicas and let’s give it a try!David BarrettFounder/Head Instructor www.bluesharmonica.comFounder/Head Instructor www.harmonicamasterclass.comFounder/Director www.schooloftheblues.comAuthor, Mel Bay Publications & Blues Revue Magazinewww.harmonicamasterclass.com/books.htm & www.bluesrevue.comPlays Hohner Harmonicas customized by Joe Filisko & MegaTone Harmonica Amplifierswww.hohnerusa.com, www.joefilisko.com & www.megatoneamps.comEmail: schooloftheblues@sbcglobal.netPhone: 408-224-2936Mail: PO Box 1723, Morgan Hill, CA 950389!
With the technique of bending, a very bluesy-sounding scale, called the Blues Scale, is possible. Here are the three most common “positions,” or keys, played on the C Harmonica with their corresponding blues scales. Figure 17 – Blues