Transcription
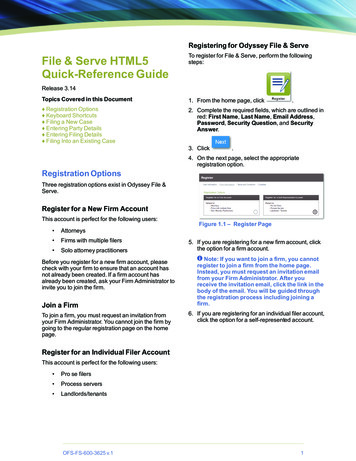
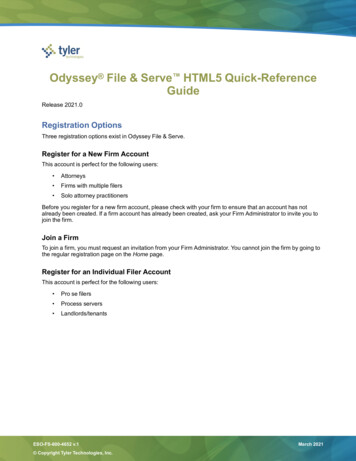
Registering for Odyssey File & ServeFile & Serve HTML5Quick-Reference GuideTo register for File & Serve, perform the followingsteps:Release 3.14Topics Covered in this Document1. From the home page, click Registration Options Keyboard Shortcuts Filing a New Case Entering Party Details Entering Filing Details Filing Into an Existing Case2. Complete the required fields, which are outlined inred: First Name, Last Name, Email Address,Password, Security Question, and SecurityAnswer.3. Click.4. On the next page, select the appropriateregistration option.Registration OptionsThree registration options exist in Odyssey File &Serve.Register for a New Firm AccountThis account is perfect for the following users: Attorneys Firms with multiple filers Solo attorney practitionersBefore you register for a new firm account, pleasecheck with your firm to ensure that an account hasnot already been created. If a firm account hasalready been created, ask your Firm Administrator toinvite you to join the firm.Join a FirmTo join a firm, you must request an invitation fromyour Firm Administrator. You cannot join the firm bygoing to the regular registration page on the homepage.Figure 1.1 – Register Page5. If you are registering for a new firm account, clickthe option for a firm account.Note: If you want to join a firm, you cannotregister to join a firm from the home page.Instead, you must request an invitation emailfrom your Firm Administrator. After youreceive the invitation email, click the link in thebody of the email. You will be guided throughthe registration process including joining afirm.6. If you are registering for an individual filer account,click the option for a self-represented account.Register for an Individual Filer AccountThis account is perfect for the following users: Pro se filers Process servers Landlords/tenantsOFS-FS-600-3625 v.11
Odyssey File & Serve HTML5 – Quick Reference Guide – Release 3.14Keyboard ShortcutsAt any time while you are in the File & Serve system,you can use keyboard shortcuts for assistance. PressSHIFT ? to display the following window.Note: The location filtering feature isconfigured by Tyler and may not beavailable on your system.Note: The selection in this field is limitedto only the courts in the county or districtthat you previously selected.c. Select your category.Note: This field is determined by thelocation you selected.d. Select your case type.Figure 1.2 – Keyboard Shortcuts WindowPress any shortcut key to initiate an action dependingon the key you pressed. The keyboard shortcuts aredesigned to make your experience flow moresmoothly and to help you to gain efficiency in usingthe system.Note: The tab key is not functional within theSafari application program.Filing a New CasePrior to filing a new case, you must set up a paymentaccount.Perform the following steps to file a new case:1. Select Start a New Case from the Actions dropdown list, or click Start a New Case from the FilerDashboard under the New Filing header.The Start a New Case page opens.2. Complete the details for the new case by usingthe drop-down lists in the required fields in theCase Information section:Note: A red box around the field indicatesthat it is required.Note: This field is determined by thecategory you selected.Note: The fee associated with the casetype is displayed.3. After completing the required fields, click.Note: If you decide to save the draft, you canstop working on the filing and resume work at alater time. To resume filing a saved draft, navigateto the Filing History page. From the Actions dropdown list for the specified draft, select ResumeDraft Envelope to continue with your filing.Entering Party DetailsEach case requires a party type.Perform the following steps to enter the details for theparties involved in the case:1. In the Party Information section, enter theinformation for the first party on the case. If youare the party, select the I am this party checkbox. Or indicate whether the party is a business oragency by selecting the Party is a Business/Agency check box.a. Select your court location in the first Locationfield.Note: This is generally the county ordistrict court where you will be doing thefiling.b. Select the specific court in the RefineLocation field.2OFS-FS-600-3625 v.1
Entering Filing DetailsNote: After all attorneys for both partieshave been selected, the lead attorney’s nameis displayed next to the specified party.7. After completing the fields for all parties, click.Note: If you decide to save the draft, you canstop working on the filing and resume work at alater time. To resume filing a saved draft, navigateto the Filing History page. From the Actions dropdown list for the specified draft, select ResumeDraft Envelope to continue with your filing.Entering Filing DetailsThe Filings section allows you to enter the filingdetails and calculate the fees associated with thefiling.Figure 1.3 – Party Information Section2. Complete the First Name, Middle Name (ifapplicable), and Last Name fields for the firstparty.3. Select the country from the drop-down list.4. For a party in the United States, complete theAddress, City, State, Zip Code, Phone Number,and Filer ID fields.For a party in Mexico, complete the Address,City, State, Postal Code, Phone Number, andFiler ID fields.For a party in Canada, complete the Address,City, Province, Postal Code, Phone Number,and Filer ID fields.Note: Select the province from the Provincedrop-down list.5. Select a lead attorney from the Lead Attorneydrop-down list.Note: If you select Pro Se from the LeadAttorney drop-down list, the system shows“Pro Se” as the lead attorney instead of theparty’s actual name when viewing filingdetails.6. If you want to add another party to the filing, clickFigure 1.4 – Filings SectionTo enter the filing details, perform the following steps:1. Enter the filing details for the case in the Filingssection:a. Select a filing type from the Filing Type dropdown list.b. Select a filing code from the Filing Code dropdown list., and then enter the partyinformation for the second party.OFS-FS-600-3625 v.13
Odyssey File & Serve HTML5 – Quick Reference Guide – Release 3.14Note: After you select the filing code, thefee associated with the filing code isdisplayed.Note: Depending on your systemconfiguration, some filing codes cause theDue Date field to be enabled.c. Type a description of the filing in the FilingDescription field.d. Type a reference number in the ReferenceNumber field.Note: A reference number is a customercreated number for internal purposes only.Most courts do not see or refer to theReference Number field for the filing. Thisis an optional field.e. Type any relevant comments in the FilingComments field.f. If you want to send courtesy copies of the filingto another party, type the recipient’s emailaddress in the Courtesy Copies field.g. Enter the date the filing is due in the Due Datefield by clicking the calendar icon.Note: The Due Date field is configured byTyler and may not be available on yoursystem.A calendar is displayed from which you canselect the specified date.h. Click the Related Parties field to select theparties from the drop-down list.Note: The related parties feature isconfigured by Tyler and may not beavailable on your system.i.Click the Lead Document field to select a leaddocument to load. If your document is stored inthe cloud, click the icon for the cloud serviceprovider where the document is stored.j. Type a name for the lead document in theDescription field.k. Click the Security drop-down list to select thelevel of security to attach to the document.l. If you have attachments to load, click theAttachments field to select the documents toload. If the attachments are stored in the cloud,click the icon for the cloud service providerwhere the attachments are stored.Note: Not all court locations acceptattachments. If your court does not acceptattachments, create the lead document andattachment as one document, and uploadthe document in the Lead Document field.m. Clickchanges, or clickaction.to save yourto cancel theIf you save your changes, the OptionalServices section is displayed.n. Clickto add anoptional service to the lead document.The Optional Service field is displayed.o. Select a service from the Optional Servicedrop-down list.Note: The fee associated with theoptional service is displayed.p. Type the number of services that you want,and then click.The total quantity that you selected and theassociated fees are displayed.q. Add additional optional services if you want.Note: Cloud services are configured byTyler and may not be available on yoursystem. If your system is configured forcloud services, you can upload documentsfrom the following cloud storage providers:Google Drive online storage service,Dropbox , and Microsoft OneDrive .Note: The Lead Document field isrequired. Only one document can beuploaded as a lead document.4r. Verify that the service contacts are correct. Ifyou want to add another service contact,select an option from the Actions drop-downlist in the Service Contacts section.s. Clickchanges, or clickaction.to save yourto cancel theOFS-FS-600-3625 v.1
Filing Into an Existing Case2. Complete the fields in the Fees section.Note: Your credit card is authorized whensubmitted. However, the transaction fees arenot posted to the credit card account until thecourt accepts the filing. Once the filing isaccepted, the total filing fee to be submittedfor the filing is displayed.a. Select the payment account from the PaymentAccount drop-down list.Note: If you enter incorrect paymentinformation in the Payment Account field,you will receive an error message statingthat the account information you entered isinvalid. You must correct the paymentinformation before you can continue withyour filing.b. Select the party that is responsible for payingthe fees from the Party Responsible for Feesdrop-down list.c. Select the filer type from the Filer Type dropdown list.d. Clickchanges, or clickaction.to save yourto cancel the3. In the Submission Agreements section, selectthe check box for the appropriate submissionagreement.Note: Submission agreements areconfigured by Tyler and may not be availableon your system.4. After completing the fields in all of the sections onthe page, perform one of the following actions: Clickto stop working onyour filing and resume work at a later time.Note: To resume filing a saved draft,navigate to the Filing History page.From the Actions drop-down list for thespecified draft, select Resume DraftEnvelope to continue with your filing. Clickyour filing.OFS-FS-600-3625 v.1, review the filing for5. If you clickedaccuracy. If you need to make any changes, clickto return to the previous page. Make anynecessary corrections, and then clickagain.6. When you are satisfied with the information inyour filing, click.A new Envelope of your filing is included on theFiling History page.Filing Into an Existing CaseOnce a new case has been created by the courts,you can file into the existing case.To file into an existing case, perform the followingsteps:1. Select one of the following methods to begin yourfiling: Click File into Existing Case from theFiler Dashboard page.Note: The File Into Existing Casepage is displayed. Select the county ordistrict location from the Location dropdown list, and then select the specificcourt from the Refine Location dropdown list. (The choices in the RefineLocation field are based on the courtthat you previously selected. Also, thelocation filtering feature is configuredby Tyler and may not be available onyour system.) Click the search optionthat you plan to use: Case Number orParty Name. Enter the search criteria,and then click Search.to review a summary of5
Odyssey File & Serve HTML5 – Quick Reference Guide – Release 3.14 Clickyour filing.to review a summary of5. If you clicked, review the filing foraccuracy. If you need to make any changes, clickto return to the previous page. Make anyFigure 1.5 – File Into Existing Case PageNote: When the correct case isdisplayed, select File Into Case fromthe Actions drop-down list for thespecified case. Select File Into Existing Case from theActions drop-down list. Note: The FileInto Existing Case page is displayed.Click Search to locate the case that youwant. When the correct case isdisplayed, select File Into Case fromthe Actions drop-down list for thespecified case.necessary corrections, and then clickagain.6. When you are satisfied with the information inyour filing, click.A new Envelope of your filing is included on theFiling History page.From the Filing History page, locate thecase that you want to file into. From theActions drop-down list for the specifiedcase, select File Into Case.The Case Information and Party Informationfields are already populated since this is anexisting case. You can immediately view theparties associated with the case.When more than 100 parties are on a case, onlythe first party of each required type is displayed,along with a message that additional parties couldnot be displayed due to system constraints. Addadditional parties to the case if you want.2. Complete the filing details in the Filings section.3. Complete the fields in the Fees section.4. After completing the fields in all of the sections onthe page, perform one of the following actions: 6Clickto stop working onyour filing and resume work at a later time.Note: To resume filing a saved draft,navigate to the Filing History page.From the Actions drop-down list for thespecified draft, select Resume DraftEnvelope to continue with your filing.OFS-FS-600-3625 v.1
Odyssey File & Serve HTML5 – Quick Reference Guide – Release 3.14 Note: After you select the filing code, the fee associated with the filing code is displayed. Note: Depending on your system configuration, some filing codes cause the Due Date field to be enabled. c. Type a desc
![[MS-HTML5]: Microsoft Edge / Internet Explorer HTML5 .](/img/13/ms-html5-170314.jpg)