Transcription
THE REALLY USEFUL LITTLE BOOK OF KNOTS
For Doris at Cottage Farm
THE REALLY USEFULLITTLEBOOK OF KNOTSPETER OWEN
Copyright 2004 by Peter OwenALL RIGHTS RESERVED. No part of this book may bereproduced in any manner without the express written consentof the publisher, except in cases of brief excerpts in criticalreviews and articles. All inquiries should be addressed to:Burford Books, Inc., PO Box 388, Short Hills, NJ 07078.Design and illustrations by Peter OwenPrinted in the United States of America.10 9 8 7 6 5 4 3 2 1Library of Congress Cataloging-in-Publication DataOwen, Peter, 1950The really useful little book of knots / Peter Owen.p. cm.ISBN 1-58080-124-2 (pbk.)1. Knots and splices--Handbooks, manuals, etc. I. Title.VM533.O94325 2004623.88'82--dc222004012947
CONTENTSINTRODUCTION . . . . . . . . . . . . . . . . . . . . . . 6Knot-tying material . . . . . . . . . . . . . . . . . . . . 7Types of rope . . . . . . . . . . . . . . . . . . . . . . . . 9How to use this book . . . . . . . . . . . . . . . . . . 11THE KNOTS . . . . . . . . . . . . . . . . . . . . . . . . 12Overhand Knot . . . . . . . . . . . . . . . . . . . . . . . . . . . . 12Multiple Overhand Knot . . . . . . . . . . . . . . . . . . . . 16Reef Knot . . . . . . . . . . . . . . . . . . . . . . . . . . . . . . . . 20Figure-Eight Loop . . . . . . . . . . . . . . . . . . . . . . . . . . 24Sheet Bend . . . . . . . . . . . . . . . . . . . . . . . . . . . . . . . 28Fisherman’s Knot. . . . . . . . . . . . . . . . . . . . . . . . . . . 32Round Turn & Two Half Hitches . . . . . . . . . . . . . 36Uni-Knot . . . . . . . . . . . . . . . . . . . . . . . . . . . . . . . . 40Bowline . . . . . . . . . . . . . . . . . . . . . . . . . . . . . . . . . . 44Clove Hitch. . . . . . . . . . . . . . . . . . . . . . . . . . . . . . . 48Highwayman’s Hitch . . . . . . . . . . . . . . . . . . . . . . . . 52Waggoner’s Hitch . . . . . . . . . . . . . . . . . . . . . . . . . . 56Constrictor Knot. . . . . . . . . . . . . . . . . . . . . . . . . . . 60Transom Knot . . . . . . . . . . . . . . . . . . . . . . . . . . . . . 64Tying a Necktie—Regular Knot . . . . . . . . . . . . . . . 68Tying a Necktie—Windsor Knot . . . . . . . . . . . . . . 72Tying a Bow Tie . . . . . . . . . . . . . . . . . . . . . . . . . . . 76
T HE R EALLY U SEFUL L ITTLE B OOK OF K NOTSINTRODUCTIONIn an ever-changing world that can supply a gadget to solvealmost every conceivable problem, it is rare and comfortingto come across a simple, practical, problem-solving activitythat is still as useful now as it has been in generations past.Tying a knot is a simple and practical solution that can solvemany everyday problems.The Really Useful Little Book of Knots will show you howto tie and use 20 of the most useful and practical knots foreveryday use at work, home, or play. This book does notpretend to be a knot encyclopedia; nor is it aimed atoutdoor pursuit specialists like mountaineers or sailors. Itcontains no knot-tying jargon or technical terms, just easyto-follow, clear step-by-step instructions for a handful ofvery useful and practical knots that will cope with most jobsand situations that the average person will encounter.Not knowing how to correctly tie and use a knot is notonly very frustrating but can also spell disaster in even thesimplest of situations. By helping you choose the right knotfor the job and tie it correctly, this incredibly handy littlebook will help you eliminate those potential disasters andmake life run just a little smoother.6I NTRODUCTION
T HE R EALLY U SEFUL L ITTLE B OOK OF K NOTSKNOT-TYING MATERIALIt is possible to tie a knot with an extremely wide variety ofmaterials both human-made and natural. But the mostcommonly used materials are rope, cord, string, and twine.Rope is traditionally anything over 0.5inch or 12mm indiameter. Ropes are also often referred to as lines. Smallerstuff, as it is informally called, is cordage; strings and twinesare generally even thinner.All of these materials used to be made by twistingnatural fibers together. Natural fibers such as manila, sisal,coir, hemp, flax, and cotton were first twisted into yarn,then into strands, and finally into rope of all different sizes.Artificial or synthetic materials have now almostcompletely replaced natural fibers. These human-madematerials can be manufactured to run the whole length of aline and do not vary in thickness; this gives them superiorstrength.Nylon, first produced in 1938 for domestic use, was thefirst human-made material to be used in this way. Since thenwide ranges of artificial rope, cord, string, and twine havebeen developed to meet different purposes. Size for size theyare lighter, stronger, and cheaper than their naturalcounterparts. They do not rot or mildew; they are resistantto sunlight, chemicals, oil, gasoline, and most commonsolvents. They can also be manufactured in a wide range ofcolors and patterns. Color-coded ropes make for instantrecognition of lines of different function and size.K NOT -T YING M ATERIAL7
T HE R EALLY U SEFUL L ITTLE B OOK OF K NOTSArtificial rope, cord, string, and twine do have somedisadvantages, the main one being that they melt whenheated. Even the friction generated when one rope rubsagainst another may be enough to cause damage, so if youuse artificial ropes in this situation it is vital to check themregularly. Another disadvantage is that artificial ropes aregenerally very smooth, unlike the older natural-fiber ropes,and this can lead to knots slipping and coming undone. Inthis situation additional stopper or security knots may berequired.Rope is sturdy material, but it is expensive, so it’s worthlooking after it properly. Always coil rope carefully when notin use and make sure it is stored in dry conditions.Coiling rope, cord, string, or twinewill ensure that it will be immediatelyat hand and untangledwhen required.8K NOT -T YING M ATERIAL
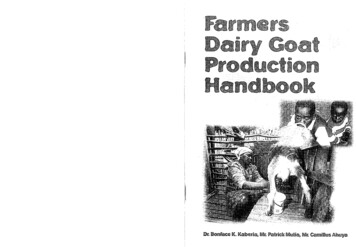
T HE R EALLY U SEFUL L ITTLE B OOK OF K NOTSTYPES OF ROPEthree-strandartificial-fiber ropefour-strandartificial-fiber ropewith a central coreTwisted or Laid RopeArtificial rope can be twisted or laid like old-style naturalfiber rope. Usually three strands of nylon filaments aretwisted together to form a length of rope, cord, string, ortwine. There are variations on this available. One verystrong variation is four strands of nylon filament twistedaround a central nylon core.The cost of twisted or laid rope is generally about twothirds that of the more widely used braided rope; see page10. Twisted or laid rope, made of thick multifilamentstightly twisted together, may be very resistant to wear, but itmay also be difficult to handle because of its stiffness. As ageneral rule, do not buy rope that is too stiff.T YPES OF R OPE9
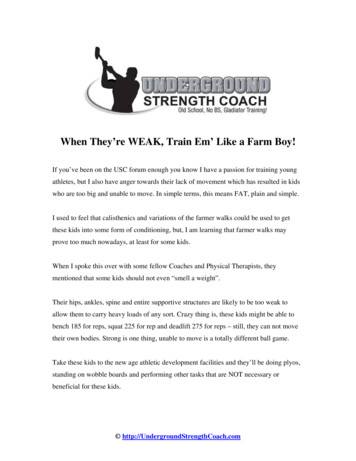
T HE R EALLY U SEFUL L ITTLE B OOK OF K NOTSbraided outersheathinner coreBraided RopeThe combination of an outer sheath surrounding an innercore makes braided rope softer, more flexible, and generallya lot stronger than other types of synthetic rope.The outer sheath generally consists of 16 strands. Thissurrounds an inner core that can be parallel fibers, ortwisted, or plaited. Both the sheath and the core contributethe strength and flexibility of the rope. Its flexibility makesit ideal for knot tying, and the smoothness of the outersheath makes the rope easy and comfortable to handle.It is very often thought that braided rope is onlymanufactured in larger-diameter sizes, but moderntechnology also enables this highly successful material to bemanufactured in very small-diameter sizes.10T YPES OF R OPE
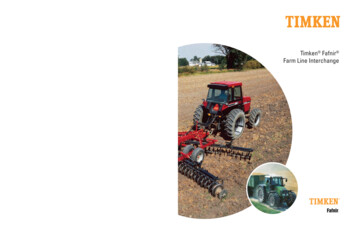
T HE R EALLY U SEFUL L ITTLE B OOK OF K NOTSHOW TO USE THIS BOOKline endknotmain lineopen loopThis book makes a conscious effort to avoid any knot-tyingjargon or technical terms—for example, the end of a line issimply called a line end.The diagrams accompanying the tying instructions areintended to be self-explanatory, but additional writteninstructions are included at specific points in the tyingprocedure. There are arrows to show the direction in whichyou should push or pull, and dotted lines indicateintermediate positions. In many of the illustrations, lines areshown faded out or cut short for clarity. When tying a knot,you should always have sufficient working line end tocomplete the knot. This can often be calculated by lookingat the illustration of the finished knot.H OW TO U SE T HIS B OOK11
T HE R EALLY U SEFUL L ITTLE B OOK OF K NOTSOVERHAND KNOTThis is the best-known and most widely used of all knots;it is the knot that we can all tie. It does form thebasis for many other knots and is often tied inconjunction with other knots. The mostcommon use for this knot is as a stopperknot at the end of a piece of string,cord, or rope—for example, at theend of a length of sewing threadto stop the thread from passingthrough the eye of a needle.S UGGESTED U SES A stopper knot to prevent the end of a piece of string orcord from fraying.A stopper knot to prevent the end of a line from passingthrough an eye, loop, or hole.Tied at regular intervals along a line, it can make theline easier to grip.Tied in conjunction with other knots, it can be used asan additional safety measure to prevent slippage. 12O VERHAND K NOT
T HE R EALLY U SEFUL L ITTLE B OOK OF K NOTST YING I NSTRUCTIONScord endmain cord1 Double the cord to form aloop and then bring the cordend over the main cord andunder the loop. Then pull outthrough the loop in thedirection of the arrow.2 Position the knot where itis required in the cord andthen tighten the completed knotby pulling in the direction ofthe arrows.continued next page O VERHAND K NOT13
T HE R EALLY U SEFUL L ITTLE B OOK OF K NOTS Overhand Knot continuedThe overhand knot (left) usedas a stopper knot to prevent theend of the line from passingthrough an eye, loop, or hole.The overhand knot(right) tied at regularintervals along a line tomake it easier to grip. 14O VERHAND K NOT
T HE R EALLY U SEFUL L ITTLE B OOK OF K NOTSA S IMPLE N OOSE F ORMED WITH AN O VERHAND K NOT12An overhandstopper knot toprevent thenoose fromslipping.Tie an overhandknot around themain cord toform a noose.A simple noose can be quickly formed using an overhand knot. Thenoose can be tied first, placed over an object, and then tightened, orcan be given its simple construction tied directly around an object.This type of noose is often the best way to start tying a parcel or toget an initial grip on an object. A second overhand knot can beadded to the end of the line to prevent the noose from slipping.O VERHAND K NOT15
T HE R EALLY U SEFUL L ITTLE B OOK OF K NOTSMULTIPLE OVERHAND KNOTThis is a quick and easy way to tie a decorative stopperknot that is often used at the end of cords to preventfraying or to stop the cord from pulling out ofholes or openings. It can also add weight tothe end of a cord and is still used today bynuns and monks to embellish the end ofthe cord tied around their waists and tomake the cord hang properly. Theappearance and size of the knotcan be varied with the numberof turns used to tie it.S UGGESTED U SES A decorative stopper knot to prevent the end of a pieceof string or cord from fraying.A decorative stopper knot to prevent the end of a linefrom passing through an eye, loop, or hole.To weight the end of a line to make it hang properly—for example, a light switch cord.A decorative separator for beads threaded on a string—for example, a bracelet or necklace. 16M ULTIPLE O VERHAND K NOT
T HE R EALLY U SEFUL L ITTLE B OOK OF K NOTST YING I NSTRUCTIONS112Double the cord to form an openand slack loop, then take the cord endover the main cord and proceed tomake four turns around themaincord before bringing the cordend back out of the loop.main cord34Bring the cord end backout of the loop.continued next page M ULTIPLE O VERHAND K NOT17
T HE R EALLY U SEFUL L ITTLE B OOK OF K NOTS Multiple Overhand Knot continued2 (left) Slowly and evenly pull onthe two cord ends, allowing the twoends to twist in opposite directions;the knot will start to form.3 (below) Tighten the finalknot as you work the knot intoits final even-looking form withyour fingers—a bit like formingplasticine. If the knot is to bepositioned at the end of a cord,trim the cord end accordingly. 18M ULTIPLE O VERHAND K NOT
T HE R EALLY U SEFUL L ITTLE B OOK OF K NOTSM ULTIPLE O VERHAND K NOT V ARIATIONSThe appearance and size of themultiple overhand knot can bevaried with the number of turnsused. The above example haseight turns.The decorative appearance ofthe multiple overhand knot isoften used as a feature—forexample, as above, a beadseparator inM ULTIPLE O VERHAND K NOT19
T HE R EALLY U SEFUL L ITTLE B OOK OF K NOTSREEF KNOTThe reef knot, or square knot, is one of the mostcommonly known knots and often is the only knotmany people know apart from the granny knot;see page 23. It is used to join together theends of the same rope or string and shouldonly be used as a temporary join in linesof identical type, weight, and diameter.The reef knot is not a secure knotand should not be used as one.Using it as a binding knot whereit can press against whatever itis securing will ensure that themore strain is placed on it,the tighter it is pulled.S UGGESTED U SES A quick and easy, temporary (unsecure) join for the twoends of the same piece of rope or string.A quick and easy, temporary (unsecure) join for twolines of identical type, weight, and diameter.As a binding knot, ideal for bandages and slings.20 R EEF K NOT
T HE R EALLY U SEFUL L ITTLE B OOK OF K NOTST YING I NSTRUCTIONSleft over right1 Take the two ends of your lineand follow the time-honoredinstruction for the reef knot—left over right2 Twist the left line under the right lineto form the above, leaving enough line forthe second part of the knot.continued next page R EEF K NOT21
T HE R EALLY U SEFUL L ITTLE B OOK OF K NOTS Reef Knot continuedright over left3 Take the two remaining ends and—right over left.Start to form the knot by pulling slowly and evenly on thetwo line ends and the two main line sections.4 Tighten the final knot into its even and balanced formas above. If the knot is raised and uneven, you have tied agranny knot; see the following page. 22R EEF K NOT
T HE R EALLY U SEFUL L ITTLE B OOK OF K NOTSR EEF K NOT V ARIATIONSThe reef knot is an ideal knot for tying pieces of materialtogether and is especially suited to bandages and slings.granny knotreef knotWhen tying the reef knot, be careful to avoid the unreliablegranny knot. Remember the simple tying instruction, “Leftover right, then right over left.”R EEF K NOT23
T HE R EALLY U SEFUL L ITTLE B OOK OF K NOTSFIGURE-EIGHT LOOPThis is one of the best-known and most widely usedof all knots. It is probably the safest andquickest way to form a strong loop oreye at the end of a rope. It is easy totie and will not slip or work loose.As a testament to this knot’sstrength and usefulness, it is thefavored loop knot used byclimbers and mountaineersto attach ropes to variouspieces of climbingequipment.S UGGESTED U SES A loop to hold in your hand to pull or hold on toan object.Interlink two loops to quickly join and unjoin tworopes; see page 27.A loop to place over or around an object.A loop to clip or hang on to an object.24F IGURE -E IGHT L OOP
T HE R EALLY U SEFUL L ITTLE B OOK OF K NOTST YING I NSTRUCTIONS1 Begin this knot by doubling the ropeto form a loop end, and then take the endback under the main rope to form anunderhand loop. At this point you may needto experiment with how much rope to doubleback, depending on the type and size of ropeyou are using and thesize of loop yourequire.loop endmain ropeholding point2Now bring the loop end back over the mainrope ready to pull it through the originalunderhand loop by holding it at the indicatedpoint and pulling it through in the directionof the arrow.continued next page F IGURE -E IGHT L OOP25
T HE R EALLY U SEFUL L ITTLE B OOK OF K NOTS Figure-Eight Loop continuedfigure-eightpatternIf necessary, trimoff this rope endafter the knot iscorrectly tied.3Pull the doubled loop endthrough the originalunderhand loop and slowlydraw the knot together bypulling the loop end and the4Finally, tighten thecompleted knot, making surethat the figure-eight patternand the loop have beencorrectly formed. 26F IGURE -E IGHT L OOP
T HE R EALLY U SEFUL L ITTLE B OOK OF K NOTSI NTERLOCKED F IGURE- E IGHT L OOP K NOT12Two figure-eight loop knots can be interlinked to create a quickand easy method of securely joining two ropes. Interlink the loops(fig. 1) and tighten by pulling on the two main ropes. The finalinterlinked knot (fig. 2) can then be easily broken by pushing thetwo figure-eight loops together to loosen the joint and thenunlinking the two loops.F IGURE -E IGHT L OOP27
T HE R EALLY U SEFUL L ITTLE B OOK OF K NOTSSHEET BENDThe sheet bend is a good general-purpose utility knot forjoining two lines together or to attach a line toanything that has an opening to pass the linethrough to enable the line to be trapped underitself. The sheet bend is a quick and easyknot to tie, can withstand great strains,and is easily undone afterward. Unlikemost other line-joining knots, thesheet bend can be used for joiningtwo lines of different diameterand material—but cautiondoes need to be exercised herethat the two lines are nottoo dissimilar.S UGGESTED U SES To join two lines togther of different diameter andmaterial.To attach to any object with an opening that willenable the line to pass through and be trapped underitself; see page 31.In a situation where the knot will be under greatstrain—the greater the strain on a sheet bend, the betterthe jamming action. 28S HEET B END
T HE R EALLY U SEFUL L ITTLE B OOK OF K NOTST YING I NSTRUCTIONSloopline endTrap the line endunder itself againstthe first loop.1 Form a small loop withone of the lines to be joined.Pass the other line end upthrough the loop.2 Take the line end aroundthe back of the loop and thenback under itself, trapping itagainst the original loop.continued next page S HEET B END29
T HE R EALLY U SEFUL L ITTLE B OOK OF K NOTS Sheet Bend continuedPull torelease theknot quickly.3 Tighten the final knot byevenly pulling on both lines.The strain will create thejamming action.4 If a quick-release knot isrequired, double the jammedline back on itself to create a“slip” that can be pulled forquick release. 30S HEET B END
T HE R EALLY U SEFUL L ITTLE B OOK OF K NOTSA TTACHING A S HEET B END TO AN O BJECTA sheet bend can beadapted to fasten a lineto anything that has anopening through whichyou can pass a single linethat can be trappedunder itself—for example,attaching a line to a toolhandle to be lifted,lowered, or hung.By using the “slipped”version of the sheet bend,you can quickly releasethe tool when required.a “slipped”sheet bendS HEET B END31
T HE R EALLY U SEFUL L ITTLE B OOK OF K NOTSFISHERMAN’S KNOTThis simple knot is made up of two overhand knotsthat jam against each other. It is a very strongknot used for joining two similar lines of equaldiameter. It is most effective when used withsmaller-diameter material such as string, cord,and twine and as its name suggests, veryeffective with fishing line. It is not suitablefor use with large- or medium-diameterrope. Normally this knot can be easilyuntied by pulling apart the twooverhand knots and then untyingthem separately. To make thisknot even stronger and morerobust, you can tie a variationusing a double overhandknot at each end; seepage 35.S UGGESTED U SES A strong knot for joining two similar lines of equaldiameter.Especially suited to small-diameter material—forexample, fishing line.32F ISHERMAN’S K NOT
T HE R EALLY U SEFUL L ITTLE B OOK OF K NOTST YING I NSTRUCTIONSa singleoverhandknot1Lay the ends of two cordsparallel to each other and makea single overhand knot in oneend around the other cord.2Repeat this operation withthe end of the other cord to tiean identical single overhandknot around the first cord.continued next page F ISHERMAN’S K NOT33
T HE R EALLY U SEFUL L ITTLE B OOK OF K NOTS Fisherman’s Knot continuedIf necessary, trimoff the cord endsafter the knot iscorrectly tied.The twooverhandknots willslide together.3 Tighten the two overhandknots and then pull the twomain cord sections to slide theoverhand knots together.4 Continue pulling the knotsuntil they snugly fit togetherand then pull hard to jam theknots to form the final knot. 34F ISHERMAN’S K NOT
T HE R EALLY U SEFUL L ITTLE B OOK OF K NOTSD OUBLE F ISHERMAN’S K NOT1a double overhandknot23Tape or seize the cord endsto help streamlinethe knot.To make the fisherman’s knot even stronger and more robust, tie thedouble version. Simply replace a single overhand knot on each cordwith a double overhand knot (fig. 1). Jam the two knots together toform the final knot (fig. 2). Depending on the type of material usedto tie the knot, the double version can be quite bulky, so to streamlinethe knot tape or seize the cord ends (fig. 3); this will prevent the knotfrom catching on objects and minimize the risk of the overhandknot’s working loose.F ISHERMAN’S K NOT35
T HE R EALLY U SEFUL L ITTLE B OOK OF K NOTSROUND TURN & TWO HALF HITCHESThis knot is a true all-arounder: It is strong, dependable,and never jams. You can use it whenever you want tofasten a line to a ring,stake, post, pole,handle, or rail.Once the end ofa rope has beensecured with a round turnand two half hitches, the otherend can be tied with a secondknot. This is especially useful forfastening down unwieldy, bulkyobjects. Its name describesexactly what it is made up of,a round turn and two halfhitches; for more informationon hitches, see page 39.S UGGESTED U SES To quickly and securely attach a line to a ring, stake,post, pole, handle, or rail.To tie down or secure loads, especially unwieldy orbulky objects, to a car roof rack or trailer.To support loads of any description.To moor boats.36R OUND T URN & T WO H ALF H ITCHES
T HE R EALLY U SEFUL L ITTLE B OOK OF K NOTST YING I NSTRUCTIONS1Take the rope endaround the object twice,making sure to leaveenough rope to tie thesecuring hitches with.rope end2Bring the rope end overthe main rope line, whichshould be under tension, andback through under the turnto form the first half hitch.main ropelinecontinued next page R OUND T URN & T WO H ALF H ITCHES37
T HE R EALLY U SEFUL L ITTLE B OOK OF K NOTS Round Turn & Two Half Hitches continuedfirst hitchsecond hitch3 Tighten the first hitchby pulling on the rope endand the main rope line, andthen form the second hitch.4 Tighten the second hitch,and then give a sharp pull onthe main rope line to securethe final knot. 38R OUND T URN & T WO H ALF H ITCHES
T HE R EALLY U SEFUL L ITTLE B OOK OF K NOTSH ALF H ITCHES21Double the ropeend back on itselfto form a slippedhalf hitch.One sharppull releasesthe knot.3The half hitch is a very widely used fastening. It can be used on itsown in single form (fig. 1) or for extra strength in double form(fig. 2) or a very useful slipped form (fig. 3)—one sharp pull releasesthe knot. Alternatively, it can be used to complete and strengthenother knots, as in the round turn and two half hitches.R OUND T URN & T WO H ALF H ITCHES39
T HE R EALLY U SEFUL L ITTLE B OOK OF K NOTSUNI-KNOTThe uni-knot, also known as the grinner knot, is a verysecure and widely used fishing knot used fortying either an artificial fly or an eyed hookto fishing line or in its double form—thedouble uni-knot (see page 43)—for tyingtwo pieces of fishing line together. It canalso be used as a very secure generalpurpose knot for joining a line to anyobject with an opening or for joiningtwo lines together. Because it can bea bulky knot, depending on howmany turns you use, it is moresuited to thin line, cord, or ropeand should only be used forjoining lines of a similar typeand diameter.S UGGESTED U SES For attaching an artificial fly or eyed fishing hook tofishing line.For securely joining two small-diameter lines together—for example, fishing line or small-diameter synthetic cord.For attaching to any small object with an opening orhandle—for example, a key, whistle, or flashlight. 40U NI -K NOT
T HE R EALLY U SEFUL L ITTLE B OOK OF K NOTST YING I NSTRUCTIONSsufficient lineto complete the knot1Thread the line through the objectopening, making sure to leave sufficient lineto complete the knot—this may have to beestablished by trial and error.openingfirst turnmain line2 Bring the threaded line back on itself to forma loose loop, and then start to make the first turnaround the main line.continued next page U NI -K NOT41
T HE R EALLY U SEFUL L ITTLE B OOK OF K NOTS Uni-Knot continued12main line3lower side of the loop3 Complete the first turn by taking the line backthrough the loop, over the lower side of the loop, andaround the main line again. Make approximatelyfour turns and then bring the line end out throughthe loop. Try to keep the knot as compact as possiblein the tying stage.If necessary, trim offthe line ends after theknot is correctly tied.4With the knot loosely formed, hold the objectand slowly pull on the main line. As the line tightens,the final knot will form. 42U NI -K NOT
T HE R EALLY U SEFUL L ITTLE B OOK OF K NOTSD OUBLE U NI- K NOT1first line234secondlineThe double uni-knot is used to join two lines together. Lay the twolines side by side and tie a single uni-knot with the first line aroundthe second line (fig. 1). Tighten the first uni-knot and then repeatthe process with the second line (fig. 2). With both knots tightened,pull on both lines to start drawing the two knots together (fig. 3).Engage the two knots and then pull to tighten the final knot (fig.4). If necessary, trim off the line ends after the knot is correctly tied.U NI -K NOT43
T HE R EALLY U SEFUL L ITTLE B OOK OF K NOTSBOWLINEThe bowline (say boh-linn) is used to form a fixedloop at the end of a line or to attach a line to anobject. It is simple to tie, strong, and stable. Thebowline’s main advantages are that it does notslip, come loose, or jam. It is also quick andeasy to untie, even when the line is undertension, by pushing the main line inthe direction of the knot. It isa knot that can work looseif it is tied with stiff orslippery line, so to bereally safe, finish theknot off with a stopperknot or extra half hitch.S UGGESTED U SES A fixed loop to hold in your hand to pull or hold on toan object.A fixed loop to tie around your waist, or someone else’swaist, in a rescue situation.A fixed loop to place over or around an object—forexample, when hoisting or dragging an object. 44B OWLINE
T HE R EALLY U SEFUL L ITTLE B OOK OF K NOTST YING I NSTRUCTIONSmain lineknotpositionline end1 First estimate the size of loopyou require, and then at thepoint you want to position theknot, form a small loop in themain line. Bring the line endup and through the loop.2 Take the line end aroundthe back of the main lineand back down into thesmall loop. Pull the lineend through the loop, holdit in position, and then slowlystart to pull the main line.continued next page B OWLINE45
T HE R EALLY U SEFUL L ITTLE B OOK OF K NOTS Bowline continued3Make any finaladjustments to the size of therequired loop and then tightenthe knot into its final form.Adjust thefinal loop sizebefore tighteningthe knot.4 For added security,the bowline can be finishedwith a stopper knot.added securitystopper knot tiedwith the line end 46B OWLINE
T HE R EALLY U SEFUL L ITTLE B OOK OF K NOTST HE R UNNING B OWLINE123A variation on the bowline, the runningbowline can be used as a secure slidingknot. It slides very easily and can beplaced over or around objects and pulledto secure or hold. Arrange the rope orline (fig. 1) and then form a bowlineknot (fig. 2). Tighten the bowline knot,leaving a small fixed loop for the mainline to slide through (fig. 3).B OWLINE47
T HE R EALLY U SEFUL L ITTLE B OOK OF K NOTSCLOVE HITCHThe clove hitch is one of the more commonly known anduseful of knots. It is used to fasten a lineto a peg, pole, post, or ring, or to anotherrope that is not part of the knot. It is aneasy knot to tie, and can with practicebe tied with just one hand—usefulwhen you’re trying tohold the object youare tying up with the otherhand. The clove hitch is not,however, a totally secure knot;it will work loose if thestrain is intermittent andcomes from different angles.Under these types ofconditions it is best usedas a temporary hold, and thenreplaced by a more stable knot.S UGGESTED U SES A quick and simple way to attach a line to a peg, post,pole, or ring—for example, securing tent guylines to pegs.A way of attaching one line to another line, as long asthe required strain will remain steady and at rightangles. 48C LOVE H ITCH
T HE R EALLY U SEFUL L ITTLE B OOK OF K NOTST YING I NSTRUCTIONS1 Pass the line aroundthe object and underneaththe main line, then cross itover the main line beforestarting to pass it aroundagain.line endmain lineTuck underthe diagonal.2 Bring the line endaround above the first turnand tuck it under thediagonal created by thesecond turn.continued next page C LOVE H ITCH49
T HE R EALLY U SEFUL L ITTLE B OOK OF K NOTS Clove Hitch continued3 Slowly and evenly pullon the line end and themain line, making sure thatthe knot keeps its shape andpattern.line endmain line4 Adjust the final requiredtension on the main line, andthen tighten the knot into itsfinal form. 50C LOVE H ITCH
T HE R EALLY U SEFUL L ITTLE B OOK OF K NOTSC LOVE H ITCH— M ADE ON A R INGline endmain line12The clove hitch is just as quick and easy to tie on a ring as it is on apeg, post, or rail. Take the line end up through the ring, around theback of the main line, up through the ring again, and then downthrough the loop that has been created (fig. 1). Tighten the knotinto its final form (fig. 2) by pulling on the main line. The clovehitc
THE REALLY USEFUL LITTLE BOOK OF KNOTS KNOT-TYING MATERIAL 7 KNOT-TYING MATERIAL It is possible to tie a knot with an extremely wide variety of materials both human-made and natural. But the most c