Transcription
NI VisionNI Vision Assistant TutorialNI Vision Assistant TutorialJune 2011372228M
SupportWorldwide Technical Support and Product Informationni.comWorldwide OfficesVisit ni.com/niglobal to access the branch office Web sites, which provide up-to-datecontact information, support phone numbers, email addresses, and current events.National Instruments Corporate Headquarters11500 North Mopac Expressway Austin, Texas 78759-3504 USA Tel: 512 683 0100For further support information, refer to the Technical Support and Professional Servicesappendix. To comment on National Instruments documentation, refer to the NationalInstruments Web site at ni.com/info and enter the Info Code feedback. 1999–2011 National Instruments Corporation. All rights reserved.
Important InformationWarrantyThe media on which you receive National Instruments software are warranted not to fail to execute programming instructions,due to defects in materials and workmanship, for a period of 90 days from date of shipment, as evidenced by receipts or otherdocumentation. National Instruments will, at its option, repair or replace software media that do not execute programminginstructions if National Instruments receives notice of such defects during the warranty period. National Instruments does notwarrant that the operation of the software shall be uninterrupted or error free.A Return Material Authorization (RMA) number must be obtained from the factory and clearly marked on the outside ofthe package before any equipment will be accepted for warranty work. National Instruments will pay the shipping costs ofreturning to the owner parts which are covered by warranty.National Instruments believes that the information in this document is accurate. The document has been carefully reviewedfor technical accuracy. In the event that technical or typographical errors exist, National Instruments reserves the right tomake changes to subsequent editions of this document without prior notice to holders of this edition. The reader shouldconsult National Instruments if errors are suspected. In no event shall National Instruments be liable for any damages arisingout of or related to this document or the information contained in it.EXCEPT AS SPECIFIED HEREIN, NATIONAL INSTRUMENTS MAKES NO WARRANTIES, EXPRESS OR IMPLIED, AND SPECIFICALLY DISCLAIMS ANYWARRANTY OF MERCHANTABILITY OR FITNESS FOR A PARTICULAR PURPOSE. CUSTOMER’S RIGHT TO RECOVER DAMAGES CAUSED BY FAULTOR NEGLIGENCE ON THE PART OF NATIONAL INSTRUMENTS SHALL BE LIMITED TO THE AMOUNT THERETOFORE PAID BY THE CUSTOMER.NATIONAL INSTRUMENTS WILL NOT BE LIABLE FOR DAMAGES RESULTING FROM LOSS OF DATA, PROFITS, USE OF PRODUCTS, OR INCIDENTALOR CONSEQUENTIAL DAMAGES, EVEN IF ADVISED OF THE POSSIBILITY THEREOF. This limitation of the liability of National Instrumentswill apply regardless of the form of action, whether in contract or tort, including negligence. Any action against NationalInstruments must be brought within one year after the cause of action accrues. National Instruments shall not be liable for anydelay in performance due to causes beyond its reasonable control. The warranty provided herein does not cover damages,defects, malfunctions, or service failures caused by owner’s failure to follow the National Instruments installation, operation,or maintenance instructions; owner’s modification of the product; owner’s abuse, misuse, or negligent acts; and power failureor surges, fire, flood, accident, actions of third parties, or other events outside reasonable control.CopyrightUnder the copyright laws, this publication may not be reproduced or transmitted in any form, electronic or mechanical,including photocopying, recording, storing in an information retrieval system, or translating, in whole or in part, without theprior written consent of National Instruments Corporation.National Instruments respects the intellectual property of others, and we ask our users to do the same. NI software is protectedby copyright and other intellectual property laws. Where NI software may be used to reproduce software or other materialsbelonging to others, you may use NI software only to reproduce materials that you may reproduce in accordance with theterms of any applicable license or other legal restriction.TrademarksCVI, LabVIEW, National Instruments, NI, ni.com, the National Instruments corporate logo, and the Eagle logo aretrademarks of National Instruments Corporation. Refer to the Trademark Information at ni.com/trademarks for otherNational Instruments trademarks.The mark LabWindows is used under a license from Microsoft Corporation. Windows is a registered trademark of MicrosoftCorporation in the United States and other countries. Other product and company names mentioned herein are trademarks ortrade names of their respective companies.Members of the National Instruments Alliance Partner Program are business entities independent from National Instrumentsand have no agency, partnership, or joint-venture relationship with National Instruments.PatentsFor patents covering National Instruments products/technology, refer to the appropriate location: Help»Patents in yoursoftware, the patents.txt file on your media, or the National Instruments Patent Notice at ni.com/patents.Export Compliance InformationRefer to the Export Compliance Information at ni.com/legal/export-compliance for the National Instruments globaltrade compliance policy and how to obtain relevant HTS codes, ECCNs, and other import/export data.WARNING REGARDING USE OF NATIONAL INSTRUMENTS PRODUCTS(1) NATIONAL INSTRUMENTS PRODUCTS ARE NOT DESIGNED WITH COMPONENTS AND TESTING FOR ALEVEL OF RELIABILITY SUITABLE FOR USE IN OR IN CONNECTION WITH SURGICAL IMPLANTS OR ASCRITICAL COMPONENTS IN ANY LIFE SUPPORT SYSTEMS WHOSE FAILURE TO PERFORM CANREASONABLY BE EXPECTED TO CAUSE SIGNIFICANT INJURY TO A HUMAN.(2) IN ANY APPLICATION, INCLUDING THE ABOVE, RELIABILITY OF OPERATION OF THE SOFTWAREPRODUCTS CAN BE IMPAIRED BY ADVERSE FACTORS, INCLUDING BUT NOT LIMITED TO FLUCTUATIONSIN ELECTRICAL POWER SUPPLY, COMPUTER HARDWARE MALFUNCTIONS, COMPUTER OPERATINGSYSTEM SOFTWARE FITNESS, FITNESS OF COMPILERS AND DEVELOPMENT SOFTWARE USED TODEVELOP AN APPLICATION, INSTALLATION ERRORS, SOFTWARE AND HARDWARE COMPATIBILITYPROBLEMS, MALFUNCTIONS OR FAILURES OF ELECTRONIC MONITORING OR CONTROL DEVICES,TRANSIENT FAILURES OF ELECTRONIC SYSTEMS (HARDWARE AND/OR SOFTWARE), UNANTICIPATEDUSES OR MISUSES, OR ERRORS ON THE PART OF THE USER OR APPLICATIONS DESIGNER (ADVERSEFACTORS SUCH AS THESE ARE HEREAFTER COLLECTIVELY TERMED “SYSTEM FAILURES”). ANYAPPLICATION WHERE A SYSTEM FAILURE WOULD CREATE A RISK OF HARM TO PROPERTY OR PERSONS(INCLUDING THE RISK OF BODILY INJURY AND DEATH) SHOULD NOT BE RELIANT SOLELY UPON ONE
FORM OF ELECTRONIC SYSTEM DUE TO THE RISK OF SYSTEM FAILURE. TO AVOID DAMAGE, INJURY, ORDEATH, THE USER OR APPLICATION DESIGNER MUST TAKE REASONABLY PRUDENT STEPS TO PROTECTAGAINST SYSTEM FAILURES, INCLUDING BUT NOT LIMITED TO BACK-UP OR SHUT DOWN MECHANISMS.BECAUSE EACH END-USER SYSTEM IS CUSTOMIZED AND DIFFERS FROM NATIONAL INSTRUMENTS'TESTING PLATFORMS AND BECAUSE A USER OR APPLICATION DESIGNER MAY USE NATIONALINSTRUMENTS PRODUCTS IN COMBINATION WITH OTHER PRODUCTS IN A MANNER NOT EVALUATEDOR CONTEMPLATED BY NATIONAL INSTRUMENTS, THE USER OR APPLICATION DESIGNER ISULTIMATELY RESPONSIBLE FOR VERIFYING AND VALIDATING THE SUITABILITY OF NATIONALINSTRUMENTS PRODUCTS WHENEVER NATIONAL INSTRUMENTS PRODUCTS ARE INCORPORATED IN ASYSTEM OR APPLICATION, INCLUDING, WITHOUT LIMITATION, THE APPROPRIATE DESIGN, PROCESSAND SAFETY LEVEL OF SUCH SYSTEM OR APPLICATION.
ContentsAbout This ManualConventions . viiRelated Documentation . viiiChapter 1Vision Assistant EnvironmentLaunching and Exiting Vision Assistant . 1-1Vision Assistant Environment . 1-1Features. 1-2Getting Help . 1-3Vision Assistant Context Help and Tooltips . 1-3National Instruments Web Site. 1-3Vision Assistant Scripts. 1-3Chapter 2Introduction to Image Processing with Vision AssistantGetting Started in Vision Assistant . 2-1Acquiring Images in Vision Assistant . 2-6Opening the Acquisition Window . 2-6Snapping an Image . 2-8Grabbing an Image . 2-9Acquiring a Sequence of Images . 2-9Chapter 3Using Particle Analysis to Analyze the Structure of a MetalWhat Is Particle Analysis?. 3-1Tutorial . 3-1Loading Images into Vision Assistant. 3-2Preparing an Image for Particle Analysis . 3-2Examining the Image. 3-2Filtering the Image. 3-4Examining the Results of the Filtering . 3-4Separating Particles from the Background with Thresholding. 3-5Modifying Particles with Morphological Functions. 3-6Isolating Circular Particles . 3-7Analyzing Circular Particles. 3-8Testing the Particle Analysis Script. 3-9Saving the Particle Analysis Script . 3-11Estimating Processing Time . 3-11Creating a LabVIEW VI. 3-11Creating a C Program . 3-12 National Instruments CorporationvNI Vision Assistant Tutorial
ContentsChapter 4Using Gauging for Part InspectionWhat Is Gauging? . 4-1Tutorial. 4-1Loading Images into Vision Assistant . 4-3Finding Measurement Points Using Pattern Matching . 4-3Finding Edges in the Image . 4-6Taking the Measurements . 4-7Analyzing the Results . 4-10Chapter 5Using a Coordinate System for Part InspectionWhat Is a Coordinate System?. 5-1Tutorial. 5-2Loading Images into Vision Assistant . 5-2Defining a Feature on which to Base a Coordinate System . 5-2Defining a Coordinate System . 5-4Checking for Presence . 5-4Testing the Dental Floss Script . 5-5Saving the Dental Floss Script. 5-7Analyzing the Results . 5-7Appendix ATechnical Support and Professional ServicesGlossaryIndexNI Vision Assistant Tutorialvini.com
About This ManualThe NI Vision Assistant Tutorial describes the Vision Assistant software interface and guidesyou through creating example image processing and machine vision applications. This tutorialis designed for Windows users with varied levels of vision experience.ConventionsThe following conventions are used in this manual:»The » symbol leads you through nested menu items and dialog boxoptions to a final action. The sequence Options»Settings»Generaldirects you to pull down the Options menu, select the Settings item,and select General from the last dialog box.This icon denotes a tip, which alerts you to advisory information.This icon denotes a note, which alerts you to important information.boldBold text denotes items that you must select or click in the software,such as menu items and dialog box options. Bold text also denotesparameter names.italicItalic text denotes variables, emphasis, a cross-reference, or anintroduction to a key concept. Italic text also denotes text that is aplaceholder for a word or value that you must supply.monospaceText in this font denotes text or characters that you should enter fromthe keyboard, sections of code, programming examples, and syntaxexamples. This font is also used for the proper names of disk drives,paths, directories, programs, subprograms, subroutines, device names,functions, operations, variables, filenames, and extensions. National Instruments CorporationviiNI Vision Assistant Tutorial
About This ManualRelated DocumentationThe following documents contain information that you may find helpful as you use this manual.To access the NI Vision Assistant documentation, select Start»All Programs»NationalInstruments»Vision Assistant. NI Vision Development Module Release Notes—Contains information about newfunctionality, minimum system requirements, installation instructions, and descriptions ofthe documentation for NI Vision Assistant. NI Vision Assistant Help—Contains descriptions of the Vision Assistant features andfunctions and provides instructions for using them. To open the help file in Vision Assistant,select Help»Online Help. NI Vision Concepts Manual—Describes the basic concepts of image analysis, imageprocessing, and machine vision. This document also contains in-depth discussions aboutimaging functions for advanced users.NI Vision Assistant Tutorialviiini.com
Vision Assistant Environment1This chapter introduces the NI Vision Assistant environment and describes resources you canconsult for more information about NI Vision software and NI image acquisition devices.Launching and Exiting Vision AssistantTo launch Vision Assistant, select Start»All Programs»National Instruments VisionAssistant.To exit Vision Assistant, complete the following steps:1.Close the Setup window.2.Save the open script and images, if necessary.3.Click File»Exit.Vision Assistant EnvironmentVision Assistant is a tool for prototyping and testing image processing applications. Toprototype an image processing application, build custom algorithms with the Vision Assistantscripting feature. The scripting feature records every step of the processing algorithm. Aftercompleting the algorithm, you can test it on other images to make sure it works.The algorithm is recorded in a script file, which contains the processing functions and relevantparameters for an algorithm that you prototype in Vision Assistant. Using the LabVIEW VICreation Wizard, you can create a LabVIEW VI that performs the prototype that you created inVision Assistant.Note You must have LabVIEW 7.1 or later and the NI Vision 8.6 DevelopmentModule or later installed to use the Vision Assistant LabVIEW VI Creation Wizard.For more information about LabVIEW VI creation, refer to the Creating a LabVIEW VI sectionof Chapter 3, Using Particle Analysis to Analyze the Structure of a Metal.Using the C Code Creation Wizard, you can generate a C function that performs the prototypethat you created in Vision Assistant. For more information about C Code creation, refer to theCreating a C Program section of Chapter 3, Using Particle Analysis to Analyze the Structure ofa Metal. National Instruments Corporation1-1NI Vision Assistant Tutorial
Chapter 1Vision Assistant EnvironmentNote If you have LabWindows /CVI 7.0 or later, you can create a project for thegenerated C code.You also can implement the algorithm defined by the Builder file into any developmentenvironment, such as Microsoft Visual Basic, using the NI Vision machine vision and imageprocessing libraries.FeaturesVision Assistant offers the following features: Script window—Records a series of image processing steps and the settings you use foreach of those steps. You can run scripts on single images or in a batch to analyze a collectionof images. You also can modify and save scripts. Refer to Figure 2-2, Processing an Image,for an example of the Script window. Image Browser—Contains all of the images currently loaded in Vision Assistant. You canselect an image to process by double-clicking it in the Image Browser. Refer to Figure 2-1,Image Browser, to view images loaded into the Image Browser. Processing Window—Updates the image as you change parameters. Because this viewimmediately reflects the changes you have made in the Setup window, you can continuemodifying parameters until you get the result you want. Refer to Figure 2-2, Processing anImage, to view an image loaded into the Processing window. Processing Functions Window/Setup Window—Displays a list of image processingfunctions you can use to develop an algorithm, or displays parameters that you can set foran image processing function. Each function available through the Processing Functionswindow has a Setup window in which you set the parameters for that function. Refer toFigure 2-3, Thresholding an Image, to view an example of the Setup window for theThreshold function. Reference Window—Displays the image source as you manipulate it in the Processingwindow. Refer to Figure 2-2, Processing an Image, to view an image in the Referencewindow. Solution Wizard—Displays a list of industries and corresponding quality-assurance tasksthat those industries perform. The wizard loads an NI Vision-based solution for the task youselect. Performance Meter—Estimates how long a script will take to complete on a given image. LabVIEW VI Creation—Creates a LabVIEW VI corresponding to the algorithm youprototype in Vision Assistant. Based on the options you select, the LabVIEW VI CreationWizard creates a new VI that implements the image processing steps of the current scriptor of a saved script file. C Code Creation—Creates a C file corresponding to the algorithm you prototype in VisionAssistant. Based on the options you select, the C Code Creation Wizard creates a C functionthat implements the image processing steps of the current script. Builder File—ASCII text file that lists the Visual Basic functions and parameters for thealgorithm you prototyped in Vision Assistant.NI Vision Assistant Tutorial1-2ni.com
Chapter 1Vision Assistant EnvironmentGetting HelpAs you work with Vision Assistant, you may need to consult other sources if you have questions.The following sources can provide you with more specific information about NI Vision softwareand NI image acquisition devices.Vision Assistant Context Help and TooltipsVision Assistant displays context-sensitive help in the Context Help window when you call anyimage processing function. The Context Help window contains several tabs that describe whento use image processing functions, how to perform an image processing function, anddescriptions of the controls that appear in the Setup window for the function. Click the ContextHelp button on the Vision Assistant toolbar to launch the Context Help window.Vision Assistant also provides tooltips in the Vision Assistant interface. Tooltips briefly describebuttons in the toolbar, Script window, Reference window, or Image Browser when you move thecursor over the buttons.National Instruments Web SiteThe National Instruments Web site provides information about NI Vision hardware and softwareat ni.com/vision.From the NI Vision site, you can locate information about new NI Vision features, machinevision problems and solutions, and selecting the appropriate NI Vision hardware, cameras,lenses, and lighting equipment for applications.The NI Developer Zone, available at ni.com/zone, is the essential resource for buildingmeasurement and automation systems. The NI Developer Zone includes the latest exampleprograms, system configurators, tutorials, and technical news, as well as a community ofdevelopers ready to share their own techniques.Vision Assistant ScriptsThe Vision Assistant installation program installs several example scripts. You can run thesescripts to learn more about Vision Assistant scripting capabilities. You also can customize thesescripts for your applications. By default, the scripts are installed to Vision Assistant \Examples and at Vision Assistant \solutions, where Vision Assistant isthe location to which Vision Assistant is installed. National Instruments Corporation1-3NI Vision Assistant Tutorial
2Introduction to ImageProcessing with VisionAssistantThis chapter describes how you can use Vision Assistant to create and test image processingalgorithms. For detailed information about digital images, refer to Chapter 1, Digital Images, ofthe NI Vision Concepts Manual.Getting Started in Vision AssistantThis section describes the software-specific terminology that you need to complete the tutorialsin this manual and understand the online help. The best way to understand how Vision Assistantworks and what you can accomplish with the software is to use it.In this short example, you load images into Vision Assistant and perform a threshold on them.Thresholding isolates objects, keeping those that interest you and removing those that do not.Thresholding also converts the image from a grayscale image, with pixel values ranging from0 to 255, to a binary image, with pixel values of 0 or 1.Complete the following steps to get started in Vision Assistant.1.Select Start»All Programs»National Instruments Vision Assistant.2.To load images, click Open Image in the Welcome screen.3.Navigate to Vision Assistant \Examples\metal, where VisionAssistant is the location to which Vision Assistant is installed.4.Enable the Select All Files checkbox. Vision Assistant previews the images in the PreviewImage window and displays information about the file type and image depth.5.Click Open. Vision Assistant opens the first image in the Processing window. National Instruments Corporation2-1NI Vision Assistant Tutorial
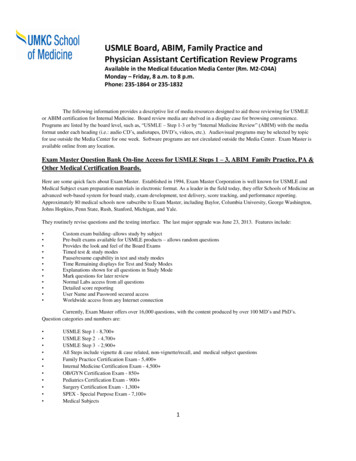
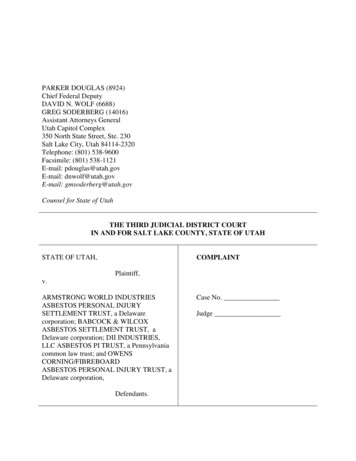
Chapter 26.Introduction to Image Processing with Vision AssistantClick Browse Images in the upper right corner of the Vision Assistant window.Vision Assistant loads the image files you opened into the Image Browser, as shown inFigure 2-1. The Image Browser provides information about the selected image, such asimage size, location, and type.1293123Image BrowserImage LocationNavigation Buttons4545667Thumbnail/Full-Size ToggleOpen ImageClose Selected Image(s)7898Image SizeImage TypeFile FormatFigure 2-1. Image BrowserYou can view images in either thumbnail view, as shown in Figure 2-1, or in full-size view,which shows a single full-size view of the selected image.7.Click the Thumbnail/Full-Size View Toggle button to view the first image in full size.NI Vision Assistant Tutorial2-2ni.com
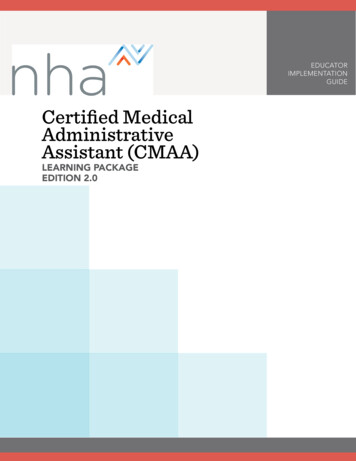
Chapter 28.Introduction to Image Processing with Vision AssistantClick Process Images in the upper right corner of the Vision Assistant window to beginprocessing images. Vision Assistant loads the image into the Processing window, as shownin Figure 2-2.TipYou can double-click an image in the Image Browser to being processing it inthe Processing window.1523412Reference WindowZoom Ratio34Image SizeScript Window5Processing WindowFigure 2-2. Processing an ImageTipThe Reference window displays the original version of the image as youmanipulate it in the Processing window. National Instruments Corporation2-3NI Vision Assistant Tutorial
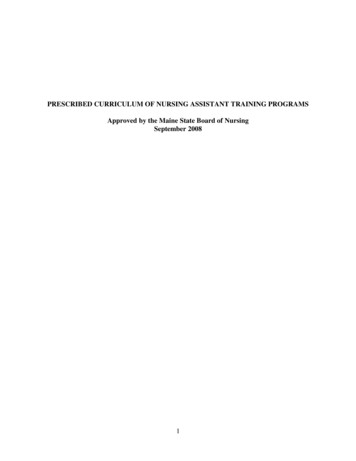
Chapter 29.Introduction to Image Processing with Vision AssistantClick Threshold in the Grayscale tab of the Processing Functions, or select Grayscale»Threshold. The Threshold Setup window opens in the lower left corner of the VisionAssistant window, as shown in Figure 2-3.11Threshold Setup WindowFigure 2-3. Thresholding an ImageThe Threshold Setup window displays a histogram. A histogram counts the total number ofpixels at each grayscale value and displays the data in a graph. From the graph, you can seeif the image contains distinct regions of certain grayscale intensities. Thresholding isolatesthese regions from the rest of the image. For example, if the image contains bright objectson a dark background, you can isolate the objects and remove the background by selectingBright Objects from the Look For drop-down list and setting a minimum threshold valueclose to 255 (white).The Processing window displays a preview of the default threshold operation, ManualThreshold, using the current set of parameters. The pixels depicted in red have intensitiesthat fall inside the threshold range. The threshold operator sets their values to 1. The pixelsdepicted in gray have values outside the threshold range. The threshold operator sets theirvalues to 0.10. To threshold this image, set the Minimum value to 130 to select all of the objects.NI Vision Assistant Tutorial2-4ni.com
Chapter 2Introduction to Image Processing with Vision AssistantTipYou may need to manipulate the Minimum value several times to find the onethat works best. Rather than enter a number in the Minimum field, you can select thevalue using the pointer on the histogram. Adjust the pointer until all of the objectsyou want to select are red.11. Click the Main tab.12. Enter Threshold Image in the Step Name control.13. Click OK to apply the manual threshold to the image. The image is converted to a binaryimage where all of the selected pixels in the threshold range are set to 1 (red) and all otherpixels are set to 0 (black).Refer to Figure 2-4 to see what the image looks like after applying the threshold.Figure 2-4. Thresholded ImageThe thresholding step is recorded in the Script window. The script records the processingoperation and all of its parameters. If you must run the same operation on other images, youcan save the script and use it again.14. Select File»Save Script As, and name the script threshold.scr.If you find another image that you must threshold similarly, run this script on the imageusing the following steps:a. Load the image.b. Select File»Open Script, select threshold.scr, and click Open.c.Click the Run Once button in the script window. National Instruments Corporation2-5NI Vision Assistant Tutorial
Chapter 2Introduction to Image Processing with Vision AssistantTry experimenting with different options and images. For example, you can perform aparticle analysis to find the area that each object in this image occupies. If you need helpwith any specific image processing operation, click the How To tab or the Controls tab inthe Context Help window.Acquiring Images in Vision AssistantVision Assistant offers three types of image acquisitions: snap, grab, and sequence. A snapacquires and displays a single image. A grab acquires and displays a continuous set of images,which is useful, for example, when you need to focus the camera. A sequence acquires imagesaccording to settings that you specify and sends the images to the Image Browser.Using Vision Assistant, you can acquire images with various National Instruments SmartCameras, digital and analog frame grabbers, DCAM-compliant IEEE 1394 cameras, and GigabitEthernet (GigE) Vision cameras. For information about driver software, refer to the NI VisionAcquisition Software Release Notes.Configure your image acquisition devices in National Instruments Measurement & AutomationExplorer (MAX). For information about configuring image acquisition devices in MAX, refer tothe NI Vision Acquisition Software Release Notes.If you do not have an image acquisition device and the corresponding driver software, you canuse the Simulate Acquisition step to simulate a live acquisition by displaying a sequence ofimages. Yo
Vision Assistant is a tool for prototyping and testing image processing applications. To prototype an image processing application, build custom algorithms with the Vision Assistant scripting f

![Unreal Engine 4 Tutorial Blueprint Tutorial [1] Basic .](/img/5/ue4-blueprints-tutorial-2018.jpg)