Transcription
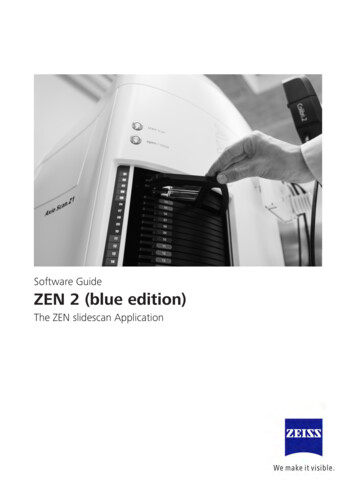
Software GuideZEN 2 (blue edition)The ZEN slidescan Application
Carl Zeiss Microscopy GmbHCarl-Zeiss-Promenade 1007745 Jena, yCarl Zeiss Microscopy GmbHKönigsallee 9-2137081 GöttingenGermanyEffective from: 02 / 2015 Jena 2014 by Carl Zeiss Microscopy GmbH - all rights reservedThis document or any part of it must not be translated, reproduced, or transmitted in any form or by any means, electronic or mechanical, includingphotocopying, recording, or by any information or retrieval system. Violations will be prosecuted.The use of general descriptive names, registered names, trademarks, etc. in this document does not imply, even in the absence of a specificstatement, that such names are exempt from the relevant protective laws and regulations and therefore free for general use. Software programs willfully remain the property of ZEISS. No program, documentation, or subsequent upgrade thereof may be disclosed to any third party, unless priorwritten consent of ZEISS has been procured to do so, nor may be copied or otherwise duplicated, even for the customer's internal needs apart froma single back-up copy for safety purposes.ZEISS reserves the right to make modifications to this document without notice.2
Content1Introduction52User Interface62.1 Scan tab2.1.1 Default Scan Profile options2.1.2 Naming Definition tool2.1.3 Storage Location tool2.1.4 Axio Scan tool68810102.2 Magazine view2.2.1 Magazine View context menu2.2.2 Slide context menu2.2.3 Scan Profile options11151617319Overview Wizards3.1 Smart Scan Profile Selection (offline)193.2 Scan Profile Wizard (online)203.3 Advanced Scan Profile Wizard (online)3.3.1 Fluorescence profiles3.3.1.1 Global Data3.3.1.2 Label Scan Settings3.3.1.3 Preview Scan Settings3.3.1.4 Tissue Detection Settings3.3.1.5 Focus Map Settings3.3.1.6 Scan Settings3.3.2 Brigthfield profiles3.3.2.1 Global Data3.3.2.2 Label Scan Settings3.3.2.3 Preview Scan Settings3.3.2.4 Tissue Detection Settings3.3.2.5 Focus Map Settings3.3.2.6 Scan Settings2223232528313762696971747481953.4 Advanced Scan Profile Wizard (offline)1013.5 Tissue detection Wizard (offline)1023.6 Axio Scan Calibration Wizard (online)1044Working with ZEN slidescan1064.1 Setting up a brightfield profile4.1.1 Step 1: Smart Profile Selection4.1.2 Step 2: Scan Profile Wizard1061061074.2 Setting up a fluorescence profile4.2.1 Step 1: Smart Profile Selection4.2.2 Step 2: Scan Profile Wizard113113114Software Guide ZEN 2 (blue edition) V 2.2 en3
Content4.3 Importing names, profiles and scenes1214.4 Using Label Scan Settings for 4''x3'' slides1234.5 Implementing your own tissue detection algorithm1244.6 Using a barcode to define name, profile and subfolder1264.7 Using Preview Scan Settings for 4"x3" slides1274.8 Setting up the ROI for the preview image1294.9 Creating a shading reference from tile image1314.10 Shading Reference From Tile image1335Smart Setup1375.1 Smart Setup dialog137Index4143Software Guide ZEN 2 (blue edition) V 2.2 en
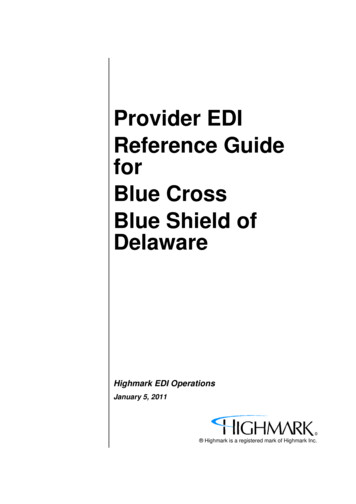
1 Introduction1 IntroductionIllustration 1: Axio Scan.Z1 systemZEN slidescan is a software package that offers all tools and functions you need tooperate the Axio Scan.Z1. E.g. it includes the possibility of creating z-stack andextended depth of focus images. With the software you can automatically generatehigh-resolution images (virtual slides) from your specimens. The system is able toperform these scans in brightfield and also multi-channel fluorescence modeThe Axio Scan.Z1 is mainly driven by software means. For details regarding theoperation of the hardware and other hardware related procedures (like exchangeof filter sets, etc.) refer to the latest hardware manual of the Axio Scan.Z1. As theAxio Scan.Z1 includes a built-in magazine with a 12 or 100 slide capacity, thesoftware deals with scanning the specimens, operating the magazine, and handlingthe slides (including the status of the slides). This is visualized via an intuitivegraphical user interface.This software guide describes the specific operation of the ZEN slidescan softwareand not the general ZEN functionality; for this, please consult the general ZEN help.The information included in this document is also available via the online help (F1).Here you can conveniently access the information in context within the tabs or thewizards.Software Guide ZEN 2 (blue edition) V 2.2 en5
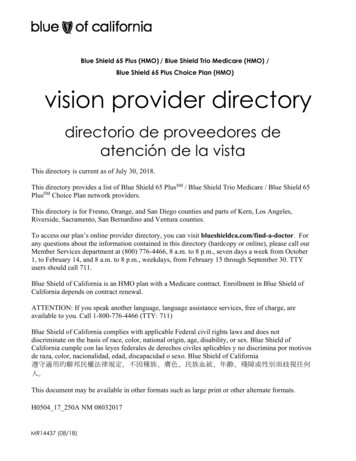
2 User Interface 2.1 Scan tab2 User InterfaceUser Interface 2.1 Scan tabHere you will find the most important functions needed to operate the AxioScan.Z1 system. The tab is closely interlinked with the Magazine view [} 11],which can be found in the Center Screen Area. On top of the tab, you will findthe Default Scan Profile (1) section where you can select predefined scanningprofiles or create new profiles. Additionally, the Smart Profile Selection (2) andthe Scan Profile Wizard (3) will help you with finding a suitable profile orchanging and creating a new one. You can start your preview scans or scans withthe prominent Scan buttons (4).Illustration 2: Scan tabDefault Scan Profile section (1)From the dropdown list, you can select the default scan profile which will be used ifnew mounting frames are inserted. The system assigns the selected profile to allnewly inserted slides. Click on the Options buttonProfile options [} 8] context menu.to open the Default ScanSmart Profile Selection (2)Clicking on this button opens the Smart Scan Profile Selection wizard [} 19]. Thiswizard helps you to open predefined profiles. This is the fastest and most intuitiveway to assign and generate scanning profiles.6Software Guide ZEN 2 (blue edition) V 2.2 en
2 User Interface 2.1 Scan tabScan Profile Wizard (3)Clicking on this button opens the Scan Profile wizard [} 20]. This wizard helps youto change/modify existing scanning profiles very easily.InfoYou can change the profile for each mounting frame afterwards in theMagazine view. If the default profile is changed, this profile will also beassigned to all unprocessed slides.Scan buttons (4)ButtonFunctionStart Preview ScanStarts a preview scan of all selected slides.To select a slide, go to Magazine view andactivate the slide's checkbox in the Processcolumn. This checkbox will be activated by defaultif mounting frames are inserted.The settings to generate the preview will be usedas defined by the assigned profile. For brightfieldspecimens, the preview consists of a snapshot ofthe label area (reflected light) and of the specimenarea (transmitted light).The result will be shown in the Preview columnof a slide. To enlarge the view, double-click on theimage. The software opens the image in aseparate tab. To adapt the regions to be scanned,please use the Advanced Scan Profile Wizard orthe Tissue Detection Wizard.Start ScanStarts a scan of all selected slides.The scan consists of the preview generation (labelarea and specimen area), tissue detection, focusmap, and high resolution scan of the specimen.The settings will be used as defined by theassigned profile.To open an image, double-click on it and it willopen in a separate tab in the center of the screen.Software Guide ZEN 2 (blue edition) V 2.2 en7
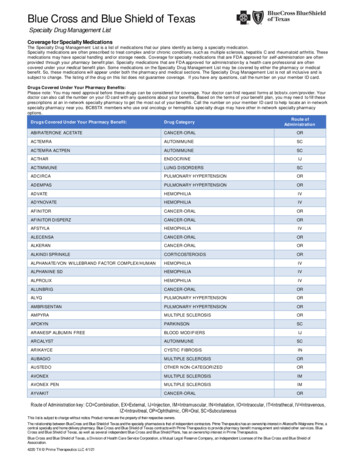
2 User Interface 2.1 Scan tab2.1.1 Default Scan Profile optionsMenu entryDescriptionNew Scan Profile Creates a new profile. If a new profile was created,it will be automatically assigned to all slides inMagazine view.Smart ProfileSelection Opens a wizard to select a predefined profile. Theuser will be guided with questions regarding hisspecimen and the result is a profile which fits bestto digitize his specimen. It is recommended toprocess this profile afterwards with the Scan ProfileWizardAdvanced Scan ProfileWizard Opens a wizard to adapt all possible settings of theprofile and gives the user the possibility to utilizethe full flexibility of the system. This wizard isrecommended for experienced users.Scan Profile Wizard Opens a wizard to adapt basic settings of theprofile; e.g. Barcode / OCR / Scanning objective / zstackRenameRenames the selected profile.Save asSaves the user profile under another file name.DeleteDeletes the selected profile.2.1.2 Naming Definition toolIllustration 3: Naming Definition toolHere you can define naming definitions for the acquired files/images. You canselect several definitions for the file names from the dropdown list. The nameautomatically contains the detected barcode content if the barcode detection is8Software Guide ZEN 2 (blue edition) V 2.2 en
2 User Interface 2.1 Scan tabactive for the active profile. The naming definition contains the command to usethe barcode. If you want to use only a sub-set of the barcode as the image / slidename you have to use the Function Name, Profile and Folder from Barcode. Ifyou click on the Options buttonnaming definitions.you can define new, edit or delete existingInfoThe Preview field shows a preview of the configured file name.Naming Definition optionsList entryFunctionNewHere you can create a new naming definition. The system willask for the name of the definition and you can then set up thenaming definition in the naming dialog.EditHere you can edit the current naming definition.RenameHere you can rename the current naming definition.Save AsHere you can save the current naming definition under anothername.DeleteHere you can delete the currently selected naming definition.Import Names, Profiles and Scenes names buttonClicking on this button allows you to import the image names and used profiles.You also have the option to apply scene names. When starting an import, it isnecessary to insert all your slides beforehand. The software will only apply theimported parameters for slides that have been inserted with the status “new”.You can read more details on the import under Importing names, profiles andscenes [} 121].Name, Profile and Folder from BarcodeActivating this checkbox allows you to use barcode information to name image,assign profiles and sub directories.You can read more details on the import under Using a barcode to define name,profile and subfolder [} 126].Software Guide ZEN 2 (blue edition) V 2.2 en9
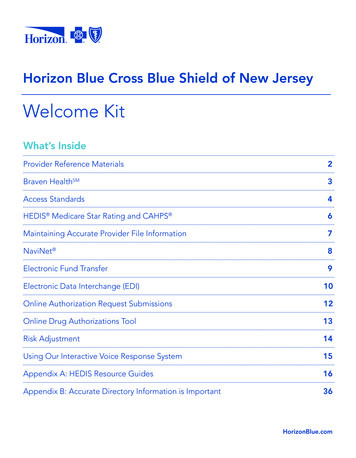
2 User Interface 2.1 Scan tab2.1.3 Storage Location toolIllustration 4: Storage location toolHere you can specify the storage location of the created images. A location can bea local path on the computer in use as well as a network share to store the data ona remote server. It is recommended to store the images locally, as depending onthe network properties, the connection may not be sufficiently reliable to store thedata. This may result in the scan workflow stopping if the network is interrupted, orslowing down if the network connection is performing at a lower rate. If a networkshare is selected, a transmission rate of at least 100 MB/s is recommended. If theyare available, you can select paths that have already been used from the dropdownlist. Clicking on the Create New Folder button in the Browse Folder dialogcreates a new storage folder.2.1.4 Axio Scan toolIllustration 5: Axio Scan tool10Software Guide ZEN 2 (blue edition) V 2.2 en
2 User Interface 2.2 Magazine viewDoor status sectionHere you can see whether the door is open or closed. With the Close/Open buttonnearby, you can open or close the door depending on the current status. Thisfunction is equivalent to the Open/ Close button on the device itself.Stage status sectionHere you see if a tray is loaded or not. You can load a tray by double-clicking onthe tray buttons on the left-hand side of the tool. If a tray is loaded, the Unloadtray button will be shown . Clicking on this button will unload the tray located onthe stage into the magazine.Tray Information sectionHere you can see information on the tray and the mounting frame. Hover over thetray buttons on the left to see the information in the display fields. The signal colorsin front of the buttons indicate the current status of the trays. This is the same kindof signal that can be found on the device itself. Refer to the operation manual for adetailed description. Double-clicking on the tray button inserts the mounting frame.If another frame is mounted, it will be removed automatically. Tray Position shows the position of the tray/mounting frame inside themagazine. Tray Type specifies the inserted mounting frame type (e.g. High-precision 1x3or High-precision 2x3). Tray Status shows the status of the frame (e.g. processed, preview done).Slide Scanner status information sectionThis sections gives you information on the Stage Position (e.g. safe) or WorkingState (e.g. ready) of the device. It is the same information as shown by the mainindicator on the device itself (e.g. ready, processing, warning).User Interface 2.2 Magazine viewThis view gives you an overview of the Axio Scan.Z1 magazine. You can assignprofiles and naming conventions to slides, show the status, and move trays up anddown (using drag and drop) to change the scanning order. The system will startprocessing slides from top to bottom for all slides that have been activated (via thecheckmark in the Process column). The view is closely interlinked with the Scan tabin Left Tool Area.Software Guide ZEN 2 (blue edition) V 2.2 en11
2 User Interface 2.2 Magazine viewIllustration 6: Magazine viewNotes If the door is closed (using hardware or software), the system detects all traysinside the magazine and establishes both the tray type and the positions in thetray that are occupied with a physical slide. The system will also check all slides by default (see Process column) and assignthe Scan Profile (defined in the Scan tab) to every slide if new slides areinserted. It is still possible to change the profile and other settings afterwards(if the slides are not processed or currently scanned), even if the batch processhas already started. Only the inserted slides will be shown. Empty places in the tray will not beshown. The loaded tray will be visualized with an orange frame around themounting frame (in our example this would be Tray 4).Main buttons (1)These buttons allow you to adjust the display and settings of the magazine viewwith ease:12Software Guide ZEN 2 (blue edition) V 2.2 en
2 User Interface 2.2 Magazine viewNameDescriptionExpand AllExpands all trays so that you can see the slides containedwithin them.Collapse AllCollapses all trays so that you can only see the traypositions.Mark AllActivates all slides for processing.Unmark AllDeactivates all slides for processing.Default OrderResets the default positions of trays and slides. Only ifyou have changed the order of trays or slides (e.g., bydrag and drop).Select AllHighlights all slides within the magazineUnselect AllDeactivate the highlighting within the magazineTray information section (2)Here you can see an overview of all trays and the inserted slides. Every tray positionhas the same structure:The headline for every tray is the physical Tray Position (e.g. Tray position: 1).Below the tray position information you will see the Tray Type which is inserted(e.g. High-precision 1x3 or High-precision 2x3). Right-clicking on a tray will openthe Magazine View context menu [} 15] with several options for magazine viewor the individual trays. If you click on the little expander button in front of the traytype, you can expand or collapse the view to see a tray's Slides . All trays areexpanded by default.Slide layout (3)Each row within a tray represents a slide. Right-clicking on a slide will open theSlide context menu [} 16] with several options for the selected slide. The slidecolumns are always the same:ColumnDescriptionProcessIndicates whether the slide will be scanned (checkbox activated)or not (checkbox deactivated).PreviewShows the preview image of the slide if a preview wasexecuted. It shows the label area and the specimen area.Software Guide ZEN 2 (blue edition) V 2.2 en13
2 User Interface 2.2 Magazine viewColumnDescriptionScan ProfileAssigns a specific scan profile to each slide. If a profile wasadapted, the system indicates this with a gearwheel in front ofthe profile name.behind the scanIf you click on the Options buttonprofile, the Scan Profile Options [} 17] context menu will beopened.Scan StatusGives information about the status of the slide scanningprocess. This can be: new: no preview was executed and no scan preview done: preview was already executed and will bedisplayed (in the Preview column) finished: the scan was successfully executedIf an error/warning comes up, this will be shown here. If youclick on the error/warning message, it will be displayed.SlidePositionRepresents the physical position of this slide inside the tray.Slide NameRepresents the name of the image which will be generated.You can insert a name or the system can create a nameaccording to an automated naming rule. The selection of theprocedure to be executed depends on the Naming column.NamingHere you can select whether the system creates the nameautomatically using a naming rule or specify a name manually.It is also possible to change the name of the image once thepreview has been generated by simply clicking on the nameand then editing it. Depending on the settings under NamingDefinition you can also import names via a CSV file or you canuse the barcode information to define a name as substring ofthe barcode.Tip: To enlarge the label image or the preview image of the specimen area simplyclick on the image. You will see an enlarged view of this image for a betterrecognition of the content. If the scanning for a slide is finished you do not see theoverview image of the specimen you will see a low magnification representation ofthe resulting image.If you want to close the image click on the image again, move the mouse pointerof the image or click another slide to enlarge another preview / scanned image.14Software Guide ZEN 2 (blue edition) V 2.2 en
2 User Interface 2.2 Magazine view2.2.1 Magazine View context menuMenu ItemDescriptionLoad trayThe system will move the selected trayfrom magazine to the stage and aneventually already loaded mountingframe on the stage will be removedbefore automatically. A loaded tray ismarked by an orange rectangle.Assign scan profileOpens a dropdown menu where youcan assign an existing profile to allhighlighted slides.Mark all slides of highlightedtrays for processingSelects all slides in the highlighted(multi-select possible) trays forprocessing.Unmark all slides of highlightedtrays for processingDeselects all slides in the highlighted(multi-select possible) tray forprocessing.Software Guide ZEN 2 (blue edition) V 2.2 en15
2 User Interface 2.2 Magazine viewMenu ItemDescriptionExpand all highlighted traysExpands all highlighted trays by on clickof he mouse (multi-select possible). Tohighlight a tray hold Crtl key and clickon the trays you want to highlight.Collapse all highlighted traysCollapses all highlighted trays by oneclick of the mouse (multi-selectpossible).2.2.2 Slide context menuMenu ItemDescriptionMove to Prescan positionMoves the selected slide to the prescanposition.Move to Scan positionMoves the selected slide to the scanposition.Assign scan profileHere you can select a scan profile andassign it to the selected slide. If youhave highlighted several slides theselected profile will be assigned to allhighlighted slides.Open image(s)Only active if the scan was finished.The software will open the image. Ifyou have selected several slides allimages from theses slides will beopened.16Mark all highlighted slides forprocessingMarks all selected (highlighted) slidesfor processing.Unmark all highlighted slides forprocessingUnmarks all selected (highlighted) slidesfor processing.Reset Scan status to newResets the scan status of the selected(highlighted) slide to “new”.Reset scan status to previewedResets the scan status of the selected(highlighted) slide to “previewed”.Software Guide ZEN 2 (blue edition) V 2.2 en
2 User Interface 2.2 Magazine view2.2.3 Scan Profile optionsMenu entryDescriptionOpen advanced wizardOpens the Advanced Scan Profile Wizard (OnlineMode). In this mode the system will take the traycontaining the slide from the magazine (only if thetray which contains the slide is not already on thestage). You can see a live image from the differentcameras (preview camera / scan camera) and youare able to navigate on the slide.This mode is useful if you want to adjust e.g.exposure times and setting windows live and direct.Thus you will always work on a physical glass slide.On the other hand this is can be time consumingbecause the physical glass slide has to be moved/loaded.Open advanced wizardin offline modeOpens the Advanced Scan Profile Wizard (Offlinemode). In this mode the system will not move thetray (slide) and you will get no live image from thecameras.This mode is useful if the user wants to changeparameters which are not directly associated with alive image; e.g. Z-stack and EDF (extended depth offocus) or focus settings. The adjustment of thesesettings are independently from any movement ofphysical glass slides and no slide needs to beloaded from the magazine.Open tissue detectionwizardOnly active if a preview was generated.Opens the Tissue Detection Wizard.By the help of this wizard you can change theregion which the system will scan afterwards.Within the wizard you can switch directly to thenext or previous slides. This makes it fast andconvenient to switch between the slides. Theadjustment of these settings are independentlyfrom any physical glass slide.This wizard can be executed even if the previewgeneration for other slides is still running.Software Guide ZEN 2 (blue edition) V 2.2 en17
2 User Interface 2.2 Magazine viewMenu entryDescriptionSave adapted scanprofileOnly active if the scan profile was adapted/changed.Here you can save an adapted scan profile (anadapted scan profile is visualized via a gear wheelin front of the profile name). After you haveactivated this function a Save As dialog comesup where you can select an appropriate name forthe adapted profile and save it.Properties18Here you can check the properties of the profile. AXML viewer comes up to present all details of thescan profile. This information is only valuable forvery experienced user.Software Guide ZEN 2 (blue edition) V 2.2 en
3 Overview Wizards 2.2 Magazine view3 Overview WizardsThe software user interface includes the following 6 wizards: Smart Scan Profile Selection (offline) [} 19] Scan Profile Wizard (online) [} 20] Advanced Scan Profile Wizard (online) [} 22] Advanced Scan Profile Wizard (offline) [} 101] Tissue detection Wizard (offline) [} 102] Axio Scan Calibration Wizard (online) [} 104]Each wizard has a certain functionality and/or provides a certain level of access tothe functionality of the Axio Scan.Z1. A wizard always contains several steps. Thesesteps guide you through all necessary settings, e.g., to generate a scan profile orcalibrate the scanner. The Tissue Detection Wizard contains only one step.Two principal wizards are implemented – the online type and the offline type. Theoffline type works without having a physical slide mounted on the stage, meaningthat no live image is produced and there is no access to the functionality which isnormally associated with a live image. The online type requires a slide to be placedon the stage (or the wizard places the slide on the stage) thereby also generating alive image.InfoFor the Advanced Profile Wizard (online/offline), it is not necessary to gothrough the wizard step by step; it is possible to jump directly to a certain stepof the wizard by double-clicking the desired step.If certain features/settings are missing, this may be because the Show all mode isnot active. If so, activate the Show all checkbox. On the other hand, severalsettings are only available for very specific applications. If these settings causeconfusion, switch off the Show all checkbox.You can generate new profiles from scratch using the default settings (via the Scantab/Default profile section/New), but in most cases it is recommended to modifyexisting profiles. This makes it easier and faster to adapt a profile for a newapplication without checking each step of the wizard.If you do not have a adequate profile as a source to modify, it is recommended touse the Smart Profile Selection first to select a base profile for a certainapplication and modify settings afterwards using the Scan Profile Wizard.Overview Wizards Software Guide ZEN 2 (blue edition) V 2.2 en19
3 Overview Wizards 3.1 Smart Scan Profile Selection (offline)3.1 Smart Scan Profile Selection (offline)This wizard will be opened via the Smart Profile Selection button on the Scan tab.Illustration 7: Smart Scan Profile Selection WizardThe system has pre-configured profiles (known as pool profiles) for a large numberof applications. These profiles are stored in a safe location and cannot be changedby the user.You will be guided through several steps to find the best profile as a preset forfurther adaptations. Each choice is followed by a selection of individual optionspaths. You can choose the desired option by double-clicking on it or by selectingthe option and clicking on the Next button at the end of the boxes.When you finish the wizard, the selected profile from the profile pool will be copiedto the user accessible folder. From here, you can select it as a scanning profile. Inthe last step, you can change the name and activate the option that the ScanProfile Wizard will be started right after the Smart Profile Selection.The user can then modify the profile using the Scan Profile Wizard or theAdvanced Scan Profile Wizard.InfoThe default scanning objective for all pool profiles is the 20x objective.Overview Wizards 20Software Guide ZEN 2 (blue edition) V 2.2 en
3 Overview Wizards 3.2 Scan Profile Wizard (online)3.2 Scan Profile Wizard (online)This simplified wizard only has basic functions for the purposes of changing anexisting profile.Illustration 8: Scan Profile WizardThe wizard includes the following settings:Settings for brightfield profiles Grid definition if grid is part of the profile Barcode reading OCR (optical character recognition) functionality Selecting the scanning objective Adjusting flash intensity and flash duration Z-stack functionality (with the definition of the number of slices and intervalautomatically via the specimen thickness) EDF (extended depth of focus) functionalitySettings for Fluorescence profiles Grid definition if grid is part of the profile Barcode reading OCR (optical character recognition) functionality Selecting the scanning objective Selecting/deselecting channels Defining stitching channelSoftware Guide ZEN 2 (blue edition) V 2.2 en21
3 Overview Wizards 3.3 Advanced Scan Profile Wizard (online) Adjusting exposure times Adjusting light source intensities Z-stack functionality (with the definition of the number of slices and intervalautomatically via the specimen thickness) EDF (extended depth of focus) functionalityOverview Wizards 3.3 Advanced Scan Profile Wizard (online)This wizard is an online wizard, thus the system will take the tray containing theslide from the magazine if the tray which contains the slide is not already on thestage. The system will always show the operator a live image from the differentcameras (preview camera/scan camera) while also moving the slide according theinput from the operator. This mode is important if the user wants to adjust settingssuch as exposure times and regions of interest including labels and preview areas.This means that the operator will always work on a physical glass slide. On theother hand, this can be time-consuming because the physical glass slide has to bemoved. If you want to change settings that are not directly associated with a liveimage, you can use the Advanced Scan Profile Wizard in offline mode.Illustration 9: Advanced Scan Profile Wizard22Software Guide ZEN 2 (blue edition) V 2.2 en
3 Overview Wizards 3.3 Advanced Scan Profile Wizard (online)3.3.1 Fluorescence profiles3.3.1.1 Global DataInfoTo access all of the functions and properties described in this guide, you have toactivate “Show All” using the checkbox in the upper right-hand corner of theleft tool area.Here you can define global settings for your scanning profile. Depending on theseglobal settings, both the wizard and the workflow will be adapted automatically.Profile & DescriptionThe name of the selected scan profile is displayed under Profile. This name cannotbe changed here. A short description of the profile can be found underDescription. As the information content of the profile name is always limited, youcan insert additional information here to highlight the most important profilesettings (e.g., magnification/z-stack settings/focus map settings).Profile TypeHere you can select between Brightfield and Fluorescence profile types. If youchoose brightfield, AF Contrast Type settings will not be shown.Software Guide ZEN 2 (blue edition) V 2.2 en23
3 Overview Wizards 3.3 Advanced Scan Profile Wizard (online)Tissue Detection ModeThis is where you select the kind of tissue detection you want to apply. Thefollowing three modes are available:ModeDescriptionAutomaticIn this mode, the system detects the tissueautomatically.InteractiveIn this mode, the system will pause the scan process ifa batch is started and waits for your input to define aregion of interest manually. As the system pauses untilthis interaction is complete, this function has to beused very carefully.ManuallyIn this mode, you can define a region of interest to bescanned manually or a grid in a subsequent step of thewizard. This is an option if you only want to select asubset of the tissue on the slide, e.g., if the tissue isvery faint, the system cannot detect the specimenreliably, or if the specimen has a regular pattern on theslide. If you use this function, the defi
Software Guide ZEN 2 (blue edition) V 2.2 en 5 1Introduction Illustration 1: Axio Scan.Z1 system ZEN slidescan is a software package that offers all tools and functions you need to operate the Axio Scan.Z1. E.g. it includes the possibility of creating z-stack and extended depth of focus