Transcription
GlobalMeet WebcastScreen SharingDocumentScreen SharingRelease5.3Revision DateJune 6, 2020
ContentsOverview . 3Screen Share Setup . 3Screen Share Delivery . 3Presenter View . 6Frequently Asked Questions . 7
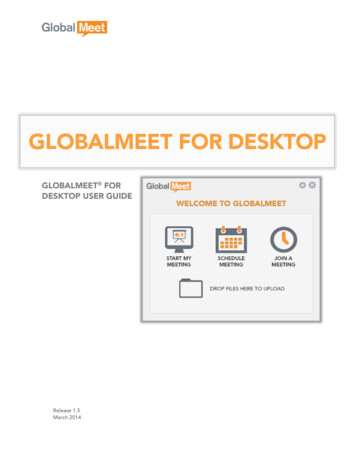
OverviewScreen sharing can be enabled on your event to allow presenters to share their entire screen, anapplication window, or a Google Chrome tab with the audience. Presenters sharing their screen arerequired to use a Google Chrome internet browser.If you would like to include screen sharing on your event, please allow for proper setup and testing inadvance of the presentation. It is recommended to run a test event with the same computer and wiredinternet connection you will use for the actual event.Screen Share Setup To include screen sharing on your event, visit the Player & Branding page of the setup.Enable the Use Live Screen Share checkbox to allow presenters to share their screen on thepresentation.Screen Share Delivery In the Live Studio, click on the Live Screen Share tab above the Slide window. On the Live Screen Share tab, click Share My Screen.
For video events, use the Select Your Audio Source dropdown to select the microphone you wouldlike to use when sharing our screen. The Audio VU meter can be used to make sure your audio isbeing picked up by the selected microphone. Click Continue once the audio source has beenselected.o For audio events, the screen share will use the event’s Presenter Bridge as the audio source.On the pop-up screen, select what content you want to share with viewers. Use the Your EntireScreen, Application Window and Chrome Tab options to select a screen share source.o When sharing an Application Window, select what application you want to share. When sharinga Chrome Tab, select what browser tab you want to share.Click Share to prepare your screen share for broadcast.o Once the screen share is connected, other presenters will be able to access the preview usingthe View Connected Screen Share button on the Live Screen Share tab.
Only one presenter can share their screen at a time. If a screen share is connected, otherpresenters will be prevented from connecting their screen.Once the screen share has been connected, click Broadcast My Screen to Audience to make yourscreen share active to viewers. A confirmation message will appear. Click OK to confirm you wouldlike to start sharing your screen.o Before broadcasting your screen, it is recommended to test the audio quality by clicking “Listento Presenter Audio” in the lower right of the screen share preview. Be sure to click “StopListening to Audio” before sharing your screen with the audience to avoid feedback.o Other presenters in the Live Studio can send your screen to the webcast audience using theBroadcast Screen Share to Audience button, which will appear to other presenters accessingthe Live Screen Share tab.A message will appear over the Live Studio to confirm when your screen share is active. Minimizethe Live Studio to begin presenting your desktop to viewers.o Be careful not to close the Live Studio window or click Stop Sharing. Both options will stop thescreen share and require you to reconnect.o
Once you have completed sharing your screen, click End My Screen Share to stop sharing yourscreen. A confirmation message will appear. Click OK to confirm you would like to stop sharing yourscreen.oOther presenters in the Live Studio can stop sharing your screen with the webcast audienceusing the End Live Screen Share button, which will appear to other presenters accessing the LiveScreen Share tab.Presenter View When a presenter has connected their screen for sharing, other presenters accessing the Live ScreenShare tab will see the message below and be prevented from sharing their screen.o Click Refresh to refresh the tab and confirm if a screen share is still connected.o Click View Connect Screen Share to view the connected screen share.o Click Broadcast Screen Share to Audience to make the connect screen share active to viewers.When a presenter’s screen share is active to viewers, other presenters will see the screen sharedisplay over their Live Studio, with controls at the top.ooooClick Refresh Stream to refresh the screen share stream.Click Watch Full Screen to display the screen share full screen.Click Unmute Audio to unmute the screen share audio.Click End This Live Screen Share to end the screen share for viewers.
Frequently Asked Questions To check what version of Google Chrome you have installed or update your Chrome browser:o Click on the Chrome menu ( ).o Select About Google Chrome.o The current version number is the series of numbers beneath the "Google Chrome" heading.o Chrome will check for updates when you're on this page. Click Relaunch to apply any availableupdate.If you have more than one microphone, you can set a default device on a Windows OperatingSystem using the following steps:o Go to Control Panel.o Choose Hardware and Sound.o Choose Sound.o Choose Recording.o Select your preferred recording device. Select Set Default. Click OK.If you do not have a webcam available on your computer, you can use the steps below to downloada virtual webcam. A webcam is required for VCU or encoder events that utilize screen sharing.o Manycam is well known and available for download at the following locations: http://download.cnet.com/ManyCam/3000-2348 4-10593500.html https://manycam.com/o Once installed, go into your Chrome browser settings and set Manycam as the default camera. In the address bar of your Chrome browser, type: “chrome://settings/”. In Search settings, type “Media”. Click Content Settings. Under Media, you will see the option to set the default camera to Manycam. Click Done.
Broadcast Screen Share to Audience button, which will appear to other presenters accessing the Live Screen Share tab. A message will appear over the Live Studio to confirm when your screen share is active. Minimize the Live Studio to begin presenting your desktop to viewers. o Be careful