Transcription
Esri Conservation ProgramIllustrated Guide topostrgreSql for ArcGIS & ServerDRAFTplease send comments, suggestions, omissions toCharles Convisecp2@esri.comThis guide was started in 2014 in response to the lack of any single organizedsource of guidance, tutorials or illustrated workflows for obtaining, installing,operating and updating postgreSql for ArcGIS Server installations. It is currentas of version 10.3, and due for update in late 2016
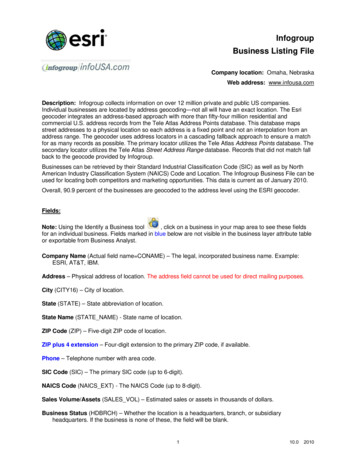
OBTAINING POSTGRESQL:Postgres install files need to be obtained from my.esri.com because of the version-linked spatial support librariesprovided. You get a free account at my.esri.com within a few days of your very first esri software grant. Check youremail for the grant activation message, it’ll often say “LOD” (license on delivery)Hang onto that email but don’t use the token url more than once. You will do your additional downloads via the myesriaccount. You can download as many times as you need to: especially useful for machine crash recovery. If you justwant to transfer licenses you can do that directly at myesri.com by deauthorizing an existing machine and reauthorize onthe new machine. If you do happen to run out valid installs for your authorization just call esri tech support and they canadd more as needed.The other way to access my.esri.com is if you have access to an ArcGIS Online Account or are part of an ArcGIS OnlineOrganization account. Anyone who is an administrator can log in and click on “My Organization” to see the following:What the admin then needs to do is right click on the gear icon next to your name and scroll down to “Enable EsriAccess”. This will give you download access at my.esri.com. (It’s worth noting that ArcGIS Online has a related softwaredownload facility, under the “Manage Licenses” tab, where you can manage and issue licenses for ArcGIS Pro and themobile apps.)Your account at my.esri.com is also called an “esri global account” because in addition to software it can also be used toallow access to ArcGIS online, to multiple ArcGIS online organizations, and the Geonet community site. Once you havelogged in to my.esri.com, you’ll see a tab called “My Organizations” that will list all of the ArcGIS online organizations youbelong to. This tab is what you click next, then look for and click on the “Downloads” tab beneath it:
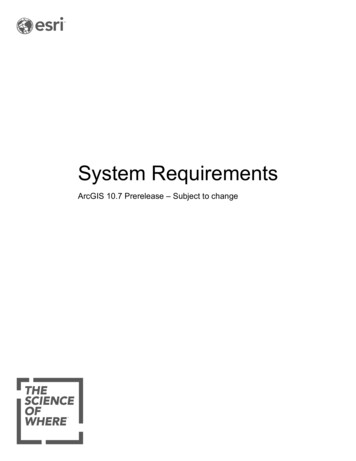
Once the Downloads panel opens, you’ll see the main list of software you have. Click on “View Downloads” tabs at rightto see the list of items available for download for each specific product.This takes you to a long list of the core components and guides for that product, you want to go to the BOTTOM of thatlist for the 5 additional categories of support products, click on “Additional Products”
Finally towards the bottom of the “Additional Products” list you’ll see the PostgreSQL section. There are many versionslisted because each version of ArcGIS Server and Desktop had a specific list of about 3-4 PostgreSQL versions that theywere compatible with. In the example below for ArcGIS 10.3, there are 3 compatible windows versions. Pick the versionyou need and download.PostgreSQL should be available here for any ArcGIS Server or ArcGIS Desktop license. (If you don’t see it, call customerservice and they will add it so that you can have access to the Postgres files). Pick the flavor and version of ArcGIS Serverthat you have.For 10.2.x and earlier there are 2 files you need for each version, the core DBMS, as above, and the “ClientLibraries” that you’ll have to install on each NODE machine in case you have a multi-instance server. At 10.3these node libraries are no longer needed thanks to “Direct Connect” functionalityOnce you click“Download” the “EsriDownload Manager “ willshow up in a popupwindow and you’ll needto click on it to start it:
Installing PosgreSQL1. Download and installPostgreSQL. (IF you have a multimachine site, install it first on SITEHOST. )PostgreSQL DBMS for Windows 935 143584.exeUse all defaults except for most server installations you’ll want toput your main data directory someplace other than C: drive, likeD:Pick the password you’ll use as the PostgreSQL superuser,Good practice is to use it only to set up and administeradditional data access accountsdefault port number for ArcGIS Installs:set locale to English, USA, uncheck stack builder, most folks don’t need itPostgreSQL it will then install2. When PostgreSQL is first installed, you will only be able connect to it from the local server machine you installed iton ie SITEHOST. If you have a multi-machine site with a SITEHOST and NODE machines, you’ll need to do more toallow the other NODE machines on your network to connect to the PostgreSQL database on SITEHOST. (Note, ArcGISServer does all this automatically with file geodatabases, for the most part, but you are now replacing FGDB storagewith PostgreSQL storage so you have to manage it yourself)2A: First, you must alter the pg hba.conf file.In a text editor, open the pg hba.conf file found in the PostgreSQL data directory. Use whatever you set it to inthe “Data Directory” step above. The default location is C:\Program Files\PostgreSQL\ PostgreSQLversion \data, but most folks will change that to something else ie D:\PostgreSQL93DataIn pg hba.conf, specify the client addresses you want to allow to access your databaseIf you want to allow all users who supply a valid password to connect to any of the databases on the PostgreSQLinstance from addresses beginning with 100, you would add a line similar to the following to the pg hba.conf file:host all all 100.0.0.0/8 md5
Note internal AWS addresses often begin with 10.99, but the following worked fine for an AWS multi-machine site:host allall10.0.0.0/8md5You can also use named domains. In the following example, all machines connecting from orgnetwork.com are allowedaccess to all databases on the host database rgnetwork.commd5actual pg hba.conf file example:# TYPE DATABASEUSERADDRESSMETHOD# IPv4 local connections:host allall10.136.58.172/8md5host allall10.231.144.222/8md5host allall10.35.151.248/8md5host allall127.0.0.1/32md5# IPv6 local connections:host allall::1/128md5# Allow replication connections from localhost, by a user with the# replication privilege.#host replication postgres127.0.0.1/32md5#host replication postgres::1/128md52B: Once finished editing pg hba.conf, Restart the PostgreSQL service.You can do this by right-clicking the postgresql-x64 service in the Windows Services list and clicking Restart.pg hba.conf instructions from esri help ql-accept-connections.htmConfigure a PostgreSQL database cluster to accept connectionsPostgreSQL is installed on a Windows serverYou can either alter the pg hba.conf file directly by opening it in a text editor, or you can alter the pg hba.conf file through PgAdminIII.Make a backup copy of the pg hba.conf file before you alter it.Open the pg hba.conf file by doing one of the following:Start PgAdminIII, connect to the PostgreSQL instance as the postgres super user, connect to the database, click Tools, point to Server Configuration,then click pg hba.conf.Start Notepad or another text editor application and open the pg hba.conf file from the PostgreSQL installation directory.Add the IP addresses of connecting client machines and the client authentication methods used for connections.For example, to allow any user who supplies a valid password to connect to a database named habitat from addresses beginning with 10.2.12 usingan md5 connection, add the following line to the pg hba.conf file:host habitat all 10.2.12.0/24 md5If you want to allow all users who supply a valid password to connect to any of the databases on the PostgreSQL instance from addresses beginningwith 100, you would add a line similar to the following to the pg hba.conf file:host all all 100.0.0.0/8 md5The preceding examples were for IPV4 addresses. If you need to configure the database cluster to accept connections from machines with an IPV6address, the format would be as follows:host all all fe60::61f9:1253:c522:9b92%10/128 md5To allow any machines with an address beginning with fe60 to connect, you would add this line to the pg hba.conf file:host all all fe60::0000:0000:0000:0000%10/8 md5If your PostgreSQL database cluster is set up on a machine that has an IPV6 address and you want machines with an IPV4 address to connect to it,you need to uncomment the following line in the pg hba.conf file:host all all ::1/128 md5Save the changes you made to the file and close it.
3. Place the ST Geometry libraries in the PostgreSQL lib directory (applies to 10.2 AND 10.3)Geodatabase creation in PostgreSQL relies on the presence of the ST Geometry library. You must place theappropriate library in the lib directory where PostgreSQL is installed before you can create a geodatabase.ST Geometry libraries can be found in the DatabaseSupport folder of your ArcGIS client installation.Since this tutorial assumes your PostgreSQL installation is on a Windows server, you will use the ST Geometrylibrary found in the Windows64 folder.In Windows Explorer, navigate to the location of the Windows ST Geometry library in your ArcGIS clientinstallation directory.The default location for ArcGIS for Desktop on 64-bit Windows operating systems isC:\Program Files (x86)\ArcGIS\Desktop release# \DatabaseSupport\PostgreSQL\Windows64;on 32-bit Windows operating systems, it isC:\Program Files\ArcGIS\Desktop release# \DatabaseSupport\PostgreSQL\Windows64.Copy st geometry.dll from this location.Navigate to the PostgreSQL lib directory on the database server and paste the library to that location.On Windows, the default location is C:\Program Files\PostgreSQL\ PostgreSQL version \lib.(Step 4 is for 10.2 and EARLIER ONLY, NOT NEEDED FOR 10.3 4. Place the PostgreSQL client files on your ArcGIS clientTo connect from ArcGIS for Desktop to create a geodatabase, you must have the PostgreSQL client libraries onyour client machine.Download the PostgreSQL client files from My Esri.To connect from ArcGIS for Desktop, you need the 32-bit files.Paste the 32-bit files into theC:\Program Files (x86)\ArcGIS\Desktop release# \bin directory (64-bit operating systems) orC:\Program Files\ArcGIS\Desktop release# \bin directory (32-bit operating systems).Note:Libraries must be placed on every ArcGIS client machine from which you will be connecting to the database.Restart ArcGIS for Server, if it is already running, so that it recognizes the files you placed in the bin directory.
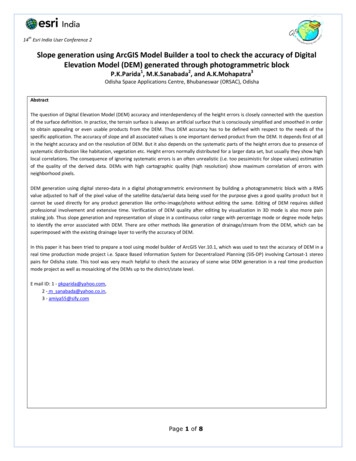
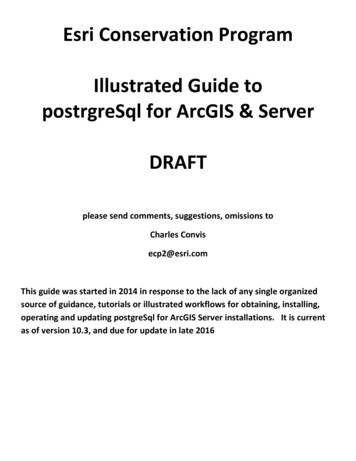
Create a newPostgresDatabase1. run the ArcGIS “CreateEnterprise Geodatabase”in the “Data ManagementTools – GeodatabaseAdministration” section.2. Be sure to select“PostgreSQL” at the topand enter “sitehost” asthe instance name or theNODE machines will fail.3. GIve it a name.DO NOT use mixed capitaland lower letters orunderscores in the name.4. DB Administrator isalways “postgres”,password is whatever yougave it during install5. Geodatabase Administrator is always set to “sde” andthe password is whatever you gave it during install6. Authorization file can only be the “.ecp” one ieServer Ent Adv.ecp.It then shows the progress window (right), takes a fewminutes to run:Will start verifying that the “geodatabase admin alreadyexists”, this is ok.Ends by saying “Finished creating geodatabase schema”Takes just a couple minutes to complete
Once the database is created, you haveto create a connection to it fromArcCatalog. Go to the “DatabaseConnections” section and double-clickon the plus “Add a DatabaseConnection”You’ll get this window. Fill it out asshown, make sure to enter “sitehost” asthe instance name. select “sde” as theuser name. Password is what you set.to check that the connection is valid,click on the downward triangle at thebottom of the window and it shouldshow you a list of all the geodatabasesavailable in that platform. That showsthat your connection is valid. Pick theone you want and click OK.By default, the connection willbe named a genericname”Connection tositehost.sde” (left) inArcCatalog, so the last step is torename the connection to match the name of the geodatabase.Right click on it and type in the new name, have it refer to the file geodatabase name &projection then use “pgsdeuser” to remind you it is a postgres geodatabase beingaccessed via an sde user connection.Next, right click on the renamed connection and pick “new” thenpick “Feature Dataset” in order to create a feature dataset to helporganize your files in the geodatabase, like by Region or Generalizelevel, ie GapLcBase SWYou’ll need to specify the coordinatesystem for it, and it will need to match thefiles you intend to add in order for them tobe stored in the dataset. Simplest way is toselect an existing file geodatabase, find it’sexisting projection under “properties” andright click on it to add it to your favorites.Then it will show up as at right when youneed to select the coordinate system foryour new feature dataset.In the next screen you’ll be asked to pick avertical coordinate system, just leave thisone blank and hit next. The last screen willask you to set tolerances, just leave it at defaults and hit “next”When done, you will see your new feature datasetnow listed in your geodatabase (right):
Next, right-click on yourfeature dataset name to useImport to bring in fgdb’sbecause cut/paste is finickyabout projections matchingand if you don’t have avertical defined it’ll reject it.Import wont. Use ImportMultiple Feature Classes tobring in a bunch at once.HOWEVER, if you have anexisting rdbms geodatabaselike from Sql Express or SqlServer and it has RELATEDtables association with it,Import will not handle therelated tables. In this case,copy/paste is the only wayto automatically import the feature class PLUS all of it’s related tables. You select ALL of them in copy, then navigate tothe postgres database connection and paste.It actually starts upa geoprocessingtask to import yourselections one at atime, you canwatch it’s progressin the “results”window:NOTE: Transferring databases in and out of PostgreSQL using “import” and “export” to a filegeodatabase class is also a simple way to copy ArcGIS geodatabases from one machine toanother, or from one PostgreSQL installation to another, especially if you do some work in the filegeodatabase version and rely on the PostgreSQL version for services or multi-user access. An alternative way to transferPostgreSQL databases is the “pgdumpall” command described at the end of this document.
OTHER INSTALL NOTES:AT 10.3: you DO have to manually open port 5432 in windows firewall, inbound settings, for Postgres to communicatewith ArcGIS/SDE. To see if it’s already there, go to a command prompt and type in “netstat –aon”, and it’ll give a list ofall ports that are open and in use. The line to search for is a TCP rule for 5432 that is listening on port 1176. If you don’tsee it youneed to add it:To add, go to control panel – windows firewall settings, “advanced” then “inbound Rules”, just like in the filezilla serversetup section.Then click on “NewRule” over on thetop right and click“NEXT”. In the nextwindow pick the“PORT” option(rather than“program”) and click“NEXT”Here is where you’ll enter thenumber “5432” in the blank for aspecific port number, then click‘NEXT”
Make sure that the button next to“Allow the connection” is checkedclick “next” Make sure all the Profiles“Domain, Private and Public” arecheckedclick “next”Give it a name like “call it “Allow PostgreeSQL then click “Finish”you should then see it as a new rule at the top ofyour rules list:
then in Task Manager, go to services and restart postgres64bit service,check that PostgreSQL running, ie draw some PostgreSQL data in ArcmapYou can also rerun the “netstat -aon” command and you should see the new port listing(Postgres port 5432 communicates withSDE/ArcCatalog via port 1176 SDE uses 1176 for it’s end)Now you should be able to register the geodatabase with ArcGIS ServerArcGIS 10.3 and ArcGIS Pro are released Some changes for Enterprise Geodatabases:ArcSDE administration command line utilities are no longer available with ArcGIS for ServerConnections to 10.3 enterprise databases are Direct Connect only as the ArcSDE application server will not be availablefor 10.3 GDBsDefault connection limitations (64 connections) have been removed – now has no limits set.New Geodatabase Administration tools added (9 ssage/444181#444181The following page explains that ArcGIS 10.3 Desktop, Server and Engine will contain the necessary PostgreSQL Clientlibraries. You can connect directly from ArcCatalog to PostgreSQL database from ArcGIS 10.3.ArcGIS 10.3 for Desktop, Server, and Engine include the required PostgreSQL files; therefore, you only need to obtainPostgreSQL client files if you need to connect from other clients.Database clients—Help ArcGIS for DesktopThe PostgreSQL Client libraries are in the version 9.3.5, and they can be used to connect to an older database, likePostgreSQL 9.2.9/9.1.14 database too. So there is no need for manually installing the PostgreSQL Client in 10.3.Supported PostgreSQL database requirements for ArcGIS 10.2.xSupported database versionsPostgreSQL 9.0.5 (64-bit)PostgreSQL 9.1.3 (64-bit)PostgreSQL 9.2.2 (64-bit)
tgresql.htmPostgreSQL database requirements for ArcGIS 10.3Minimum supported database versionsPostgreSQL 9.3.5 (64-bit) and PostGIS 2.1PostgreSQL 9.2.9 (64-bit) and PostGIS 2.0PostgreSQL 9.1.14.1 (64-bit) and PostGIS age-data/databases/database-clients.htmA database client is required on all machines that connect to a database management system. The databaseclient release must be compatible with the release of the database management system to which you areconnecting.You can obtain the following database management system client installations from the database managementsystem vendor or download them from My Esri:PostgreSQL libpq files*ArcGIS 10.3 for Desktop, Server, and Engine include the required PostgreSQL files; therefore, you only need to obtainPostgreSQL client files if you need to connect from other clients.Some ArcGIS clients, such as ArcMap and ArcGIS Engine, are 32-bit applications. If you are making a database connectionfrom one of these clients, you must use a 32-bit Informix, ALTIBASE, SAP HANA, Netezza, Oracle, Teradata 14.x,PostgreSQL database management system client to connect to the database. This is true even if you install the ArcGISclient application on a computer with a 64-bit operating system and the database and server operating system are 64bit. To connect from 64-bit ArcGIS clients, you must install 64-bit database management system clients.Two tier connection (also called direct connect)Usually the preferred type of connection is via what is termed a two tier connection, where you connect directlyfrom your computer to the database which will be on one of the corporate servers. The term two tier refers tothe first tier being the ArcGIS Desktop application and the second being the database being accessed. Aprerequisite for this is to have the appropriate database client software installed on your computer, for example if it isan Oracle database you are connecting to you will need an appropriate 32 bit Oracle Client installed.ArcSDE connection syntax For most database management systems (DBMSs), you provide the name of the server, thename of the database, and either ArcSDE service information or a direct connection string. The ArcSDE service, alsoknown as an application server
The other way to access my.esri.com is if you have access to an ArcGIS Online Account or are part of an ArcGIS Online Organization account. . USA, uncheck stack builder, most folks don [t need it PostgreSQL it will then install 2. When PostgreSQL is first installed, you will only be