Transcription
Consumer Cellular Link IIUSER GUIDE1
TABLE OF CONTENTSThank you for choosing Consumer Cellular!We know you’re excited to use your new Consumer Cellular Link II, and thisuser guide will help you get familiar with it, so you can start using it as soonas possible. Each section includes instructions and pictures to make it easy tostart using your device. If you would like to learn more, turn to the back of thisguide, where you’ll find the SUPPORT section.We’re always happy to help you!Need More Information?Visit our website at ConsumerCellular.com/HelpCall us at (800) 686-44602Getting Started. 7Installing a microSDHC Card.7Removing the microSDHC Card andthe nano-SIM Card.7Charging the Battery. 8Extending the Battery Life. 9Powering Your Phone On/Off. 9Getting to Know Your Phone.10Key Functions.12Getting to Know the Home Screen.14Personalizing. 15Changing the System Language.15Setting the Date and Time.15Changing the Phone, Notification, or Alarm Ringtone.16Turning System Sounds On/Off.16Adjusting Volumes. 17Switching to Vibration or Silent Mode. 17Applying New Wallpapers.18Changing the Screen Brightness.18Protecting Your Phone With a Screen Lock.191
TABLE OF CONTENTSKnowing the Basics.20Phone Status Icons. 20Notification Icons.21External Display Icons.21Entering Text. 22Opening an App.23Connecting to Networks and Devices.24Connecting to Mobile Networks.24Connecting to Bluetooth Devices.24Connecting to Your Computer via USB. 26Using the microSDHC Card as Portable Storage.27Phone Calls.29Placing and Ending Calls. 29Answering or Rejecting Calls.30Using Real-Time Text (RTT).31Working With the Call History.33Calling Your Contacts.35Checking Voicemail.35Using Options During a Call.36Managing Multi-Party Calls. 37Adjusting Your Call Settings.382TABLE OF CONTENTSContacts.43Adding a New Contact.43Setting Up Your Own Profile.43Importing, Exporting, and Sharing Contacts.44Working With Groups.46Searching for a Contact. 47Editing Contacts. 47Messages.50Opening the Messages Screen. 50Sending a Message. 50Replying to a Message.51Forwarding a Message.51Deleting Messages or Threads. 52Calendar.53Viewing Your Calendar and Events.53Creating an Event.54Editing, Deleting, or Sharing an Event.54Changing Calendar Settings.54Camera.55Capturing a Photo. 55Recording a Video.573
TABLE OF CONTENTSGallery.58Opening the Gallery.58Sharing/Deleting Pictures or Videos.58Playing Videos.58Working With Pictures. 59Music.60Viewing Your Music Library. 60Managing Playlists. 60Playing Music.61Video.62Opening the Video Library. 62Deleting or Sharing Video Files. 62Playing and Controlling Videos. 62FM Radio.64Scanning and Saving Channels.64Listening to FM Radio.64Other Options and Settings. 65Sound Recorder. 67Recording a Voice Memo.67Playing a Voice Memo.674TABLE OF CONTENTSMore Apps.68Calculator.68Setting a New Alarm.68Checking World Time. 69Using Stopwatch and Countdown. 69File Manager. 69Notifications.70Settings.71Wireless & Networks. 71Accessibility. 71Sound & Notifications.72Display.72Phone Settings. 73Call Settings.75About Phone.75Troubleshooting. 76For Your Safety.80General Safety. 80FCC RF Exposure Information (SAR).81FCC Regulations.825
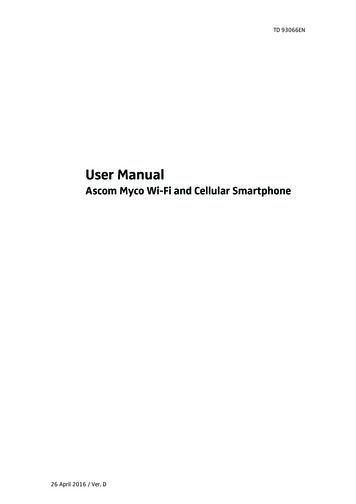
TABLE OF CONTENTSHearing Aid Compatibility (HAC) Regulations for Mobile Phones.83CTIA Requirements.85Distractions.86Product Handling.87Electrical Safety.91Radio Frequency Interference. 92Explosive . 97GETTING STARTEDINSTALLING A microSDHC CARDPower off your phone before installing or removing the microSDHC card.1. Place your finger in the slot at the lower left of theback cover to lift and remove the cover.2. If the battery is installed already, remove it.3. Hold your microSDHC card with the metal contactsfacing down and slide it into the microSDHC card slot.4. Install the battery.5. Press the cover gently back into place until you heara click.REMOVING THE microSDHC CARD ANDTHE nano-SIM CARD1. With the phone powered off, open the back cover andremove the battery.2. Press the soft blocks 1 that keep the cards in place andslide the microSDHC card 2 or the nano-SIM card 3 out.WARNING! Do not remove the cards with sharp objects. You may damagethe card slots and make the phone unable to read the cards or you could hurtyourself. Press the soft block that keeps the cards in place and slide the nanoSIM card or the microSDHC card out.67
GETTING STARTEDGETTING STARTEDCHARGING THE BATTERYEXTENDING THE BATTERY LIFEYour phone’s battery should have enough power for the phone to turn on, finda signal, and make a few calls. You should fully charge the battery as soon aspossible.If the battery is low, there will be a pop-up message on the screen. As youcharge your phone, the external screen will show the exact battery level.WARNING! Use only approved chargers and USB cables. The use ofunapproved accessories could damage your phone or cause the battery toexplode.1. Connect the adapter to the charging jack. Ensure that the adapter isoriented correctly. Do not use force.2. Connect the charger to a standard AC power outlet. If the phone is on,you’ll see a charging icon, such as or , appear in the status bar.3. Disconnect the charger when the battery is fully charged.NOTE: If the battery is extremely low, you may be unable to power on thephone even when it is being charged. In this case, try again after chargingthe phone for at least 20 minutes. Contact customer service if you still cannotpower on the phone after prolonged charging.Active applications, screen brightness levels, Bluetooth usage, and GPSfunctionality can drain your battery. You can follow the helpful tips below toconserve your battery power: Reduce the screen backlight time. Lower the screen brightness. Turn Bluetooth off when not in use. Disable the GPS function when not in use. Most applications using thisfunction will periodically query the GPS satellites for your current location;each query drains your battery.8POWERING YOUR PHONE ON/OFF Press and hold the Power/End Key to turn on your phone. To turn it off, press and hold the Power/End Key.9
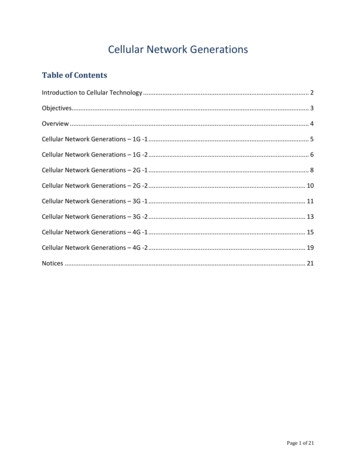
GETTING STARTEDGETTING STARTEDGETTING TO KNOW YOUR PHONEAuxiliary MicrophoneCameraEarpieceInternal Display4-way Navigation KeyLeft Soft KeySend KeyCamera KeyVoicemail KeyExternal DisplayVolume Up KeyVolume Down KeyOK KeyRight Soft Key3.5 mm Headset JackSpeakerPower/End KeyClear KeyBack CoverRingtone KeyVibration Mode KeyMain MicrophoneCharging/micro-USB Jack1011
GETTING STARTEDGETTING STARTEDKEY FUNCTIONSKeyFunctionPower/End KeyPress and hold to power on or power off.Press to end or reject a call.Press to go to the home screen.Left Soft KeyPress to select the option at the bottom left corner of thedisplay, which changes depending on the application/function in use.Right Soft KeyPress to select the option at the bottom right cornerof the display, which changes depending on theapplication/function in use.Press up, down, left, or right to navigate to and highlight4-way Navigationoptions on the display, or to move the cursor whenKeyentering text or numbers.OK KeyPress to select the option at the bottom center of thedisplay (which changes depending on the application/function in use) or the highlighted option in a list.Send KeyPress to answer or place a call.Press to view call history from the home screen.12KeyFunctionRingtone KeyPress to silence or restore the incoming call ringtone.Camera KeyPress to launch the Camera application from the homescreen or the apps menu.When the Camera app is opened, press the key to takea picture or record a video.Clear KeyPress to delete text or numbers before the cursor.Voicemail KeyPress and hold in the home screen to check yourvoicemail.Vibration ModeKeyPress and hold in the home screen to turn vibrationmode on or off.While entering text, press and hold to change the inputmode.Volume Up/Down Press to turn the volume up or down or to enable silent/Keyvibration mode.13
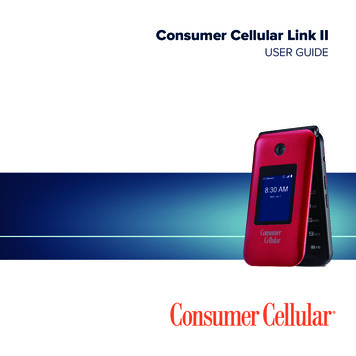
GETTING STARTEDGETTING TO KNOW THE HOME SCREENPERSONALIZINGThe home screen is the starting point for your phone’s applications, functions,and menus.CHANGING THE SYSTEM LANGUAGEStatus andNotification Bar1. From the home screen, select Menu Settings Phone settings Languages & input.2. Press up or down on the 4-way Navigation Key to select the language youneed and press the OK Key.SETTING THE DATE AND TIMEWallpaperApps MenuContacts14Messages1. From the home screen, select Menu Settings Phone settings Date &time.2. Set the date, time, time zone, and time format. To adjust the date and time automatically, select Automatic date & time On. To adjust the date and time manually, select Automatic date & time Off and select Set date / Set time to change the date and time. To adjust the time zone automatically, select Automatic time zone On. To adjust the time zone manually, select Automatic time zone Off andselect Select time zone to set the correct time zone. To adjust the time format, select Use 24-hour format On/Off.15
PERSONALIZINGCHANGING THE PHONE, NOTIFICATION, OR ALARMRINGTONEYou can customize the default ringtone for incoming calls, the defaultnotification sound, and the default alarm sound.1. From the home screen, select Menu Settings Sound & notifications.2. Select Phone ringtone, Default notification ringtone, or Default alarmringtone.3. Select the ringtone you'd like to use, and press the OK Key.NOTE: If you have additional audio files saved in the internal storage or themicroSDHC card, select Add ringtone, Add notification, or Add alarm atthe bottom of the list and select one as the ringtone.NOTE: See Contacts – Editing Contacts – Editing Contact Details for how toassign a special ringtone to an individual contact.TURNING SYSTEM SOUNDS ON/OFF1. From the home screen, select Menu Settings Sound & notifications.2. Select Key tone or Charging sounds and then select On or Off to enableor disable each type of sound.16PERSONALIZINGADJUSTING VOLUMES1. From the home screen, select Menu Settings Sound & notifications Volume.2. Highlight the Media volume, Alarm volume, Ring volume, or Notificationvolume slider.3. Press left or right on the 4-way Navigation Key to adjust the volume.NOTE: You can adjust the media volume when a media application is in useby pressing the Volume Up/Down Key. If no media application is active, pressthe Volume Up/Down Key to adjust the ring volume (or the earpiece volumeduring a call).SWITCHING TO VIBRATION OR SILENT MODEYou can set the phone to vibration or silent mode by using one of thefollowing methods. Keep pressing the Volume Down Key when no media application is activeto switch the phone to vibration mode. Press the key again in vibrationmode to switch the phone to silent mode. From the home screen, select Menu Settings Sound & notifications Notification mode and select Mute or Vibrate to switch to silent orvibration mode. From the home screen, press and hold the Vibration Mode Key to turn onor off vibration mode.17
PERSONALIZINGNOTES: Silent and vibration modes will not silence your alarms. To instantly turn off an incoming call ringtone, press the Volume Up/DownKey.APPLYING NEW WALLPAPERSYou can set the home screen wallpaper for the internal screen.1. From the home screen, select Menu Settings Display Wallpaper.2. Select Gallery
2 1 Thank you for choosing Consumer Cellular! We know you’re excited to use your new Consumer Cellular Link II, and this user guide will help yo