Transcription
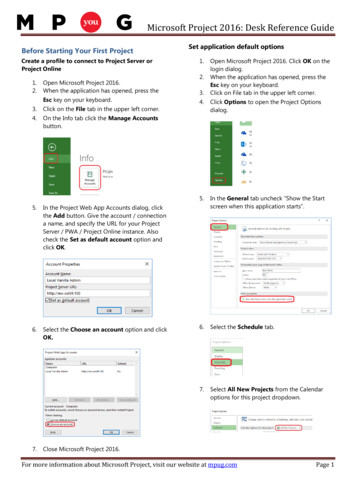
Microsoft Project 2016: Desk Reference GuideBefore Starting Your First ProjectCreate a profile to connect to Project Server orProject Online1.2.Open Microsoft Project 2016.When the application has opened, press theEsc key on your keyboard.3.Click on the File tab in the upper left corner.4.On the Info tab click the Manage Accountsbutton.5.In the Project Web App Accounts dialog, clickthe Add button. Give the account / connectiona name, and specify the URL for your ProjectServer / PWA / Project Online instance. Alsocheck the Set as default account option andclick OK.6.Select the Choose an account option and clickOK.7.Set application default options1.2.3.Open Microsoft Project 2016. Click OK on thelogin dialog.When the application has opened, press theEsc key on your keyboard.Click on File tab in the upper left corner.4.Click Options to open the Project Optionsdialog.5.In the General tab uncheck “Show the Startscreen when this application starts”.6.Select the Schedule tab.7.Select All New Projects from the Calendaroptions for this project dropdown.Close Microsoft Project 2016.For more information about Microsoft Project, visit our website at mpug.comPage 1
Microsoft Project 2016: Desk Reference Guide8.Set the calendar options for your organization.13. Check the Show project summary taskoption.9.Select All New Projects from the Schedulingoptions for this project dropdown.14. Click OK.15. Close Microsoft Project.Starting Your First ProjectCreate a new project10. Select Auto Scheduled from the New taskscreated dropdown.1.2.Open Microsoft Project 2016.Upon opening, Project will automatically setyou up with a blank project.Open a project from an existing file1.2.3.Open Microsoft Project 2016.Click on File in the upper left corner.Click on Open.4.Select the appropriate folder and file and click11. Select the Advanced tab.Open.Open a Project from a template12. Select All New Projects from the Displayoptions for this project dropdown.1.Open Microsoft Project 2016.2.Select the File tab.3.Select the New menu item and click on thetemplate icon.For more information about Microsoft Project, visit our website at mpug.comPage 2
Microsoft Project 2016: Desk Reference Guide4.Select and download your template.Set the Project Start Date and apply theProject Calendar1. Click the Project tab, then click ProjectInformation.2. Enter the project Start Date.3. Select the project Calendar and click OK.Adjust the Calendar1.The default Microsoft Project calendar is calledStandard. To view and change this calendarwith Project, select the Project tab on theCreate Tasks1.Ensure the Gantt Chart view is active byselecting the Task tab on the ribbon andribbon under Properties. Click on the Changeclicking the Gantt Chart button.Working Time button.2.Click in the Task Name cells of the first emptytask row and enter the name for the task /2.Once the Change Working Time dialog boxsummary task.opens, you will view the Standard Calendar.3.To set a holiday as a non-working day, click onthe Holiday Date. Click in an Open Exceptionline at the bottom. Enter the holiday name.Click Enter. Recurring holidays may be enteredby clicking Details while selecting the holidayentry.3.Press the Tab key to move to the durationcolumn, and enter the duration in days.4.Create additional tasks and milestones asrequired for your project. Milestones arecreated by specifying zero days of duration.To change daily working time, click on WorkWeeks at the bottom. Click on Details. Selectdays of the week to be changed, Click thethird radio button on the right and changethe working times. Click Enter.4.Click OK to close the box.Tip: Keep your duration in thesame units (e.g. days)For more information about Microsoft Project, visit our website at mpug.comPage 3
Microsoft Project 2016: Desk Reference GuideCreating a WBS / Outline StructureInserting and Deleting TasksMake a task (or milestone) a child of the precedingTo insert a new task row into the middle of yourtask by selecting it and clicking on the Indent Taskproject schedule, select a task and either:button on the Task ribbon tab. You can select multipletasks if there is more than one subtask. Press the Insert key on your keyboard, or; Right click the row and select Insert Task.A blank row will be inserted above the selected task.To delete a task from your project schedule, right clickon the task and select Delete Task.Create Task Dependency RelationshipsCreating relationships between tasks creates thetimeline of the project. Select a task; hold the Ctrl keyTip: Pressing the Del key will remove the contents ofand select a second task, then click the Link button onthe selected cell; it does not delete the task.the Task ribbon tab. The first task becomes apredecessor of, and drives the start date of, thesecond.Working with ResourcesBuild a team using enterprise resources1.With Microsoft Project open, click on the Viewtab on the ribbon bar and select ResourceSheet under Resource Views.Multiple tasks and milestones can be linked byselecting multiple rows (hold down the Shift and / orCtrl keys) when selecting task rows.2.Click on the Resource tab on the ribbon,select Add Resources under Insert, andchoose Build Team from Enterprise.Best Practice Tip: Do not link summary tasks.For more information about Microsoft Project, visit our website at mpug.comPage 4
Microsoft Project 2016: Desk Reference Guide3.In the Build Team dialog, select one or moreenterprise resources from the list on the leftside. Use the Shift and / or Ctrl keys to selectmultiple.4.Press the Add button to move the selectedresources to the right side list.Alternatively, you can type resource namesdirectly into the Resource Names cell. If youneed to enter more than one, separate theresources with commas.View all Task and Resource assignments for a5.Select additional resources if required andthen click OK.Project1.To view resource assignments for tasks, clickthe Task Usage button on the View ribbon.Assign resources to tasks1.Click the Gantt Chart button on the Task2.To view task assignments for resources, clickthe Resource Usage button on the Viewribbon.ribbon to return to the Gantt Chart view.2.Click in the Resource Names cell of a task youwish to assign and click the dropdown arrow.Select the resource / resources you wish toassign to the task.For more information about Microsoft Project, visit our website at mpug.comPage 5
Microsoft Project 2016: Desk Reference GuideAssign a Calendar to a TaskTip: Add Key Milestones to the Timeline ViewNote: When a task needs to be performed outside ofThe default view in Project 2016 is a combination of the Ganttthe normal working hours of the Project Calendar, aTask Calendar may be assigned to alter the timeframefor an individual task.1.Select the Task you wish to assign to thecalendar.3.Chart click the task or milestone you want to add to theTimeline view. Right-click the milestone and click Add toTimeline.To assign a Task Calendar, with MicrosoftProject open, select the Gantt Chart view.2.Chart view with the Timeline view layered above it. In the GanttChange the Way the Data is Viewed1.You can apply predefined filters and groupingto the view by using the Filter and Group Bydropdowns in the Data section.2.You can also filter a view using the quick filterfor one or more columns. Click the downarrow in the column header to show filteroptions.3.To sort a view, select a sort order from theDouble-click the task or click the Informationbutton on the Task ribbon tab.4.Select the Advanced tab and change theCalendar in the Calendar dropdown menu.5.Click OK.Working with ViewsSelect a View1.With Microsoft Project open, select the Viewribbon.2.Under the Task View and Resource Viewsections, select the view you wish to use.Sort dropdown on the View ribbon tab.For more information about Microsoft Project, visit our website at mpug.comPage 6
Microsoft Project 2016: Desk Reference Guide4.Alternatively, sort using the column dropdownmenu.5.When the view definition dialog box opens, nameyour new view, select the Screen (type of view) youwant displayed, and (when appropriate) the tableto be displayed, then click OK.Create a New View1.With Microsoft Project open, click on the Viewtab.2.To create a new task view, click on the MoreViews option in the Other Views dropdown inthe Task Views section. To create a newresource view, click on the More Views optionin the Other Views dropdown in the ResourceViews section.Tip: The best view to see slippage between baselineand actual work is the Detail Gantt oft-project-tips-for-new-users/Add a Timeline3.1.To view the timeline, check the Timelineoption on the ribbon’s View tab.2.The timeline will then appear under the ribbon.3.To add a task or milestone to the timeline,When the dialog box opens, click on the Newbutton.right click it (in the Gantt Chart view) andselect Add to Timeline.4.Select Single View and click on OK.For more information about Microsoft Project, visit our website at mpug.comPage 7
Microsoft Project 2016: Desk Reference Guide4.By default a timeline view has only one2.Under the Schedule section, click on Set Baseline.3.The Set Baseline dialog box will open. Select thetimeline. You can add additional timelines byclicking the Timeline Bar button on theFormat ribbon tab. Note the Format ribbon iscontext-sensitive, so ensure the Timeline viewhas the focus by clicking in it.Baseline you wish to set.4.Select whether the Baseline will be for the EntireProject or just for Selected Tasks. Click OK.5.If you have multiple timelines, ensure youcheck the appropriate one before adding atask or milestone. Tasks and milestones can bemoved between timelines simply by draggingand dropping.Tip: Check out the MPUG article on the new multipletimeline feature iew-multiple-timelines/Enter Progress Using Percent Complete1.With Microsoft Project open and in theTracking Gantt chart view, select the TaskName column.Managing a Project2.Click on a task you wish to update.3.On the Task tab, click the appropriate updatepercentage for the task in the ScheduleTip: There are 11 sets of baseline fields in the system,section.Baseline and Baselines 1-10. The Baseline fields arethe default used when you first set a baseline. When abaseline is updated, you may optionally select one ofthe other 10 sets of Baseline fields or update thecurrent Baseline sUpdating-the-Baseline.aspx4.Note the update values to the right of theGantt bars in the Tracking Gantt chart view.Set a Baseline1.With Microsoft Project open, select the Projecttab.Tip: % Complete represents the percentage of taskduration that's complete. % Work Complete is thepercentage of task work hours that are complete. Andyou probably know that time can pass without aFor more information about Microsoft Project, visit our website at mpug.comPage 8
Microsoft Project 2016: Desk Reference Guidecorresponding amount of work getting done. Whenthe percent duration is updated, the percentage ofCreate a Visual Report1.Click on Visual Reports, under the Project tab.2.When the Create Report Dialog opens, selectwork completed is updated also.See: g-Project-Progress/ReportingCreate a Project Reportthe desired report from the tabs and ClickView.With Microsoft Project open, select the Report tab.1.Under the View Reports section, select oneof the canned reports from Dashboards,Resources, Costs or In Progress.2.To create a new report, select the reportstyle from the New Report dropdown.3.Your report will open in either Microsoft Excelor Microsoft Visio depending on which reportyou select.For more information about Microsoft Project, visit our website at mpug.comPage 9
Microsoft Project 2016: Desk Reference GuideMicrosoft Project Keyboard ShortcutsActionShortcutShow field settings dialog boxAlt F3Close Project help windowAlt F4Move to end of projectAlt EndCreate new projectCtrl NOpen projectCtrl OSave projectCtrl SInsert new taskInsertAssign resources boxAlt F10Close an active project windowCtrl WSwitch to next project windowCtrl F6Maximize project windowCtrl F10Remove all tasks filtersF3Calculate projectF9Move to beginning of projectAlt HomeCopy picture of selected window to ClipboardAlt Print ScreenHide subtasksAlt Shift -Show all tasksAlt Shift *Show subtasksAlt Shift Outdent taskAlt Shift Left ArrowIndent taskAlt Shift Right ArrowSwitch to previous windowAlt Shift TabActivate control menuAlt Spacebar Alt HyphenNext windowAlt TabMove between tasksArrow KeysMove to end of text boxCtrl EndLink selected tasksCtrl F2Restore size of active window after maximizing itCtrl F5 Ctrl F10For more information about Microsoft Project, visit our website at mpug.comPage 10
Microsoft Project 2016: Desk Reference GuideSwitch to next window in multiple open windowsCtrl F6Turn auto calculate on or offCtrl F9Fill downCtrl DOpen “Find” dialog boxCtrl FOpen “Go To” dialog boxCtrl GInsert hyperlinkCtrl KPasteCtrl VCutCtrl XUndoCtrl ZAdd object to multi-sectionCtrl ClickMove to beginning of text boxCtrl HomeMove one word to rightCtrl Right ArrowMove one word to leftCtrl Left ArrowChange task to "Auto Schedule"Ctrl Shift AUnlink selected tasksCtrl Shift F2Switch to previous windowCtrl Shift F6Change task to "Manually Schedule"Ctrl Shift MSelect current columnCtrl SpacebarJump to first row / last rowCtrl Up/Down ArrowClose active project windowCtrl W or Ctrl F4Open project help windowF1Edit taskF2Remove column filters (when active)F3SpellcheckF7Extend selection modeF8Save asF12Jump to first / last cell in rowHome / EndInsert new taskInsertOpen task information dialog boxShift F2Activate split barShift F6Shortcut menuShift F10For more information about Microsoft Project, visit our website at mpug.comPage 11
Microsoft Project 2016: Desk Reference GuideINDEXBaseline 8Calendar 2,3Assign to tasks 6Create Tasks 3Default Options 1Keyboard Shortcuts 10, 11Managing a Project 8Profile 1Reporting 9ResourcesWorking with 4Assignments 5Start Date 3Starting a Project 1TasksAssignments 5Dependency 4Insert, Delete 4Template 2Views 6New View 7Timeline 7WBS Outline Structure 4NEW MPUG Learning Paths!MPUG has created three new learning paths for project managers, developed with YOU in mind,addressing your specific training needs!See more at For more information about Microsoft Project, visit our website at mpug.comPage 12
Create a new project 1. Open Microsoft Project 2016. 2. Upon opening, Project will automatically set you up with a blank project. Open a project from an existing file 1. Open Microsoft Project 2016. 2. Click on File in the upper left corner. 3. Click on Open. 4. Select the appropriate folder and file a